Section 12 – J7 Trigger Outputs
12-5
Audio Alarm Verification (AAV) Equipment
An Audio Alarm Verification (AAV) Module (also known as two-way voice), such as the Eagle
1250, is an add-on accessory that permits voice dialog between an operator at a central
station and a person at the alarm installation, for the purpose of alarm verification. This
feature is supported only if Alarm reports are programmed to be sent to the primary phone
number. For a detailed explanation on the operation and wiring of the AAV, see the Audio
Alarm Verification section.
Auxiliary Alarm Signaling Equipment
The J7 connector can be used to provide triggers for the following conditions:
•
Fire alarm
•
Burglary/audible panic alarm
•
Silent panic/duress alarm
•
Opening/closing (arming/disarming)
These triggers may be used to trip auxiliary alarm signaling equipment such as ADEMCO's
7720, 7720ULF, and 7920SE Long Range Radios.
The open/close, fire alarm, burglary/audible panic alarm, and silent panic/duress alarm
triggers are common to all partitions and must be enabled for each partition (data field 2*20).
The open/close trigger is LOW when all enabled partitions are armed, and HIGH when any
enabled partition is disarmed. The remaining triggers are normally LOW and go HIGH
when the corresponding condition occurs in at least one enabled partition. The fire and
burglary/audible panic alarm triggers remain HIGH until a [User Code] + OFF is entered in
all enabled partition(s) which display these conditions. The silent panic/duress trigger works
the same way, except that it is momentary when initiated by duress.
Wiring Auxiliary Alarm Signaling Equipment
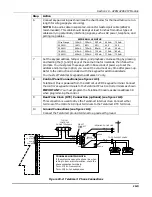
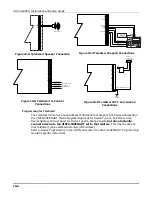
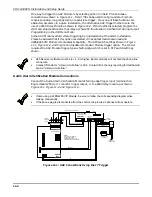
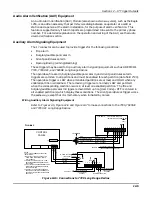
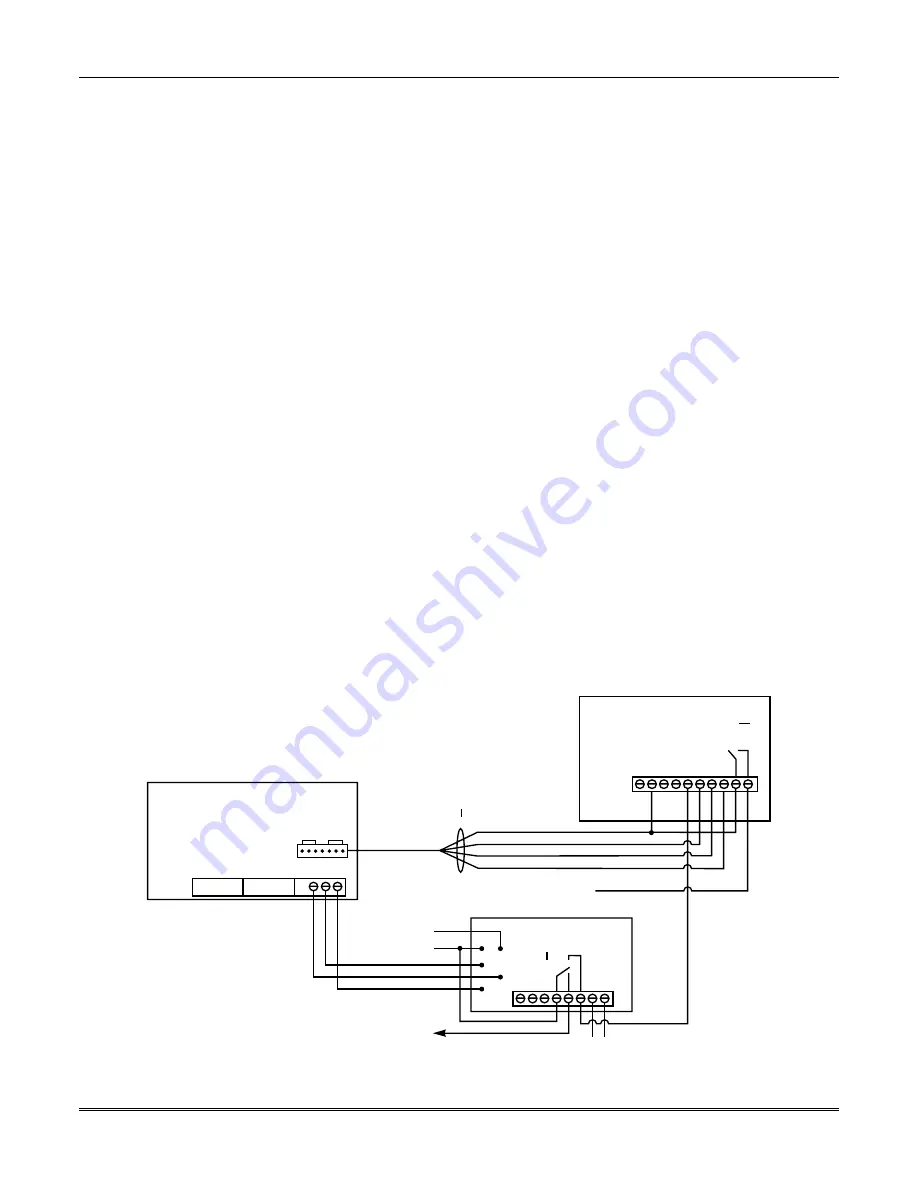
Refer to Figure 12-5, Figure 12-6 and Figure 12-7 to make connections to the 7720, 7920SE
and 7720ULF Long Range Radios.
GND
(GRAY)
BURG/AUDIBLE PANIC
(BROWN) REQUIRED
SILENT PANIC/DURESS
(BLACK) OPTIONAL
FIRE
(RED)
OPTIONAL
7720 RADIO
FA
U
LT
FA
U
LT
ZONE 1
ZONE 2
ZONE 3
ZONE 4
GND
SEE 7720 INST. INSTR. FOR
INSTRUCTIONS ON POWERING UNIT
1 2
3
4
5
6
7
8
9 10
1 2
3
4
5
6
7
8
▲
▲
▲
}
28 29 30
J7
4142TR CABLE
▲
659EN LINE FAULT MONITOR
FAULT
+12V GND
ORANGE
YELLOW
GREEN
PHONE LINE MONITOR
(+12V ON FAULT)
OPTIONAL
SEE NOTE 4
INCOMING PHONE LINE
PHONE LINE MONITOR
(OPENS ON FAULT)
REQUIRED
7 BLACK
6 RED
TO C-COM AUX PWR
(35mA DRAW)
EAR
TH GR
OUND
RING
TIP
CONTROL
PANEL
7720 WIRING
SEE NOTE 2
RADIO FAULT OUTPUT
(PROGRAM FOR SHORT ON FAULT)
▲
FAULT
▲
}
NOTES:
FOR UL LISTED COMMERCIAL BURGLARY
INSTALLATIONS:
1. MOUNT THE 7720 WITH 3 FEET OF THE
C-COM. RUN WIRING FROM C-COM TO
7720 IN CONDUIT.
2. CONNECT RADIO OK OUTPUT TO C-COM
EOLR SUPERVISED ZONE (ZONE 2-8 ONLY).
USE 2K EOLR.
3. SEE UL INSTALLATION REQUIREMENTS ON A
LATER PAGE TO DETERMINE WHEN 659EN
USAGE IS REQUIRED.
4. CONNECT TO C-COM EOLR SUPERVISED
ZONE (ZONE 2-8 ONLY) WHEN DESIRED TO
HAVE PANEL LOCALLY ANNUNCIATE PHONE
LINE FAULTS.
Figure 12-5: Connections to 7720 Long Range Radios
Summary of Contents for VISTA-50PEN
Page 2: ...ii...
Page 10: ...VISTA 50PEN Installation and Setup Guide x...
Page 26: ...VISTA 50PEN Installation and Setup Guide 3 4...
Page 42: ...VISTA 50PEN Installation and Setup Guide 6 6...
Page 56: ...VISTA 50PEN Installation and Setup Guide 8 8...
Page 82: ...VISTA 50PEN Installation and Setup Guide 13 4...
Page 110: ...VISTA 50PEN Installation and Setup Guide 18 8...
Page 118: ...VISTA 50PEN Installation and Setup Guide 20 4...
Page 138: ...VISTA 50PEN Installation and Setup Guide 22 18...
Page 166: ...VISTA 50PEN Installation and Setup Guide 25 6...
Page 172: ...VISTA 50PEN Installation and Setup Guide 27 2...
Page 186: ...VISTA 50PEN Installation and Setup Guide 29 8...
Page 192: ...VISTA 50PEN Installation and Setup Guide 30 6...
Page 197: ...B 1 A P P E N D I X B DIP Switch Tables...
Page 200: ...VISTA 50PEN Installation and Setup Guide B 4...
Page 214: ...l K3271 1BX 9 00 165 Eileen Way Syosset NY 11791 Copyright 2000 PITTWAY Corporation...

