Installation on an AdeptOne with sEJI System
Adept IO Blox User’s Guide, Rev B
17
2.6
Installation on an AdeptOne with sEJI System
Mechanical Mounting
For AdeptOne robots with sEJI, the IO Blox can be mounted on a DIN rail - see
“Mounting on a DIN Rail” on page 12
.
Cable Installation
1. Locate the IO Blox-to-Robot cable supplied with the system.
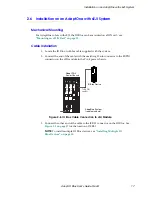
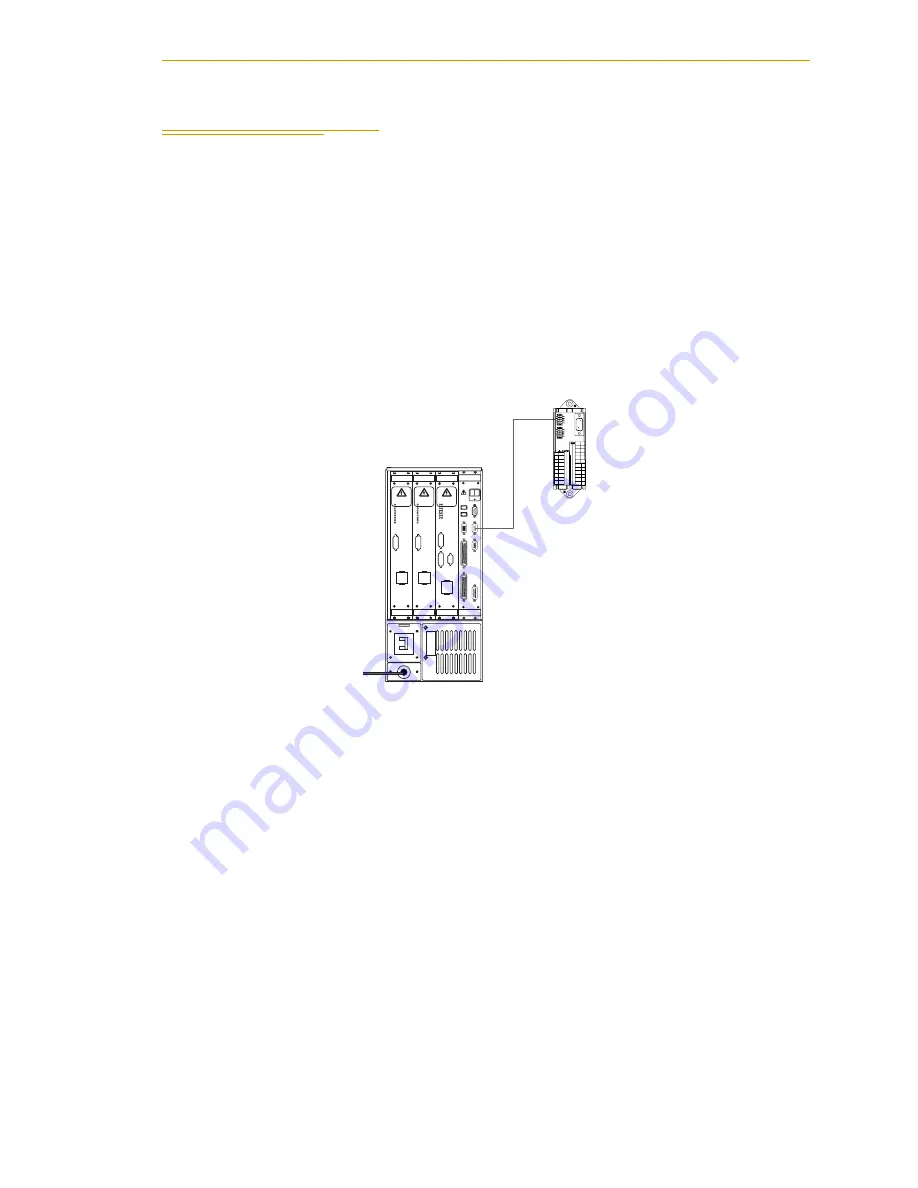
2. Connect the end of the cable with the matching D-sub connector to the EXPIO
connector on the sEJI module in the PA-4 power chassis.
Figure 2-8. IO Blox Cable Connection to sEJI Module
3. Connect the other end of the cable to the JCBL1 connector on the IO Blox. See
for the location of JCBL1.
NOTE:
To install multiple IO Blox devices, see
.
a
dept
technolo
g
y, inc.
PWM ON
LOW VOLTS ON
OPEN CKT FAULT
HV SAG/OVER TEMP
HIGH VOLTS ON
A PHASE SHORT FAULT
B PHASE SHORT FAULT
C PHASE SHORT FAULT
C
O
N
T
R
O
L
S
I
G
N
A
L
A AMP
M
O
T
O
R
P
O
W
E
R
O
U
T
P
U
T
DO NOT REMOVE OR INSTALL THIS
MODULE UNLESS HIGH VOLTS LED
IS COMPLETELY EXTINGUISHED.
PWM ON
LOW VOLTS ON
OPEN CKT FAULT
HV SAG/OVER TEMP
HIGH VOLTS ON
A PHASE SHORT FAULT
B PHASE SHORT FAULT
C PHASE SHORT FAULT
C
O
N
T
R
O
L
S
I
G
N
A
L
A AMP
M
O
T
O
R
P
O
W
E
R
O
U
T
P
U
T
DO NOT REMOVE OR INSTALL THIS
MODULE UNLESS HIGH VOLTS LED
IS COMPLETELY EXTINGUISHED.
PWM ON
LOW VOLTS ON
OPEN CKT FAULT
HV SAG/OVER TEMP
HIGH VOLTS ON
SHORT FAULT
A
M
P
L
I
F
I
E
R
C
O
N
T
R
O
L
B
+
AMP
M
O
T
O
R
P
O
W
E
R
O
U
T
P
U
T
B1
B2
B1
B2
DO NOT REMOVE OR INSTALL THIS
MODULE UNLESS HIGH VOLTS LED
IS COMPLETELY EXTINGUISHED.
T
E
A
C
H
R
E
S
T
R
I
C
T
T
E
A
C
H
R
E
S
T
R
I
C
T
CAUTION
HIGH
VOLTAGE
INSIDE
R
S
2
3
2
E
X
P
I
O
A
M
P
L
I
F
I
E
R
S
I
G
N
A
L
S
I
G
N
A
L
A
R
M
S
E
C
U
R
I
T
Y
P
A
N
E
L
SmartServo
2
1
X
S
L
V
STATUS
EJI
s
Adept PA-4
Power Chassis
IO Blox Device
To EXPIO
on sEJI
AdeptOne System
(robot not shown)


