background image

3

First use of the oven

It is advised to follow these instructions:

Do  not  use  harsh


abrasive cleaners  or  sharp


metal 

scrapers  to  clean  the oven door glass since they can 
scratch the surface,  which  may result in shattering of 
the glass.

*

Clean the oven regularly and do not allow fat or oils

to build up in the oven base or tray

.


Remove spillages as

soon


as they occur.

*

Do not stand on the cooker or on the open oven

door.
*

 Always stand back from the appliance when

opening


the  oven  door  to  allow  steam  and  hot  air to

escape


before removing the food.

*

The  appliance must  not  be  installed  behind  a

decorative door in order to avoid over heating.
*

The oven accessories (e.g. oven wire rack) must be

fitted correctly.
*

If  the  power  supply cable is damaged, it  must  be

replaced only by an authorized service agent in order to
avoid a hazard.

Energy labelling/eco

-

design

Use  of  the  appliance,  energy saving tips 

oven

*

Check  the  oven  door  always closes properly and

the door gasket is clean and in order. During use,open the
oven  door only  when  strictly  necessary  to  avoid heat
losses  (for  some


functions  it  may be necessary to use

the  oven  with  the  door  half-closed,  check  the  oven
operating instructions).
*

Turn off the oven 5-10 minutes before the end of

the


the oretical cooking time to recuperate the stored

heat.
*

We  recommend  using  oven  proof  dishes  and

adjusting  the  oven  temperature  during  cooking  if
necessary.

*

Commission delegated regulation (EU) No 65/2014

(supplementing Directive 2010/30/EU of the European
Parliament and of the Council).
*

Commission regulation (EU) No 66/2014 (implemen

-


ting Directive 2009/125/EC of the European Parliament
and of the Council).
Reference to the measurement and calculation methods
used to establish compliance with the above requirements:
*

Standard EN 60350-1 (electric ovens).

*

Standard EN30-2-1 (hobs: gas fired burners).

Unattended  cooking  on  a  hob  with  fator  oilcan  be 
dangerous and may result in fire.


Never try to extinguish 

a fire with water,  but  switch  off the appliance and  then


cover  flame  e.g.with  a  lid  or a fire blanket. Do not line 
the oven  walls  or  base  with   aluminium  foil.  Do  not 
place baking trays  or  the  drip  tray  on the base of the


oven chamber.

Fire risk

Do  not  store  flammable  material in the oven or in the 
storage compartment.

* Always use oven gloves when removing the shelves
and food trays from the oven whilst hot.

Fire risk

Do not


hang


towels, dish cloths  or  other items on  the 

appliance or its handle as this could be a fire hazard.

Safe food handling

Leave  food  in the oven for as short a time as possible 
before and after cooking. This is to avoid contamination 
by  organisms  which  may cause food poisoning.  Take 
particular care during warmer weather.

*

Furnish the interior of the oven.

*

Switch  on  the  empty  oven  on  max  to  eliminate

grease from the heating elements.
*

Disconnect the appliance from the electrical  power

supply,  let the oven cool down and clean the interior of
the oven


with  a cloths


oaked in water and neutral

detergent;  then


dry carefully.

Hob gas fired burners

*

It is important that the diameter of the pot is suitable

to the potentiality of the burner so as not to compromise
the  high  output  of  the  burners  and  there fore energy
waste. A small pot on a large burner does not give you a
boiling point in a shorter amount of time since the capacity
of heat absorption of a liquid mass depends on the

volum

e and the surface of the


pot.

*  Avoid keeping a burner on without something on it (
without pot).

Take care NOT to lift the cooker by the door handle.

Caution

Warning

Warning

Caution

The cooking process has to be supervised. A short term

cooking process has to be supervised continuously.

Summary of Contents for ALTAY900

Page 1: ...ALTAY900...

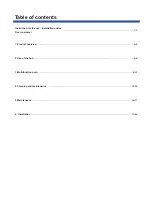
Page 2: ...tents 1 3 Instruction for the use Installation advice Dear customer 4 5 1 Product overview 6 8 2 Use of the hob 9 13 3 Multifunction oven 13 14 4 Cleaning and maintenance 14 17 5 Maintenance 17 20 6 I...

Page 3: ...taken to a special local authority differentiated waste collection centre or to a dealer providing this service Disposing of a household appliance separately avoids possible negative consequences for...

Page 4: ...ess especially in relation to children who could play with unused appliances The various components of the appliance are recyclable Dispose them in accordance with the regulations in force in your cou...

Page 5: ...compliance with the above requirements Standard EN 60350 1 electric ovens Standard EN30 2 1 hobs gas fired burners Unattended cooking on a hob with fator oilcan be dangerous and may result in fire Ne...

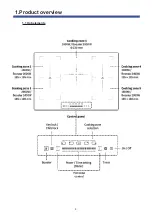
Page 6: ...1 1 Hob elements 1 Product overview 4...

Page 7: ...c hob Control panel controls description 1 Range function start control knob 2 LED display 3 Range temperature time control knob Your appliance has been fitted with a cooling fan to achieve optimum ef...

Page 8: ...r for more than 2 seconds the corresponding cooking zone will switch off Now place suitable cookware centrally on the desired coo king zone s Make sure that the surface of the hob and the bottom of th...

Page 9: ...ible area the new position is automatically detected the power level of the zone on which the cookware was originally placed is maintained and the part not covered by the cookware is automatically swi...

Page 10: ...witched off Note Other previously set cooking zones remain unaffected by the timer and remain in operation To cancel the time setting press the timer key again The remaining time display disappears an...

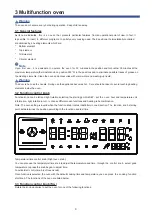
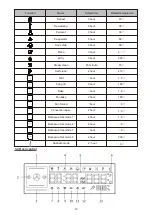
Page 11: ...3 2 Function control knob Function knob can be left and right rotation selection the starting point is SET set the oven hour and temperature unit information right rotation in turn to choose differen...

Page 12: ...elf clean 410 Grill 1 0 Fan grill 160 Bake 1 0 Fan bake 180 Fan forced 0 Convection bake 1 0 Barbecue fork mode 1 1 0 Barbecue fork mode 2 0 Barbecue fork mode 3 0 Barbecue fork mode 4 3 hour 3 hour 3...

Page 13: ...this time the temperature icon is highlighted the hour part of the time icon is highlighted flashing and the countdown icon is highlighted The default value is the default value required by each func...

Page 14: ...mode you can press the function knob to start the set program and start working At this time the corresponding ICONS will be displayed in the function area and the status area and the outer frame of t...

Page 15: ...tile or paper towel Remove these immediately with a spatula scraper or razor blade scraper suitable for glass ceramic cooktops Switch off the hob Hold the scraper at a 30 angle to the hob and scrape t...

Page 16: ...direction of the control panel to prevent it from over heating 4 3 Enamelled parts All the enamelled parts must be cleaned with a sponge and soapy water or other non abrasive products Dry preferably...

Page 17: ...then switch it on again Error message of the cooktop sensor I short circuit Error message of the IGBT sensor short circuit Contact the customer service or a certified elecrician Malfunction of the coo...

Page 18: ...mpt to remove the door Make sure the oven and all its parts have cooled down Do not attempt to handle the parts of a hot oven Take extreme care when handling the glass pane Avoid the edges of the glas...

Page 19: ...by QUALIFIED technicians and in compliance with the local safety standards Failure to observe this rule will invalidate the warranty The appliance must be installed in compliance with regulations in f...

Page 20: ...re openings made in the outside walls with a free area of at least 100 cm2 or refer to applicable local regulations The openings should be near the floor and preferably on the side opposite the exhaus...

Page 21: ...ting plate and the cabinet or the cooker hood above the heating plate should be at least 760 mm If the hob is installed above an oven the oven must have its own fan The safety distance between the bot...

Page 22: ...ot use adapters reducers or branching devices as they can cause overheating and fire The cable must not be kinked or pinched The power supply cable must not touch any hot parts and must be positioned...

Page 23: ...WARRANTY AND SERVICE For full warranty details on this product please contact EMAIL service adexa co uk TEL 44 01788222410...

Reviews: