background image


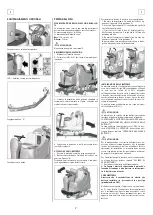
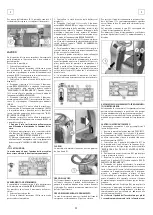
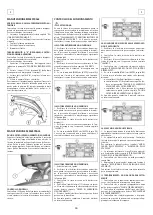
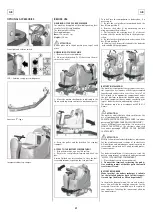
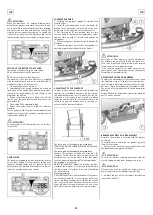
3.  Aprire la barra della gomma laterale (2) come in 

figura. 


4.  Estrarre la piastra di supporto (3) delle spazzole 

tirandola verso l’esterno impugnando l’apposita ma-

niglia. 

5.  Estrarre la spazzola (4). 


6.  Nel rimontare la spazzola (4), inserirla nel basa-

mento dalla parte dove la sede è più profonda (circa 

40 mm). La parte opposta con la profondità di circa 

13,5 mm deve essere verso la piastra di supporto. 


7.  Riposizionare la piastra di supporto (3) quindi ri-

posizionare la barra della gomma laterale (2) bloc-

candola con il pomello (1). 


  ATTENZIONE: 

Le spazzole devono inserirsi in modo semplice senza 

ricorrere ad utensili per non danneggiarle o forzarle. 

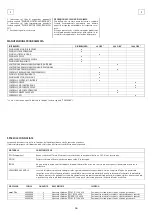
Usare solo le spazzole fornite con la macchina o 

quelle specificate nel paragrafo “SPAZZOLE CONSI-

GLIATE”. L’uso di altre spazzole può compromettere il 

buon lavaggio.


PULIZIA DEI PAVIMENTI 


SERBATOIO DI RECUPERO 

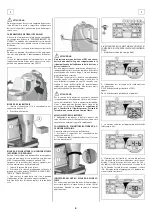
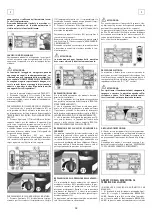
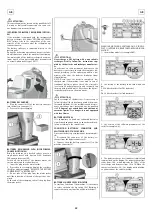
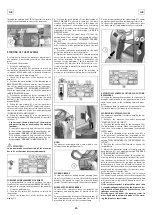
Controllare che il coperchio filtro aspirazione (1) sia 

correttamente bloccato, dopo aver ruotato le levette 

(2) e che sia correttamente connesso al tubo del mo-

tore aspirazione (3). 

Verificare inoltre, che i manicotti (4/5) del tubo ter-

gipavimento siano correttamente inseriti nelle sedi e 

che il tappo del tubo di scarico (6), posto nella parte 

posteriore della macchina, sia ben chiuso. 


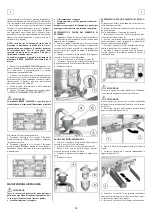
SERBATOIO DI SOLUZIONE DETERGENTE 

La capacità del serbatoio soluzione è indicata nella 

scheda tecnica. 

Aprire il tappo a vite che si trova sul lato sinistro del-

la macchina e riempire il serbatoio soluzione con ac-

qua pulita, ad una temperatura non superiore a 50°C. 

Aggiungere il detersivo liquido nella concentrazione 

e con le modalità previste dal fabbricante. Per evita-

re la formazione di un’eccessiva quantità di schiuma, 

che potrebbe creare problemi al motore di aspirazio-

ne, usare la minima percentuale di detersivo. Avvita-

re il tappo del serbatoio soluzione. 


  ATTENZIONE: 

Usare sempre detersivo a schiuma frenata. Per evita-

re con sicurezza la produzione di schiuma, prima di 

iniziare il lavoro introdurre nel serbatoio di recupero 

una minima quantità di liquido antischiuma. 

Non utilizzare acidi allo stato puro. 


3SD SOLUTION SAVING SYSTEM DISPENSER 

(OPZIONALE) 

E’ un sistema che permette il dosaggio predefinito 

della quantità percentuale del detergente che andrà 

a miscelarsi con l’acqua proveniente dal serbatoio 

soluzione. 

Il detergente è contenuto in un serbatoio trasparente 

della capacità di 8 litri, posto nella parte anteriore 

della macchina. 


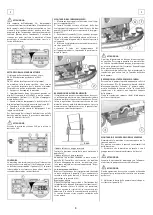
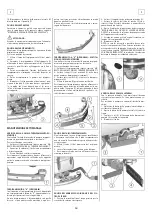
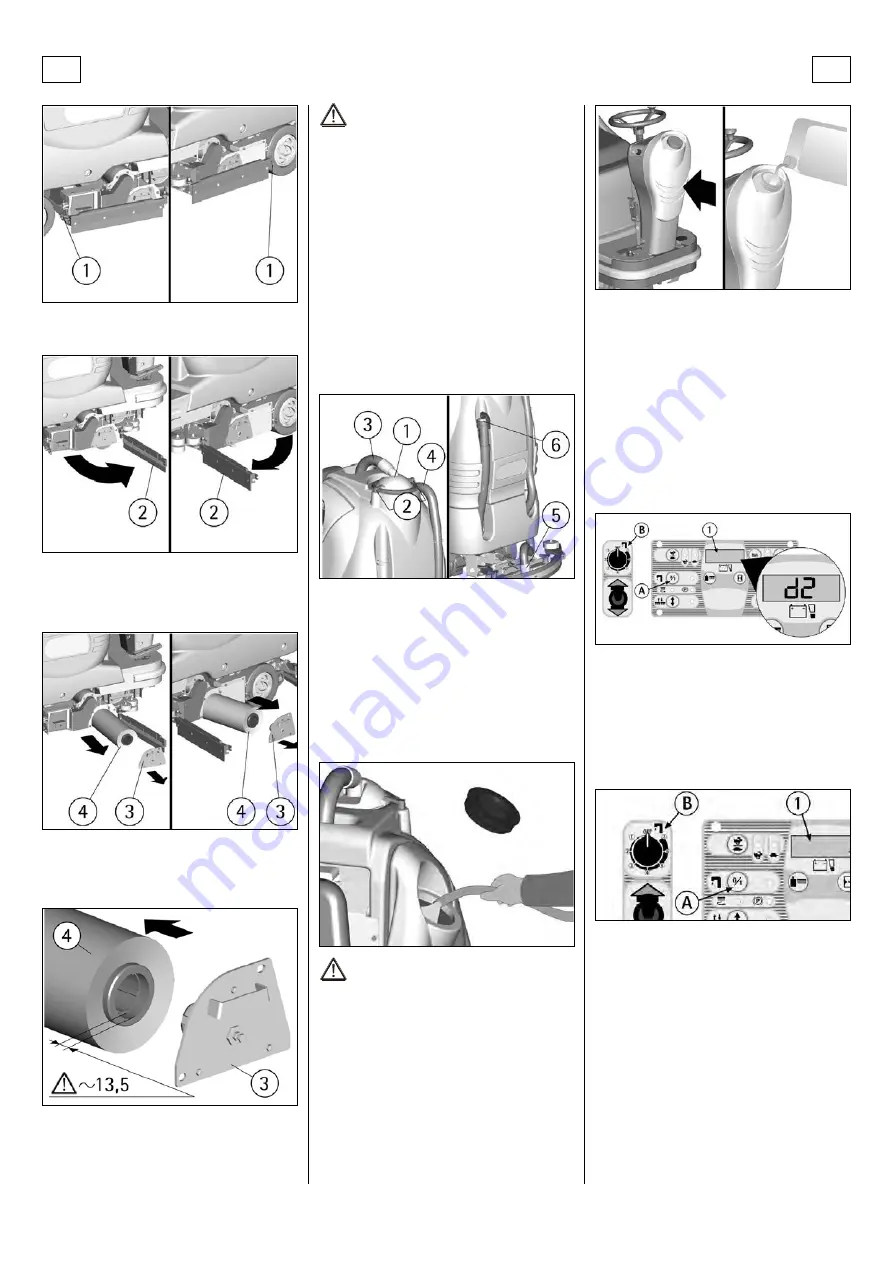
Con le spazzole in movimento, premendo una volta il 

pulsante (A) sul cruscotto, viene visualizzato sul 

display (1) l’indicazione della percentuale di deter-

gente che si sta utilizzando. 

Premendo lo stesso pulsante in successione si può se-

lezionare tra  sei diverse possibilità di settaggio il cui 

indicatore viene visualizzato sempre sul display (1). 

L’indicazione di livello corrisponde alle seguenti per-

centuali (di riferimento) di detergente nell’acqua: 

d0 =    0 % 

d1 = 0,3 % 

d2 = 0,6 % 

d3 = 1,2 % 

d4 = 2,4 % 

d5 = 4,5 % 


La regolazione del dosaggio che viene impostata re-

sta memorizzata dal sistema anche a macchina spen-

ta. 

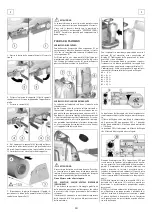
Il flusso dell’acqua viene regolato dal commutatore 

ad 8 posizioni (B): una posizione OFF e 7 posizioni 

attive da un minimo di 1,2 litri/min ad un massimo di 

3,7 litri/min. 

In posizione OFF si interrompe sia il flusso dell’acqua 

che il flusso del detergente ad esso legato. 


Quando il commutatore (B) è in posizione OFF può 

essere messo in funzione un impianto idrico ausilia-

rio che permette l’uso tradizionale della macchina e 

quindi il riempimento del serbatoio soluzione con 

acqua e detersivo. In tal caso è necessario aprire e 

regolare  manualmente un rubinetto (C) posto sotto 

la macchina. In questa situazione il pulsante (A) ge-

stisce il comando dell’elettrovalvola in funzione ma-

nuale. 

NOTA: Alla ripresa del lavoro in modalità 3SD, è im-

portante che il rubinetto  (C) sia chiuso, questo per 

mantenere le predeterminate proporzioni acqua-

detergente.  

NOTA: se il sistema automatico di dosaggio non vie-

ne utilizzato per un lungo periodo è possibile che i 

tubi del circuito del detergente si svuotino e quindi 

al primo riutilizzo il detergente inizi a fuoriuscire 

sulle spazzole con un certo ritardo rispetto alla fuo-

riuscita dell’acqua.  


10 

Summary of Contents for coral 70s

Page 1: ...enung und Wartungsanleitung Uso y mantenimiento Attenzione Leggere le istruzioni prima dell uso Attention Please read the instructions before use Attention Lire les instructions avant de l emploi Achtung Vor dem Gebrauch die Anleitungen lesen Atención Leer las instrucciones antes del empleo COD 65308003 ...

Page 2: ......
Page 3: ...Regolazioni di lavoro 12 Regolazione del flusso di soluzione detergente 12 Regolazione della pressione delle spazzole 12 Protezione elettrica 12 Dispositivo troppopieno 12 ARRESTO DELLA MACCHINA AL TERMINE DEL LAVORO 12 MANUTENZIONE GIORNALIERA 13 Svuotamento e pulizia del serbatoio di recupero 13 Pulizia del filtro aspirazione 13 Svuotamento e pulizia cassetto di raccolta 13 Pulizia delle spazzol...

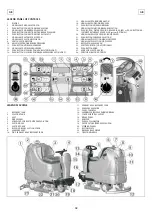
Page 4: ...A ELETTROVALVOLA oppure PULSANTE REGO LAZIONE DOSAGGIO DETERGENTE Sistema 3SD OPZIONALE 20 SPIA DI SEGNALAZIONE ACQUA APERTA ELETTROVALVOLA 21 PULSANTE PER SELEZIONE VELOCITÀ 22 SPIA DI SEGNALAZIONE SELEZIONE VELOCITÀ MASSIMA 23 SPIA DI SEGNALAZIONE SELEZIONE VELOCITÀ LENTA 24 INTERRUTTORE A CHIAVE DI ACCENSIONE MACCHINA 25 INTERRUTTORE FARO OPZIONALE 26 PULSANTE CLAXON 27 POMELLO RUBINETTO 28 SEL...

Page 5: ... aspirazione mbar 160 Tipo di avanzamento autom Velocità di avanzamento km h 5 0 Pendenza superabile max 10 Serbatoio soluzione l 100 Serbatoio recupero l 105 Lunghezza macchina mm 1575 Altezza macchina mm 1320 Larghezza macchina senza tergipavimento mm 780 Peso macchina a vuoto e senza batterie kg 262 Capacità batterie Ah 5 240 Peso batterie kg 200 Dimensione vano batterie LxPxH mm 415x520x385 Li...

Page 6: ...orizzato In caso di sostituzione di pezzi richiedere i ricambi ORIGINALI ad un Concessionario Autorizzato Impiegare solamente spazzole ORIGINALI indicate nel paragrafo SPAZZOLE CONSIGLIATE Per ogni intervento di pulizia e o manutenzione togliere l alimentazione elettrica dalla macchina Non togliere le protezioni che richiedano l uso di utensili per essere rimosse Non lavare la macchina con getti d...

Page 7: ...ie collegate in serie o di elementi di tipo DIN raggruppati e collegati in serie per un totale di 24 Volt alloggiate nell apposito vano previsto sotto il pianale del sedile e devono essere movimentate utilizzando attrezza ture di sollevamento idonee sia per il peso da valu tare in funzione delle batterie prescelte che per il si stema di aggancio Le batterie devono soddisfare inoltre i requisiti ri...

Page 8: ...ampeg giante di batterie scariche NOTE Non lasciare mai le batterie completamente scariche anche se la macchina non viene usata In caso di batterie tradizionali ogni 20 ricariche con trollare il livello dell elettrolito ed eventualmente rabboccare con acqua distillata Non lasciare mai le batterie scariche oltre due settimane ATTENZIONE Per la ricarica delle batterie è necessario attenersi scrupolo...

Page 9: ...deve ave re nella gomma posteriore una curvatura del labbro inferiore uniforme lungo tutta la lunghezza Per va lutare la regolazione è necessario mettersi nelle con dizioni di lavoro e quindi la macchina deve essere in movimento con l aspiratore acceso e le spazzole fun zionanti con soluzione detergente Il labbro inferiore è troppo incurvato Togliere la pressione ruotando in senso antiorario il po...

Page 10: ...di recupero una minima quantità di liquido antischiuma Non utilizzare acidi allo stato puro 3SD SOLUTION SAVING SYSTEM DISPENSER OPZIONALE E un sistema che permette il dosaggio predefinito della quantità percentuale del detergente che andrà a miscelarsi con l acqua proveniente dal serbatoio soluzione Il detergente è contenuto in un serbatoio trasparente della capacità di 8 litri posto nella parte ...

Page 11: ... per avviare la macchina 8 Regolare la velocità di avanzamento in marcia avanti premendo ogni volta il pulsante 21 per sce gliere quella lenta al massimo si raggiungono 3 6 km h o quella veloce al massimo si raggiungono 5 km h La spia 22 indica che è selezionata la marcia veloce invece la spia 23 indica che è selezionata la marcia lenta 9 In retromarcia quando la macchina è in movi mento si attiva...

Page 12: ...ere capitolo REGOLA ZIONE TERGIPAVIMENTO 2 che la regolazione del flusso di soluzione deter gente sia sufficiente per bagnare in modo uniforme il pavimento evitando la fuoriuscita di detergente dalla protezione paraspruzzi vedere capitolo REGO LAZIONE DEL FLUSSO DI SOLUZIONE DETERGENTE 3 che la pressione delle spazzole permetta una effi cace azione lavante in funzione dell entità dello sporco e de...

Page 13: ...ere eseguite utilizzando dei guanti per proteggersi dal contatto con soluzioni pericolose SVUOTAMENTO E PULIZIA DEL SERBATOIO DI RECUPERO 1 Impugnare il tubo di scarico 1 posto sulla parte posteriore della macchina dopo averlo estratto dalla apposita sede di supporto 2 Togliere il tappo 2 del tubo di scarico azionando la leva 3 posta sullo stesso e svuotare il serbatoio di recupero nelle vasche pr...

Page 14: ...ato di usura della gomma tergipavi mento ed eventualmente girarla o sostituirla Per la sostituzione è necessario 1 Sollevare il tergipavimento vedere capitolo AR RESTO DELLA MACCHINA AL TERMINE DEL LAVORO 2 Svitare i tiranti 1 sui terminali 2 della lama premi gomma e disimpegnare i terminali 3 Svitare tutti i galletti 3 e togliere la lama pre migomma 4 3 Sfilare la gomma 5 per girarla o sostituirl...

Page 15: ...are la funzionalità 2 Controllare lo stato di carica delle batterie sul display 1 3 Verificare di aver attivato correttamente la fun zione di lavaggio con le spazzole vedere capitolo LAVORO 4 Se sia in modalità MAN che AUTO la spia 18 è accesa ma le spazzole non girano contattare il centro di assistenza tecnica autorizzato IL MOTORE TRAZIONE NON FUNZIONA 1 Sedersi al posto di guida 2 Verificare ch...

Page 16: ...ne del tipo di pavimento e dello sporco da asportare Il materiale impiegato ed il diametro delle setole sono gli elementi che differenziano le spazzole MATERIALE CARATTERISTICHE PPL Polipropilene Buona resistenza all usura Mantiene le caratteristiche con acqua calda fino a 50 C Non è igroscopico NYLON Ottima resistenza all usura anche con acqua calda E igroscopico TYNEX Ha una setola in nylon con ...

Page 17: ...rds 25 Working in automatic mode 25 Working in manual mode 26 Working adjustments 26 Flow adjustment of the detergent solution 26 Adjustment of the brushes pressure 26 Electric protection 26 Overflow device 26 STOP OF THE MACHINE AFTER CLEANING OPERATION 26 DAILY MAINTENANCE 27 Recovery tank emptying and cleaning 27 Suction filter cleaning 27 Emptying and cleaning of the collection box 27 Brushes ...

Page 18: ... SOLENOID VALVE or PUSH BUTTON AD JUSTMENT DETERGENT DOSAGE 3SD system OPTIONAL 20 SIGNAL LAMP WATER OPEN SOLENOID VALVE 21 PUSH BUTTON FOR SPEED SELECTION 22 SIGNAL LAMP SELECTION MAXIMUM SPEED 23 SIGNAL LAMP SELECTION SLOW SPEED 24 KEY SWITCH MACHINE ON 25 SWITCH FOR FRONT LIGHT OPTIONAL 26 PUSH BUTTON HORN 27 KNOB FOR SOLUTION VALVE 28 SELECTOR DIRECTION OF DRIVE LEGEND MACHINE 1 RECOVERY TANK ...

Page 19: ...on vacuum mbar 160 Type of drive autom Movement speed km h 5 0 Maximum gradient 10 Solution tank l 100 Recovery tank l 105 Machine length mm 1575 Machine height mm 1320 Machine width without squeegee mm 780 Weight of the machine empty and without batteries kg 262 Capacity of the batteries Ah 5 240 Weight of the batteries kg 200 Compartment of the batteries mm 415x520x385 Acoustic pressure level in...

Page 20: ...e Where parts are required ask for ORIGINAL spare parts to an authorized dealer Use only ORIGINAL brushes indicated in the para graph RECOMMENDED BRUSHES For any cleaning and or maintenance operation take off the power supply from the machine Do not take off the protections which require the use of tools to be removed Do not wash the machine with direct water jets or with high water pressure nor w...

Page 21: ...either with batteries in se rial connection or elements of DIN type assembled together and connected in series for a total of 24 Volt placed in its appropriate compartment under the seat platform and must be handled using suita ble lifting equipment due to weight considering the type of batteries chosen and coupling system The batteries must be in accordance with CEI 21 5 Norms ATTENTION The machi...

Page 22: ... within a few minutes after that the batteries discharge signal starts blinking NOTE Never leave the batteries completely dis charged even if the machine is not used In case of traditional batteries please check the electrolyte level every 20 recharging cycles and eventually top them up with distilled water Never leave the batter ies discharged for more than two weeks ATTENTION For the recharge of...

Page 23: ...ubber must have the lower bend ing uniformly adjusted in all its length For the ad justment it is necessary to put oneself in working condition and therefore the suction motor has to be switched on and the brushes have to function to gether with the detergent solution The lower part of the rubber is too much bent Take off the pressure rotating the wing nut 6 coun terclockwise The lower part of the...

Page 24: ...r use pure acid 3SD SYSTEM SOLUTION SAVING SYSTEM DIS PENSER OPTIONAL The system permits the predetermined dosing of the detergent percentage which will be mixed with the water of the solution tank The detergent is contained in a transparent tank with a capacity of 8 litres placed in the front part of the machine With the brushes moving pressing once the push button A on the instrument board on th...

Page 25: ...the slow one at the maximum 3 6 km h is reached or the fast one at the maximum 5 km h is reached The signal lamp 22 indicates that the fast drive is se lected while signal lamp 23 indicates that the slow drive is selected 9 In backward movement when the machine is moving an intermittent warning device is activated HORN The machine is equipped with a horn which is acti vated pressing the push butto...

Page 26: ...ion flow is sufficient to wet the floor uniformly avoiding the leakage of detergent from the splash guards see under paragraph FLOW ADJUSTMENT OF THE DE TERGENT SOLUTION 3 that the brushes pressure permits an efficient washing action in function of the dirt and the speed see under paragraph ADJUSTMENT OF THE BRUSH ES PRESSURE FLOW ADJUSTMENT OF THE DETERGENT SOLU TION To adjust the detergent solut...

Page 27: ... off the plug 2 from the exhaust hose act ing upon its lever 3 and empty the recovery tank into appropriate containers in compliance with the respective rules what the liquid disposal concerns 3 Take off suction cover 4 after rotating the blocking levers 5 4 Take off the filter and filter protection 6 5 Rinse the inside of the tank with a water jet through the hole become free of the filter 6 Reas...

Page 28: ...rubber 5 into its guides then positioning the rubber holder blade and finally screwing down all wing nuts and the tie rods of the two terminals SQUEEGEE HOSE CLEANING Weekly or in case of insufficient suction it is neces sary to check that the squeegee hose is not obstruct ed Eventually to clean it proceed as follows 1 Take off the hose 1 from the squeegee coupling 2 Wash the inside of the hose wi...

Page 29: ...to restore the functionality 3 Check the charge level of the batteries on the display 1 4 Check through the signal lamp 15 that the parking brake is not inserted and eventually release it see under paragraph EMERGENCY PARKING BRAKE 5 Press the accelerator pedal placed on the right side to start the machine If the problem persists please contact the authorized technical assistance THE WATER DOES NO...

Page 30: ...ter up to 50 C It is not hygroscopic NYLON Excellent wear resistance even with hot water It is hygroscopic TYNEX Nylon bristles with grains of abrasive material Use with caution in order not to mark the floor or ruin the polishing BRISTLES THICKNESS Thicker bristles are more rigid and must be used on smooth floor or floor with small joints On irregular floors with deep joints or relieves it is rec...

Page 31: ...n mode automatique 39 Travail en mode manuel 40 Réglages de travail 40 Réglage du débit de la solution détergente 40 Réglage pression des brosses 40 Protection électrique 40 Dispositif trop plein 40 ARRET DE LA MACHINE A LA FIN DU NETTOYAGE 40 ENTRETIEN JOURNALIER 41 Vidange et nettoyage du réservoir de récupération 41 Nettoyage du filtre d aspiration 41 Vidange et nettoyage du bac à déchets 41 Ne...

Page 32: ...URE D EAU ELECTROVANNE ou BOUTON DE REGLAGE DO SAGE DETERGENT Système 3SD OPTIONNEL 20 TEMOIN DE SIGNALISATION EAU OUVERTE ELECTROVANNE 21 BOUTON POUR LA SELECTION VITESSE 22 TEMOIN DE SIGNALISATION SELECTION VITESSE MAXIMUM 23 TEMOIN DE SIGNALISATION SELECTION VITESSE LENTE 24 INTERRUPTEUR A CLEF D ALLUMAGE DE LA MACHINE 25 INTERRUPTEUR POUR PROJECTEUR OPTIONNEL 26 BOUTON DE KLAXON 27 POMMEAU DE ...

Page 33: ...épression d aspiration mbar 160 Type d avancement autom Vitesse d avancement km h 5 0 Pente maximum 10 Réservoir d eau propre l 100 Réservoir de récupération l 105 Longueur machine mm 1575 Hauteur machine mm 1320 Largeur machine sans suceur mm 780 Poids de la machine à vide et sans les batteries kg 262 Capacité des batteries Ah 5 240 Poids des batteries kg 200 Compartiment des batteries mm 415x520...

Page 34: ...nder les pièces ORIGINALES au distributeur autorisé Utiliser seulement des brosses ORIGINALES indi quées dans le paragraphe BROSSES CONSEILLEES Pour réaliser les intervention de nettoyage et ou de manutention stopper l alimentation électrique de la machine Ne pas enlever les protections qui réclament des outils pour les déplacer Ne pas laver la machine à grand jets ou avec une haute pression ou av...

Page 35: ...levage appropriés INSTALLATION DES BATTERIES La machine réclame l utilisation des batteries con nectées en série ou des éléments du type DIN grou pés et connectés en série pour un total de 24 Volt logées dans le compartiment prévu sous le plate forme du siège et doivent être déplacées avec des moyens de levage appropriés tant pour le poids d évaluer en fonction des batteries choisies que pour le s...

Page 36: ...arge entre quelques minutes dès l apparition du signal cli gnotant indiquant la décharge des batteries NOTE Ne jamais laisser les batteries complètement déchargées même si la machine n est pas utilisée Dans le cas des batteries traditionnelles chaque 20 recharges contrôler le niveau de l électrolyte et éventuellement remplir avec de l eau distillée Ne jamais laisser les batteries déchargées plus d...

Page 37: ... arrière doit avoir une courbure du bord infé rieur sur toute sa longueur Pour le réglage il est né cessaire de se mettre dans les conditions de travail et par conséquent avec l aspirateur allumé et les brosses en état de marche avec la solution déter gente Le bord inférieur est trop courbé Enlever la pression en agissant sur l écrou papillon 6 dans le sens inverse aux aiguilles d une montre Le bo...

Page 38: ...érée Pour éviter avec sécurité la production de la mousse avant de commencer le travail introduire dans le ré servoir de récupération une quantité minimale de li quide antimousse Ne pas utiliser des acides à l état pur 3SD SYSTEM SOLUTION SAVING SYSTEM DIS PENSER OPTIONAL Il est un système qui permet le dosage prédéfini de la quantité à pourcentage du détergent qui se mélan gera avec l eau provena...

Page 39: ...arche arrière 7 Appuyer sur la pédale de l accélérateur située à droite pour démarrer la machine 8 Régler la vitesse d avance en marche avant en appuyant toutes les fois sur le bouton 21 pour choisir la marche lente au maximum on arrive à 3 6 km h ou la marche rapide au maximum on arrive à 5 km h Le témoin 22 indique qu on a sélectionnée la marche rapide par contre le témoin 23 indique qu on a sél...

Page 40: ...premiers mètres contrôler 1 que le réglage du suceur garanti un séchage im peccable voir paragraphe REGLAGE DU SUCEUR 2 que le réglage du débit de la solution détergente soit adéquat pour mouiller uniformément le sol en évitant l écoulement du détergente sous les bavettes de protection voir paragraphe REGLAGE DU DEBIT DE LA SOLUTION DETERGENTE 3 que la pression des brosses permet une action de lav...

Page 41: ... des liquides et par conséquent Réservoirs de solution et de récupération Filtres de solution et de récupération Suceur bavettes et tuyau correspondants Brosses doivent être réaliser en utilisant des gants pour se protéger du contact avec des solutions dange reuses VIDANGE ET NETTOYAGE DU RESERVOIR DE RE CUPERATION 1 Empoigner le tuyau de vidange 1 situé dans la partie arrière de la machine après ...

Page 42: ...BAVETTE ARRIERE Contrôler l état d usure de la bavette du suceur et éventuellement la tourner ou la remplacer Pour le remplacement il est nécessaire de 1 Remonter le suceur voir paragraphe ARRET DE LA MACHINE A LA FIN DU NETTOYAGE 2 Dévisser les tirants 1 sur les parties finales 2 de la lame presse bavette et dégager les parties finales 3 Dévisser tous les écrous papillon 3 et enlever la lame pres...

Page 43: ...ACTIONNEMENT DE LA MACHINE 4 Vérifier que le réservoir de récupération ne soit pas plein 5 Si soit en mode MAN soit AUTO le témoin 8 est allumé mais le système d aspiration ne fonc tionne pas il est nécessaire de contacter le service d assistance technique autorisé LE MOTEUR DES BROSSES NE FONCTIONNE PAS 1 Vérifier que l interrupteur à clef soit positionnée dans le sens des aiguilles d une montre ...

Page 44: ...REMPLACEMENT DE LA BAVETTE ARRIERE DU SUCEUR REMPLACEMENT DES BAVETTES LATERALES CONTROLE REGLAGE DU SUCEUR NETTOYAGE DU TUYAU SUCEUR NETTOYAGE DU RESERVOIR DE LA SOLUTION CONTROLE DE L ELECTROLYTE DES BATTERIES CONTROLE DU FREIN CONTROLE DU MOTEUR DE TRACTION CONTROLE DU MOTEUR DES BROSSES CONTROLE DU MOTEUR D ASPIRATION CONTROLE DU GROUPE D EMBASE DES BROSSES SERRAGE DES VIS Les heures se réfère...

Page 45: ...t in manuell 54 Regulierungen der Arbeit 54 Regulierung Fluss Frischwassermenge 54 Regulierung Bürstendruck 54 Elektrische Schutzvorrichtung 54 Schutzvorrichtung durch Schwimmer 54 VORGANG NACH ARBEITSENDE 55 TÄGLICHE WARTUNG 55 Entleerung und Reinigung Schmutzwassertank 55 Reinigung des Absaugfilters 55 Entleerung und Reinigung des Schmutzbehälters 55 Reinigung der Bürsten 56 Reinigung Saugfuss 5...

Page 46: ...G 19 DRUCKKNOPF WASSERÖFFNUNG MAGNETVENTIL oder DRUCKKNOPF RE GULIERUNG REINIGUNGSMITTELMENGE 3SD SYSTEM OPTIONAL 20 SIGNALLAMPE WASSER OFFEN MAGNETVENTIL 21 DRUCKKNOPF AUSWAHL GESCHWINDIGKEIT 22 SIGNALLAMPE AUSWAHL MAX GESCHWINDIGKEIT 23 SIGNALLAMPE AUSWAHL GESCHWINDIGKEIT LANGSAM 24 SCHLÜSSELSCHALTER MASCHINENZÜNDUNG 25 SCHALTER ARBEITSLICHT OPTIONAL 26 DRUCKKNOPF HUPE 27 KNOPF WASSERHAHN 28 WÄH...

Page 47: ...500 Saugmotor W 580 Wassersäule mbar 160 Fahrantrieb autom Vorschubgeschwindigkeit km h 5 0 Maximale Steigfähigkeit 10 Frischwassertank l 100 Schmutzwassertank l 105 Maschinenlänge mm 1575 Maschinenhöhe mm 1320 Maschinenbreite ohne Saugfuss mm 780 Leergewicht kg 262 Kapazität Batterien Ah 5 240 Gewicht Batterien kg 200 Batterieraum mm 415x520x385 Geräuschpegel gemäss der EN Norm 60704 1 dB A 70 Sc...

Page 48: ...rungen fest gestellt werden überprüfen ob die Störungen nicht von einer fehlenden Wartung abhängen Ist das nicht der Fall den autorisierten Kundendienst anfordern Im Falle von Ersatzteilbedarf die ORIGINAL Teile beim autorisierten Vertreter verlangen Nur ORIGINAL Bürsten benutzen die im Abschnitt EMPFOHLENE BÜRSTEN angegeben sind Für jeden Reinigungs und Wartungseingriff die Stromversorgung an der...

Page 49: ... von serienmässig verbundenen Batterien oder DIN Elemente die gruppiert und serienmässig verbunden sind Die totale Spannung beträgt 24V Sie sind im vorgesehenem Raum unter dem Sitzträger unterge bracht und müssen mittels geeignete Hebegeräte be fördert werden sei es des Gewichtes das je nach den ausgewählten Batterien zu beurteilen ist wie auch des Anhängesystems wegen Die Batterien müssen ausserd...

Page 50: ...e Entladung zu vermeiden und für die Aufladung sorgen nachdem das blinkende Signal entladene Batterien eintritt HINWEIS Die Batterien nie vollständig entladen las sen auch wenn die Maschine nicht gebraucht wird Bei traditionellen Batterien alle 20 Aufladungen den Elektrolyt Stand kontrollieren und eventuell mit des tilliertem Wasser nachfüllen Die Batterien nie mehr als zwei Wochen entladen lassen...

Page 51: ...eisen Für die Regulierung ist es notwendig sich in Arbeitsbedingungen zu setzen d h mit eingeschaltetem Saugmotor und die Bürsten funktionierend mit der Frischwassermenge Die untere Gummileiste ist zu viel gebogen Druck wegnehmen bei dem die Flügelmutter 6 ge gen den Uhrzeigersinn gedreht wird Die untere Gummileiste ist zu wenig gebogen Druck erhöhen bei dem die Flügelmutter 6 im Uhr zeigersinn ge...

Page 52: ...en ACHTUNG Stets schaumhemmende Reinigungsmittel benötigen Damit mit Sicherheit Schaumbildung vermieden wird vor Arbeitsbeginn eine geringe Menge von Anti schaummittel in den Schmutzwassertank dazugeben Keine unverdünnte Säuren verwenden 3SD SYSTEM SOLUTION SAVING SYSTEM DISPENSER OPTIONAL Das System erlaubt eine wählbare Lösungsmenge der Reiniger Konzentration die sich mit dem Frischwas ser misch...

Page 53: ... 7 Das Fahrpedal drücken das sich auf der rechten Seite befindet um die Maschine zu starten 8 Die Geschwindigkeit im Vorwärtsgang regulieren Jedesmal auf den Knopf 21 drücken um die lang same Geschwindigkeit zu wählen maximum werden 3 6 km h erreicht oder die schnelle maximum wer den 5 km h erreicht Die Signallampe 22 zeigt an dass die schnelle Geschwindigkeit gewählt wurde während die Signallampe...

Page 54: ...ei in automatischer als auch in manueller Weise muss während den ersten Metern kontrolliert werden 1 dass die Saugfussregulierung ein perfekte Trock nung garantiert siehe unter Abschnitt REGULIE RUNG SAUGFUSS 2 dass die Regulierung der Frischwassermenge aus reichend ist Sie muss genügend sein um den Boden regelmässig zu benetzen aber nicht zuviel dass sie vom Spritzgummi ausfliesst siehe unter Abs...

Page 55: ...en und die mit Flüssigkeiten in Kontakt kommen und daher Frisch und Schmutzwassertank Frisch und Schmutzwasserfilter Saugfuss Sauggummi und Schläuche Bürsten müssen nur mit Handschuhe durchgeführt werden um sich vor gefährliche Wirkstoffe zu schützen ENTLEERUNG UND REINIGUNG SCHMUTZWAS SERTANK 1 Den Abwasserschlauch 1 ergreifen der sich an der hinteren Seite der Maschine befindet nachdem man ihn v...

Page 56: ...V VERSION OPTIONAL ERSATZ HINTERER SAUGFUSSGUMMI Die Abnützung des Sauggummi kontrollieren und eventuell drehen oder auswechseln Für den Ersatz ist notwendig 1 Den Saugfuss anheben siehe unter Abschnitt VORGANG NACH ARBEITSENDE 2 Die Spannstangen 1 auf den Endstücken 2 der Klemmleiste losschrauben und die Endstücke befrei en 3 Alle Flügelschrauben 3 losschrauben und die Klemmleiste 4 entfernen 4 D...

Page 57: ...igt worden sind siehe unter Abschnitt REI NIGUNG 4 Überprüfen dass der Schmutzwassertank nicht voll ist 5 Falls sei in manueller MAN als auch in automa tischer AUTO Weise die Signallampe 8 aufleuchtet aber das Absaugsystem nicht funktioniert sich mit dem zuständigen technischen Kundendienst in Ver bindung setzen DER BÜRSTENMOTOR FUNKTIONIERT NICHT 1 Überprüfen ob der Schlüsselschalter in der rich ...

Page 58: ...der Boden nur gering schmut zig ist In diesem Fall die Reinigungslösung mehr verdünnen EINGEPLANTE WARTUNG EINGRIFF TÄGLICH 20 STUNDEN 200 STUNDEN 1000 STUNDEN REINIGUNG SCHMUTZWASSERTANK REINIGUNG ABSAUGFILTER REINIGUNG FRISCHWASSERFILTER REINIGUNG BÜRSTEN DEMONTAGE BÜRSTEN UND REINIGUNG REINIGUNG SAUGFUSS ERSATZ VORDERER SAUGFUSSGUMMI ERSATZ HINTERER SAUGFUSSGUMMI ERSATZ SEITLICHE SPRITZGUMMI KO...

Page 59: ...mutz 48906060 2 Walzenbürste PPL 1 Ø 150 x 650 Für widerstandsfähige und sehr schmutzige Bodenflächen 48906080 2 Walzenbürste PPL 0 7 Ø 150 x 650 Glatte Bodenflächen mit kleinen Fugen und beständigem Schmutz 48906100 2 Walzenbürste PPL 0 3 Ø 150 x 650 Glatte Bodenflächen mit kleinen Fugen und beständigem Schmutz 59 ...

Page 60: ... Regulaciones de trabajo 68 Regulación del flujo de la solución detergente 68 Reglaje de la presión de los cepillos 68 Protección eléctrica 68 Dispositivo rebosadero 68 DETENCIÓN DE LA MÁQUINA AL FINAL DE LA LIMPIEZA 69 MANTENIMIENTO DIARIO 69 Vaciado y limpieza del depósito de recuperación 69 Limpieza del filtro de aspiración 69 Vaciado y limpieza cajón de recolección 69 Limpieza de los cepillos ...

Page 61: ...A ELECTROVÁLVULA o bien PULSADOR REGULA CIÓN DOSIFICACIÓN DETERGENTE Sistema 3SD OPCIONAL 20 INDICADOR DE SEÑAL ABERTURA AGUA ELECTROVÁLVULA 21 PULSADOR SELECCIÓN VELOCIDAD 22 INDICADOR DE SEÑAL SELECCIÓN VELOCIDAD MÁXIMA 23 INDICADOR DE SEÑAL SELECCIÓN VELOCIDAD LENTA 24 INTERRUPTOR A LLAVE DE ENCENDIDO MÁQUINA 25 INTERRUPTOR LUZ DE TRABAJO OPCIONAL 26 PULSADOR BOCINA 27 TUERCA GRIFO 28 SELECTOR ...

Page 62: ...or de aspiración W 580 Depresión aspirador mbar 160 Tipo de avance autom Velocidad de avance km h 5 0 Desnivel máximo 10 Depósito de solución l 100 Depósito de recuperación l 105 Longitud máquina mm 1575 Altura máquina mm 1320 Anchura máquina sin boquilla de secado mm 780 Peso máquina en vacío y sin baterías kg 262 Capacidad baterías Ah 5 240 Peso baterías kg 200 Espacio baterías mm 415x520x385 Ni...

Page 63: ...sí requerir la intervención del centro de asisten cia autorizado En caso de sustitución de piezas pedir los repue stos ORIGINALES a un concesionario autorizado Emplear solamente cepillos ORIGINALES señalados en el párrafo CEPILLOS ACONSEJADOS Para cualquier intervención de limpieza y o mante nimiento cortar el suministro eléctrico a la máquina No quitar las protecciones que requieren el empleo de ...

Page 64: ...uados INSTALACIÓN DE LAS BATERÍAS La máquina necesita el empleo de baterías conectadas en serie o de elementos del tipo DIN en grupos conectados en serie por un total de 24 Volt introducidas en el hueco para tal efecto debajo del asiento y tienen que ser movidas empleando equipos de levantamiento adecuados sea por el peso evaluándolo en función de las baterías seleccionadas sea por el sistema de e...

Page 65: ...de pocos mi nutos desde el encendido de la señal relampagueante de baterías descargadas NOTA No hay que dejar nunca las baterías descarga das por completo aunque la máquina no se emplee En caso de baterías tradicionales cada 20 recargas verificar el nivel del electrólito y eventualmente añ adir agua destilada No hay que dejar las baterías descargadas por más de dos semanas ATENCIÓN Para la recarga...

Page 66: ...la utilización debe tener una cur vatura de la parte inferior del labio trasero de mane ra uniforme por toda su longitud Para el reglaje es necesario ponerse en las condiciones de trabajo y por lo tanto con el aspirador encendido y los cepillos en función con la solución detergente El labio inferior está demasiado curvado Quitar la presión volviendo a girar en sentido antiho rario el regulador 6 E...

Page 67: ...controlada Para evitar con seguridad la producción de espuma antes de empezar el trabajo introducir en el depósito de recuperación una cantidad mínima de líquido antiespumante No emplear ácidos en estado puro GRUPO SISTEMA 3SD DOSIFICADOR OPCIONAL Este es un sistema que permite la dosificación prede finida de la cantidad porcentual del detergente que va a mezclarse con el agua procedente del depós...

Page 68: ...ionándolo atrás viene elegido la marcha atrás 7 Apretar el pedal del acelerador colocado a la de recha de la plataforma para activar la máquina en marcha adelante 8 Regular la velocidad de avance en marcha ade lante apretando cada vez el pulsador 21 para selec cionar la lenta al máximo se alcanzan 3 6 km h o la rápida al máximo se alcanzan 5 km h La espía 22 indica que está seleccionada la marcha ...

Page 69: ...ada manualmente REGULACIONES DE TRABAJO Sea en modalidad automática que manual durante los primeros metros controlar 1 que la regulación de la boquilla de secado garan tizca un secado perfecto ver capítulo REGLAJE DE LA BOQUILLA DE SECADO 2 que el reglaje del flujo de la solución detergente sea adecuado Tendrá que ser suficiente para mojar de manera uniforme el suelo evitando la salida del deterge...

Page 70: ...ondiente a los siguientes com ponentes en las partes en contacto con liquidos osea depósitos de la solución y recuperación filtros solución y recuperación boquilla de secado gomas relativas y tuberias cepillos tienen que ser efectuadas empleando guantes pa ra protegerse del contacto con soluciones peli grosas VACIADO Y LIMPIEZA DEL DEPÓSITO DE RECUPE RACIÓN 1 Empuñar el tubo de descarga 1 colocado...

Page 71: ...CIÓN LABIO TRASERO Controlar el estado de desgaste del labio de secado y eventualmente girarlo o sustituirlo Para la sustitución es necesario 1 Levantar la boquilla de secado ver en el capítulo DETENCIÓN DE LA MÁQUINA AL FINAL DE LA LIM PIEZA 2 Destornillar los tirantes 1 en los terminales 2 del listón fijador del labio y liberar los terminales 3 Destornillar todas las mariposas 3 y sacar el listó...

Page 72: ...a funcionalidad 2 Controlar el estado de carga de las baterías sobre el display 1 3 Verificar haber activado corretamente la función de secado ver capítulo ACCIONAMIENTO DE LA MÁQUINA 4 Verificar que el depósito de recuperación no esté lleno 5 Si sea en modalidad MAN que AUTO la espía 8 esté encendida pero el motor de aspiración no funciona contactar el centro de asistencia técnica autorizado EL M...

Page 73: ...OS CEPILLOS Y LIMPIEZA LIMPIEZA DE LA BOQUILLA DE SECADO SUSTITUCIÓN DEL LABIO DELANTERO DE LA BOQUILLA DE SECADO SUSTITUCIÓN DEL LABIO TRASERO DE LA BOQUILLA DE SECADO SUSTITUCIÓN DE LOS LABIOS LATERALES CONTROL DE REGLAJE BOQUILLA DE SECADO LIMPIEZA DEL TUBO DE LA BOQUILLA DE SECADO LIMPIEZA DEL DEPÓSITO DE LA SOLUCIÓN CONTROL DEL ELECTRÓLITO BATERÍAS CONTROL DEL FRENO CONTROL DEL MOTOR DE TRACC...

Reviews: