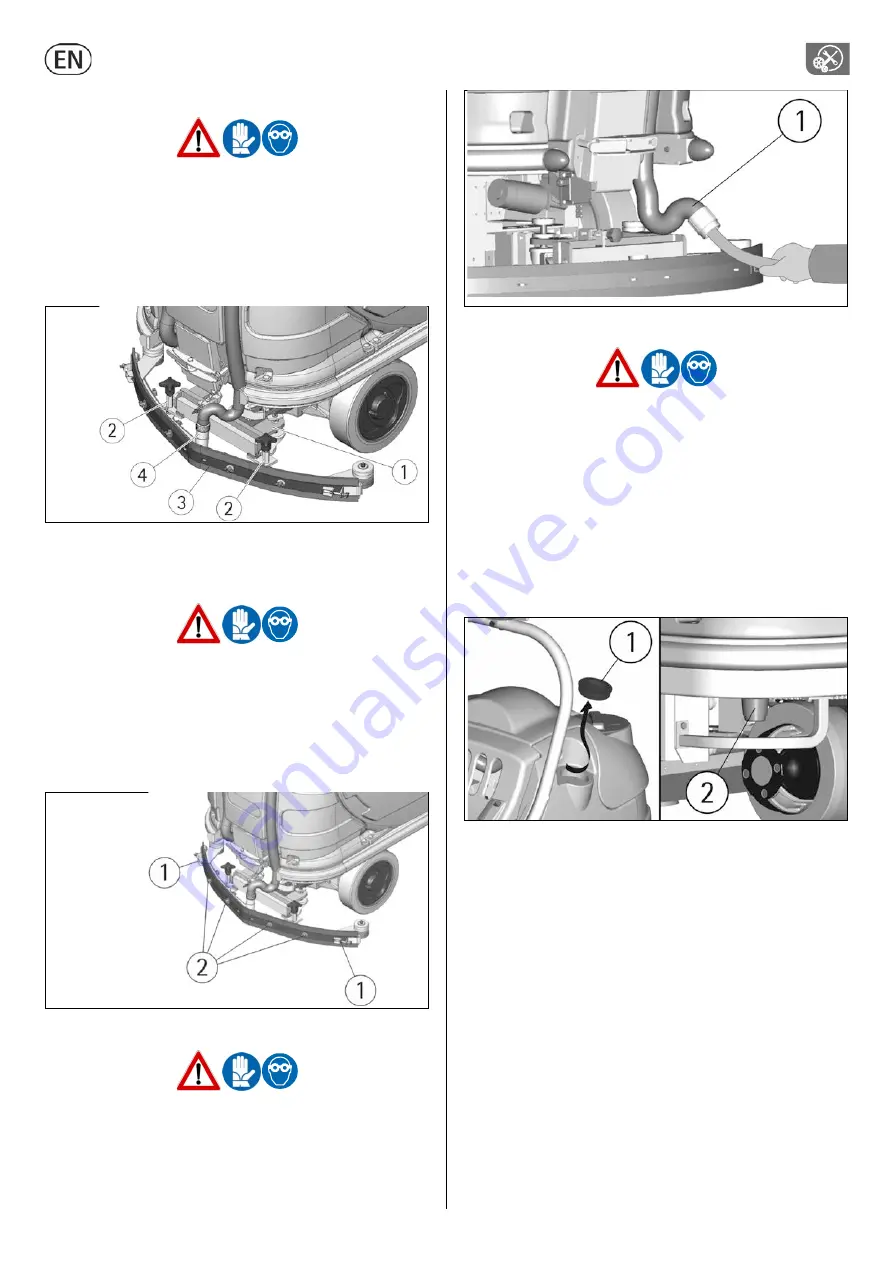
background image


16 

SQUEEGEE CLEANING 


Keeping the squeegee clean guarantees always the best drying result. 

For its cleaning it is necessary to: 

1.


Take off the squeegee hose (4) from the coupling. 

2.


Disassemble the squeegee (3) from its support (1) loosening the 

stud bolts (2) and making them slide inside the slots up to release 

them. 

3.


Clean with care the internal part of the squeegee inlet eliminating 

eventual dirt residuals. 

4.


Clean with care the squeegee rubbers. 

5.


Reassemble all parts. 


WEEKLY MAINTENANCE 


REAR SQUEEGEE RUBBER CHECK 


Check the squeegee rubber wear and eventually turn or replace it.  

For the replacement it is necessary to: 

1.


Take off the squeegee (see under paragraph “SQUEEGEE 

CLEANING”). 

2.


Unhook the couplers (1), unscrew the wing nuts (2) that block the 

rubber blade and take off the rubber. 

3.


Turn the rubber to a new side or replace it. 

4.


To reassemble the squeegee repeat inversely above-mentioned 

operations, inserting the rubber on the guides and blocking it with 

the rubber holder blade. 


SQUEEGEE HOSE CLEANING 


Weekly or in case of insufficient suction, it is necessary to check that 

the squeegee hose is not obstructed. Eventually, to clean it, proceed as 

follows: 

1.


Take off the hose (1) from the squeegee coupling. 

2.


Wash the inside of the hose with a water jet. 

3.


To reassemble the hose repeat inversely the above-mentioned 

operations. 


CLEANING OF THE SOLUTION TANK AND OF THE OUTER FILTER 


Bring the machine to an appropriate place for the detergent solution 

draining. 

1.


Unscrew the solution tank cap (1). 

2.


Unscrew the cap of the exhaust filter (2) and take off the filter. Be 

careful not to lose the gasket of the cap. 

3.


Open the solution valve adjustment (see under paragraph “FLOW 

ADJUSTMENT OF THE DETERGENT SOLUTION”), so that the 

detergent solution flows down into appropriate containers. 

4.


Rinse with a water jet the solution tank and the components of 

the filter. 

5.


Reassemble all parts. 

NOTE: in case of need it is possible to wash only the components of the 

outer solution filter as above-mentioned by closing the solution valve 

adjustment (see under paragraph “FLOW ADJUSTMENT OF THE 

DETERGENT SOLUTION”), so that the detergent solution remains in the 

solution tank. 


TWO-MONTHLY MAINTENANCE 


FRONT SQUEEGEE RUBBER CHECK 

Check the wear of the squeegee rubber and eventually replace it. 

For the replacement it is necessary to: 

1.


Take off the squeegee (see under paragraph “SQUEEGEE 

CLEANING”). 

2.


Unscrew the wing nuts in the front part of the squeegee. 

3.


Take off the rubber holder blade. 

4.


Replace the front rubber. 

5.


Reassemble all parts. 


SIX-MONTHLY MAINTENANCE 


SPLASH GUARD RUBBER CHECK 

With the brushes assembled, the splash guards must slightly touch the 

floor. If they are worn, they have to be replaced.  

Disassemble first the two metal covers (see under paragraph “SPLASH 

GUARD ASSEMBLY”) and then act upon the screws to disassembly the 

blades and the rubbers to be replaced. 


Summary of Contents for diamond 100 AC

Page 1: ...diamond 100 AC diamond 130 03 2019 Use and maintenance Warning Please read the instructions before use...

Page 2: ......

Page 3: ...f the machine 9 Battery charge level 9 Hourmeter 9 Squeegee assembly 9 Adjusting the squeegee 10 Assembling the splashguards 10 Brushes assembly 10 FLOOR CLEANING 10 Recovery tank 10 Detergent solutio...

Page 4: ...ORS ON 19 SIGNAL LAMP DETERGENT SOLUTION LOW 20 SIGNAL LAMP RECOVERY TANK FULL 21 SIGNAL LAMP SQUEEGEE DOWN 22 SIGNAL LAMP BRUSHES DOWN 23 SIGNAL LAMP BRUSHES ROTATION 24 SIGNAL LAMP WATER OPEN SOLENO...

Page 5: ...ng and transfer Symbol denoting the activation of the squeegee up Symbol denoting the signal lamp of overflow of the recovery tank Symbol denoting the activation and the signal lamp brushes down Symbo...

Page 6: ...here possible constructed using recyclable materials CORRECT USE Do not use the machine on surfaces covered with inflammable liquids or dusts for example hydrocarbons ashes or soot In case of fire use...

Page 7: ...5 in 80 80 Machine height without roll bar mm 1330 1330 in 53 53 Height with rollbar without blinking light mm 1685 1685 in 66 66 Height with rollbar and blinking light mm 1850 1850 in 73 73 Machine w...

Page 8: ...CHARGE LEVEL INDICATOR In case of GEL batteries installation it is necessary to set the check card Please contact the authorized technical assistance Strictly follow manufacturer distributor indicatio...

Page 9: ...BATTERY CHARGE LEVEL When the machine is switched on on the display 1 appear in order the following information 1 the version for example A003 of software installed on the machine 2 the setting of the...

Page 10: ...while smooth floors ceramics need higher pressure If the cleaning operations are made always on the same type of floor the adjustment can change only in function of the rubber wear ASSEMBLING THE SPLA...

Page 11: ...with clean water at a maximum temperature of 50 C 122 F Add the liquid detergent in the percentage and conditions foreseen by the manufacturer To avoid excessive foam presence which could cause probl...

Page 12: ...ring the selector 12 in central position BREAK WASHING to carry out the mere transfer of the machine In fact in this mode the washing functions of the machine are not working and only the traction sys...

Page 13: ...n the pedal the machine starts to move again and in automatic mode all the working functions are reactivated WORKING IN MANUAL MODE The manual mode is useful when in special cases it is necessary to c...

Page 14: ...r to avoid serious damages to the suction motors the machine is equipped with a float that intervenes when the recovery tank is full closing the suction the switching on of the signal lamp 20 for the...

Page 15: ...it is empty SUCTION FILTER CLEANING 1 Rotate the seat platform forward up to the blocking of the support 2 Take off the upper hose 1 3 Unhook the lever closings 2 4 Take off the plate with the filter...

Page 16: ...CLEANING OF THE SOLUTION TANK AND OF THE OUTER FILTER Bring the machine to an appropriate place for the detergent solution draining 1 Unscrew the solution tank cap 1 2 Unscrew the cap of the exhaust...

Page 17: ...the functionality 2 Check the charge level of the batteries on the display 1 3 Verify of having activated correctly the function of washing with the brushes see under paragraph STARTING OF THE MACHINE...

Page 18: ...at the suction and the squeegee hoses are correctly inserted in their proper seats on the recovery tank 5 Clean the suction filter see under paragraph SUCTION FILTER CLEANING 6 Clean the squeegee hose...

Page 19: ......

Reviews: