background image


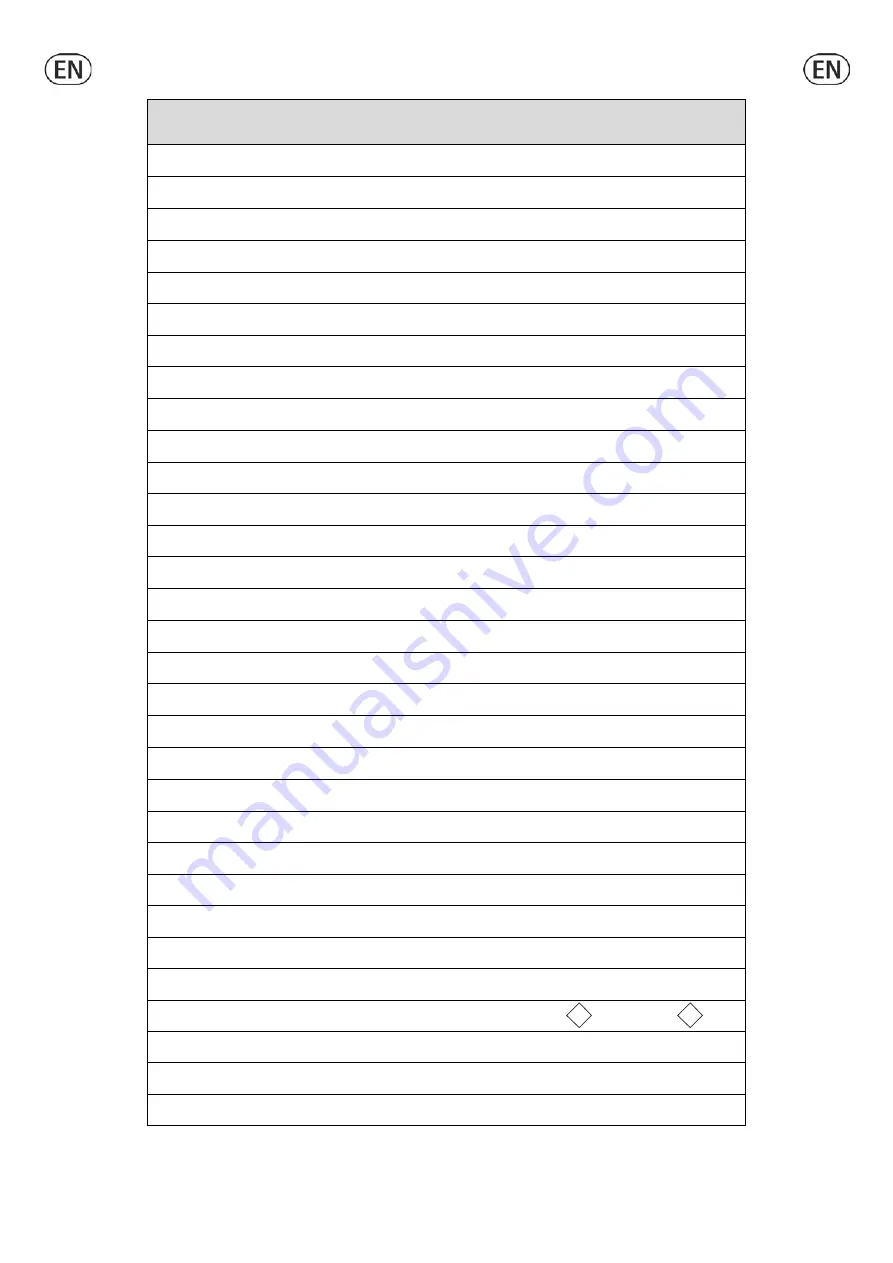
TECHNICAL DESCRIPTION 


diamond 

100AC 

diamond 130 

Cleaning width 

mm 

1000 

1300 

in 

40 

51 

Squeegee width 

mm 

1175 

1550 

in 

46 

61 

Working capacity, up to 

m

2

/h 

7000 

9100 

sqft/h 

75347 

97951 

Brushes diameter 

mm 

2x510 

4 x 355 

in 

2x20 

4 x 14 

Brushes rpm 

rpm 

162 

220 

Pressure on the brushes 

kg 

160 

160 

lbs. 

353 

353 

Brushes motor 

2000 

1920 

56 

53 

Suction motor 

2x570 

2x570 

2x16 

2x16 

Suction vacuum 

mbar 

190 

190 

water lift 

76 

76 

Traction motor 

1200 

1400 

33 

39 

Type of drive 


Autom. 

Autom. 

Movement speed (max) 

km/h 

mph 

4.35 

4.35 

Maximum gradient 

10 

10 

Solution tank 

235 

235 

gal 

62 

62 

Recovery tank 

250 

250 

gal 

66 

66 

Machine length 

mm 

2025 

2025 

in 

80 

80 

Machine height without roll-bar 

mm 

1330 

1330 

in 

53 

53 

Height with rollbar, without blinking light 

mm 

1685 

1685 

in 

66 

66 

Height with rollbar and blinking light 

mm 

1850 

1850 

in 

73 

73 

Machine width (without squeegee) 

mm 

1040 

1400 

in 

41 

55 

Weight  of the machine (empty and without 

batteries) 

kg 

600 

600 

lbs. 

1323 

1323 

Gross weight of the machine 

(in conformity with EN 60335-2-72 art. 5.z102) 

kg 

1510 

1530 

lbs. 

3329 

3373 

Battery voltage 

36 

36 

Capacity of the batteries 

Ah

5


500 

500 

Weight of the batteries 

kg 

600 

600 

lbs. 

1323 

1323 

Battery van (LxPxH) 

mm 

665x640x530 

665x640x530 

in 

26x25x21 

26x25x21 

Acoustic pressure level  

(in conformity with EN 60704-1) Lpa 

dB (A) 

<70 

<70 

Class 


Protection level 

IP 

X3 

X3 

Packed machine weight 

kg 

650 

650 

lbs. 

1433 

1433 

Package dimensions (LxDxH) 

cm 

213 x 115 x 165 

213 x 115 x 165 

in 

84 x 45 x 65 

84 x 45 x 65 


III

III

Summary of Contents for diamond 100 AC

Page 1: ...diamond 100 AC diamond 130 03 2019 Use and maintenance Warning Please read the instructions before use...

Page 2: ......

Page 3: ...f the machine 9 Battery charge level 9 Hourmeter 9 Squeegee assembly 9 Adjusting the squeegee 10 Assembling the splashguards 10 Brushes assembly 10 FLOOR CLEANING 10 Recovery tank 10 Detergent solutio...

Page 4: ...ORS ON 19 SIGNAL LAMP DETERGENT SOLUTION LOW 20 SIGNAL LAMP RECOVERY TANK FULL 21 SIGNAL LAMP SQUEEGEE DOWN 22 SIGNAL LAMP BRUSHES DOWN 23 SIGNAL LAMP BRUSHES ROTATION 24 SIGNAL LAMP WATER OPEN SOLENO...

Page 5: ...ng and transfer Symbol denoting the activation of the squeegee up Symbol denoting the signal lamp of overflow of the recovery tank Symbol denoting the activation and the signal lamp brushes down Symbo...

Page 6: ...here possible constructed using recyclable materials CORRECT USE Do not use the machine on surfaces covered with inflammable liquids or dusts for example hydrocarbons ashes or soot In case of fire use...

Page 7: ...5 in 80 80 Machine height without roll bar mm 1330 1330 in 53 53 Height with rollbar without blinking light mm 1685 1685 in 66 66 Height with rollbar and blinking light mm 1850 1850 in 73 73 Machine w...

Page 8: ...CHARGE LEVEL INDICATOR In case of GEL batteries installation it is necessary to set the check card Please contact the authorized technical assistance Strictly follow manufacturer distributor indicatio...

Page 9: ...BATTERY CHARGE LEVEL When the machine is switched on on the display 1 appear in order the following information 1 the version for example A003 of software installed on the machine 2 the setting of the...

Page 10: ...while smooth floors ceramics need higher pressure If the cleaning operations are made always on the same type of floor the adjustment can change only in function of the rubber wear ASSEMBLING THE SPLA...

Page 11: ...with clean water at a maximum temperature of 50 C 122 F Add the liquid detergent in the percentage and conditions foreseen by the manufacturer To avoid excessive foam presence which could cause probl...

Page 12: ...ring the selector 12 in central position BREAK WASHING to carry out the mere transfer of the machine In fact in this mode the washing functions of the machine are not working and only the traction sys...

Page 13: ...n the pedal the machine starts to move again and in automatic mode all the working functions are reactivated WORKING IN MANUAL MODE The manual mode is useful when in special cases it is necessary to c...

Page 14: ...r to avoid serious damages to the suction motors the machine is equipped with a float that intervenes when the recovery tank is full closing the suction the switching on of the signal lamp 20 for the...

Page 15: ...it is empty SUCTION FILTER CLEANING 1 Rotate the seat platform forward up to the blocking of the support 2 Take off the upper hose 1 3 Unhook the lever closings 2 4 Take off the plate with the filter...

Page 16: ...CLEANING OF THE SOLUTION TANK AND OF THE OUTER FILTER Bring the machine to an appropriate place for the detergent solution draining 1 Unscrew the solution tank cap 1 2 Unscrew the cap of the exhaust...

Page 17: ...the functionality 2 Check the charge level of the batteries on the display 1 3 Verify of having activated correctly the function of washing with the brushes see under paragraph STARTING OF THE MACHINE...

Page 18: ...at the suction and the squeegee hoses are correctly inserted in their proper seats on the recovery tank 5 Clean the suction filter see under paragraph SUCTION FILTER CLEANING 6 Clean the squeegee hose...

Page 19: ......

Reviews: