


3
INTRODUCTORY COMMENT
Thank you for having chosen our machine. This floor cleaning machine is used for the industrial and civil cleaning and is able to clean any type of
floor. During its advance movement, the combined action of the brushes and the detergent solution removes the dirt which is aspirated through the
rear suction assembly, giving a perfectly dry surface.
The machine must be used only for such purpose. It gives the best performance if it is used correctly and maintained in perfect efficiency. We
therefore ask you to read this instruction booklet carefully whenever difficulties arise in the course of the machine’s use. In case of need, we ask you
to contact our service department for all advice and servicing as may prove necessary.
SUMMARY
GENERAL RULES OF THE BATTERIES
Handling of the packed machine
Access to the battery compartment
Batteries charge level indicator
Assembling and disassembling the splash guards
Connecting the battery connector and switching on the machine 13
Detergent solution reserve signal
Speed adjustment, forward and backward
Optional mode – 3SD (Solution Saving System Dispenser)
Installation detergent tank (mode 3SD)
Selection detergent level (mode 3SD)
Manual movement of the machine
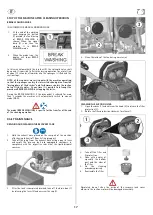
STOP OF THE MACHINE AFTER CLEANING OPERATION
Draining and cleaning the recovery tank
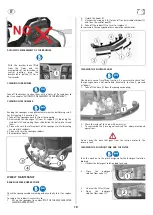
Automatic disassembly of the brushes
Cleaning the solution tank and the filter
The suction motor does not work
The brushes motor does not work
The traction motor does not work
Water does not come down onto the brushes
The machine does not clean properly
The squeegee does not dry perfectly
Periodic ordinary maintenance chart


