background image


BEFORE USE 


HANDLING OF THE PACKED MACHINE 

The machine is supplied with suitable packing foreseen for fork lift 

truck handling. 

For the package dimensions please look at the “TECHNICAL 

DESCRIPTION” table. 


Do not place more than 2 packagins on top of each other. 


UNPACKING THE MACHINE 
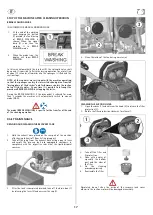
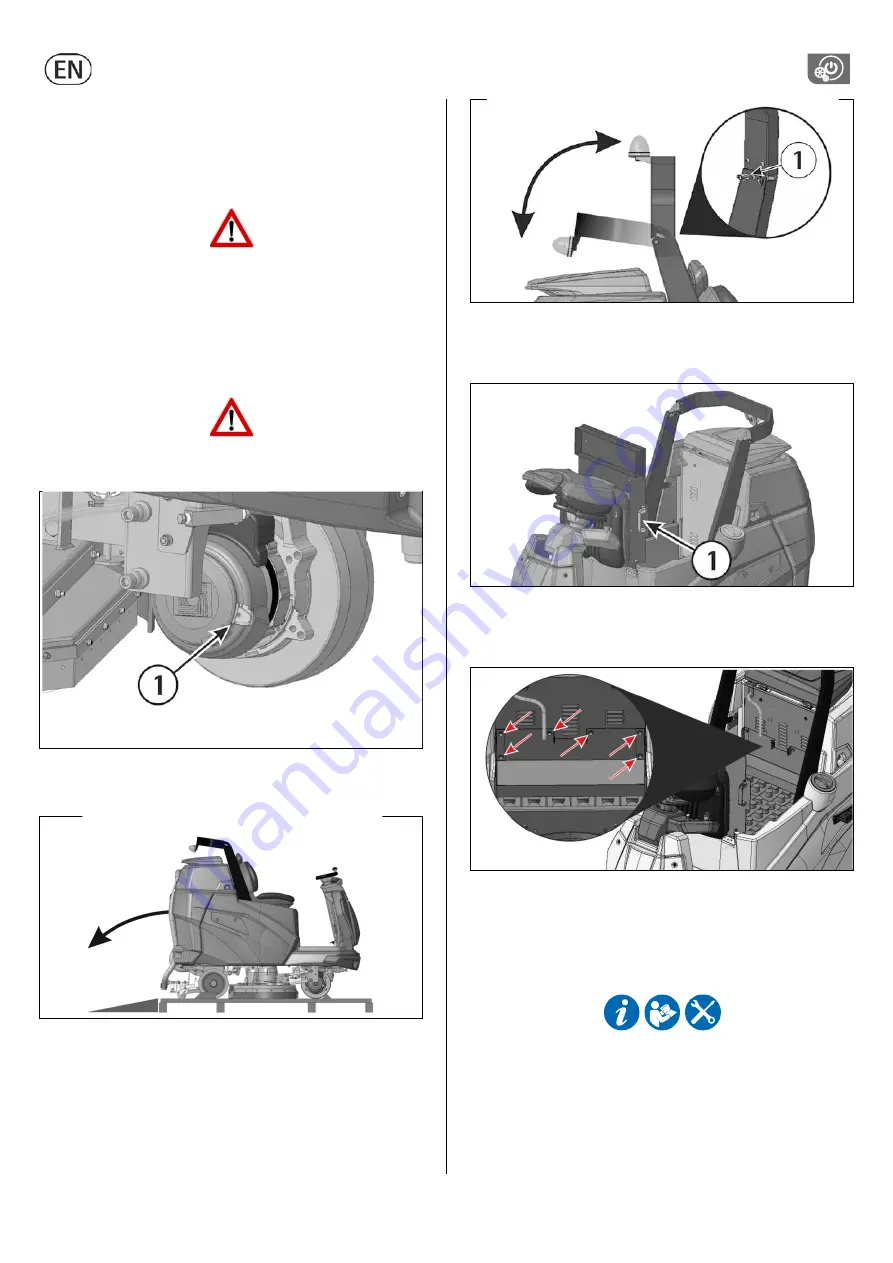
1.


Remove the external packing. 

2.


Before moving the machine from the pallet, it is necessary to 

unblock the parking brake that blocks the traction motor wheel. 

To do this, keep the lever (1) lifted. With the delivery of the 

machine we also supply a cord that permits the lever operation 

(1). After having moved the machine, take off the cord and keep 

it for eventual re-use. 


When the parking brake is released manually, for example when the 

machine has to be moved without batteries, avoid covering slopes 

and do not park on them either. 
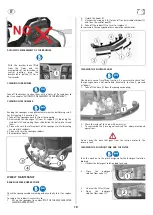


3.


Release the machine from the wooden brackets by moving it 

backwards, as indicated in the figure, avoiding heavy contacts to 

mechanical parts. 


Keep the pallet and the wooden brackets for an eventual transport. 

The portable slope is not included in the packaging. 
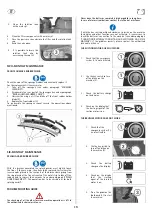
 

ROLLBAR 

The machine is provided with a tipping rollbar. 

To rotate the rollbar from an open to a closed position, or the other 

way around, work on blocks (1). 


ACCESS TO THE BATTERY COMPARTMENT 

Open the rollbar. 

To reach the battery compartment lift the seat base by grabbing the 

handle (1). 


If the machine is equipped with the optional 3SD water system, it is 

necessary to take off the support of the detergent tanks after lifting 

the seat base. 

To remove the support, unscrew the 6 fixing screws. 


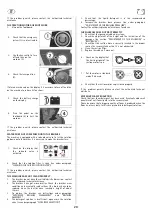
INSTALLING THE BATTERIES 

The standard machine is provided with the batteries set on lead/acid.  

For different settings see chapter “BATTERY SETTINGS”. 

Batteries must be handled using suitable lifting equipment (due to 

weight, considering the type of batteries chosen, and coupling 

system). 

The batteries must be in accordance with CEI 21-5 Norms. 


Strictly follow manufacturer/distributor indications for the 

maintenance and recharge of the batteries.  All installation and 

maintenance operations must be executed by specialized staff, using 

suitable protection accessories. 

 
For batteries installation it is necessary to reach the battery 

compartment as indicated under paragraph “ACCESS TO THE BATTERY 

COMPARTMENT”. 

1.  Place the batteries in its compartment. 

Summary of Contents for Topaz 90

Page 1: ...Topaz 90 01 2019 Use and maintenance Warning Please read the instructions before use...

Page 2: ......

Page 3: ...splash guards 11 Assembling the brushes 11 Adjusting the steering wheel 11 Adjusting the footboard 11 Adjusting the seat 12 FLOOR CLEANING 13 Connecting the battery connector and switching on the mac...

Page 4: ...constructed using recyclable materials CORRECT USE Do not use the machine on surfaces covered with inflammable liquids or dusts for example hydrocarbons ashes or soot In case of fire use a powder bas...

Page 5: ...Recovery tank l 190 Machine length mm 1962 Machine height with roll bar without roll bar mm 1865 1613 Machine width without squeegee mm 985 Weight of the machine empty and without batteries kg 458 Gr...

Page 6: ...D 10 SAFETY BUTTON 11 KEY SWITCH 12 HORN 13 DIRECTION LEVER FORWARD BACKWARD 14 FLOW RATE SELECTOR MACHINE LEGEND 1 CONTROLS BOARD 2 STEERING WHEEL PANEL 3 STEERING WHEEL 4 ROLLBAR 5 SQUEEGEE HOSE 6 D...

Page 7: ...sh base up Squeegee up Maximum speed level set Standard mode selection Automatic mode Suction motor on Brush base down Squeegee down Solenoid valve on Manual mode Suction motor quiet mode Brushes on S...

Page 8: ...curity of both the operator and the machine Symbol preceding an information about the correct use of the machine Warning Icon Risk of acid leakage from the batteries Symbol indicating operations to be...

Page 9: ...ed in the packaging ROLLBAR The machine is provided with a tipping rollbar To rotate the rollbar from an open to a closed position or the other way around work on blocks 1 ACCESS TO THE BATTERY COMPAR...

Page 10: ...lower bending uniformly adjusted in all its length For the adjustment it is necessary to put oneself in working condition and therefore the suction motor has to be switched on and the brushes have to...

Page 11: ...hout the operator seated turning the key switch clockwise the display comes on and after 3 seconds all working groups come off automatically and are lifted from the floor Switch off the machine turnin...

Page 12: ...12 ADJUSTING THE SEAT Using the lever 1 it is possible to adjust the seat position...

Page 13: ...o the recovery tank a minimum quantity of anti foam product Never use pure acid DETERGENT SOLUTION RESERVE SIGNAL When H2 O appears on the display it means that the machine is running out of detergent...

Page 14: ...rk The speed will change from the minimum to the maximum previously set and visible on the display If backward movement is selected the brush base will stay down the squeegee will lift up When the for...

Page 15: ...e will be selected INSTALLATION DETERGENT TANK MODE 3SD To use the machine in 3SD mode it is necessary to install the tank containing the detergent as follows Insert the tank into the appropriate hous...

Page 16: ...sed again When the batteries are connected and when the key switch is positioned on 1 on the display the brake signal comes on MANUAL MOVEMENT OF THE MACHINE To move the machine manually it is necessa...

Page 17: ...seconds the machine will automatically switch to manual mode MAN The mode BREAK WASHING is specific for the transfer at the end of the cleaning operation DAILY MAINTENANCE DRAINING AND CLEANING THE RE...

Page 18: ...g and eventually turn it or replace it To replace the rubber it is necessary to 1 Lift up the squeegee see under STOP OF THE MACHINE AFTER CLEANING OPERATION 2 Unlock the hooks 1 3 Unscrew the wing nu...

Page 19: ...he new ones see under paragraph SPLASH GUARD ASSEMBLY This operation has to be carried out for both splash guards TROUBLESHOOTING GUIDE The checking of all the other foreseen machine operations is lef...

Page 20: ...to be replaced when the bristles have reached a height of about 15mm 3 To replace the brushes see instructions under paragraph AUTOMATIC BRUSHES DISASSEMBLY and BRUSHES ASSEMBLY 4 The detergent solut...

Page 21: ...NING SUCTION FILTER CLEANING SOLUTION TANK FILTER CLEANING BRUSHES CLEANING BRUSHES DISASSEMBLY AND CLEANING SQUEEGEE CLEANING FRONT SQUEEGEE RUBBER CHECK REAR SQUEEGEE RUBBER CHECK SPLASH GUARD RUBBE...

Reviews: