28
Getting Started
Leading
EDGE COMPUTING
2.4.2
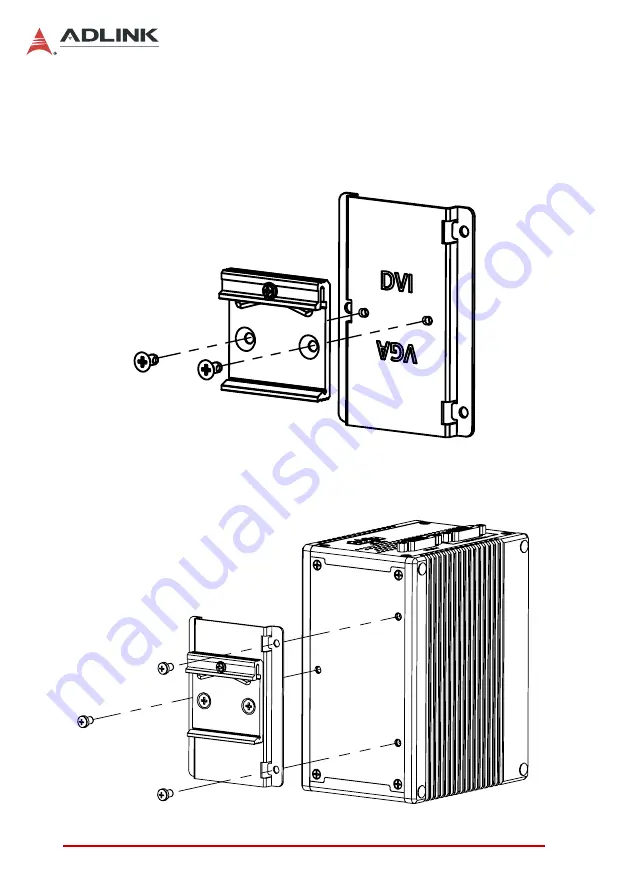
DIN Rail Mount w/ Left Side Up
1. Place the terminal plate with DVI label up and secure the
provided DIN rail bracket via the two screw holes on the
rear side of the terminal plate.
2. Secure the terminal plate via the 3 screw holes to the
rear side of the chassis.
Summary of Contents for DEX-100
Page 7: ...Table of Contents vii DEX 100 Getting Service 69...
Page 8: ...viii Table of Contents Leading EDGE COMPUTING...
Page 10: ...x List of Tables Leading EDGE COMPUTING This page intentionally left blank...
Page 12: ...xii List of Figures Leading EDGE COMPUTING This page intentionally left blank...
Page 18: ...6 Introduction Leading EDGE COMPUTING Figure 1 2 Top View Figure 1 3 Right Side View 140...
Page 19: ...Introduction 7 DEX 100 Figure 1 4 Left Side View Figure 1 5 Rear Side View...
Page 34: ...22 Introduction Leading EDGE COMPUTING This page intentionally left blank...
Page 39: ...Getting Started 27 DEX 100...
Page 42: ...30 Getting Started Leading EDGE COMPUTING This page intentionally left blank...
Page 63: ...BIOS Setup 51 DEX 100 SEMA Features Shows features supported by the SEMA version...
Page 66: ...54 BIOS Setup Leading EDGE COMPUTING Flags Shows BMC flags with exception codes...
Page 67: ...BIOS Setup 55 DEX 100 Power Up Lists Power Up Watchdog status...
Page 76: ...64 BIOS Setup Leading EDGE COMPUTING This page intentionally left blank...
Page 80: ...68 Important Safety Instructions Leading EDGE COMPUTING This page intentionally left blank...


