background image

Installation

 15

2

Installation

Follow these steps to install the PCI-/MPC-/PXI-8164 card. 

X

Check the card package contents (section 2.1)

X

Check the card PCB and face plate/front panel layout  (sec-
tion 2.2)

X

Install the card to the chassis  (section 2.3)

X

Install the drivers (section 2.4)

X

Refer to the I/O signal connections (chapter 3) and their 
operation (chapter 4)

X

Refer to the connector pin assignments (the remaining sec-
tions) and wiring connections

Summary of Contents for MPC-8164

Page 1: ...Advance Technologies Automate the World Manual Rev 2 00 Revision Date August 25 2006 Part No 50 11124 1050 PCI 8164 MPC 8164 PXI 8164 Advanced 4 Axis Servo Stepper Motion Control Card User s Manual ...

Page 2: ... or inability to use the product or documentation even if advised of the possibility of such damages This document contains proprietary information protected by copy right All rights are reserved No part of this manual may be repro duced by any mechanical electronic or other means in any form without prior written permission of the manufacturer Trademarks NuDAQ NuIPC DAQBench are registered tradem...

Page 3: ...Service adlinktech com TEL 886 2 82265877 FAX 886 2 82265717 Address 9F No 166 Jian Yi Road Chungho City Taipei 235 Taiwan Email or fax this completed service form for prompt and satisfac tory service Company Information Company Organization Contact Person E mail Address Address Country TEL FAX Web Site Product Information Product Model Environment OS M B CPU Chipset BIOS Please give a detailed de...

Page 4: ......

Page 5: ...8164 layout 19 2 5 PCI 8164 PXI 8164 hardware installation 20 Hardware configuration 20 PCI slot selection 20 Installing the PCI 8164 card 20 Installing the PXI 8164 card 21 2 6 MPC 8164 hardware installation 22 Hardware configuration 22 2 7 Driver installation 24 2 8 CN1 pin assignments External Power Input PCI 8164 only 25 2 9 CN3 pin assignments Manual Pulse Input PCI 8164 only 26 2 10 J4 pin a...

Page 6: ...and MEL 47 3 5 Ramping down and PCS 48 3 6 In position Signal INP 49 3 7 Alarm Signal ALM 50 3 8 Deviation Counter Clear Signal ERC 51 3 9 General purpose Signal SVON 52 3 10 General purpose Signal RDY 53 3 11 Position compare output pin CMP 54 3 12 Position latch input pin LTC 55 3 13 Pulser Input Signals PA and PB PCI 8164 only 56 3 14 Simultaneously Start Stop Signals STA and STP PCI 8164 only ...

Page 7: ...I O status 112 SD PCS 112 EL 114 ORG 115 4 4 Counters 116 Command position counter 116 Feedback position counter 117 Position error counter 119 General purpose counter 120 Target position recorder 122 4 5 Multiple PCI 8164 Card Operation PCI 8164 Only 123 4 6 Change position or speed on the fly 124 Change speed on the fly 124 Change position on the fly 129 4 7 Position compare and Latch 132 Compar...

Page 8: ...01 6 9 Home Return Mode 211 6 10 Manual Pulser Motion 214 6 11 Motion Status 218 6 12 Motion Interface I O 220 6 13 Motion I O Monitoring 224 6 14 Interrupt Control 226 6 15 Position Control and Counters 234 Return Code 238 6 16 Position Compare and Latch 239 6 17 Continuous motion 249 6 18 Multiple Axes Simultaneous Operation 251 6 19 General purposed TTL output PCI 8164 Only 257 6 20 General pur...

Page 9: ...78 How to wire 280 7 5 Wiring with DIN 814PA 281 Wiring Example 283 Mechanical Dimensions 285 PIN Assignment 286 7 6 Wiring with DIN 814M J3A 288 PIN Assignment 289 7 7 Wiring with DIN 814Y 292 PIN Assignment 293 8 Appendix 295 8 1 Color code of CN3 Cable MPC 8164 Only 295 Warranty Policy 297 ...

Page 10: ...vi List of Tables List of Tables Table 2 1 GEME hardware configuration 22 Table 2 2 Base Addresses 22 ...

Page 11: ... building flow chart 5 Figure 2 1 PCI 8164 PCB layout 17 Figure 2 2 PCI 8164 face plate 17 Figure 2 3 MPC 8164 PCB layout 18 Figure 2 4 MPC 8164 face plate 18 Figure 2 5 PXI 8164 layout and front panel 19 Figure 7 1 System Integration with PCI 8164 266 Figure 7 2 Connection of PCI 8164 with Panasonic Driver 268 Figure 7 3 Connection of PCI 8164 with SANYO Driver 269 ...

Page 12: ......

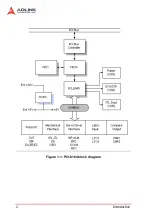
Page 13: ...IFO the PCI MPC PXI 8164 also performs precise and extremely fast position comparison and trigger functions without compromising CPU resources In addition a mechanical sensor interface a servo motor interface and general purposed I O signals are pro vided for easy system integration The following figures show the functional block diagrams of the 8164 card in PCI MPC and PXI interfaces The PCI MPC ...

Page 14: ...2 Introduction Figure 1 1 PCI 8164 block diagram ...

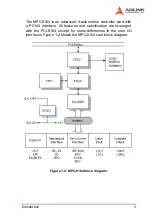
Page 15: ...is motion controller card with a PC104 interface All features and specification are leveraged with the PCI 8164 except for some differences in the user I O interfaces Figure 1 2 shows the MPC 8164 card block diagram Figure 1 2 MPC 8164 block diagram ...

Page 16: ...axis motion controller card with a PXI interface All features and specification are the same with the PCI 8164 except for some differences in the user I O interfaces Figure 1 3 shows the PXI 8164 the block diagram Figure 1 3 PXI 8164 block diagram ...

Page 17: ...screen display lists all installed axes information and the card s I O signal status DOS and Windows programming libraries for C and Visual Basic are included together with some sample programs to illus trate the operations of these functions Figure 1 4 illustrates a flow chart of application development using the contents of this manual Refer to the related chapters for details Figure 1 4 Applica...

Page 18: ...ition comparing X 13 home return modes with auto searching X Hardware backlash compensator and vibration suppression X 2 software end limits for each axis X 28 bit up down counter for incremental encoder feedback X Home switch index signal EZ positive and negative end limit switches interface on all axes X 2 axis high speed position latch input X 2 axis position compare trigger output with 4k FIFO...

Page 19: ...Introduction 7 X Includes Motion Creator a Microsoft Windows based appli cation development software X Libraries and utilities support DOS Windows 9X NT 2000 XP and Linux ...

Page 20: ...tion suppression X 2 Software end limits for each axis X 28 bit up down counter for incremental encoder feedback X Home switch index signal EZ positive and negative end limit switches interface on all axes X 2 axis high speed position latch input X 2 axis position compare trigger output with 4k FIFO auto loading X 2500Vrms isolated digital input and output signals X Programmable interrupt sources ...

Page 21: ...ous interpolation for contour following motion X Change position and speed on the fly X Change speed by condition comparing X 13 home return modes with auto searching X Hardware backlash compensator and vibration suppression X 2 software end limits for each axis X 28 bit up down counter for incremental encoder feedback X Home switch index signal EZ positive and negative end limit switches interfac...

Page 22: ...10 Introduction X Includes Motion Creator a Microsoft Windows based appli cation development software X Libraries and utilities DOS Windows 9x NT 2000 XP and Linux ...

Page 23: ...quency linear trape zoidal or S Curve velocity profile drive X 19 66 MHz internal reference clock X 28 bit up down counter range 0 to 268 435 455 or 134 217 728 to 134 217 727 X Position pulse setting range 28 bit 134 217 728 to 134 217 728 X Pulse rate setting ranges pulse ratio 1 65535 Z 0 1 PPS to 6553 5 PPS multiplier 0 1 Z 1 PPS to 65535 PPS multiplier 1 Z 100 PPS to 6553500 PPS multiplier 10...

Page 24: ... digital output pin X RDY general purposed digital input pin X PA and PB PCI 8164 PXI 8164 pulse signal input pin X STA and STP PCI 8164 PXI 8164 simultaneous start stop signal General purpose output X 6 TTL level digital outputs PCI 8164 only X 8 digital inputs 8 digital outputs MPC 8164 only X 4 digital inputs 4 digital outputs PXI 8164 only General specifications X 100 pin SCSI type connector X...

Page 25: ...Introduction 13 Dimensions X PCI 8164 185 mm L X 106 68 mm W X MPC 8164 152 mm L X 104 7 mm W X PXI 8164 3U Eurocard form factor CompactPCI compliant PICMG 2 0 R2 1 ...

Page 26: ... card package Support for Linux based systems is also included MPC 8164 supports DOS Windows 98 NT 2000 XP Windows XP NT Embedded Windows CE and Linux 1 3 2 Motion Creator This Windows based utility sets up cards motors and systems It also debugs hardware and software problems and enables the user to set I O logic parameters that can be loaded in their own programs Refer to Chapter 5 for more deta...

Page 27: ...ection 2 1 X Check the card PCB and face plate front panel layout sec tion 2 2 X Install the card to the chassis section 2 3 X Install the drivers section 2 4 X Refer to the I O signal connections chapter 3 and their operation chapter 4 X Refer to the connector pin assignments the remaining sec tions and wiring connections ...

Page 28: ...s X PCI 8164 MPC 8164 PXI 8164 card X ADLINK All in one CD X 24V power input cable for CN1 accessories PCI 8164 only X Optional terminal board for wiring purposes If any of these items are missing or damaged contact your dealer immediately Save the original packaging for future shipment ...

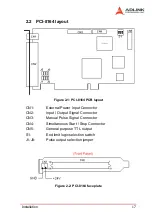
Page 29: ... External Power Input Connector CN2 Input Output Signal Connector CN3 Manual Pulse Signal Connector CN4 Simultaneous Start Stop Connector CN5 General purpose TTL output S1 End limit logic selection switch J1 J8 Pulse output selection jumper Figure 2 2 PCI 8164 face plate ...

Page 30: ...18 Installation 2 3 MPC 8164 layout Figure 2 3 MPC 8164 PCB layout Figure 2 4 MPC 8164 face plate CN2 Input Output Signal Connector CN3 8 DI 8 DO Connector JP1 IRQ selection SW1 Base Address Selection ...

Page 31: ...allation 19 2 4 PXI 8164 layout Figure 2 5 PXI 8164 layout and front panel S1 Switch setting for EL logic S2 Card ID setting from 0 11 J3 4 CH isolated digital Input output J4 4 axis pulser input interface ...

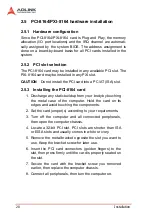
Page 32: ... card 1 Discharge any static buildup from your body by touching the metal case of the computer Hold the card on its edges and avoid touching the components 2 Set the card jumper s according to your requirements 3 Turn off the computer and all connected peripherals then open the computer chassis 4 Locate a 32 bit PCI slot PCI slots are shorter than ISA or EISA slots and usually comes in white or iv...

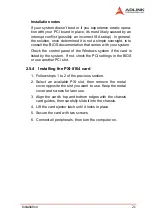
Page 33: ...dows system if the card is listed by the system If not check the PCI settings in the BIOS or use another PCI slot 2 5 4 Installing the PXI 8164 card 1 Follow steps 1 to 2 of the previous section 2 Select an available PXI slot then remove the metal cover opposite the slot you want to use Keep the metal cover and screws for later use 3 Align the card s top and bottom edges with the chassis card guid...

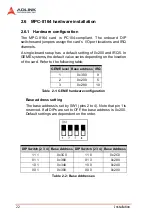
Page 34: ...n the location of the card Refer to the following table Table 2 1 GEME hardware configuration Base address setting The base address is set by SW1 pins 2 to 4 Note that pin 1 is reserved If all DIPs are set to OFF the base address is 0x200 Default settings are dependent on the order Table 2 2 Base Addresses GEME level Base address IRQ 1 0x300 9 2 0x200 5 3 0x280 10 DIP Switch 2 3 4 Base Address DIP...

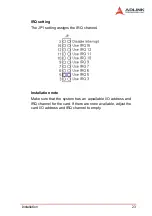
Page 35: ...ng The JP1 setting assigns the IRQ channel Installation note Make sure that the system has an aqvailable I O address and IRQ channel for the card If there are none available adjust the card I O address and IRQ channel to empty ...

Page 36: ... DOS_BC directory of the CD MPC 8164 1 Place the ADLINK All In One CD to the CR ROM drive 2 When the Autorun screen appears select Driver Instal lation Motion Control MPC 8164 3 Launch the MPC 8164 Add Remove utililty from the Start menu or installed directory to register the new card The I O address and IRQ channel must be the same with the settings on the board 4 Restart the computer NOTES When ...

Page 37: ... 10 mm standard The diagram below shows the external power supply system of the PCI 8164 An external 24V power must be provided An on board regulator generates 5V for both internal and external use CAUTION The output current capacity of the 5V power source from the onboard DC DC is limited DO NOT use this to drive several devices simultaneously especially stepper mo tors or external encoders NOTE ...

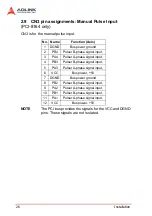
Page 38: ...t isolated No Name Function Axis 1 DGND Bus power ground 2 PB4 Pulser B phase signal input 3 PA4 Pulser A phase signal input 4 PB3 Pulser B phase signal input 5 PA3 Pulser A phase signal input 6 VCC Bus power 5V 7 DGND Bus power ground 8 PB2 Pulser B phase signal input 9 PA2 Pulser A phase signal input 10 PB1 Pulser B phase signal input 11 PA1 Pulser A phase signal input 12 VCC Bus power 5V ...

Page 39: ...er ground 2 PB4 Axis 3 Pulser PHB 3 PA4 Axis 4 Pulser PHA 4 PB3 Axis 2 Pulser PHB 5 PA3 Axis 3 Pulser PHA 6 VCC Bus Power 5V 7 DGND Bus power ground 8 PB2 Axis 1 Pulser PHB 9 PA2 Axis 1 Pulser PHA 10 PB1 Axis 0 Pulser PHB 11 PA1 Axis 0 Pulser PHA 12 VCC Bus Power 5V 13 N A 14 N A 15 N A 16 N A 17 N A 18 N A 19 N A 20 N A ...

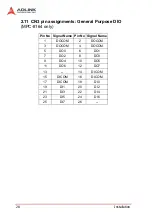
Page 40: ...al Purpose DIO MPC 8164 only Pin No Signal Name Pin No Signal Name 1 DOCOM 2 DOCOM 3 DOCOM 4 DOCOM 5 DO0 6 DO1 7 DO2 8 DO3 9 DO4 10 DO5 11 DO6 12 DO7 13 14 DICOM 15 DICOM 16 DICOM 17 DICOM 18 DI0 19 DI1 20 DI2 21 DI3 22 DI4 23 DI5 24 DI6 25 DI7 26 ...

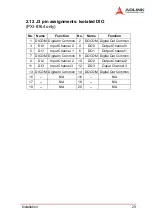
Page 41: ... Out Common 3 DI0 Input Channel 0 4 DO0 Output Channel 0 5 DI1 Input Channel 1 6 DO1 Output Channel 1 7 DICOM Digital In Common 8 DOCOM Digital Out Common 9 DI2 Input Channel 2 10 DO2 Output Channel 2 11 DI3 Input Channel 3 12 DO3 Ouput Channel 3 13 DICOM Digital In Common 14 DOCOM Digital Out Common 15 N A 16 N A 17 N A 18 N A 19 N A 20 N A ...

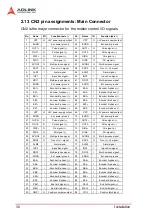
Page 42: ...1 I Encoder Z phase 67 EZ3 I Encoder Z phase 18 EZ1 I Encoder Z phase 68 EZ3 I Encoder Z phase 19 VPP O 5V power supply output 69 VPP O 5V power supply output 20 EGND Ext power ground 70 EGND Ext power ground 21 OUT2 O Pulse signal 71 OUT4 O Pulse signal 22 OUT2 O Pulse signal 72 OUT4 O Pulse signal 23 DIR2 O Dir signal 73 DIR4 O Dir signal 24 DIR2 O Dir signal 74 DIR4 O Dir signal 25 SVON2 O Mult...

Page 43: ...L4 I End limit signal 44 MEL2 I End limit signal 94 MEL4 I End limit signal 45 CMP2 O Position compare output 95 LTC4 I Position latch input 46 SD PCS2 I Ramp down signal 96 SD PCS4 I Ramp down signal 47 ORG2 I Origin signal 97 ORG4 I Origin signal 48 EGND Ext power ground 98 GND Ext power ground 49 EGND Ext power ground 99 E_24V Ext power supply 24V 50 EGND Ext power ground 100 E_24V Ext power su...

Page 44: ...ple axes or mul tiple cards Note 5V and GND pins are provided by the PCI Bus power No Name Function Axis 1 DGND Bus power ground 2 STP Simultaneous stop signal input output 3 STA Simultaneous start signal input output 4 STP Simultaneous stop signal input output 5 STA Simultaneous start signal input output 6 VCC Bus power output 5V ...

Page 45: ... for general purposed TTL output signals Pin No Name Function 1 DGND Digital ground 2 DGND Digital ground 3 ED0 Digital Output 0 4 ED1 Digital Output 1 5 ED2 Digital Output 2 6 ED3 Digital Output 3 7 ED4 Digital Output 4 8 ED5 Digital Output 5 9 VCC VCC 5V 10 N C Not used ...

Page 46: ... 8164 only J1 J8 sets the type of pulse output signals DIR and OUT The output signal type may either be differential line driver or open col lector output Refer to section 3 1 for detailed jumper settings The default setting is differential line driver mode ...

Page 47: ...t the EL switch is set to ON which is the normally open position or A contact type while OFF is the normally closed position or B contact type For safety reasons you must set a type that will make the end limit active when it is broken or disconnected NOTE MPC 8164 uses a software function for this setting ...

Page 48: ...se DI DO ports MPC 8164 only CN3 Pin No Signal Name CN3 Pin No Signal Name 1 DOCOM 2 DOCOM 3 DOCOM 4 DOCOM 5 DO0 6 DO1 7 DO2 8 DO3 9 DO4 10 DO5 11 DO6 12 DO7 13 14 DICOM 15 DICOM 16 DICOM 17 DICOM 18 DI0 19 DI1 20 DI2 21 DI3 22 DI4 23 DI5 24 DI6 25 DI7 26 ...

Page 49: ...d ID switch setting PXI 8164 only NOTE Other settings are invalid In order to enable this function see section 6 21 Card ID Switch Setting ON 1 0 0000 1 0001 2 0010 3 0011 4 0100 5 0101 6 0110 7 0111 8 1000 9 1001 10 1010 11 1011 ...

Page 50: ...38 Installation ...

Page 51: ...ection 3 4 End Limit Signals PEL and MEL X Section 3 5 Ramping down PCS signals X Section 3 6 In position signals INP X Section 3 7 Alarm signal ALM X Section 3 8 Deviation counter clear signal ERC X Section 3 9 General purposed signals SVON X Section 3 10 General purposed signal RDY X Section 3 11 Position compare output pin CMP X Section 3 12 Position latch input pin LTC X Section 3 13 Pulse inp...

Page 52: ...OUT2 signals The following table shows all pulse output signals on CN2 The output of the OUT or DIR signals can be configured by jump ers as either differential line drivers or open collector output For PCI 8164 card you can select the output mode by closing either breaks between 1 and 2 or 2 and 3 of jumpers J1 J8 CN2 Pin No Signal Name Description Axis 3 OUT1 Pulse signals 1 4 OUT1 Pulse signals...

Page 53: ...signals The sink current must not exceed 20 mA on the OUT and DIR pins By default pin 1 2 of the jumper is shorted USAGE Short pin 2 3 of the jumper and connect OUT DIR to a 470 ohm pulse input interface s COM of driver See the following figure Output Signal For differential line driver output close breaks between 1 and 2 of For open collector out put close breaks between 2 and 3 of OUT1 J1 J1 DIR...

Page 54: ...ial type wiring example MPC 8164 PXI 8164 or PCI 8164 when pin 2 3 of the jumper is shorted Choose one of OUT DIR and OUT DIR to connect to the driver s OUT DIR WARNING The sink current must not exceed 20 mA to prevent dam age to the PCI MPC PXI 8164 card ...

Page 55: ...t circuit of the EA EB and EZ signals Note that the voltage across each differential pair of encoder input signals EA EA EB EB and EZ EZ should be at least 3 5V Therefore the output current must be observed when con necting to the encoder feedback or motor driver feedback to avoid CN2 Pin No Signal Name Axis CN2 Pin No Signal Name Axis 13 EA1 1 63 EA3 3 14 EA1 1 64 EA3 3 15 EB1 1 65 EB3 3 16 EB1 1...

Page 56: ...pairs with at least 6 mA driving capacity The grounds of both sides must be tied together The maximum frequency will be 4 Mhz or more depending on the wiring distance and signal conditioning Connection to open collector output You need an external power supply to connect with an open collector output Some motor drivers provide the power source The diagram below shows the connection between the car...

Page 57: ...Signal Connections 45 For more operation information on the encoder feedback signals refer to section 4 4 ...

Page 58: ... origin on one axis The specifi cations of the limit switch should have contact capacity of 24 V 6 mA minimum An internal filter circuit is used to filter out any high frequency spikes which may cause errors in the operation When the motion controller is operated in the home return mode the ORG signal is used to inhibit the control output signals OUT and DIR For detailed operations of the ORG sign...

Page 59: ... circuit diagram is provided below The external limit switch should have a contact capacity of 24V 6 mA minimum Either A type normal open contact or B type normal closed contact switches can be used To set the type of switch configure dipswitch S1 SW2 By default all bits of S1 on the card are set to ON refer to section 2 10 For more details on EL operation refer to section 4 3 2 CN2 Pin No Signal ...

Page 60: ... axis numbers are shown in the table below A circuit diagram is shown below Typically the limit switch is used to generate a slow down signal to drive motors operating at slower speeds For more details on SD PCS operation refer to section 4 3 1 CN2 Pin No Signal Name Axis 40 SD1 PCS1 1 46 SD2 PCS2 2 90 SD3 PCS3 3 96 SD4 PCS4 4 ...

Page 61: ...um bers are shown in the table below The diagram below shows the input circuit of the INP signals The in position signal is usually generated by the servomotor driver and is ordinarily an open collector output signal An external circuit must provide at least 5 mA current sink capabilities to drive the INP signal For more details of INP signal operations refer to section 4 2 1 CN2 Pin No Signal Nam...

Page 62: ...ow The input alarm circuit diagram is provided The ALM signal is usually generated by the servomotor driver and is ordinarily an open collector output signal An external circuit must provide at least 5 mA current sink capabilities to drive the ALM signal For more details of ALM signal operations refer to section 4 2 2 CN2 Pin No Signal Name Axis 9 ALM1 1 27 ALM2 2 59 ALM3 3 77 ALM4 4 ...

Page 63: ...R signals 4 An emergency stop command is issued by software operator The signal names pin numbers and axis numbers are shown in the table below The ERC signal clears the deviation counter of the servomotor driver The ERC output circuit is an open collector with a maximum of 35V at 50 mA driving capacity For more details on ERC opera tion refer to section 4 2 3 CN2 Pin No Signal Name Axis 8 ERC1 1 ...

Page 64: ...be used as a servomotor on control or gen eral purpose output signal The signal names pin numbers and its axis numbers are shown in the following table The output circuit for the SVON signal is shown below CN2 Pin No Signal Name Axis 7 SVON1 1 25 SVON2 2 57 SVON3 3 75 SVON4 4 ...

Page 65: ...an be used as motor driver ready input or gen eral purpose input signals The signal names pin numbers and axis numbers are shown in the table below The input circuit of RDY signal is shown in this diagram CN2 Pin No Signal Name Axis 11 RDY1 1 29 RDY2 2 61 RDY3 3 79 RDY4 4 ...

Page 66: ...lue set by the user The CMP channel is located on CN2 The signal names pin num bers and axis numbers are shown below The wiring diagram below shows the CMP on the first 2 axes NOTE CMP trigger type may be set to normal low rising edge or normal high falling edge Default setting is normal high Refer to function _8164_set_trigger_type in sec tion 6 16 for details The CMP pin can be regarded as a TTL...

Page 67: ... the last 2 axes 3 and 4 The LTC signal triggers the counter value capturing functions which provides a precise posi tion determination The LTC channel is on CN2 The signal names pin numbers and axis numbers are shown below The wiring diagram below shows the LTC of the last 2 axes CN2 Pin No Signal Name Axis 89 LTC3 3 95 LTC4 4 ...

Page 68: ...re directly connected to PA and PB pins of the PCL6045 The interface circuit is shown below If the signal voltage of the pulser is not 5V or if the pulser is dis tantly placed it is recommended that a photocoupler or a line driver be installed in between Note that the CN3 5V and DGND lines are provided from the PCI bus and that this source is not iso lated CN3 Pin No Signal Name Axis CN3 Pin No Si...

Page 69: ...on simultaneously both software control and external control are needed With software control the signals can be generated from any one of the PCL6045 You can also use an external open collector or switch to drive the STA STP signals for simultaneous start stop If there are two or more PCI 8164 cards cascade the CN4 con nectors of all cards for simultaneous start stop control on all con cerned axe...

Page 70: ...58 Signal Connections ...

Page 71: ...t is located on CN5 The signal names pin num bers and axis numbers are listed below The diagram shows the LTC of the last 2 axes Pin No Name Function 1 DGND Digital ground 2 DGND Digital ground 3 ED0 Digital Output 0 4 ED1 Digital Output 1 5 ED2 Digital Output 2 6 ED3 Digital Output 3 7 ED4 Digital Output 4 8 ED5 Digital Output 5 9 VCC VCC 5V ...

Page 72: ...It has convenient wiring screw terminals and an easy install DIN socket that can be mounted to the DIN rails ADLINK also provides DIN 814M termination boards for Mitsubishi J2S servo motor drivers DIN 814PA termination board for Pana sonic Minas A servo motor drivers DIN 814M J3A termination board for Mitsubishi J3A Servo motor drviers and DIN 814Y termi nation board for Yaskawa sigma II servo mot...

Page 73: ... Pin No Signal Name 1 DOCOM 2 DOCOM 3 DOCOM 4 DOCOM 5 DO0 6 DO1 7 DO2 8 DO3 9 DO4 10 DO5 11 DO6 12 DO7 13 14 DICOM 15 DICOM 16 DICOM 17 DICOM 18 DI0 19 DI1 20 DI2 21 DI3 22 DI4 23 DI5 24 DI6 25 DI7 26 No Name Function No Name Function 1 DICOM Digital In Common 2 DOCOM Digital Out Common 3 DI0 Input Channel 0 4 DO0 Output Channel 0 5 DI1 Input Channel 1 6 DO1 Output Channel 1 7 DICOM Digital In Com...

Page 74: ...62 Signal Connections 3 17 1 Isolated input channels 3 17 2 Isolated output channels ...

Page 75: ...Signal Connections 63 3 17 3 Example of input connection ...

Page 76: ...64 Signal Connections 3 17 4 Example of output connections ...

Page 77: ...er interface INP ERC ALM SVON RDY X Section 4 3 The limit switch interface and I O status SD PCS EL ORG X Section 4 4 The counters EA EB EZ X Section 4 5 Multiple card operation X Section 4 6 Change position or speed on the fly X Section 4 7 Position compare and latch X Section 4 8 Hardware backlash compensator X Section 4 9 Software limit function X Section 4 10 Interrupt control X Section 4 11 P...

Page 78: ...axis X 4 1 4 S Curve profile motion for one axis X 4 1 5 Linear interpolation for 2 4 axes X 4 1 6 Circular interpolation for 2 axes X 4 1 7 Circular interpolation with acc dec time X 4 1 8 Relationship between velocity and acceleration time X 4 1 9 Continuous motion for multiple axis X 4 1 10 Home return mode for one axis X 4 1 11 Home Search mode for one axis X 4 1 12 Manual pulse mode for one a...

Page 79: ...be differential line driver or open collector output Refer to section 3 1 for the jumper setting for different signal types Single Pulse Output Mode OUT DIR Mode In this mode the OUT signal is for the command pulse posi tion or velocity chain The numbers of OUT pulse represent the relative distance or position The frequency of the OUT pulse represents the command for speed or velocity The DIR sign...

Page 80: ...ut Mode CW CCW Mode In this mode the waveform of the OUT and DIR pins represent CW clockwise and CCW counter clockwise pulse output respectively Pulses output from the CW pin makes the motor move in positive direction whereas pulse output from the CCW pin makes the motor move in negative direction The following dia ...

Page 81: ...B phase Mode In this mode the waveform of the OUT and DIR pins represent A phase and B phase pulse output respectively Pulses output from the OUT pin leading makes the motor move in positive direction whereas pulse output from the DIR pin leading makes the motor move in negative direction The following diagram shows the out ...

Page 82: ...70 Operation Theory put waveform of positive commands and negative com mands This mode is not available in older version boards Related function X _8164_set_pls_outmode Refer to section 6 4 ...

Page 83: ...an operation Before this function is applied make sure to call _8164_fix_speed_range Refer to section 4 6 for more information The _8164_sd_stop function is used to decelerate the motion until it stops The _8164_emg_stop function is used to immediately stop the motion These change or stop functions follow the same velocity profile as its original move functions tv_move or sv_move The velocity prof...

Page 84: ... point to point functions In the _8164_start_ta_move function the absolute target position must be given in units of pulses The physical length or angle of one movement is dependent on the motor driver and mechanism including the motor Since absolute move mode needs the infor mation of current actual position the External encoder feedback EA EB pins should be set in _8164_set_feedback_src function...

Page 85: ...oder is used in a X Y table The resolution of encoder is 2000 counts per phase The maxi mum rotating speed of motor is designed to be 3600 RPM What is the maximum pulse command output frequency that you have to set on 8164 Answer MaxVel 3600 60 2000 4 480000 PPS Multiplying by 4 is necessary because there are four states per AB phase See Section 4 4 Usually the axes need to set the move ratio if t...

Page 86: ...ommand it will cause problems when running in Absolute Mode because the 8164 won t recognize the actual absolute position during motion Related functions X _8164_start_ta_move _8164_start_tr_move Refer to section 6 6 X _8164_motion_done Refer to section 6 11 X _8164_set_feedback_src Refer to section 6 4 X _8164_set_move_ratio Refer to section 6 6 ...

Page 87: ...e These include Pos target position in absolute mode in units of pulses Dist moving distance in relative mode in units of pulses StrVel start velocity in units of PPS MaxVel maximum velocity in units of PPS Tacc time for acceleration StrVel MaxVel in units of seconds Tdec time for deceleration MaxVel StrVel in units of seconds VSacc S curve region during acceleration in units of PPS VSdec S curve ...

Page 88: ...c VSdec is in units of PPS and it should always keep in the range of 0 to MaxVel Strvel 2 where 0 means no linear region The S curve profile motion functions are designed to always pro duce smooth motion If the time for acceleration parameters com bined with the final position don t allow an axis to reach the maximum velocity i e the moving distance is too small to reach MaxVel then the maximum ve...

Page 89: ...ar interpolation for 2 4 axes In this mode any two of four three of four or all four axes may be chosen to perform linear interpolation Interpolation between multi axes means these axes start simultaneously and reach their ending points at the same time Linear means the ratio of speed of every axis is a constant value Note that you cannot use two groups of two axes for linear interpo lation on a s...

Page 90: ...rapezoidal and S curve profiles are available Example _8164_start_tr_move_xy 0 30000 0 40000 0 1000 0 5000 0 0 1 0 2 will cause the XY axes axes 0 1 of Card 0 to perform a linear interpolation movement in which X 30000 pulses Y 40000 pulses Start vector speed 1000pps X speed 600pps Y speed 800pps Max vector speed 5000pps X speed 3000pps Y speed 4000pps Acceleration time 0 1sec Deceleration time 0 ...

Page 91: ...164_start_sa_line2 Refer to section 6 7 The characters t s r and a after _8164_start mean t Trapezoidal profile s S Curve profile r Relative motion a Absolute motion 3 axis linear interpolation Any three of the four axes of the card may perform 3 axis linear interpolation As shown the figure below 3 axis linear interpola tion means to move the XYZ if axes 0 1 2 are selected and assigned to be X Y ...

Page 92: ...00 0 StrVel 5000 0 MaxVel 0 1 sec 0 2 sec X 1000 pulse Y 2000 pulse Z 3000 pulse Start vector speed 100pps X X speed 100 26 7pps X Y speed 2 100 53 3pps X Z speed 3 100 80 1pps Max vector speed 5000pps X X speed 5000 1336pps X Y speed 2 5000 2672pps X Z speed 3 5000 4008pps The following functions are used for 3 axis linear interpolation _8164_start_tr_line3 _8164_start_sr_line3 _8164_start_ta_lin...

Page 93: ... axis is X Y Z U respectively and the vector speed is The following functions are used for 4 axis linear interpolation _8164_start_tr_line4 _8164_start_sr_line4 _8164_start_ta_line4 _8164_start_sa_line4 Refer to section 6 7 The characters t s r and a after _8164_start mean t Trapezoidal profile s S Curve profile r Relative motion a Absolute motion ...

Page 94: ...er X 0 cen ter Y 1800 0 End X 600 0 End Y 1000 0 MaxVel To specify a circular interpolation path the following parameters must be clearly defined Center point The coordinate of the center of arc In absolute mode or the off_set distance to the center of arc In relative mode End point The coordinate of end point of arc In absolute mode or the off_set distance to center of arc In relative mode Direct...

Page 95: ...ns the target axes are already assigned _8164_start_r_arc_xy _8164_start_r_ arc _zu _8164_start_a_ arc _xy _8164_start_a_ arc _zu Refer to section 6 8 The second group allows user to freely assign any targeted two axes _8164_start_r_arc2 _8164_start_a_arc2 Refer to section 6 8 ...

Page 96: ...ich means that Axis3 cannot be used for other pur poses while running these functions For example to perform a circular interpolation with a T curve speed profile the function _8164_start_tr_arc_xyu is used This function will use Axis0 and Axis1 and also Axis3 Axis0 x Axis1 y Axis2 z Axis3 u For the full lists of functions refer to section 6 8 To check if the card supports these functions use the ...

Page 97: ...urn results in a smaller acceleration time Note it does not affect the actual end velocity For example to have a 1ms acceleration time from a velocity of 0 to 5000 pps the func tion can be inserted before the motion function as shown _8164_fix_speed_range AxisNo OverVelocity _8164_start_tr_move AxisNo 5000 0 5000 0 001 0 001 How do users decide an optimum value for OverVelocity in the _8164_fix_sp...

Page 98: ...000 The value miniAccT will be 0 000948sec and maxAccT will be 31 08sec This minimum acceleration time meets the require ments So the motion command can be changed to _8164_fix_speed_range AxisNo 140000 _8164_start_tr_move AxisNo 5000 0 5000 0 001 0 001 Notes X The return value of _8164_verify_speed is the mini mum velocity of motion command it does not always equal to your start velocity setting ...

Page 99: ...relationship So one must change the MaxV MiniT relationship to a higher value MaxV1 MiniT1 Finally the command would be _8164_fix_speed_range AxisNo MaxV1 _8164_start_tr_move AxisNo Distance 0 MaxV2 Target T Tar get T Related functions X _8164_fix_speed_range _8164_unfix_speed_range _8164_verify_speed Refer to section 6 5 ...

Page 100: ...ll a second motion refer to the next function Notice that the deceleratin of this function is set to 0 It means that deceleration is not needed in this command in order to smoothly link the next command velocity 3 _8164_start_tr_move 0 20000 100 30000 0 0 0 2 The second function call does not affect the first one Actually it will be executed and written into the card pre register After the first m...

Page 101: ...and executed immediately by the ASIC 3 The second function is called The CPU writes the corre sponding values into pre register2 _8164_start_tr_move 0 20000 0 100 0 30000 0 0 0 0 2 4 Since Pre register1 is empty the data in pre register 2 is automatically moved to Pre Rregister1 and waits to be executed 5 You may can execute a 3rd function and it will be stored to Pre register2 6 When the first fu...

Page 102: ...2 Set bit 2 of INT factor to be True using _8164_set_int_factor 3 Set the conti_logic to be 1 by _8164_set_continuous_move 4 Call the first three motion functions 5 Wait for interrupt in ISR under DOS or Event under Windows of 2nd pre register empty 6 Call the fourth motion function 7 Wait for interrupt in ISR under DOS or Event under Windows of 2nd pre register empty 8 Repeat steps 6 and 7 until ...

Page 103: ...f the next must be the same There are several methods to achieve this The easiest way is to set the deceleration acceleration time to 0 3 The dimension of axes can not be changed during con tinuous motion For example _8164_set_continuous_move 0 1 _8164_set_continuous_move 1 1 _8164_set_inp 0 0 0 _8164_set_inp 1 0 0 1st motion _8164_start_tr_move_XY 0 1000 0 0 5000 0 2 0 0 2nd motion _8164_start_r_...

Page 104: ...ame as the max_vel of the 1st the 8164 will output a constant frequency at intersections between them 1 Continuous motion between different axes is meaning less Different axes have their own register and pre reg ister system 2 Continuous motion between different numbers of axes is not allowed For example _8164_start_tr_move can not be followed by _8164_start_ta_move_xy nor vice versa 3 It is possi...

Page 105: ...les of continuous motion The following are examples of continuous motion 1 Single axes continuous motion Changing velocity at preset points This example demonstrates how to use the continuous motion function to achieve velocity changing at pre set points The 1st motion ta moves the axis to point A with Tdec 0 and then the 2nd continues immediately The start velocity of 2 is the same with max veloc...

Page 106: ...ontinuous motion func tion to achieve 2 axis continuous interpolation In this application the velocity continuity is the key Refer to the previous example The functions related to continuous motion are listed below X _8164_set_continuous_move _8164_check_continuous_buffer Refer to section 6 17 ...

Page 107: ...counter counts the number of pulse inputs X Position error counter counts the error between command and feedback pulse numbers X General Purposed counter can be configured as pulse out put feedback pulse manual pulse or CLK 2 X Target position recorder records the target position Soft ware mainained Refer to section 4 4 for details on the position counters After home move is complete the first fou...

Page 108: ...96 Operation Theory home_mode 0 ORG Slow down Stop X When SD Ramp down signal is inactive X When SD Ramp down signal is active ...

Page 109: ...Operation Theory 97 ...

Page 110: ...98 Operation Theory ...

Page 111: ...Operation Theory 99 ...

Page 112: ...100 Operation Theory ...

Page 113: ...Operation Theory 101 ...

Page 114: ...102 Operation Theory Relative Functions X _8164_set_home_config _8164_home_move _8164_set_fa_speed _8164_escape_home Refer to section 6 9 ...

Page 115: ... is set without calling _8164_home_move but use _8164_home_search to perform this function The following illustration shows an example of home mode 2 The ORG offset must not be zero Suggested value is the double length of ORG area Related functions X _8164_set_home_config _8164_home_move _8164_home_search _8164_set_fa_speed _8164_escape_home Refer to section 6 9 ...

Page 116: ...tive pulses CW CCW or 90 degree phase difference signals AB phase from the pulser at the PA and PB pins To set the input signal modes of the pulser use the _8164_set_pulser_iptmode function The 90 degree phase difference in signals can be set by a multiplication of 1 2 or 4 If the AB phase input mode is selected PA and PB sig nals should have a 90 degree phase shift and the position counter increa...

Page 117: ...sArray DistArray StartV MaxV Tacc Tdec It will wait STA signal to start You can call _8164_stop_move_all 0 to cancel it 2 Simultaneously start stop by software function Example 3 axes move simultaneously I16 AxisArray 3 0 1 2 I16 DistArray 3 5000 6000 2000 I16 StartV 3 0 0 0 I16 MaxV 3 10000 20000 50000 I16 Tacc 3 0 02 0 02 0 02 I16 Tdec 3 0 03 0 03 0 03 _8164_set_tr_move_all 3 AxisArray DistArray...

Page 118: ... _8164_set_sync_option 2 0 0 2 0 _8164_set_sync_signal_source 2 1 _8164_set_sync_signal_mode 1 9 _8164_start_tr_move 1 1000 0 5000 0 01 0 01 _8164_start_tr_move 0 500 0 1000 0 01 0 01 Related functions X _8164_set_sync_signal_mod _8164_set_sync_signal_source _8164_set_sync_option _8164_set_tr_move_all _8164_start_move_all Refer to section 6 18 ...

Page 119: ...e train input has a deviation position error counter to detect the deviations between the input pulse command and feedback counter The driver controls the motion of the servomotor to minimize the deviation until it becomes 0 Theoretically the servomotor operates with some time delay from the command pulses Likewise when the pulse gener ator stops outputting pulses the servomotor does not stop imme...

Page 120: ...np The INP signal status can be monitored by software with the function _8164_get_io_status Related functions X _8164_set_inp Refer to section 6 12 X _8164_get_io_status Refer to section 6 13 X _8164_motion_done Refer to section 6 11 ...

Page 121: ...M signal is in the ON status at the start of an operation the card generates the INT signal and does not generate any command pulses The ALM signal may be a pulse signal with a minimum time width of 5 micro seconds Setting the parameters alm_logic and alm_mode of the _8164_set_alm function can alter the input logic of the ALM Whether or not the 8164 is generating pulses the ALM signal allows the g...

Page 122: ... Since the servomotor operates with some delay from the pulse generated from the 8164 it continues to move until the deviation counter of the driver is zero even if the 8164 has stopped output ting pulses because of the EL signal or the completion of home return The ERC signal allows immediate stopping of the servomo tor by resetting the deviation counter to zero The ERC signal is outputted as a o...

Page 123: ... Servo ON command and RDY to receive the Servo Ready signal There are no built in procedures for SVON and RDY The SVON signal is controlled by the software function _8164_Set_Servo RDY pins are dedicated for digital input usage The status of this signal can be monitored using the software function _8164_get_io_status Related functions X _8164_Set_Servo Refer to section 6 12 X _8164_get_io_status R...

Page 124: ...n Change Signal PCS To configure the input signal type use the function _8164_set_sd_pin When the SD PCS pin is directed to a SD the default setting the PCS signal is kept at a low level and vice versa Care must be taken with the logic attributes of the signal not being used The slow down signals are used to force the output pulse OUT and DIR to decelerate to and then maintain the StrVel when it i...

Page 125: ...urrent tr and sr motions Refer to the chart below The logic of PCS is configurable using _8164_set_pcs_logic Related functions X _8164_set_sd_pin _8164_set_pcs_logic Refer to sec tion 6 5 X _8164_set_sd Refer to section 6 12 X _8164_get_io_status Refer to section 6 13 ...

Page 126: ... pulse train will immediately stop when the PEL signal is asserted where the MEL signal is meaningless and vice versa When the PEL is asserted only a negative minus direction output pulse can be generated when moving the motor in a negative minus direction The EL signal can generate an IRQ if the interrupt service is enabled Refer to section 4 7 You can either use A or B type contact switches by s...

Page 127: ...ed using home_mode argument in the function _8164_set_home_config The logic polarity of the ORG sig nal level or latched input mode is also selectable using this func tion as well After setting the configuration for the home return mode with _8164_set_home_config the _8164_home_move com mand can perform the home return function Related functions _8164_set_home_config _8164_home_move Refer to secti...

Page 128: ...counter its input source is the output pulse from the 8164 thus it provides accurate information of the current position Note the command position is different from target position The command position increases or decreases according to the pulse output while the target position changes only when a new motion command has been executed The target position is recorded by the software and needs manu...

Page 129: ...plemented an encoder it is possible to set the feedback counter source to generate the out put pulses just as with the command counter Thus the feedback counter and the command counter will have the same value To enable the counters to count the number of pulses inputted set the Src parameter of the software function _8164_set_feedback_src to 1 Plus and Minus Pulses Input Mode CW CCW Mode The patt...

Page 130: ...onfig The EZ signals status of the four axes can be monitored by get_io_status The feedback position counter is automatically cleared to 0 after a home move is complete Besides setting a position with the func tion call _8164_set_position it can also be executed at any time to set a new position value To read the current command position use _8164_get_position Related functions X _8164_set_pls_ipt...

Page 131: ...motor when an encoder is applied Since the position error counter automatically calculates the differ ence between pulses outputted and pulses fed back it is inevita ble to get an error if the motion ratio is not equal to 1 To obtain a position error reading use the function call _8164_get_error_counter To reset the position error counter use the function call _8164_reset_error_counter The positio...

Page 132: ...rate timer 9 8 MHz The default setting of the general purpose counter is set to manual pulse Refer to section 4 1 9 for a detailed explanation of manual pulsing To change the source type use the function _8164_set_general_counter To obtain the counter status use the function _8164_get_general_counter Related function X _8164_set_general_counter _8164_get_general_counter Refer to section 6 15 The t...

Page 133: ...s of EA EB _8164_set_feedback _src Set the counters input source _8164_set_position Set a new value for feed back position _8164_get_position Read current feedback posi tion Position error Counts the error between command and feed back pulse EA EB and Pulse output _8164_get_error_cou nter Gets the posi tion error _8164_reset_error_c ounter Resets the position error counter General Purpose General ...

Page 134: ...y important to understand how the software handles the target position recorder Every time a new motion command is executed the displacement is automatically added to the target position recorder To ensure the correctness of the target position recorder users need to manually maintain it in the following two situations using the function _8164_reset_target_pos 1 After a home move completes 2 After...

Page 135: ...number is the first argument for most functions called in the library Hence it is important to identify the slot number before writing any applica tion programs For example if three PCI 8164 cards are plugged in to PCI slots then the corresponding axis number on each card are Example To accelerate Axis 3 of Card2 from 0 to 10000 pps in 0 5 sec for Constant Velocity Mode operation the axis number i...

Page 136: ...ingle axis motion Both velocity mode motion and position mode motion are acceptable The graph above shows the basic operating the ory The following functions are related to changing speed on the fly _8164_v_change change the MaxVel on the fly _8164_cmp_v_change change velocity when the general com parator comes into existence _8164_sd_stop slow down to stop _8164_emg_stop immediately stop _8164_fi...

Page 137: ...are relatively easy to understand and use So the discussion below will be focused on _8164_v_change Theory of _8164_v_change The _8164_v_change function is used to change MaxVel on the fly In a normal motion operation the axis starts at StrVel speed accelerates to MaxVel and then maintains MaxVel until it enters the deceleration region If MaxVel is change during this time it will force the axis to...

Page 138: ...ses and the maximum velocity is 1000 PPS At 5000 pulses _8164_v_change 0 NewVel Tacc is applied 1 To set the maximum velocity the function _8164_fix_speed_range must be used in order for the function _8164_v_change to work correctly If _8164_fix_speed_range is not applied MaxVel set by _8164_v_move or _8164_start_ta_move automatically becomes the maximum velocity where _8164_v_change can not be ex...

Page 139: ...te move for 200000 pulses Initial maximum speed is 10000 pps Change to 25000 pps if Sensor 1 is touched Change to 50000 pps if Sen sor 2 is touched Change to 100000 pps if Sensor 3 is touched Then the code for this application and the resulting velocity pro files are shown below include pci_8164 h _8164_fix_speed_range axis 100000 0 _8164_start_ta_move axis 200000 0 1000 10000 0 02 0 01 while _816...

Page 140: ...lse if Sensor1 Low Sensor2 Low Sensor3 High _8164_v_change axis 100000 0 02 The information of the three sensors is acquired from another I O card and the resulting velocity profile from experiment is shown below Related functions X _8164_v_change _8164_sd_stop _8164_emg_stop X _8164_fix_speed_range _8164_unfix_speed_range X _8164_get_currebt_speed Refer to section 6 5 ...

Page 141: ...start_ta_move and _8164_start_sa_move functions This function changes the target position defined originally by these two functions After changing position the axis will move to the new target position and totally disregard the original position If the new position is in the passed path it will cause the axis to decelerate and eventually stop then reverse as shown in the chart The acceleration and...

Page 142: ...enough distance between the new target position and current position where _8164_p_change is executed because the 8164 needs enough space to finish deceleration For example A trapezoidal absolute motion is applied _8164_start_ta_move 0 10000 0 1000 0 5 1 It cause axis 0 to move to pulse 10000 position with a maximum velocity of 1000 PPS The necessary number of pulses to deceler ate is 0 5 1000 1 5...

Page 143: ... Related function X _8164_p_change refer to section 6 6 NewPos CurrentPos OK Error Note 5000 4000 OK 5000 4501 Error 5000 5000 Error 5000 5499 Error 5000 6000 OK Go back 5000 9499 OK Go back 5000 9500 Error 5000 9999 Error ...

Page 144: ...s 2 and LTC4 axis 3 are used to receive latch pulses 4 7 1 Comparators of the 8164 There are 5 comparators for each axis of the card Each compara tor has its unique functionality Below is a table for comparison Note Only comparator 5 has the ability to trigger an output pulse via the CMP pin Comparators 1 and 2 are used for soft limits Refer to section 4 9 Comparator 3 is used to compare with the ...

Page 145: ...r which will gener ate an interrupt default reaction if the comparing condition comes into existence The comparing source counter can be any counter The compared value source counter comparing method and reaction are set by the function _8164_set_general_comparator ...

Page 146: ...red In continuous comparison this data will be ignored automatically since the compare data is built by other functions Continuously comparison with trigger output To compare multiple data continuously functions for building com parison tables are provided and are shown below 1 _8164_build_comp_function AxisNo Start End Inter val 2 _8164_build_comp_table AxisNo tableArray Size 3 _8164_set_auto_com...

Page 147: ...ering points per stroke trigger speed is 6000 pts sec Program settings X Table starts moving from 0 to 36000 X Compare points are on 1001 35000 total 34000 pts points to points interval 1 pulse X Moving Speed is 6000 pps X Compare condition is Program code _8164_set_trigger_comparator 0 1 1 1001 _8164_build_compare_function 0 1001 35000 1 1 _8164_set_auto_compare 0 1 _8164_start_tr_move 0 36000 0 ...

Page 148: ...136 Operation Theory Users can use this function to check if auto trigger is running Results ...

Page 149: ...point into the comparison table array at the final position This value must be far enough from the table s stroke If using _build_compare_function a dummy after final point is automatically loaded This value is equal to End point Interval x Total counts x moving ratio Related functions X _8164_set_trigger_comparator _8164_build_comp_function X _8164_build_comp_table _8164_set_auto_compare X _8164_...

Page 150: ...4 The latency between the occurring latch sig nal and the finish position of the captured data is extremely short as the latching procedure is done by hardware Only axes 2 and 3 can perform a position latch function LTC3 axis 2 and LTC4 axis 3 are used to receive latch pulses To set the latch logic use _8164_set_ltc_logic To obtain the latch values of the counters use _8164_get_latch_data AxisNo C...

Page 151: ...backlash_comp sets the pulse number In order to minimize vibration when a motor stops the card can output a single pulse for a negative direction and then single pulse for a positive direction right after completion of a command move ment Refer to the timing chart below the _8164_suppress_vibration function is used to set T1 and T2 Related function X _8164_backlash_comp _8164_suppress_vibration Re...

Page 152: ...r reaches the set limit value the card reacts by generating the stop immediately or decelerates to stop pulse output X To set the soft limit _8164_set_softlimit X To enable soft limit _8164_enable_softlimit X To disable soft limit _8164_diable_softlimit Note The soft limit is only applied to the command position and not the feedback position Refer to 4 4 In cases where the mov ing ratio is not equ...

Page 153: ...an be masked by _8164_set_int_factor The error_int_status is for abnor mal stoppage of the 8164 i e EL ALM etc This INT cannot be masked The following are the definitions of the two int_status error_int_status can be masked by function call _8164_int_factor Bit Description 0 Soft Limit on and stop 1 Soft Limit on and stop 2 Reserved 3 General Comparator on and stop 4 Reserved 5 End Limit on and st...

Page 154: ...tart 5 Acceleration End 6 Deceleration Start 7 Deceleration End 8 Position Soft Limit On 9 Negative Soft Limit On 10 Error Comparator Compared 11 General Comparator compared 12 Trigger Comparator compared 13 Reserved 14 Counter Latched for axis2 3 15 ORG Input and Latched 16 SD on 17 Reserved 18 Reserved 19 CSTA Sync Start on 20 30 Reserved 31 Axis Stop Interrupt controlled by continuous motion co...

Page 155: ...t events Each event is linked to an axis HANDLE hEvent 4 2 Enable interrupt event service and setup interrupt factors and enable interrupt channel _8164_int_enable 0 hEvent _8164_set_int_factor 0 0x01 Normal Stop interrupt _8164_int_control 0 1 3 Start move command _8164_start_tr_move 0 12000 0 10000 0 1 0 1 4 Wait for axis 0 interrupt event STS WaitForSingleObject hEvent 0 15000 ResetEvent hEvent...

Page 156: ...brary pro vided have the names of the ISR fixed for example _8164_isr0 void _8164_isr1 void etc A sample program is described below It assumes that two cards are present in the system axes 1 and 5 are requested to work with the ISR header file declare include pci_8164 h void main void I16 TotalCard i Initialize cards _8164_initial TotalCard if TotalCard 0 exit 1 _8164_set_int_factor 0 0x1 Set int ...

Page 157: ...ror_int i int_status1 i Insert User s Code in Error INT if int_type 0x2 _8164_get_event_int i int_status2 i Insert User s Code in Event INT end of for every axis on card0 for i 0 i 4 i _8164_leave_isr i else _8164_not_my_irq 0 Send EOI _OUTPORTB 0x20 0x20 _OUTPORTB 0xA0 0x20 enable allow int service void interrupt _8164_isr1 void void interrupt _8164_isr2 void void interrupt _8164_isr3 void void i...

Page 158: ...id void interrupt _8164_isra void void interrupt _8164_isrb void Related functions X _8164_int_control _8164_set_int_factor _8164_int_enable _8164_int_disable _8164_get_int_status _8164_link_interrupt X _8164_get_int_type _8164_enter_isr _8164_leave_isr X _8164_get_event_int _8164_get_error_int _8164_get_irq_status X _8164_not_my_irq _8164_isr0 9 a b Refer to section 6 14 ...

Page 159: ...I cards card A and card B in one system Card A will send a trigger signal through PXI_TRG to card B and card B is waiting for this signal to do some action There is another dedicated channel for trigger input and output They are called PXI_STAR input and STAR_TRG output They can not be programmed as input or ouput individually They can only be enabled or disabled This section describes the PXI_TRG...

Page 160: ... and AP6 to PXI trigger bus they can set it to one of the PXI_TRG 7 0 by setting them as out put There is no dedicated channel for these two signals Any sources active will force all of the PXI_TRG output You may also enable STAR_TRG triggering If you want to control the PXI trigger bus output by software use the software trigger mode for these channels All of the PXI_TRIG 7 0 could be used for th...

Page 161: ...trol system and manually testing the cards to verify correct operation The Motion Creator software provides a simple yet powerful means to setup configure test and debug a motion control sys tem that uses the PCI MPC PXI 8164 cards Note Motion Creator is only available for Windows 95 98 or Win dows NT 2000 XP operating system and a monitor with a screen resolution of 800x600 or higher Motion Creat...

Page 162: ...alling the software drivers for the card in Windows 95 98 NT 2000 XP the motion creator program is located at chosen path PCI Motion MotionCreator To launch the program double click on the executable file or click Start Program Files PCI Motion MotionCreator ...

Page 163: ...s Saved configurations are auto matically loaded the next time Motion Creator is launched The 8164 ini and 8164MC ini files in Win dows root directory saves all settings and configura tions 3 To duplicate configurations from one system to another copy 8164 ini and 8164MC ini into the Windows root directory 4 When multiple cards use the same saved Motion Creator configuration files the DLL function...

Page 164: ... Main Menu The main menu appears after launching the Motion Creator Refer to the illustration on the next page for the description of the main menu functions 5 3 2 Interface I O Configuration Menu This menu configures EL ORG EZ ERC ALM INP SD and LTC ...

Page 165: ... Active timing Selects the Logic and Active timing of the ERC signal The related function call is _8164_set_erc 4 EL Response mode Selects the response mode of the EL signal The related function call is _8164_set_el 5 ORG Logic Selects the logic of the ORG signal The related function call is _8164_set_home_config 6 EZ Logic Selects the logic of the EZ signal The related function call is _8164_set_...

Page 166: ..._set_ltc_logic 9 Buttons Z Next Axis Changes the operating axis Z Save Config Saves current configuration to 8164 ini Z Operate Go to the operation menu Refer to section 5 3 4 Z Config Pulse INT Go to the Pulse I O and Interrupt Configuration menu Refer to section 5 3 3 Z Back Returns to the main menu ...

Page 167: ...ns of the Pulse input signal EA EB The related function calls are _8164_set_pls_iptmode _8164_set_feedback_src 3 INT Factor Selects factors to initiate the event int The related function call is _8164_set_int_factor 4 Buttons Z Next Axis Changes the operating axis Z Save Config Saves the current configuration to 8164 ini Z Operate Go to the operation menu Refer to section 5 3 Z Config Pulse INT Go...

Page 168: ...ommand counter The related function is _8164_get_command Z Feedback displays the value of the feedback position counter The related function is _8164_get_position Z Pos Error displays the value of the position error counter The related function is _8164_get_error_counter Z Target Pos displays the value of the target position recorder The related function is _8164_get_target_pos 2 Position Reset Se...

Page 169: ...d function is _8164_get_int_status Z Error displays the error_int_status in hexadecimal The related function is _8164_get_int_status Z Count total count of interrupt Z Clear Button clears all INT status and counter to 0 5 Velocity The absolute value of velocity in units of PPS The related function is _8164_get_current_speed 6 Show Velocity Curve Button Opens up a window showing a velocity vs time ...

Page 170: ... Pulser Move Manual Pulse motion Clicking this button invokes the manual pulse configuration win dow Z Home Mode Home return motion Clicking this button invokes the home move configuration window The related function is _8164_set_home_config If the ATU check box is checked it will execute auto homing when motion starts Z ERC Output Select to send the ERC signal when home move is completed Z EZ Cou...

Page 171: ...sition1 position2 This is only available when Rela tive Mode or Absolute Mode is selected 11 Vel Profile Selects the velocity profile Both Trapezoi dal and S Curve are available for Absolute Mode Rela tive Mode and Cont Move 12 Motion Parameters Sets the parameters for single axis motion This parameter is meaningless if Manual Pulser Move is selected since the velocity and moving distance is decid...

Page 172: ...ve range during deceleration in unit sof PPS Z Move Delay This setting is available only when repeat mode is On It causes the card to delay for a specified time before it continues to the next motion 13 Speed Range Sets the max speed of motion When you select Not Fix the Maximum Speed automatically becomes the maximum speed range which can not be exceeded by on the fly velocity change 14 Servo On ...

Page 173: ...e speed limit is the value set by Maxi mum Velocity 16 Change Position On The Fly Button When enabled you can change the target position of the current motion The new position must be defined in Position2 The related function is _8164_p_change 17 Change Velocity On The Fly Button When enabled you can change the velocity of the current motion The new velocity must be defined in Maximum Velocity The...

Page 174: ... Save Config Saves the current configuration to 8164 ini Z Config Pulse INT Go to the Pulse IO and Interrupt Configuration menu Refer to section 5 3 3 Z Config Interface I O Go to the Interface I O Configura tion menu Refer to section 5 3 2 Z Back Return to the main menu ...

Page 175: ...ialization _8164_initialx Card initialization with I O base address and IRQ Channel _8164_close Card Close _8164_get_base_addr Get base address of 8164 _8164_get_irq_channel Get the 8164 card s IRQ number _8164_delay_time Delay execution of program for specified time in units of ms _8164_config_from_file Configure 8164 cards according to configuration file i e 8164 ini which is created by Motion C...

Page 176: ...ion time under max speed Function Name Description _8164_start_tr_move Begin a relative trapezoidal profile move _8164_start_ta_move Begin an absolute trapezoidal profile move _8164_start_sr_move Begin a relative S curve profile move _8164_start_sa_move Begin an absolute S curve profile move _8164_set_move_ratio Set the ratio of command pulse and feedback pulse _8164_p_change Change position on th...

Page 177: ...e profile _8164_start_sa_move_zu Begin an absolute 2 axis linear interpolation for Z U with S curve profile _8164_start_tr_line2 Begin a relative 2 axis linear interpolation for any 2 axes with trapezoidal profile _8164_start_sr_line2 Begin a relative 2 axis linear interpolation for any 2 axes with S curve profile _8164_start_ta_line2 Begin an absolute 2 axis linear interpolation for any 2 axes wi...

Page 178: ...ion with S curve profile _8164_start_ta_line4 Begin an absolute 4 axis linear interpolation with trapezoidal profile _8164_start_sa_line4 Begin an absolute 4 axis linear interpolation with S curve profile _8164_set_axis_option Choose interpolation speed mode Function Name Description ...

Page 179: ...axis sync _8164_start_tr_arc_xy Begin a t curve relative circular interpolation for X Y _8164_start_ta_arc_xy Begin a t curve absolute circular interpolation for X Y _8164_start_sr_arc_xy Begin a s curve relative circular interpolation for X Y _8164_start_sa_arc_xy Begin a s curve absolute circular interpolation for X Y _8164_start_tr_arc_zu Begin a t curve relative circular interpolation for Z U ...

Page 180: ... v move _8164_pulser_pmove Start pulser p move _8164_pulser_home_move Start pulser home move _8164_set_pulser_ratio Set manual pulser ratio for actual output pulse rate _8164_pulser_r_line2 pulser mode for 2 axis linear interpolation _8164_pulser_r_arc2 pulser mode for 2 axis arc interpolation Function Name Description _8164_motion_done Return the motion status Function Name Description _8164_set_...

Page 181: ...nterrupt Set link to interrupt call back function For Windows only _8164_set_int_factor Set INT factor _8164_get_int_type Get INT type For DOS only _8164_enter_isr Enter interrupt service routine For DOS only _8164_leave_isr Leave interrupt service routine For DOS only _8164_get_event_int Get event status For DOS only _8164_get_error_int Get error status For DOS only _8164_get_irq_status Get IRQ s...

Page 182: ...ommand position counter _8164_get_error_counter Get the value of the position error counter _8164_reset_error_counter Reset the position error counter _8164_get_general_counter Get the value of the general counter _8164_set_general_counter Set the general counter _8164_get_target_pos Get the value of the target position recorder _8164_reset_target_pos Reset target position recorder _8164_get_rest_...

Page 183: ...64_check_compare_data Check current comparator data _8164_check_compare_status Check current comparator status _8164_set_auto_compare Set comparing data source for auto loading _8164_build_compare_function Build compare data via constant interval _8164_build_compare_table Build compare data via compare table _8164_cmp_v_change Speed change by comparator _8164_force_cmp_output Force to output trigg...

Page 184: ...ultaneous operation setup _8164_start_move_all Begin a multi axis trapezoidal profile motion _8164_stop_move_all Simultaneously stop multi axis motion _8164_set_sync_option Optional sync options _8164_set_sync_stop_mode Set the stop mode when CSTOP signal is ON _8164_set_sync_signal_source Select internal sync signal s source of axis _8164_set_sync_signal_mode Select internal sync signal s conditi...

Page 185: ... Description _8164_enable_card_id Enable card ID s function _8164_check_card Check if this Card ID exist Function Name Description _8164_get_pxi_trigger_value Digital Output _8164_set_pxi_trigger_value Digital Input _8164_enable_pxi_input Enable PXI input channel _8164_select_pxi_output Select PXI output channel ...

Page 186: ...rogramming environment _ hardware_model _ action_name e g _8164_Initial In order to recognize the difference between a C library and a VB library a capital B is placed at the beginning of each function name e g B_8164_Initial Type Name Description Range U8 8 bit ASCII character 0 to 255 I16 16 bit signed integer 32768 to 32767 U16 16 bit unsigned integer 0 to 65535 I32 32 bit signed long integer 2...

Page 187: ... Check hardware and software version information Description _8164_Initial Initializes the card without assigning the hardware resources All 8164 cards must be initialized by this function before calling other functions The card uses this function in all platforms because it is Plug and Play compatible The MPC 8164 uses this function in Windows 98 NT 2000 XP _8164_initialx Initializes the cards wi...

Page 188: ...onfiguration is automatically loaded When this function is executed all cards in the system will be con figured as the following functions were called according to param eters recorded in 8164 ini _8164_set_pls_outmode _8164_set_feedback_src _8164_set_pls_iptmode _8164_set_home_config _8164_set_int_factor _8164_set_el _8164_set_ltc_logic _8164_set_erc _8164_set_sd _8164_set_alm _8164_set_inp _8164...

Page 189: ...ByVal CardNo As Integer base_addr As Integer As Integer B_8164_delay_time ByVal AxisNo As Integer ByVal MiniSec As Long As Integer B_8164_config_from_file ByVal filename As string as integer B_8164_version_info ByVal CardNo As Integer HardwareInfo As Integer SoftwareInfo As Integer DriverInfo As Integer As Integer Argument existCards Number of installed 8164 cards cardNo Card index number AxNo Spe...

Page 190: ...178 Function Library Return Code ERR_NoError ERR_NoCardFound ERR_PCIBiosNotExist ERR_ConigFileOpenError ...

Page 191: ...nal feedback pulses There are four types for feedback pulse input This functionis only avail able when the Src parameter in _8164_set_feedback_src function is enabled _8164_set_feedback_src If external encoder feedback is available in the system enable the Src parameter in this function The internal 28 bit up down counter counts according to the configuration of the _8164_set_pls_iptmode function ...

Page 192: ... to configure pulse Input Output pls_outmode Setting of command pulse output mode pls_iptmode setting of encoder feedback pulse input mode pls_logic Logic of encoder feedback pulse X pls_logic 0 Not inverse direction X pls_logic 1 Inverse direction Value Meaning Notes 0 OUT DIR OUT Falling edge DIR is high level 1 OUT DIR OUT Rising edge DIR is high level 2 OUT DIR OUT Falling edge DIR is low leve...

Page 193: ...Function Library 181 Src Counter source Return Code ERR_NoError Value Meaning 0 External Feedback 1 Command pulse ...

Page 194: ...move Accelerates an axis to the specified constant velocity with a trape zoidal profile The axis continues to travel at a constant velocity until the velocity is changed or the axis is commanded to stop The direction is determined by the sign of the velocity parameter _8164_sv_move Accelerates an axis to the specified constant velocity with a S curve profile The axis continues to travel at a const...

Page 195: ...ve both trapezoidal and S curve motion manual move or home return function is performed _8164_fix_speed_range Defines the speed range It should be called before starting motion that may contains velocity changing _8164_unfix_speed_range Releases the speed range constrains _8164_get_current_speed Reads the current pulse output rate of a specified axis It is appli cable in any time in any operating ...

Page 196: ...ble ByVal Tacc As Double ByVal SVacc As Double As Integer B_8164_v_change ByVal AxisNo As Integer ByVal NewVel As Double ByVal TimeSecond As Double As Integer B_8164_sd_stop ByVal AxisNo As Integer ByVal Tdec As Double As Integer B_8164_emg_stop ByVal AxisNo As Integer As Integer B_8164_fix_speed_range ByVal AxisNo As Integer ByVal MaxVel As Double As Integer B_8164_unfix_speed_range ByVal AxisNo ...

Page 197: ...eleration time in units of second SVacc Specified velocity interval in which S curve acceleration is performed Note SVacc 0 for pure S Curve NewVel New velocity in units of pulse per second Tdec specified deceleration time in units of second Speed Variable to save current speed speed range 0 6553500 Return Code ERR_NoError ERR_SpeedError ERR_SpeedChangeError ERR_SlowDownPointError ERR_AxisAlreadyS...

Page 198: ...le move _8164_set_move_ratio Set the ratio of command pulse and feedback pulse _8164_p_change Change position on the fly _8164_set_pcs_logic Set the logic of PCS Position Change Signal pin _8164_set_sd_pin Set SD PCS pin _8164_backlash_comp Set backlash compensating pulse for compensation _8164_suppress_vibration Set vibration suppressing tim ing _8164_set_idle_pulse Set suppress vibration idle pu...

Page 199: ...d decelerates to stop at the specified absolute position with trapezoidal profile The acceleration and deceleration time is specified independently This command does not let the program wait for motion completion but immediately returns control to the program _8164_start_sr_move This function accelerates the axis from a starting velocity slew at constant velocity and decelerates to stop at the rel...

Page 200: ...ignal Only when the SD PCS pin is set to PCS by _8164_set_sd_pin that this _8164_set_pcs_logic function becomes available _8164_set_sd_pin Sets the operating mode of the SD pin The SD pin may be used as a Slow Down signal input or as a Position Change Signal PCS input Refer to section 4 3 1 _8164_backlash_comp Whenever direction change occurs the 8164 outputs backlash corrective pulses before send...

Page 201: ...4 MaxVel F64 Tacc F64 Tdec I16 _8164_start_ta_move I16 AxisNo F64 Pos F64 StrVel F64 MaxVel F64 Tacc F64 Tdec I16 _8164_start_sr_move I16 AxisNo F64 Dist F64 StrVel F64 MaxVel F64 Tacc F64 Tdec F64 SVacc F64 SVdec I16 _8164_start_sa_move I16 AxisNo F64 Pos F64 StrVel F64 MaxVel F64 Tacc F64 Tdec F64 SVacc F64 SVdec I16 _8164_set_move_ratio I16 AxisNo F64 move_ratio I16 _8164_p_change I16 AxisNo F6...

Page 202: ...s Double ByVal MaxVel As Double ByVal Tacc As Double ByVal Tdec As Double ByVal SVacc As Double ByVal SVdec As Double As Integer B_8164_set_move_ratio ByVal AxisNo As Integer ByVal move_ratio As Double As Integer B_8164_p_change ByVal AxisNo As Integer ByVal NewPos As Double As Integer B_8164_set_pcs_logic ByVal AxisNo As Integer ByVal pcs_logic As Integer As Integer B_8164_set_sd_pin ByVal AxisNo...

Page 203: ...urve acceleration is performed X Note SVacc 0 for pure S Curve SVdec specified velocity interval in which S curve deceleration is performed X Note SVdec 0 for pure S Curve Move_ratio ratio of feedback resolution command resolu tion should not be 0 NewPos specified new absolute position to move pcs_logic Specify he pcs logic X Value 0 low active X Value 1 high active Type define the SD pin usage X ...

Page 204: ...2 Function Library Idl_pulse Idl_pulse 0 7 miniSecond time of dwell move the unit is in ms FA_Speed the speed of FA Return Code ERR_NoError ERR_SpeedError ERR_PChangeSlowDownPointError ERR_MoveRatioError ...

Page 205: ...move_zu Begin a relative 2 axis linear interpolation for Z U with S curve profile _8164_start_sa_move_zu Begin an absolute 2 axis linear interpolation for Z U with S curve profile _8164_start_tr_line2 Begin a relative 2 axis linear interpo lation for any 2 axes with trapezoidal profile _8164_start_sr_line2 Begin a relative 2 axis linear interpo lation for any 2 axes with S curve profile _8164_star...

Page 206: ...164_start_tr_move_xy 2 T R Axes 0 1 _8164_start_ta_move_xy 2 T A Axes 0 1 _8164_start_sr_move_xy 2 S R Axes 0 1 _8164_start_sa_move_xy 2 S A Axes 0 1 _8164_start_tr_move_zu 2 T R Axes 2 3 _8164_start_ta_move_zu 2 T A Axes 2 3 _8164_start_sr_move_zu 2 S R Axes 2 3 _8164_start_sa_move_zu 2 S A Axes 2 3 _8164_start_tr_move_line2 2 T R Any 2 of 4 _8164_start_ta_move_ line2 2 T A Any 2 of 4 _8164_start...

Page 207: ...tart_ta_move_zu I16 CardNo F64 PosX F64 PosY F64 StrVel F64 MaxVel F64 Tacc F64 Tdec I16 _8164_start_sr_move_zu I16 CardNo F64 DistX F64 DistY F64 StrVel F64 MaxVel F64 Tacc F64 Tdec F64 SVacc F64 SVdec I16 _8164_start_sa_move_zu I16 CardNo F64 PosX F64 PosY F64 StrVel F64 MaxVel F64 Tacc F64 Tdec F64 SVacc F64 SVdec I16 _8164_start_tr_line2 I16 CardNo I16 AxisArray F64 DistX F64 DistY F64 StrVel ...

Page 208: ...Tdec I16 _8164_start_ta_line4 I16 CardNo F64 PosX F64 PosY F64 PosZ F64 PosU F64 StrVel F64 MaxVel F64 Tacc F64 Tdec I16 _8164_start_sr_line4 I16 CardNo F64 DistX F64 DistY F64 DistZ F64 DistU F64 StrVel F64 MaxVel F64 Tacc F64 Tdec F64 SVacc F64 SVdec I16 _8164_start_sa_line4 I16 CardNo F64 PosX F64 PosY F64 PosZ F64 PosU F64 StrVel F64 MaxVel F64 Tacc F64 Tdec F64 SVacc F64 SVdec I16 FNTYPE _816...

Page 209: ...os As Double ByVal Pos As Double ByVal StrVel As Double ByVal MaxVel As Double ByVal Tacc As Double ByVal Tdec As Double As Integer B_8164_start_sr_move_zu ByVal CardNo As Integer ByVal Dist As Double ByVal Dist As Double ByVal StrVel As Double ByVal MaxVel As Double ByVal Tacc As Double ByVal Tdec As Double ByVal SVacc As Double ByVal SVdec As Double As Integer B_8164_start_sa_move_zu ByVal CardN...

Page 210: ... MaxVel As Double ByVal Tacc As Double ByVal Tdec As Double As Integer B_8164_start_ta_line3 ByVal CardNo As Integer AxisArray As Integer ByVal PosX As Double ByVal PosY As Double ByVal PosZ As Double ByVal StrVel As Double ByVal MaxVel As Double ByVal Tacc As Double ByVal Tdec As Double As Integer B_8164_start_sr_line3 ByVal CardNo As Integer AxisArray As Integer ByVal DistX As Double ByVal DistY...

Page 211: ...Integer ByVal PosX As Double ByVal PosY As Double ByVal PosZ As Double ByVal PosU As Double ByVal StrVel As Double ByVal MaxVel As Double ByVal Tacc As Double ByVal Tdec As Double ByVal SVacc As Double ByVal SVdec As Double As Integer B_8164_set_axis_option ByVal AxisNo As Integer ByVal option1 As Integer As Integer Argument CardNo Designated card number to perform linear interpolation DistX speci...

Page 212: ...n is performed X Note SVacc 0 for pure S Curve SVdec specified velocity interval in which S curve deceleration is performed X Note SVdec 0 for pure S Curve AxisArray Array of axis number to perform interpolation X Example Int AxisArray 2 0 2 axis 0 2 Int AxisArray 3 0 1 3 axis 0 1 3 Note AxisArray n must be smaller than AxisArray m if n m Option1 X 0 default line move mode X 1 Composite speed cons...

Page 213: ...terpolation for any 2 axes _8164_start_tr_arc_xyu Begin a T curve relative circular interpolation _8164_start_ta_arc_xyu Begin a T curve absolute circular interpolation _8164_start_sr_arc_xyu Begin a S curve relative circular interpolation _8164_start_sa_arc_xyu Begin a S curve absolute circular interpolation _8164_start_tr_arc_yzu Begin a T curve relative circular interpolation _8164_start_ta_arc...

Page 214: ...ion _8164_start_ta_arc_xy Begin a T curve absolute circular interpolation _8164_start_tr_arc_zu Begin a T curve relative circular interpolation _8164_start_ta_arc_zu Begin a T curve absolute circular interpolation _8164_start_sr_arc_xy Begin a S curve relative circular interpolation _8164_start_sa_arc_xy Begin a S curve absolute circular interpolation _8164_start_sr_arc_zu Begin a S curve relative...

Page 215: ... 0 or 1 _8164_start_a_arc_zu A Flat Axes 2 3 0 or 1 _8164_start_r_arc2 R Flat Any 2 of 4 0 or 1 _8164_start_a_arc2 A Flat Any 2 of 4 0 or 1 _8164_start_tr_arc_xyu R T curve Axes 0 1 0 or 1 _8164_start_ta_arc_xyu A T Curve Axes 0 1 0 or 1 _8164_start_sr_arc_xyu R S Curve Axes 1 2 0 or 1 _8164_start_sa_arc_xyu A S Curve Axes 1 2 0 or 1 _8164_start_tr_arc_xy R T curve Axes 0 1 1 _8164_start_ta_arc_xy...

Page 216: ...rdNo F64 Cx F64 Cy F64 Ex F64 Ey I16 DIR F64 StrVel F64 MaxVel F64 Tacc F64 SVacc I16 _8164_start_tr_arc_yzu I16 CardNo F64 OffsetCx F64 OffsetCy F64 OffsetEx F64 OffsetEy I16 DIR F64 StrVel F64 MaxVel F64 Tacc I16 _8164_start_ta_arc_yzu I16 CardNo F64 Cx F64 Cy F64 Ex F64 Ey I16 DIR F64 StrVel F64 MaxVel F64 Tacc I16 _8164_start_sr_arc_yzu I16 CardNo F64 OffsetCx F64 OffsetCy F64 OffsetEx F64 Off...

Page 217: ...c_zu I16 CardNo F64 OffsetCx F64 OffsetCy F64 OffsetEx F64 OffsetEy I16 DIR F64 StrVel F64 MaxVel F64 Tacc F64 Tdec I16 _8164_start_ta_arc_zu I16 CardNo F64 Cx F64 Cy F64 Ex F64 Ey I16 DIR F64 StrVel F64 MaxVel F64 Tacc F64 Tdec I16 _8164_start_sr_arc_xy I16 CardNo F64 OffsetCx F64 OffsetCy F64 OffsetEx F64 OffsetEy I16 DIR F64 StrVel F64 MaxVel F64 Tacc F64 Tdec F64 SVacc F64 SVdec I16 _8164_star...

Page 218: ...tEx As Double ByVal OffsetEy As Double ByVal DIR As Integer ByVal MaxVel As Double As Integer B_8164_start_a_arc2 ByVal CardNo As Integer AxisArray As Integer ByVal Cx As Double ByVal Cy As Double ByVal Ex As Double ByVal Ey As Double ByVal DIR As Integer ByVal MaxVel As Double As Integer B_8164_start_r_arc2 ByVal CardNo As Integer AxisArray As Integer ByVal OffsetCx As Double ByVal OffsetCy As Do...

Page 219: ...ByVal MaxVel As Double ByVal Tacc As Double As Integer B_8164_start_ta_arc_yzu ByVal CardNo As Integer ByVal Cx As Double ByVal Cy As Double ByVal Ex As Double ByVal Ey As Double ByVal DIR As Integer ByVal StrVel As Double ByVal MaxVel As Double ByVal Tacc As Double As Integer B_8164_start_sr_arc_yzu ByVal CardNo As Integer ByVal OffsetCx As Double ByVal OffsetCy As Double ByVal OffsetEx As Double...

Page 220: ...yVal CardNo As Integer AxisArray As Double ByVal Cx As Double ByVal Cy As Double ByVal Ex As Double ByVal Ey As Double ByVal DIR As Integer ByVal StrVel As Double ByVal MaxVel As Double ByVal Tacc As Double ByVal Tdec As Double ByVal SVacc As Double ByVal SVdec As Double As Integer B_8164_start_tr_arc_xy ByVal CardNo As Integer ByVal OffsetCx As Double ByVal OffsetCy As Double ByVal OffsetEx As Do...

Page 221: ...uble As Integer B_8164_start_sa_arc_xy ByVal CardNo As Integer ByVal Cx As Double ByVal Cy As Double ByVal Ex As Double ByVal Ey As Double ByVal DIR As Integer ByVal StrVel As Double ByVal MaxVel As Double ByVal Tacc As Double ByVal Tdec As Double ByVal SVacc As Double ByVal SVdec As Double As Integer B_8164_start_sr_arc_zu ByVal CardNo As Integer ByVal OffsetCx As Double ByVal OffsetCy As Double ...

Page 222: ...elocity of a velocity profile in unit of pulse per second MaxVel Starting velocity of a velocity profile in unit of pulse per second Tacc Specified acceleration time in unit of second Tdec Specified deceleration time in unit of second SVacc Specified velocity interval in which S curve acceleration is performed X Note SVacc 0 for pure S Curve SVdec Specified velocity interval in which S curve decel...

Page 223: ...g to the _8164_set_home_config function settings The direction of movement is determined by the sign of velocity parameter svel mvel Since the stopping condition of this function is determined by the home_mode setting you must take caution in selecting the initial moving direction You must also take caution when handling conditions when the limit switch is touched or other conditions that are poss...

Page 224: ...dows 95 NT 2K XP B_8164_set_home_config ByVal AxisNo As Integer ByVal home_mode As Integer ByVal org_logic As Integer ByVal ez_logic As Integer ByVal ez_count As Integer ByVal erc_out As Integer As Integer B_8164_home_move ByVal AxisNo As Integer ByVal StrVel As Double ByVal MaxVel As Double ByVal Tacc As Double As Integer B_8164_escape_home ByVal AxisNo As Integer ByVal SrVel As Double ByVal MaxV...

Page 225: ...iguration for E X EZ_logic 0 active low X EZ_logic 1 active high ez_count 0 15 Refer to section 4 1 8 erc_out Set ERC output options X erc_out 0 no erc out X erc_out 1 erc out when home finishing StrVel starting velocity of a velocity profile in units of pulse per second MaxVel starting velocity of a velocity profile in units of pulse per second Tacc specified acceleration time in units of seconds...

Page 226: ...manual pulser _8164_pulser_vmove With this command the axis begins to move according to the man ual pulse input The axis outputs one pulse when it receives one manual pulse until the sd_stop or emg_stop command is writ ten _8164_pulser_pmove With this command the axis begins to move according to the man ual pulse input The axis outputs one pulse when it receives one manual pulse until the sd_stop ...

Page 227: ...ode for 2 axis arc interpolation relative mode only Syntax C C DOS Windows 95 NT 2K XP I16 _8164_set_pulser_iptmode I16 AxisNo I16 InputMode I16 Inverse I16 _8164_pulser_vmove I16 AxisNo F64 SpeedLimit I16 _8164_pulser_pmove I16 AxisNo F64 Dist F64 SpeedLimit I16 _8164_pulser_home_move I16 AxisNo I16 HomeType F64 SpeedLimit I16 _8164_set_pulser_ratio I16 AxisNo I16 PDV I16 PMG I16 _8164_pulser_r_l...

Page 228: ...No As Integer AxisArray As Integer ByVal DistX As Double ByVal DistY As Double ByVal SpeedLimit As Double As Integer B_8164_pulser_r_arc2 ByVal CardNo As Integer AxisArray As Integer ByVal OffsetCx As Double ByVal OffsetCy As Double ByVal OffsetEx As Double ByVal OffsetEy As Double ByVal DIR As Integer ByVal MaxVel As Double As Integer Argument AxisNo Designated axis number to start manual move In...

Page 229: ...DV 0 2047 Divide Factor X PMG 0 31 Multi Factor Output Pulse Count Input Pulse Count PMG 1 PDV 1 2048 DistX specified relative distance of axis 0 to move DistY specified relative distance of axis 1 to move OffsetCx X axis offset from center OffsetCy Y axis offset from center OffsetEx X axis offset from end of arc OffsetEy Y axis offset from end of arc DIR Specified direction of arc CW 0 CCW 1 Spee...

Page 230: ... the 8164 If the card is in stopped condition check if it is in error stop status by reading error inter rupt status in section 6 14 Syntax C C DOS Windows 95 NT 2K XP I16 _8164_motion_done I16 AxisNo Visual Basic Windows 95 NT 2K XP B_8164_motion_done ByVal AxisNo As Integer As Integer Argument AxisNo Designated axis number to start manual move ...

Page 231: ...nal 3 Wait Internal sync signal 4 Wait for another axis to stop 5 Wait ERC timer finished 6 Wait DIR Change timer finished 7 Backlash compensating 8 Wait PA PB input 9 In FA speed motion 10 In start velocity motion 11 In acceleration 12 In Max velocity motion 13 In deceleration 14 Wait INP input 15 Others ...

Page 232: ...en the ALARM signal is active _8164_set_el Sets the stopping mode of the EL active _8164_set_inp Sets the active logic of the In Position signal input from the servo driver You can select whether to enable or disable this function The function is disabled by default _8164_set_erc Sets the logic and on time of the ERC _8164_set_servo Sets the ON OFF state of the SVON signal The default value is 1 O...

Page 233: ...lm_mode As Integer As Integer B_8164_set_el ByVal AxisNo As Integer ByVal el_mode As Integer As Integer B_8164_set_inp ByVal AxisNo As Integer ByVal inp_enable As Integer ByVal inp_logic As Integer As Integer B_8164_set_erc ByVal AxisNo As Integer ByVal erc_logic As Integer ByVal erc_on_time As Integer As Integer B_8164_set_servo ByVal AxisNo As Integer ByVal On_Off As Integer As Integer B_8164_se...

Page 234: ... 1 Enabled inp_logic Set the active logic for the INP signal X inp_logic 0 active LOW X inp_logic 1 active HIGH erc_logic Set the active logic for the ERC signal X erc_logic 0 active LOW X erc_logic 1 active HIGH erc_on_time Set the time length of ERC active X erc_on_time 0 12µs X erc_on_time 1 102µs X erc_on_time 2 409µs X erc_on_time 3 1 6ms X erc_on_time 4 13ms X erc_on_time 5 52ms X erc_on_tim...

Page 235: ... sd_logic 1 active HIGH sd_latch Set the latch control for the SD signal X sd_latch 0 do not latch X sd_latch 1 latch sd_mode Set the reacting mode of the SD signal X sd_mode 0 slow down only X sd_mode 1 slow down then stop el_logic Set EL as normal low 0 or normal high 1 Return Code ERR_NoError ...

Page 236: ... I16 AxisNo U16 io_sts Visual Basic Windows 95 NT 2K XP B_8164_get_io_status ByVal AxisNo As Integer io_sts As Integer As Integer Bit Name Description 0 RDY RDY pin input 1 ALM Alarm Signal 2 EL Positive Limit Switch 3 EL Negative Limit Switch 4 ORG Origin Switch 5 DIR DIR output 6 EMG EMG status 7 PCS PCS signal input 8 ERC ERC pin output 9 EZ Index signal 10 Reserved 11 Latch Latch signal input ...

Page 237: ...ction Library 225 Argument AxisNo Axis number for I O control and monitoring io_status I O status word 1 is ON and 0 is OFF ON OFF state is read based on the corresponding set logic Return Code ERR_NoError ...

Page 238: ... For DOS only _8164_leave_isr Leave interrupt service routine For DOS only _8164_get_event_int Get event status For DOS only _8164_get_error_int Get error status For DOS only _8164_get_irq_status Get IRQ status For DOS only _8164_not_my_irq Not My IRQ For DOS only _8164_isr0 9 a b Interrupt service routine For DOS only _8164_set_axis_stop_int enable axis stop int _8164_mask_axis_stop_int mask axis...

Page 239: ... the definition of these two int_status By setting the relative bit as 1 the card can generate INT signal to the host computer Interrupt factors Bit Description 0 Normal Stop 1 Next command Starts 2 Command pre register 2 is empty 3 Reserved 4 Acceleration Start 5 Acceleration End 6 Deceleration Start 7 Deceleration End 8 Positive soft limit on 9 Negative soft limit on 10 Comparator 3 compared 11 ...

Page 240: ..._set_int_factor The definition for bit of error_int_status is as following error_int_status can not be masked Bit Interrupt Factor 0 Soft Limit on and stop 1 Soft Limit on and stop 2 Reserved 3 General Comparator on and Stop 4 Reserved 5 End Limit on and stop 6 End Limit on and stop 7 ALM happen and stop 8 CSTP Sync Stop on and stop 9 CEMG Emergency on and stop 10 SD on and slow down to stop 11 Re...

Page 241: ...only Detects the type of INT that occurred Bit Description 0 Normal Stop 1 Next command Starts 2 Command pre register 2 is empty 3 Reserved 4 Acceleration Start 5 Acceleration End 6 Deceleration Start 7 Deceleration End 8 Reserved 9 Reserved 10 Reserved 11 General Comparator compared 12 Trigger Comparator compared 13 Reserved 14 Counter Latched for axes 2 and 3 15 ORG Input and Latched 16 SD on 17...

Page 242: ... card generates the INT signal to host PC _8164_isr0 _8164_isr1 _8164_isr2 _8164_isr3 _8164_isr9 _8164_isra _8164_isrb DOS only Individual Interrupt service routine for cards 0 11 _8164_set_axis_stop_int Enables an axis stop interrupt Once it is enabled the interrupt happens no matter if it is a normal stop or error stop This interrupt condition can be turned on or off accompanied with every motio...

Page 243: ...6 _8164_get_error_int I16 AxisNo U32 error_int I16 _8164_get_irq_status U16 cardNo U16 sts I16 _8164_not_my_irq I16 CardNo void interrupt _8164_isr0 void void interrupt _8164_isr1 void void interrupt _8164_isr2 void void interrupt _8164_isr3 void void interrupt _8164_isr4 void void interrupt _8164_isr5 void void interrupt _8164_isr6 void void interrupt _8164_isr7 void void interrupt _8164_isr8 voi...

Page 244: ...k Visual Basic Windows 95 NT 2K XP B_8164_int_control ByVal CardNo As Integer ByVal intFlag As Integer As Integer B_8164_set_int_factor ByVal AxisNo As Integer ByVal int_factor As Long As Integer B_8164_int_enable ByVal CardNo As Integer phEvent As Long As Integer B_8164_int_disable ByVal CardNo As Integer As Integer B_8164_get_int_status ByVal AxisNo As Integer error_int_status As Long event_int_...

Page 245: ...efer to previous table error_int error_int_status refer to previous table sts 0 not this card s IRQ 1 this card s IRQ phEvent event handler Windows error_int_status refer to previous table event_int_status refer to previous table int_mask 0 make axis stop interrupt active 1 make axis stop interrupt in active axis_stop_int 0 disable axis stop interrupt factor 1 enable axis stop interrupt factor Ret...

Page 246: ...sition counter _8164_get_error_counter Get the value of position error counter _8164_reset_error_counter Reset the position error counter _8164_get_general_counter Get the value of general counter _8164_set_general_counter Set the general counter _8164_get_target_pos Get the value of target position recorder _8164_reset_target_pos Reset target position recorder _8164_get_rest_command Get remaining...

Page 247: ...the given value _8164_get_command Reads the value of the command position counter The source of the command position counter is the pulse output of the 8164 _8164_set_command Changes the value of the command position counter _8164_get_error_counter Reads the value of the position error counter _8164_reset_error_counter Clears the position error counter _8164_get_general_counter Read the value of t...

Page 248: ...s start to decelerate when remaining pulse count reach the data Syntax C C DOS Windows 95 98 NT I16 _8164_get_position I16 AxisNo F64 pos I16 _8164_set_position I16 AxisNo F64 pos I16 _8164_get_command I16 AxisNo I32 cmd I16 _8164_set_command I16 AxisNo I32 cmd I16 _8164_get_error_counter I16 AxisNo I16 error_counter I16 _8164_reset_error_counter I16 AxisNo I16 _8164_get_general_counter I16 AxisNo...

Page 249: ...ror_counter As Integer As Integer B_8164_reset_error_counter ByVal AxisNo As Integer As Integer B_8164_get_general_counter ByVal AxisNo As Integer CntValue As Double As Integer B_8164_set_general_counter ByVal AxisNo As Integer ByVal CntSrc As Integer ByVal CntValue As Double As Integer B_8164_get_target_pos ByVal AxisNo As Integer Pos As Double As Integer B_8164_reset_target_pos ByVal AxisNo As I...

Page 250: ... X range 32768 32767 T_pos T_pos Target position recorder value X T_range 134217728 134217727 CntValue CntValue General counter value X range 134217728 134217727 rest_command rest_command Rest pulse count till end X range 134217728 134217727 rdp_command rdp_command Ramping down point data X range 0 167777215 CntSrc Source of general counter X 0 command X 1 EA EB X 2 PA PB Default X 3 CLK 2 6 15 1 ...

Page 251: ...trigger_type Set the trigger output type _8164_check_compare_data Check current comparator data _8164_check_compare_status Check current comparator status _8164_set_auto_compare Set comparing data source for auto loading _8164_build_compare_function Build compare data via constant interval _8164_build_compare_table Build compare data via com pare table _8164_cmp_v_change Speed change by comparator...

Page 252: ...alue the card generates an interrupt event_int_status bit 10 when position error counter exceed tolerance _8164_set_general_comparator Sets the source and comparing value for the general comparator When the source counter value reached the comparing value the 8164 will generate an interrupt event_int_status bit 11 _8164_set_trigger_comparator Sets the comparing method and value for the trigger com...

Page 253: ... table _8164_build_compare_function Builds a comparing function by defining the start end point and interval There is no limitation on the max number of comparing data It automatically loads a final point after user s end point That is end point Interval x total points x move ratio Note Turn off all interrupt functions when triggering is running _8164_build_compare_table Builds a comparing table b...

Page 254: ...98 NT I16 _8164_set_ltc_logic I16 AxisNo_2or3 I16 ltc_logic I16 _8164_get_latch_data I16 AxisNo I16 LatchNo F64 Pos I16 _8164_set_soft_limit I16 AxisNo I32 PLimit I32 NLimit I16 _8164_disable_soft_limit I16 AxisNo I16 _8164_enable_soft_limit I16 AxisNo I16 Action I16 _8164_set_error_counter_check I16 AxisNo I16 Tolerance I16 On_Off I16 _8164_set_general_comparator I16 AxisNo I16 CmpSrc I16 CmpMeth...

Page 255: ...al I16 _8164_build_compare_table I16 AxisNo F64 TableArray I32 Size Visual Basic Windows 95 NT 2K XP B_8164_set_ltc_logic ByVal AxisNo As Integer ByVal ltc_logic As Integer As Integer B_8164_get_latch_data ByVal AxisNo As Integer ByVal Counter As Integer Pos As Double As Integer B_8164_set_soft_limit ByVal AxisNo As Integer ByVal PLimit As Long ByVal NLimit As Long As Integer B_8164_disable_soft_l...

Page 256: ...r ByVal Start As Double ByVal End As Double ByVal Interval As Double ByVal Device As Integer As Integer B_8164_build_compare_table ByVal AxisNo As Integer TableArray As Double ByVal Size As Integer ByVal Device As Integer As Integer B_8164_cmp_v_change ByVal AxisNo ByVal Res_dist as Double ByVal oldvel as Double ByVal newvel as Double ByVal AccTime as Double B_8164_force_cmp_output ByVal AxisNo As...

Page 257: ...rection Action The reacting method of soft limit X Action 0 INT only X Action 1 Immediately stop X Action 2 Slow down then stop X Action 3 Reserved Tolerance The tolerance of step losing detection form 0 32767 On_Off Enable Disable step losing detection X On_Off 0 Disable X On_Off 1 Enable CompNo The comparator number of axis X CompNo 1 Comparator1 default for positive soft limit X CompNo 2 Compar...

Page 258: ...ir X CmpMethod 4 CmpValue Counter X CmpMethod 5 CmpValue Counter X CmpMethod 6 Reserved CmpAction The reacting mode when comparison comes into exist X CmpAction 0 INT and Internal sync signal output X CmpAction 1 Immediate stop X CmpAction 2 Slow down then stop X CmpAction 3 Speed change Data Comparing value TriggerType Selection of type of trigger output mode X Hardware Version A2 Z TriggerType 0...

Page 259: ...t Start point of compare function End End point of compare function Interval Interval of compare function TableArray Array of comparing data Size Size of table array Device Selection of reload device for comparator data X Device 0 RAM for axis2 3 of card outputting pulses to DO0 1 X Device 1 FIFO for axis 0 1 of card outputting pulses to CMP0 1 Res_dist The remaining distance from the compare poin...

Page 260: ...isable X Value 1 Latch pin ON X Value 2 ORG pin ON X Value 3 Comparator 4 ON X Value 4 Comparator 5 ON Return Code ERR_NoError ERR_CompareNoError ERR_CompareMethodError ERR_CompareAxisError ERR_CompareTableSizeError ERR_CompareFunctionError ERR_CompareTableNotReady ERR_CompareLineNotReady ERR_HardwareCompareAxisWrong ERR_AutocompareSourceWrong ERR_CompareDeviceTypeError ...

Page 261: ...hether the command pre register is empty or not Once the command pre register is empty you may write the next motion command into it Otherwise the new command overwrites the pre vious command in the 2nd command pre register Syntax C C DOS Windows 95 NT 2K XP I16 _8164_set_continuous_move I16 AxisNo I16 conti_flag I16 _8164_check_continuous_buffer I16 AxisNo Visual Basic Windows 95 NT 2K XP B_8164_...

Page 262: ...motion sequence is started Return Value ERR_NoError Return value of _8164_check_continuous_buffer X Hardware version bit 12 0 Z 0 command register 2 is empty Z 1 command register 2 is in use Return value of _8164_check_continuous_buffer X Hardware version bit 12 1 Z 0 all command registers are empty Z 1 command register is in use Z 2 command register 1 is in use Z 3 command register 2 is in use ...

Page 263: ...s operation setup _8164_set_sa_move_all Multi axis simultaneous operation setup _8164_start_move_all Begin a multi axis trapezoidal profile motion _8164_stop_move_all Simultaneously stop Multi axis motion _8164_set_sync_option Other sync motion setting _8164_set_sync_stop_mode Setting the stop mode of CSTOP signal _8164_set_sync_signal_source Synchronous signal source setting _8164_set_sync_signal...

Page 264: ...specified axes occur at the same time Note that proper CN4 connections are needed for these two func tions Refer to Section 3 14 The following codes tell how to utilize these functions This code moves axis 0 and axis 4 to distance 8000 0 and 120000 0 respec tively If you choose velocities and accelerations that are propor tional to the ratio of distances then the axes will arrive at their endpoint...

Page 265: ...es the internal synchronous signal output timing If one of the condition is satisfied the internal synchronous signal is trig gered Syntax C C DOS Windows 95 NT 2K XP I16 _8164_set_tr_move_all I16 TotalAxes I16 AxisArray F64 DistA F64 StrVelA F64 MaxVelA F64 TaccA F64 TdecA I16 _8164_set_sa_move_all I16 TotalAx I16 AxisArray F64 PosA F64 StrVelA F64 MaxVelA F64 TaccA F64 TdecA F64 SVaccA F64 SVdec...

Page 266: ...nteger PosA As Double StrVelA As double MaxVelA As double TaccA As double TdecA As double B_8164_set_sr_move_all ByVal TotalAxes As Integer AxisArray As Integer DistA As Double StrVelA As double MaxVelA As double TaccA As double TdecA As double SVaccA As double SVdecA As Double B_8164_start_move_all ByVal FirstAxisNo As Integer B_8164_stop_move_all ByVal FirstAxisNo As Integer B_8164_set_sync_opti...

Page 267: ...ration is performed SVdecA specified velocity interval array in which S curve decel eration is performed FirstAxisNo the first element in AxisArray Sync_stop_on Axis will stop if the CSTOP signal is on Cstop_output_on CSTOP signal will output with an abnormal stop ALM EL etc Sync_option1 Choose command start type X 0 default immediately start X 1 waiting _8164_start_move_all or CSTA signal X 2 wai...

Page 268: ...stop_mode X 0 immediate stop X 1 slow down to stop mode X 0 Off X 1 5 compare 1 5 active X 8 Acc start X 9 Acc end X 10 Dec start X 11 Dec end Sync_axis 0 3 the axis index in the card Return Code ERR_NoError ERR_SpeedError ...

Page 269: ...ital output pin _8164_get_dio_status Reads the status of all digital output pins Syntax C C DOS Windows 95 NT 2K XP I16 _8164_d_output I16 CardNo I16 Ch_No I16 value I16 _8164_get_dio_status I16 CardNo U16 dio_sts Visual Basic Windows 95 NT 2K XP B_8164_d_output ByVal CardNo As Integer ByVal Ch_No As Integer ByVal value As Integer As Integer B_8164_get_dio_status ByVal CardNo As Integer dio_sts As...

Page 270: ...signated card number Ch_No Designated channel number 0 5 Value On Off Value for output X Value 0 output OFF X Value 1 output ON dio_status Digital output status X bit0 bit5 for channel 0 5 respectively Return Value ERR_NoError ERR_DioNoError ...

Page 271: ...ls _8164_write_axis_do Controls the axis general digital output channel _8164_read_axis_di Reads back the axis general digital input channel Syntax C C DOS Windows 95 NT 2K XP I16 _8164_write_do I16 CardNo U16 Value U16 _8164_read_di I16 CardNo I16 _8164_write_axis_do I16 AxisNo U16 Value U16 _8164_read_axis_di I16 AxisNo Visual Basic Windows 95 NT 2K XP B_8164_write_do ByVal CardNo As Integer ByV...

Page 272: ...esignated card number AxisNo Designated axis number Value Value for output X Bit value 0 output OFF X Bit value 1 output ON Return Value ERR_NoError Digital Input Value for 8 channels in MPC 8164 Axis general digital input value in PXI 8164 ...

Page 273: ...ion _8164_check_card Checks if the card ID exists You can use this function to search all the cards in the 0 11 range Syntax C C DOS Windows 95 NT 2K XP void _8164_enable_card_id void I16 _8164_check_card I16 CardNo Visual Basic Windows 95 NT 2K XP B_8164_enable_card_id B_8164_check_card ByVal CardNo As Integer As Integer Argument CardNo Designated card number Return Value ERR_NoError _8164_check_...

Page 274: ... three dedicated channels in the PXI_TRG for STA STP and CEMG When this is enabled the corresponding channels of PXI_TRG are set as inputs These channels map to PXI_TRG s channel 5 6 and 7 If you need these functions the correspond ing PXI_TRG channel is fixed as Input _8164_select_pxi_output You can select many sources for PXI_TRG outputs You can use this function to assign a source for PXI_TRG o...

Page 275: ... I16 source I16 pxi_channel Visual Basic Win32 B_8164_get_pxi_trigger_value ByVal CardNo As Integer value As Integer As Integer B_8164_set_pxi_trigger_value ByVal CardNo As Integer ByVal value As Integer As Integer B_8164_enable_pxi_input ByVal CardNo As Integer ByVal STA As Integer ByVal STP As Integer ByVal CEMG As Integer As Integer B_8164_select_pxi_output ByVal CardNo As Integer ByVal source ...

Page 276: ...isable 1 link to PXI_TRG 5 2 link to PXI_STAR STP 0 disable 1 link to PXI_TRG 6 CEMG 0 disable 1 link to PXI_TRG 7 source X 0 Software control X 1 AP6X X 2 AP6Y X 3 AP6Z X 4 AP6U X 5 CMP1 X 6 CMP2 pxi_channel X PXI_TRG value bit0 7 X STAR_TRG bit8 Return Value ERR_NoError ERR_CardTypeWrong ERR_CardNoError ERR_PXISourceWrong ERR_PXIChannelWrong ...

Page 277: ...ose DIO for MPC 8164 CN4 Connector for simultaneously start or stop of multiple PCI 8164 cards CN5 TTL digital output for PCI 8164This example will illustrate the connection between a Panasonic Servo Driver and the 8164 Figure 9 shows the wiring diagram NOTES 1 For convenience the drawing shows connections for single axis only 2 Default pulse output mode is OUT DIR Default input mode is 1X AB phas...

Page 278: ...266 Connection Example Figure 7 1 illustrates the integration of the PCI 8164 card with a physical system Figure 7 1 System Integration with PCI 8164 ...

Page 279: ...ram NOTES 1 For convenience the drawing shows connections for single axis only 2 Default pulse output mode is OUT DIR Default input mode is 1X AB phase Other modes can be set using the available software functions 3 Most general purpose servomotor drivers can operate in Torque Mode Velocity Mode or Position Mode To con nect the card you must set the operating mode to Posi tion Mode ...

Page 280: ...268 Connection Example Figure 7 2 Connection of PCI 8164 with Panasonic Driver ...

Page 281: ...GND EX 24V SVON 1 ERC 1 ALM 1 INP 1 EA1 EA1 EB1 EB1 EZ1 EZ1 EX GND PEL1 MEL1 PSD1 MSD1 ORG1 RDY 1 EX GND 11 12 EX 5V 19 PCI_8164 Axis 1 Servo Driver SANYO BL Super P Series Table MEL ORG MSD PSD PEL E M 26 27 28 29 PPC PPC NPC NPC 25 23 37 DC24V COM DC24V Servo ON 43 39 ALM1 General Out 32 PROT 3 Encoder A 4 Encoder A 5 6 Encoder B Encoder B 7 Encoder C 8 Encoder C 33 NROT CN1 EX 24V 100 49 DC24V ...

Page 282: ...are directly shorted DO NOT use both connectors at the same time 2 CAN or CNB cables Two 20 pin cables pin to pin are required to connect the CNA and CNB with the Mitsub ishi J2S driver The required cables are available from ADLINK 3 PSD Signal The PSD signal on the IOIF connector has different functions depending on different motion CNA1 CNA3 CN2 CNA2 CN1 SJ3 SJ4 SJ1 SJ2 LED4 LED3 LED2 LED1 IOIF4...

Page 283: ...each axis of the IOIF or HD connectors and short jumpers J1 J4 of 2 3 to make EMG controllable by a switch 7 3 1 PIN Assignments CNA1 CNA4 Mitsubishi AC Servo Driver CNA Interface No Name I O Function No Name I O Function 1 IGND Isolated Ground 2 DIR O Direction Signal 3 OUT O Pulse Signal 4 5 EZ I Encoder Z phase 6 EA I Encoder A phase 7 EB I Encoder B phase 8 ERC O Error counter Clear 9 Voltage ...

Page 284: ...Internal EMG Signal 16 IGND Isolated Ground 17 IGND Isolated Ground 18 ALM I Servo Alarm 19 ZSP I Zero Speed 20 IGND Isolated Ground No Name I O Function No Name I O Function 1 24V O Voltage output 6 MSD I Negative Slow Switch 2 EX_EMG I External EMG Signal 7 ORG I Origin Switch 3 PEL I Positive Limit 8 IGND Isolated Ground 4 MEL I Negative Limit 9 IGND Isolated Ground 5 PSD I CMP LTC PSD Please c...

Page 285: ...EX_EMG I Servo ON O Servo On 5 ALM I RDY I Servo Ready 6 IGND J1 J4 1 GND 2 EMG4 3 EX_EMG No Name I O Function No Name I O Function 1 RES I Reset 5 ZSP O ABS bit 1 2 ABSM I ABS transfer mode 6 TLC O Send data ready 3 ABSR I ABS request 7 IGND Isolated Ground 4 D01 O ABS bit 0 8 IGND Isolated Ground No Name I O Function No Name I O Function 1 SP2 I Speed Selection 2 4 LG Control Common 2 P15R I 15V...

Page 286: ...HD 3 CMP LTC in IOIF s PSD pin only for 8164 series 4 CNA CNB CN2 5 CN1 This connector is parallel with on board CN1 6 SJ1 4 For stepping driver refer to the ADLINK user s manual for wiring 7 TD1 4 Refer to the Mitsubishi user s manual for wiring 8 TJ1 2 Refer to the Mitsubishi user s manual for wiring ...

Page 287: ...Connection Example 275 7 3 3 Mechanical Dimensions ...

Page 288: ...e sec ond is through the SJ connector for stepping drivers or other servo drivers for the Mitsubishi J2S driver use DIN 814M The signals in SJ and CNIF of the same axis are directly shorted DO NOT use these connectors at the same time CNIF 4 CNIF 1 CNIF 3 CN2 CNIF 2 CN1 SJ 3 SJ 4 SJ 1 SJ 2 LED4 LED3 LED2 LED1 IOIF 4 IOIF 2 IOIF 3 IOIF 1 To PCI 8134 8164 GND 24V 4th Axis To Panasonic Driver CN1 2nd...

Page 289: ...ing on the PCI 8134 PCI 8164 card usage some signals in the IOIF connector such as PSD and MSD will function differently When using PCI 8134 the PSD and MSD signals are for positive slow down and nega tive slow down signal respectively When using PCI 8164 PSD is for CMP and LTC and MSD is for SD For more details refer to the PCI 8134 PCI 8164 user s manual 7 4 1 Mechanical Dimensions ...

Page 290: ...t 12 Servo ON O Servo On 13 ERC O Error counter Clear 14 15 IGND Isolated Ground 16 17 18 19 EA I Encoder A phase 20 EA I Encoder A phase 21 EB I Encoder B phase 22 EB I Encoder B phase 23 24 25 INP I Servo In Position 26 ALM I Servo Alarm 27 RDY I Servo Ready 28 IGND Isolated Ground 29 30 31 32 33 34 35 36 No Name I O Function No Name I O Function 1 24V O Voltage output 6 MSD I Negative Slow Swit...

Page 291: ...LM I Servo Alarm 2 OUT O Pulse Signal 7 5V O Voltage output 3 DIR O Direction Signal 8 Servo ON O Servo On 4 DIR O Direction Signal 9 5V O Voltage output 5 EZ I Index Signal 10 IGND Isolated Ground No Name I O Function 1 EX 24V I External Power Supply Input 24V DC 5 2 EXGND External Power Supply Ground ...

Page 292: ... 3 How to wire PEL MEL ORG SD PSD MSD in IOIF CMP LTC in IOIF X CMP is a TTL 5V or 0V output vs Ext GND X LTC is a TTL 5V or 0V input vs Ext GND CNA CNB CN2 SJ Refer to PCI 8134 PCI 8164 user s manual for wiring infor mation CN1 ...

Page 293: ...has two kinds of connections for four axes motion control One is connector CNIF designed for Panasonic MINAS A series servo driver Another is the SJ connector designed for stepping drivers or other CNIF1 CNIF2 CNIF3 CNIF4 IOIF4 IOIF3 IOIF2 IOIF1 CN2 CN1 SJ1 SJ2 SJ3 SJ4 To stepping motor driver Mechanical I O interface 1st axis to servo driver 2nd axis to servo driver 3rd axis to servo driver 4th a...

Page 294: ...sonic MINAS A series servo driver with the CNIF connector on the DIN 814PA Contact your local ADLINK represen tative for additional information 3 Signals PSD and MSD at the connector IOIF are assigned different names on the 8164 series motion control board The PSD1 PSD2 PSD3 and PSD4 sig nals are renamed CMP1 CMP2 LTC3 and LTC4 respectively MSD is replaced by SD PCS ...

Page 295: ...Connection Example 283 7 5 1 Wiring Example PEL MEL ORG SD PSD MSD and Alarm Clear at IOIF CMP LTC at IOIF Z CMP is a TTL 5V or 0V output vs Ext GND Z LTC is a TTL 5V or 0V input vs Ext GND ...

Page 296: ...284 Connection Example CNIF and CN2 SJ Refer to 8134 64 series user manual CN1 24V power supply input ...

Page 297: ...Connection Example 285 7 5 2 Mechanical Dimensions ...

Page 298: ... I Encoder Z phase 25 IGND Isolated Ground 26 NC 27 NC 28 NC 29 SVON Servo On 30 ERC O 31 A CLR O Alarm Clear 32 NC 33 IGND Isolated Ground 34 IGND Isolated Ground 35 RDY Servo Ready 36 IGND Isolated Ground 37 ALM Servo Alarm 38 IGND Isolated Ground 39 INP Servo In Position 40 NC 41 IGND Isolated Ground 42 NC 43 NC 44 NC 45 NC 46 NC 47 NC 48 EB I Encoder B phase 49 EB I Encoder B phase 50 NC No Na...

Page 299: ...nal 6 ALM I Servo Alarm 2 OUT O Pulse Signal 7 5V O 5V Power supply 3 DIR O Direction Signal 8 SVON O Servo On 4 DIR O Direction Signal 9 5V O 5V Power supply 5 EZ I Index Signal 10 IGND Isolated Ground No Name I O Function 1 EX 24V I External Power Supply Input 24V DC 5 2 EXGND External Ground ...

Page 300: ...288 Connection Example 7 6 Wiring with DIN 814M J3A ...

Page 301: ...d rotation 18 ABSR O Reverse rotation 19 RES I Reset Signal 20 24V Voltage output 21 24V Voltage output 22 ABSB0 I Speed reached 23 ZSP I Zero Speed 24 INP I In position Signal 25 TLC I Limiting Torque 26 N C 27 TC O Analog torque command 28 IGND Isolated Ground 29 N C 30 N C 31 N C 32 N C 33 N C 34 IGND Isolated Ground 35 DIR O Direction Signal 36 DIR O Direction Signal 37 N C 38 N C 39 N C 40 N ...

Page 302: ...XEMG I External EMG Signal 14 IGND Isolated Ground 15 LOP O Control selection 16 IGND Isolated Ground No Name I O Function 1 24V Voltage output 2 EXEMG I External EMG Signal 3 PEL I Positive Limit 4 MEL I Positive Limit 5 PSD I Positive Slow Switch 6 MSD I Negative Slow Switch 7 ORG I Origin signal 8 RES I Reset Signal 9 IGND Isolated Ground No Name I O Function 1 OUT O Pulse Signal 2 OUT O Pulse ...

Page 303: ...Connection Example 291 CN1 No Name I O Function 1 EX 24V I External Power Supply Input 24V DC 5 2 EX GND External Power Supply Ground ...

Page 304: ...292 Connection Example 7 7 Wiring with DIN 814Y ...

Page 305: ...9 EZ I Encoder Z phase 20 EZ I Encoder Z phase 21 BAT I Battery 22 BAT I Battery 23 X 24 X 25 INP I In position Signal 26 IGND Isolated Ground 27 X 28 X 29 RDY I Servo Ready Signal 30 IGND Isolated Ground 31 ALM I Alarm Signal 32 IGND Isolated Ground 33 EA I Encoder A phase 34 EA I Encoder A phase 35 EB I Encoder B phase 36 EB I Encoder B phase 37 AL01 O Alarm Number1 38 AL02 O Alarm Number2 39 AL...

Page 306: ... output 16 IGND Isolated Ground No Name I O Function No Name I O Function 1 24V O Voltage output 6 MSD I Negative Slow Switch 2 IGND Isolated Ground 7 ORG I Origin Signal 3 PEL I Positive Limit 8 RES I Reset Signal 4 MEL I Positive Limit 9 IGND Isolated Ground 5 PSD I Positive Slow Switch No Name I O Function No Name I O Function 1 OUT O Pulse Signal 6 ALM I Servo Alarm 2 OUT O Pulse Signal 7 5V O...

Page 307: ...White 5 DO0 Red 6 DO1 Grey Black 7 DO2 White 8 DO3 Purple White 9 DO4 Orange 10 DO5 Light Green Black 11 DO6 Pink 12 DO7 White Blue 13 Yellow 14 DICOM Light Blue Black 15 DICOM Light Blue 16 DICOM Red White 17 DICOM Green 18 DI0 Green Black 19 DI1 Light Green 20 DI2 Brown White 21 DI3 Blue 22 DI4 Yellow Black 23 DI5 Red Black 24 DI6 White Black 25 DI7 Purple 26 Black Orange ...

Page 308: ...296 ...
Page 309: ...rd party products not manufactured by ADLINK will be covered by the original manufactur ers warranty X For products containing storage devices hard drives flash cards etc please back up your data before send ing them for repair ADLINK is not responsible for any loss of data X Please ensure the use of properly licensed software with our systems ADLINK does not condone the use of pirated software an...

Page 310: ... of battery fluid during or after change of batteries by customer user X Damage from improper repair by unauthorized ADLINK technicians X Products with altered and or damaged serial numbers are not entitled to our service X This warranty is not transferable or extendible X Other categories not protected under our warranty 4 Customers are responsible for shipping costs to transport damaged products...

Page 311: ...Mouser Electronics Authorized Distributor Click to View Pricing Inventory Delivery Lifecycle Information ADLINK Technology PXI 8164 ...

Reviews: