DREAMWEAVER CS3
User Guide
262
•
To add a value for an attribute with no value, click in the attribute-value column to the right of the attribute and
add a value (see the next procedure).
•
If the attribute takes a URL value, enter the URL.
•
If the attribute takes pre-defined values, select a value from the pop-up menu (or the color picker) to the right of
the attribute-value column.
•
If the attribute takes a value from a source of dynamic content (such as a database), click the Dynamic Data button
to the right of the attribute-value column. Then select a source.
4
Press Enter (Windows) or Return (Macintosh), or click elsewhere in the Tag inspector, to update the tag in your
document.
See also
“Defining sources of dynamic content” on page 547
Use the Image Viewer Flash element
Adobe Dreamweaver CS3 contains a Flash element you can use in your pages: a Flash image viewer that can double
as a web photo album.
The Image Viewer element is a resizable application for loading and viewing a series of JPEG or SWF images. You
define a list of images, along with a link and caption for each image.
Users can view images in order with the previous and next buttons, or jump to a specific image by entering that
image's number. You can also set the images to play in a slide-show format.
Note:
Website visitors must have Flash® Player 7 or later installed to see any Image Viewers in your pages.
1
Place the insertion point in your page where you want the Image Viewer to appear and select Insert > Media >
Image Viewer.
2
In the Save Flash Element dialog box, browse to a location in your site to save the element, enter a name, and click Save.
Note:
It’s a good idea to save the Flash element in the same Dreamweaver site as the page to which you are adding the
Image Viewer.
The Flash element placeholder appears in your page and the Tag inspector opens.
3
Select the Flash element placeholder if it’s not already selected.
4
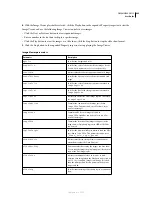
In the Tag inspector (Window > Tag inspector), click the field beside the
imageURLs
parameter, and click the Edit
Array Values icon at the end of the line.
5
In the Edit imageURLs Array dialog box, click the Minus (-) button to remove placeholder elements; to add
images, click the Plus (+) button, click the folder icon next to the blank value line that appears, and select the image
you want to add. You can add JPEG or SWF files.
Note:
It’s a good idea to use files that are located in the same Dreamweaver site as the page to which you are adding the
Image Viewer.
6
Click OK to close the Edit imageURLs Array dialog box.
7
(Optional) Use the Tag inspector to set other parameters for the Image Viewer.
Note:
You can also set properties for the Image Viewer in the Property inspector. For more information, select the Flash
element, and click the Help icon in the Property inspector.
September 4, 2007

