Reed Switch 24
This diagnostic continuously displays the result of the media height sensor. As the reed switch
passes in front of a pinch wheel with a magnet installed, the output will change from 1111 to 0000.
Front Panel Only Diagnostics
Some diagnostics can only be run from the front panel
Display Last Error 15
Running diagnostic 15 will display the last error number saved in NVM.
Factory Defaults 43
You can select factory defaults for settings by running diagnostic 43.
Set Model Number 03
From the control panel
scroll to
0003
and press the select key. Enter password of 23 and then
select. Enter model press the Select Key. Do not change the model number unless you know what
you are doing.
From the remote panel
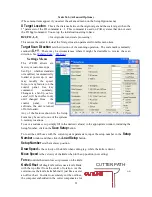
open the
Set-up
menu then the
Options
Menu. Click on the desired
Model Radio Button. When you click on OK the remote panel will ask for the password to change
the model number. Enter password 23 and click on ok.
Set Static/DHCP IP Address 04
Normally you do not need to run this diagnostic. If you are using a cross over cable the default ad-
dress is 192.168.4.10 and you have set your computers ip address to 192.168.4.2. If you are using
a dhcp server, most algorithms normally try to assign same ip address to mac address everytime the
device requests an ip address. If you have trouble with your dhcp server giving you a different ip
address everytime you turn on your machine you can set a static ip address.
To run diagnostic on 230 or 315 you type esc.z (e.g. press esc key, then period key then z key) to
open simulated front panel, start diagnostic by pressing keys on numeric pad as if you were press-
ing them on front panel of cutter.
To change the default IP address for mmc you run diagnostic 4 on the mmc.
Select -> right arrow to dia -> up arrow to 0004 -> select
if dhcp is desired select dhcp and press select.
Otherwise if you want to set your cutter to use ip address 192.168.4.10 and mask to 255.255.255.0
and gateway of 192.168.4.1 use up/down to select IP then press select key
Change first part of address with force/speed up/down key to 192 then press select
change 2nd part of ip address to 168 then press select
change 3rd part of ip address to 4 then press select
change 4th part of ip address to 10 then press select
MAS will then appear. Press select
First part of mask is 255 -> press select
2nd part of mask is 255 -> press select
change 3rd part of mask to 255 then press select
4th part of mask is 0 -> press select
33

