27
1.4 Troubleshooting & FAQ
This document gives some basic advice about troubleshooting your Centra HS Printer. There are
some simple steps you can take to try and diagnose a problem. If you have managed to perform
some basic troubleshooting procedures, then our tech support team will be in a much better position
to help before you contact them.
1.4.2 Material Test Procedure
1.4.1 Material Compatibility
Using a compatible media is critical for proper operation of this printer. Using incompatible media
will result in print job failures, poor output quality, possible damage to the printer and its
components, lost time and down time. This guide will help you determine what media will safely run
through your system.
NOTE: Avoid rubber based adhesives, polypropylene and polystyrene substrates. Any damage
caused by improper media is not covered by warranty.
Before we start printing on a new material, we want to first make sure it can handle the printers
high fusing temperatures. Start by cutting off an 8.5”x11” sheet of the material you are testing.
1.
To get the fuser up to temperature: Open and Close the top cover by pressing down on the
OPEN button, and open the top cover. Then push it back down until it locks closed. The unit will
make some noise and the LED display should say Adjusting Temperature.
2
. Wait 30 seconds.
3.
Open the top cover by pressing down on the OPEN button.
4.
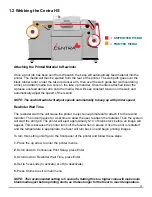
Lift up on the two blue lock levers on each side of the fuser unit in the direction of the unlock
arrow. Lift up the fuser only by the handle to remove.
NOTE: Fuser unit will be very hot. Be careful when handling.
5.
Take the 8.5”x11” sheet of the material and gently touch it to the red roller through the larger
opening,
removing it within 3 seconds
. If you see any warping, melting or damage of the
media DO NOT use this media in the printer. If material is unaffected then it is okay to try a roll
test print.
NOTE: This test is not a guarantee that the media will work with this system.
This test will help prevent damage to the printers internal components.
6.
Return the Fuser unit by its handle to printer. Lock down the two blue lock levers on each side
of the fuser unit in the direction of the lock arrow and close the top cover.
If you see any damage to the media then DO NOT print with it.
If the media is unaffected continue with your print quality testing.
Summary of Contents for iTech Centra HS
Page 2: ...02...

