background image

Declarations of Conformity

For complete DoC please visit the NETGEAR EU Declarations of Conformity website at: 

http://support.netgear.com/app/answers/detail/a_id/11621/

WARNING: 

Do not stack equipment or place equipment in tight spaces, in drawers, or on 

carpets. Make sure your equipment is surrounded by at least 2 inches of air space.

For indoor use only in all EU countries and Switzerland.

This symbol is placed in accordance with the European Union Directive 2002/96 
on the Waste Electrical and Electronic Equipment (the WEEE Directive). If 
disposed of within the European Union, this product should be treated and 
recycled in accordance with the laws of your jurisdiction implementing the 
WEEE Directive.


NETGEAR, the NETGEAR logo, and Connect with Innovation are trademarks and/or 
registered trademarks of NETGEAR, Inc. and/or its subsidiaries in the United States and/
or other countries. Information is subject to change without notice. Other brand and 
product names are registered trademarks or trademarks of their respective holders. © 
2012 NETGEAR, Inc. All rights reserved.

Summary of Contents for HS101ADT-1ADNAS

Page 1: ...ADT Pulsesm Interactive Solutions Touch Screen Installation Guide Model HS101ADT 1ADNAS ...

Page 2: ... rights reserved ADT the ADT logo 800 ADT ASAP and the product service names listed in this document are marks and or registered marks Unauthorized use is strictly prohibited Licence number RBQ 3019 4070 50 2012 ADT Security Services Canada Inc All rights reserved ADT the ADT logo 800 ADT ASAP and the product service names listed in this document are marks and or registered marks Unauthorized use ...

Page 3: ...3 ADT Pulsesm Interactive Solutions Touch Screen Installation Guide Package Contents Touch Screen Model HS101ADT 1ADNAS Touch Screen 12V Power Adapter USB Adapter Installation Guide ...

Page 4: ...m Interactive Solutions Touch Screen Installation Guide Hardware Features The Touch Screen includes a Stand Home button and controls shown here and described below 3 12V power port 4 USB port 2 Home button 1 Stand ...

Page 5: ...tton Tap the Home button at any time to perform the following actions Tap once to return to the previous screen Press and hold the Home button for approximately ten seconds or more to display a menu Touch Restart to reboot the Touch Screen Touch Power Off to turn off the Touch Screen Note If a selection is not made the Touch Screen will automatically restart 3 12V power port Input for the 12V powe...

Page 6: ...een Installation Guide Configuring the Touch Screen for Installation to the ADT Pulse System 1 Plug the USB adapter into the USB port located on the back of the Touch Screen 2 With an Ethernet cable connect the USB adapter to the gateway LAN port ...

Page 7: ...7 ADT Pulsesm Interactive Solutions Touch Screen Installation Guide 3 Plug the 12V power adapter into the 12V power port ...

Page 8: ...e Privacy Policy ADT Security Services Inc Sign In Username Username domain com Password Please Sign In Forgot your username or password Your use of this site signifies that you accept the ADT Pulse Website Terms of Use Agreement c 2010 ADT Security Services Inc and c 2010 ADT Security Services Canada Inc ADT and the ADT logo are registered trademarks of ADT Services AG and are used under license ...

Page 9: ...ystem D e v i c e s Site Settings Wednesday Nov 30 Users My Profile My Profile History N a m e S y s t e m Security Panel Z o n e About Contact Us Customer Support Terms of Use Privacy Policy ADT Security Services Inc Device Type Rec ent Alarm Gateway powered by Control Manage Devices Al arm arm rm m age Devices Help Front Door Motion Detector Back Door S e n s o r s R e m o t e s 4 Button Remote ...

Page 10: ...on Guide 4 In the Manage Devices Assistant window click Touch Screens Cancel Manage Devices Assistant Help Touch Screens Click here to add touch screens Cameras Click here to add wired and wireless cameras Lights Thermostats more Click here to add Z Wave devices ...

Page 11: ... Device Step Four Adding Device Step Five Done Continue Select Model Touch Screen Assistant This assistant will guide you through the steps to add a Touch Screen Note Only approved devices are supported to work with your ADT Pulsesm system Non approved devices may not perform as expected Select the model of the device you are installing Step One Select Touch Screen Select Touch Screen 7 GE Touch S...

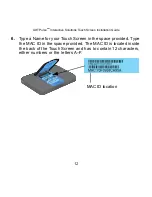
Page 12: ...stallation Guide 6 Type a Name for your Touch Screen in the space provided Type the MAC ID in the space provided The MAC ID is located inside the back of the Touch Screen and has to contain 12 characters either numbers or the letters A F MAC ID location ...

Page 13: ...ouch Screen Assistant 7 Click Continue Continue Back Cancel Step One Step Two Select Model Step Two Name Device Step Three Connect Device Step Four Adding Device Step Five Done Continue Name Device Touch Screen Assistant Enter a name for your Touch Screen Next locate the MAC ID on the back of the Touch Screen and enter it below Name MAC ID Bedroom Touch Screen F12345678901 ...

Page 14: ... displayed Click Continue Continue Back Cancel Step One Step Three Select Model Step Two Name Device Step Three Connect Device Step Four Adding Device Step Five Done Continue Connect Device Touch Screen Assistant Connect the USB Ethernet Adapter to your Touch Screen Connect the USB Ethernet Adapter to the Device LAN port of your Gateway with an Ethernet cable Note this is a required but temporary ...

Page 15: ...ded to your system Note Adding the Touch Screen can take up to one to two minutes Cancel Touch Screen Assistant Step One Step Four Select Model Step Two Name Device Step Three Connect Device Step Four Adding Device Step Five Done Adding Device We are adding your touch screen This may take a few seconds ...

Page 16: ... web portal Finish Add Another Cancel Step One Step Five Select Model Step Two Name Device Step Three Connect Device Step Four Adding Device Step Five Done Finish Done Touch Screen Assistant Your touch screen has been added You may now disconnect and move the touch screen to your desired location If you are finished adding touch screens click Finish If you have another touch screen to add click Ad...

Page 17: ... USB adapter 11 Disconnect the USB adapter from the Touch Screen Move the Touch Screen and power supply to your desired location 12 Once you move the Touch Screen to your desired location it may take up to 5 minutes to connect to the system If the Touch Screen does not connect refer to Troubleshooting number 2 ...

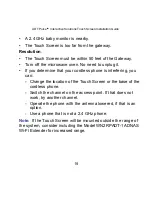
Page 18: ...he connection between the Touch Screen and the gateway is lost Resolution Touch the logo in the top left corner Then touch Version Information on the resulting screen to display technical information about your Touch Screen 2 Wi Fi Connection Lost or intermittent Wi Fi connection Reason If the microwave oven is on it can disrupt Wi Fi service 2 4 GHz cordless telephones can interfere with the Touc...

Page 19: ... determine that your cordless phone is interfering you can Change the location of the Touch Screen or the base of the cordless phone Switch the channel on the access point If that does not work try another channel Operate the phone with the antenna lowered if that is an option Use a phone that is not a 2 4 GHz phone Note If the Touch Screen will be mounted outside the range of the system consider ...

Page 20: ...peration to only the channels allowed in a particular Region or Country Therefore all options described in this user s guide may not be available in your version of the product FCC Requirements for Operation in the United States FCC Information to User This product does not contain any user serviceable components and is to be used with approved antennas only Any product changes or modifications wi...

Page 21: ...his equipment has been tested and found to comply with the limits for a Class B digital device pursuant to Part 15 of the FCC Rules These limits are designed to provide reasonable protection against harmful interference in a residential installation This equipment uses and can radiate radio frequency energy and if not installed and used in accordance with the instructions may cause harmful interfe...

Page 22: ...e must accept any interference received including interference that may cause undesired operation For product available in the USA market only channel 1 11 can be operated Selection of other channels is not possible This device and its antenna s must not be co located or operation in conjunction with any other antenna or transmitter Canadian Department of Communications Radio Interference Regulati...

Page 23: ... environment This equipment should be installed and operated with minimum distance 20cm between the radiator your body Caution Ce dispositif est conforme à la norme CNR 210 d Industrie Canada applicable aux appareils radio exempts de licence Son fonctionnement est sujet aux deux conditions suivantes 1 le dispositif ne doit pas produire de brouillage préjudiciable et 2 ce dispositif doit accepter t...

Page 24: ...mmended minimum distance between NETGEAR equipment and household appliances to reduce interference in feet and meters Household Appliance Recommended Minimum Distance in feet and meters Microwave ovens 30 feet 9 meters Baby Monitor Analog 20 feet 6 meters Baby Monitor Digital 40 feet 12 meters Cordless phone Analog 20 feet 6 meters Cordless phone Digital 30 feet 9 meters Bluetooth devices 20 feet ...

Page 25: ... European Union Directive 2002 96 on the Waste Electrical and Electronic Equipment the WEEE Directive If disposed of within the European Union this product should be treated and recycled in accordance with the laws of your jurisdiction implementing the WEEE Directive NETGEAR the NETGEAR logo and Connect with Innovation are trademarks and or registered trademarks of NETGEAR Inc and or its subsidiar...

Page 26: ...ADT Security Services October 2012 ...

Reviews: