NetVanta 1531/1534/1544 Series
NetVanta 1131 RPS/EPS
61702590G1-34H
Copyright © 2019 ADTRAN, Inc.
45
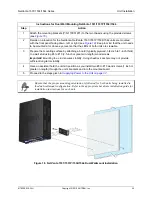
Connecting the NetVanta 1131 and the NetVanta Switch
Follow these instructions to connect your NetVanta 1131 RPS/EPS to your NetVanta switch
.
1
Ensure that all power sources have been removed from the NetVanta 1131 and the NetVanta
switch(es) to be connected.
2
With a Phillips head screwdriver, remove the cover plates from both the NetVanta 1131
RPS/EPS receptacles and the NetVanta switch’s RPS/EPS receptacles on the rear panels of
the units.
Important!
Do not remove the cover plates from the RPS/EPS receptacles unless you plan to
use them.
3
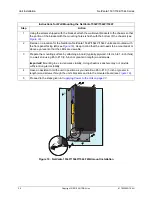
Insert one end of the RPS cable (P/N 1700532F1 sold separately) into a receptacle labeled
RPS1
,
RPS2
, or
RPS3
located on the rear panel of the NetVanta 1131. Press the connector
until the pins are fully inserted and the base of the connector is flush with the unit.
Important!
Do not use excessive force. If the connector does not insert easily, check to ensure
you are inserting the correct connector into the unit.
4
Insert the connector on the other end of the RPS cable into the receptacle labeled
RPS
located
on the rear panel of the NetVanta switch. Press the connector until the pins are fully inserted
and the base of the connector is flush with the unit.
5
If you plan to use the NetVanta 1131 as an EPS, repeat Steps 1 through 4 using the EPS cable
(P/N 1700533F1 sold separately) and the receptacles labeled
EPS
located on the rear panels
of the NetVanta 1131 and the NetVanta switch and an EPS cable.
6
To remove an RPS or EPS cable from the unit, pinch the sides of the connector and pull gently
to release it from the receptacle.
7
Proceed to
Powering the NetVanta 1131 and the NetVanta Switch on page 46
Instructions for Connecting the NetVanta 1131 to the NetVanta Switch
Step
Action

