background image

Version 1 

Using the stove 

Mounting the Wi-Fi antenna 

During transportation, the Wi-Fi antenna is dismounted and is placed in the combustion chamber. Therefore, 
the antenna must be screwed to the back of the stove in order to establish the Wi-Fi connection. 


Control 

The stove can be operated with the remote control, the Aduro pellet stove app or the most basic functions 
via the control panel on the side of the stove. 

Ensure that the stove is connected to a power source and to the chimney. We recommend using the remote 
for the initial start and setup of the stove. 


Remote control 

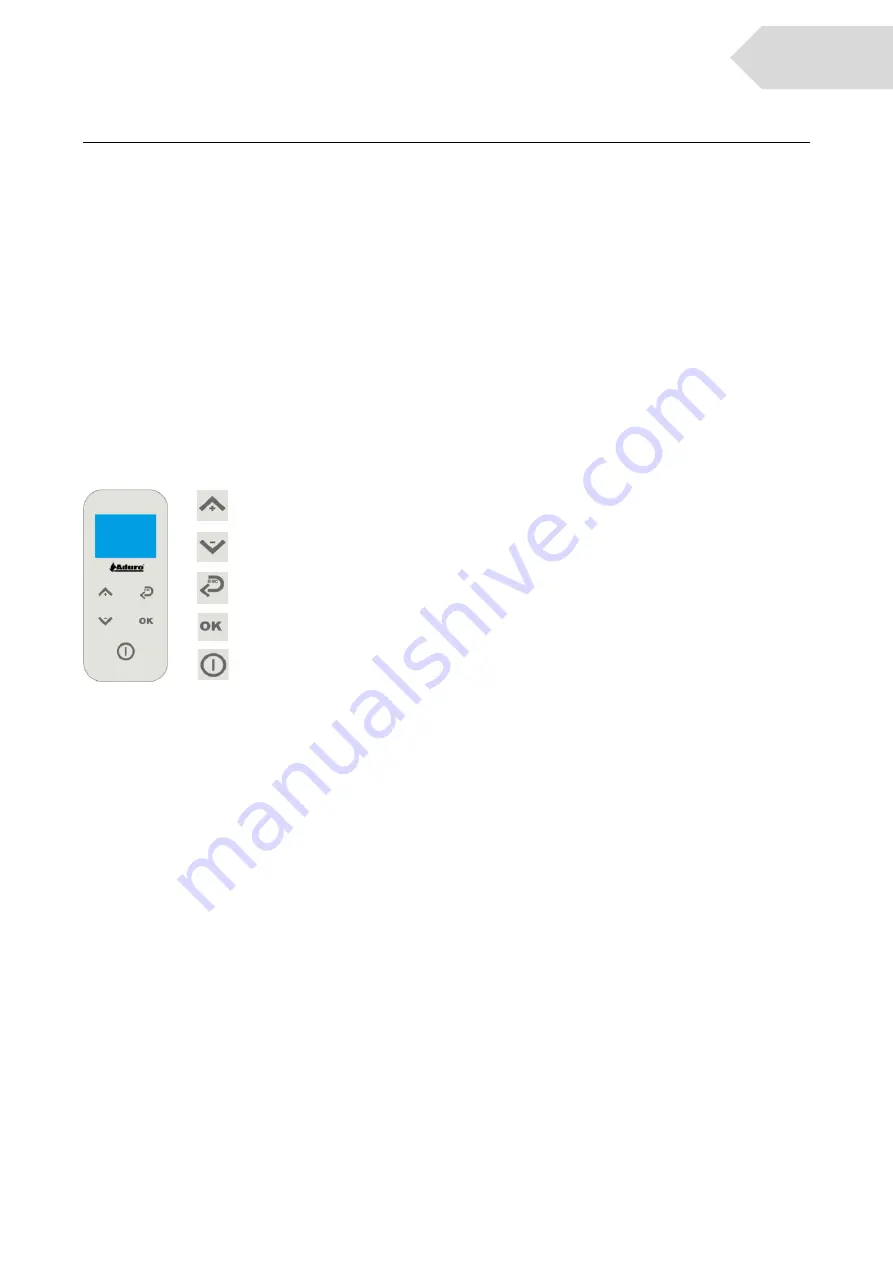
The remote shows basic information about the stove’s operation and has 5 buttons for various settings (see 
illustration below). 


You can define the desired room temperature and/or the heat level (1-5), at which the stove should start.  


Temperature control 

Push the “+” button to select the room temperature setting and use the buttons “+” and “–“ to increase or 
decrease the temperature. 

Then hold the “ON/OFF” button to turn on the stove. Now, use the “–” button to 

select the heat level. The higher the heat level, the faster the desired temperature will be reached. Once the 
temperature is reached, the stove will regulate the heat level up and down automatically to maintain the 
chosen temperature. 

When the stove is running by room temperature, it will automatically use the temperature sensor placed on 
the lower back part of the stove. The remote control also contains a temperature sensor that can be used 
instead. Using the sensor on the remote makes it possible to read the room temperature further away from 
the stove and it thus gives a more accurate reading. The sensor on the remote is activated via the remote by 
choosing OK -> USER SETTINGS -> CHOOSE PROBE -> ON BOARD (on stove) / REMOTE (on remote). 

If it is desired to run the stove at a fixed heat level without temperature control, set the temperature at for 
instance 10° higher than the room temperature and then set the stove at the desired heat level. 


Room temperature setting, change menu 

Heat level setting, change menu 

Back, exit 

Confirm, menu 

ON/OFF, exit 

EN 

Summary of Contents for P5 Series

Page 1: ...en og tilslutningen udf res af en autoriseret servicepartner i overensstemmelse med europ iske og nationale standarder lokale bestemmelser og vedlagte monteringsinstruktioner Pilleovnen fungerer udelu...

Page 2: ...en Hold derefter knappen t nd sluk nede for at t nde ovnen Derefter benyttes knappen til at indstille varmeniveauet Jo h jere varmeniveau jo hurtigere vil den nskede temperatur opn s N r den nskede te...

Page 3: ...yk p tandhjulsikonet og indstille den til at k re efter varmeniveau rumtemperatur eller kalenderfunktion Selve ops tningen af kalenderen foreg r via fjernbetjeningen F rste p fyldning af piller Efter...

Page 4: ...r ret ved sneglen under br ndehulen M nedlig eller efter behov En gang om m neden skal du fjerne vermiculitestenene i br ndkammeret for at g re rent bn inspektionsl gerne i bagv ggen og bunden reng r...

Page 5: ...rd Stellen Sie sicher dass der Brennkegel korrekt und sauber platziert ist bevor Sie erneut z nden Wir empfehlen dass Installation und Anschluss von qualifiziertem Fachpersonal durchgef hrt werden Eur...

Page 6: ...und oder Heizstufe festlegen mit denen der Ofen starten soll Temperaturkontrolle Dr cken Sie die Taste um die Einstellungen f r die Raumtemperatur zu w hlen und nutzen Sie die Tasten und um die Temper...

Page 7: ...den Ofen starten dr cken Sie das Zahnradsymbol und w hlen Sie ob er mit Heizstufe Raumtemperatur oder Kalender laufen soll Die Einrichtung des Kalenders wird mit der Fernbedienung vorgenommen Erstes...

Page 8: ...em kleinen Schraubendreher oder einer kleinen Milchschlauchb rste Monatlich oder nach Bedarf Entfernen Sie die Vermiculite Isolierplatten aus der Brennkammer ffnen Sie die berpr fungs ffnungen in der...

Page 9: ...horized service partner in compliance with local regulation national and European standards and with the annexed installation instructions The pellet stove operates exclusively with wood pellets compl...

Page 10: ...the temperature Then hold the ON OFF button to turn on the stove Now use the button to select the heat level The higher the heat level the faster the desired temperature will be reached Once the temp...

Page 11: ...th pellets for the first time the auger needs to be filled with pellets Move the brazier so you can see the top of the internal auger Close the door so the door sensor is activated and use the menu IN...

Page 12: ...the inspection openings in the back wall and bottom and clean the smoke way and ventilators smoke fan with a vacuum cleaner After cleaning close openings and reinstall the insulation stones The frequ...

Page 13: ...toriserad servicepartner i enlighet med lokala best mmelser nationella och europeiska standarder och de bifogade installationsanvisningarna Pelletskaminen drivs uteslutande med tr pellets i enlighet m...

Page 14: ...ler s nka temperaturen H ll sedan in knappen AV P f r att starta kaminen Anv nd nu knappen f r att v lja v rmeniv Ju h gre v rmeniv desto snabbare kommer den nskade temperaturen uppn s N r temperature...

Page 15: ...llts med pellets f rsta g ngen m ste skruvtransport ren fyllas med pellets Flytta br nnkoppen s att du ser toppen p den interna skruvtransport ren St ng luckan s att lucksensorn aktiveras och anv nd m...

Page 16: ...br nnkammaren varje m nad ppna inspektionsluckorna nertill i den bakre v ggen och reng r r kv gen och r kgasfl kten med en dammsugare St ng ppningarna och s tt tillbaka isoleringsstenarna efter reng...

Page 17: ...a encender la estufa Recomendamos que la instalaci n y puesta en marcha la realice t cnico autorizado La instalaci n tiene que cumplir la normativa local nacional y europea as como las instrucciones...

Page 18: ...intos ajustes ver ilustraci n En el mando a distancia permite regular la temperatura ambiente y o la pontencia 1 5 en la que debe encenderse la estufa Control de temperatura Cuando se alcanza la tempe...

Page 19: ...calendario Para configurar la estufa en modo calendario hay que usar el control remoto Primera recarga de pellet Despu s de llenar el contenedor de pellets por primera vez hay que cargar el sinf n tam...

Page 20: ...os los meses hay que retirar las placas de vermiculita en la c mara de combusti n Abrir las trampillas de inspecci n en la pared trasera y la parte inferior Limpiar la salida de humos y aspirar los ve...

Page 21: ...eseguire l installazione ed il collegamento da un partner di assistenza autorizzato nel rispetto della normativa locale delle norme nazionali ed europee e delle istruzioni di installazione allegate La...

Page 22: ...tire la stufa Controllo della temperatura Una volta raggiunta la temperatura la stufa regoler automaticamente il livello di potenza adatto per mantenere la temperatura scelta Quando la stufa in funzio...

Page 23: ...er la prima volta il serbatoio del pellet necessario riempire le coclee Sposta il braciere in modo da poter vedere la parte superiore della coclea interna Chiudere la porta in modo che il sensore si a...

Page 24: ...di ispezione nella parete posteriore e nella parte inferiore e pulire i passaggi dei fumi insieme alle ventole con un aspiracenere Dopo la pulizia chiudere le aperture e reinstallare le piastre di ver...

Page 25: ...ainoastaan puupelletti joka t ytt standardien DINplus tai ENplus 14961 2 A1 tai PEFC 04 31 0220 tai ONORM M7135 vaatimukset Reklamaatio oikeus Tanskan lains d nt n kuuluvan tavaroiden myyntilain mukai...

Page 26: ...s tai alasp in automaattisesti pit en yll valittua l mp tilaa Jos uuni toimii huonel mp tilan mukaan se k ytt automaattisesti uunin takapaneelin alaosaan kiinnitetty l mp tila anturia Vaihtoehtoisest...

Page 27: ...l Siirr polttokammiota niin ett n et uunin sis ll olevan sy tt ruuvin yl osan Sulje luukku jotta ovianturi kytkeytyy p lle ja siirry kauko ohjaimen INITIAL LOAD valikkoon K ynnist sy tt ruuvit 6 minuu...

Page 28: ...lkeen sulje tarkistusaukot ja nosta erist v t kivet paikoilleen tulipes n Valitse puhdistusv lit sen mukaan kuinka hyvin pelletit palavat Mit paremmin ne palavat sit v hemm n j mi ker ntyy tulipes n i...

Page 29: ...seren de installatie en aansluiting uit te laten voeren door een bevoegde servicepartner overeenkomstig de plaatselijke wetgeving en nationale en Europese normen en aan de hand van de meegeleverde ins...

Page 30: ...mperatuurregeling Druk op de knop om de instelling voor de kamertemperatuur te selecteren en gebruik de en om de temperatuur te verhogen of te verlagen Houd de AAN UIT knop vervolgens ingedrukt om de...

Page 31: ...ngesteld met de App voor Aduro pelletkachels kunt u de kachel starten druk op het tandwielpictogram daarna selecteert u run by heat level branden op basis van verwarmingsniveau room temperature kamert...

Page 32: ...ks of afhankelijk van het gebruik Verwijder de isolatiestenen in de verbrandingskamer iedere maand Open de inspectieopeningen in de achterwand en de bodem en reinig het rookkanaal en de ventilatoren r...

Reviews: