FORM NO. 56043111 - Adhancer
™
-
71
APPENDIX
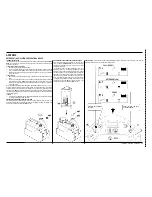
DETERGENT (AXP) SYSTEM PREPARATION AND USE
COMMON INSTRUCTIONS:
The system should be purged of previous detergent when switching to a different detergent.
SERVICE
NOTE:
Move machine over
fl
oor drain before purging because a small amount of detergent will be
dispensed in the process.
To Purge When Changing Detergents:
1
Disconnect and remove the detergent cartridge.
2 Turn the Key Switch
(A)
ON and press the Detergent Switch
(F)
and the Solution Switch
(B)
down for at least 2 seconds.
NOTE:
Once activated the purge process takes 10 seconds. See
illustration on next page for Detergent System indicators. Normally one purge cycle is adequate
to purge the system.
To Purge Weekly:
1 Disconnect and remove the detergent cartridge. Install and connect a Cartridge
fi
lled with clean
water.
2 Turn the Key Switch
(A)
ON and press the Detergent Switch
(F)
and the Solution Switch
(B)
down for at least 2 seconds.
NOTE:
Once activated the purge process takes 10 seconds. See
illustration on next page for Detergent System indicators. Normally one purge cycle is adequate
to purge the system.
When the Detergent Cartridge is almost empty a Display Panel
(D)
indicator will come on. This “Low
Detergent” indicator will remain on until you reset the system. Once this indicator comes on you should
be able to simply pour an entire gallon bottle of detergent into the Cartridge to re
fi
ll without worrying
about measuring.
NOTE:
Only reset the system when the cartridge is full. When switching cartridges,
the “Low Detergent” indicator is only accurate if the replacement cartridge is at the same level as the
cartridge being replaced.
To Reset:
1
Turn the Key Switch
(A)
ON and hold the Detergent Switch
(F)
down for 2 seconds. See illustration
on next page for Detergent System indicators.
DISPOSABLE CARTRIDGE SPECIFIC INSTRUCTIONS:
The standard detergent “Adhancing Agent” comes in a cartridge without the magnetic slider. The
machine will default to the correct dilution ratio. Remove the Cap
(AA)
and place the cartridge in the
detergent box. Install the Dry Break Cap
(BB)
as shown.
NON-DISPOSABLE CARTRIDGE SPECIFIC INSTRUCTIONS:
Fill the detergent cartridge with a maximum of 1.25 gallons (4.73
Liters) of detergent.
SERVICE NOTE:
Remove the detergent
cartridge from the detergent box prior to
fi
lling to avoid spilling
detergent on the machine.
It is recommended that a separate cartridge be used for each
detergent you plan to use. The detergent cartridges have a white
decal on them so you can write the detergent name on each cartridge
to avoid mixing them up. The detergent cartridge has a Magnetic
Slider
(CC)
on one end that needs to be set to the proper dilution
ratio according to the dilution instructions on the manufacturer’s
bottle. Slide the Magnet Slider
(CC)
to the appropriate location
on Detergent Dilution Ratio Decal
(DD)
. When installing a new
cartridge, remove the Cap
(AA)
and place the cartridge in the
detergent box. Install the Dry Break Cap
(BB)
as shown.
SERVICE NOTE:
Refer to
MAIN CONTROL PROGRAMMING OPTIONS, Detergent Use Ratio Selection
to electronically
program the chemical ratio if your cartridge has no magnetic slider.
FULL (RESET)
DETERGENT LOW
PURGE
Press (F) for 2 seconds
to reset.
Press (F) and (B) for 2
seconds to purge.
Summary of Contents for Adhancer 56316001(W32-C)
Page 1: ...7 08 FORM NO 56043111 SERVICE MANUAL Models 56316000 W28 C 56316001 W32 C Adhancer...
Page 2: ......
Page 7: ...FORM NO 56043111 Adhancer 5 TECHNICAL SPECIFICATIONS...
Page 25: ...FORM NO 56043111 Adhancer 23 SCRUB SYSTEM FIGURE 2...
Page 51: ...FORM NO 56043111 Adhancer 49 FIGURE 4...
Page 53: ...FORM NO 56043111 Adhancer 51 FIGURE 5 ELECTRICAL SYSTEM...
Page 59: ...FORM NO 56043111 Adhancer 57 FIGURE 6 ELECTRICAL SYSTEM...
Page 68: ......
Page 74: ......


