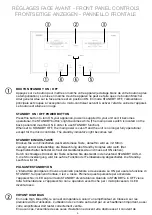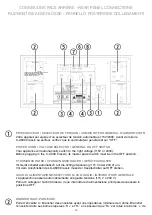
RÉGLAGES FACE AVANT - FRONT PANEL CONTROLS
FRONTSEITIGE ANZEIGEN - PANNELLO FRONTALE
BOUTON STANDBY ON / OFF
Appuyez sur ce bouton pour mettre en marche votre appareil (éclairage blanc de votre bouton après
sa temporisation). La mise en marche de votre appareil ne peut se faire que si le bouton Marche/
Arrêt général situé sur la face arrière est en position ON. En mode STANDBY OFF, l’alimentation
principale est coupée à l’exception du micro-contrôleur servant à activer l’état de veille de l’appareil.
Le bouton est allumé en rouge.
STANDBY ON / OFF POWER BUTTON
Press this button to turn ON your appliance, power is supplied to your unit and it becomes
operational, the STANDBY button’s light becomes white. (The main power switch is located on the
back panel and must be ON in order to use STANDBY function).
When set to STANDBY OFF, the main power is cut-off and the unit is no longer fully operational
except for the micro controller. The standby indicator’s light becomes red.
STANDBY EIN/AUS-TASTE
Drücken Sie zum Einschalten des Geräts diese Taste, daraufhin wird es mit Strom
versorgt und ist betriebsfähig; die Beleuchtung des Standby Knopfes wird weiß. (Der
Hauptnetzschalter befindet sich auf der Geräterückseite und muss auf ON stehen).
Durch nochmaliges Drücken der Taste schalten Sie das Gerät in den Zustand STANDBY AUS, d.
h. die Stromversorgung wird bis auf die Funktion der Fernbedienung abgeschaltet. Die Standby-
Leuchte wird rot.
PULSANTE STANDBY/ON
L’interruttore principale si trova sul pannello posteriore e deve essere su ON per usare la funzione di
STANDBY. Sul pannello frontale, il led è rosso. Premere questo pulsante per accendere
l’apparecchio; il LED sopra il tasto STANDBY diventa bianco Quando lo STANDBY è in OFF viene
tolta l’alimentazione e l’apparecchio non è operativo eccetto che per i microprocessori. Il LED
diventa rosso.
VOYANT HIGH BIAS
En mode High Bias (ON), le son est comparable à celui d’un amplificateur en Classe A sur les
premiers watts d’utilisation. L’utilisation de ce mode se traduit par un échauffement important, aussi
votre amplificateur doit rester correctement ventilé.
En aucun cas, l’ensemble de ses ouies d’aération ne doivent être obstruées et il convient de
w
q
q
w
e
e
r
t
y
6


