AirFusion™ Inflatable Kayak Owner’s Manual
13
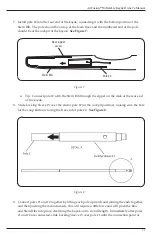
10. Moving to one side of the kayak, you will install poles #4 and #5.
See Figure 11.
Slide pole
#4 into the Velcro guide loops along the main inflation chambers at the side of the kayak.
The two loops you will need for this pole are at the front end of the kayak, along the
side, and at the midpoint, also along the side.
a. Tip: Access the front guide loop through the front deck zipper.
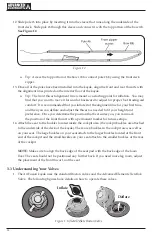
Slide pole #5 along the main inflation chambers towards the rear of the kayak and secure it
into place using the rear Velcro guide loop that is located along the side of the kayak at the
stern of the boat.
a. Tip: Access the rear guide loop through the rear deck zipper.
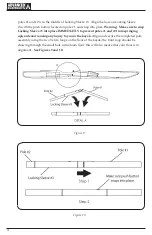
After positioning poles #4 and #5, connect the two ends, making sure that the holes on
the ends of each pole are aligned, and lock them together with the spring snap at the
end of pole #5.
See Figure 11.
Once poles #4 and #5 are interlocked, align the joining seam of the two poles with the
arrows located on the tube sleeves in the cockpit area.
b. Tip: The alignment arrows on the tube sleeves are meant as a guideline for aligning
your poles. Do not be concerned if they are not perfectly aligned after the kayak has
been inflated.
11. Move to the other side of the kayak and repeat step #10.
See Figure 11.
Figure 11
Summary of Contents for AirFusion AE1040-Y
Page 22: ...TM 22 NOTES...
Page 23: ...AirFusion Inflatable Kayak Owner s Manual 23 NOTES...
Page 24: ...NOTES...


