background image

Artisan Technology Group - Quality Instrumentation ... Guaranteed | (888) 88-SOURCE | www.artisantg.com

Summary of Contents for MDX 10K

Page 1: ...l service in house repair center WE BUY USED EQUIPMENT Sell your excess underutilized and idle used equipment We also offer credit for buy backs and trade ins www artisantg com WeBuyEquipment REMOTE INSPECTION Remotely inspect equipment before purchasing with our interactive website at www instraview com LOOKING FOR MORE INFORMATION Visit us on the web at www artisantg com for more information on ...

Page 2: ...tic input voltage 200 208 V ac ADVANCED ENERGY INDUSTRIES INC 1600 Prospect Parkway Fort Collins Colorado 80525 303 221 4670 Telex 45 0938 PN 5700092 D March 1993 Artisan Technology Group Quality Instrumentation Guaranteed 888 88 SOURCE www artisantg com ...

Page 3: ...e the list on the next page 1991 Advanced Energy Industries Inc All rights reserved Printed in the United States of America This manual is supplied to enable the reader to safely install operate and service the equipment described herein Making copies of any part ofthis manual for any purpose otherthan these is a violation of U S copyright law In the interest of providing even better equipment Adv...

Page 4: ...ason for the proposed return This consultation call will allow Customer Service to determine if the unit must actually be returned for the problem to be corrected Such technical consultation is always available at no charge If you return a unit without first getting authorization from Customer Service and that unit is found to be functional you will have to pay a retest and calibration fee and all...

Page 5: ...ent produces potentially lethal high voltage and high current energy You should read this manual and understand its contents before you attempt to hook up or operate the equipment it describes Follow all safety precautions Never defeat interlocks or grounds DANGER All personnel who work with or who are exposed to this equipment must take precautions to protect themselves against serious or possibl...

Page 6: ...out turning the output off Three interfaces are available a control panel connected or remote an analog digital port and an RS 232 port Control can be given exclusively to any or1e interface or distributed among two orthree ofthem Each MDX is equipped with a built in impedance matching transformer These transformers are available in low impedance standard impedance and high impedance configuration...

Page 7: ...RT II OPERATING YOUR MDX MAGNETRON DRIVE 3 PREPARING FOR USE Table of Contents 3 3 Setting Up 3 5 Making Rear Panel Connections 3 13 First time Operation 3 31 4 CHOOSING MODES SETTINGS Table of Contents 4 1 Output Regulation 4 5 Program Mode 4 5 Lock Mode 4 19 Remotes 4 21 Tap Selection 4 27 Impedance Options 4 45 Line Voltage Changes 4 47 Master Slave Operation 4 49 5 USING THE SPECIAL FEATURES O...

Page 8: ...RON DRIVE 6 OPERATING NOTES DC Bias DC 1 7 HOOK UP NOTES Grounding Gmd 1 TROUBLESHOOTING GUIDE APPENDIX warranty and claims infonnation Index Schematics Artisan Technology Group Quality Instrumentation Guaranteed 888 88 SOURCE www artisantg com ...

Page 9: ...o guide you through the manual Overview ofthe Manual explains the organization ofthe manual so that you can more quickly find what you need Interpreting the Manual explains the type conventions what it means when a word appears in capitalized italic type for instance and what the five icons symbols mean Physical specifications Connectors Setting up Start up procedures Control panel switches and LE...

Page 10: ...ndicators and messages and suggested responses are briefly discussed and functions that are available through each ofthe interfaces are described The transmission parameters for the Host RS 232 port are also included in this section as are several tables detailing recognized commands and explaining possible responses to those commands Part II consists ofthree chapters Preparing for Use Choosing Mo...

Page 11: ...ion which is standard and the optional ARC CHECKN and fast ramp features Part Ill contains two technical operating notes one on de bias and one on grounding considerations X Artisan Technology Group Quality Instrumentation Guaranteed 888 88 SOURCE www artisantg com ...

Page 12: ...s which simply begin with a capital letter User port Specific messages that will appear on the control panel meters are indicated by quotation marks E 02 1 Functions are printed in boldface lowercase letters contactor hold How to Use the Symbols YO U_ __ SHOULD KNOW Safety notes Important notes concerning potential harm to people Warning notes Important notes concerning possible harm to this unit ...

Page 13: ...ncerning input and output power connections or used in connecting communication and control interfaces Service notes General practices to be used in maintaining this equipment in top running condition xii Artisan Technology Group Quality Instrumentation Guaranteed 888 88 SOURCE www artisantg com ...

Page 14: ...PART I GETTING TO KNOW YOUR MDX MAGNETRON DRIVE Artisan Technology Group Quality Instrumentation Guaranteed 888 88 SOURCE www artisantg com ...

Page 15: ...Typical Applications 1 9 Basic Magnetron Sputtering 1 9 Factory Configuration Negative Output 1 9 Optimum Configuration Positive or Negative Output 1 10 Optimum Configuration Floating Output 1 12 DC Sputtering with RF Bias 1 13 De biased RF Sputtering 1 15 Specifications 1 17 Functional Specifications 1 17 Physical Specifications 1 19 1 3 Artisan Technology Group Quality Instrumentation Guaranteed...

Page 16: ... transformer and tap see pages 4 27 and 4 45 load impedances requiring voltages from 400 V to 1250 V can be accomodated Plasma strike voltages are available on all taps levels reach as high as 1500 V depending on the model The full rated power output for each MDX is available throughout the range of each tap Output Regulation The MDX can be used as a power current or voltage source depending on th...

Page 17: ...ont panel indicators are provided for safety related inputs such as vacuum water and auxiliary user specified interlocks Arc suppression Circuitry ARC OUTTM provides multilevel suppression and quenching of different types of arcs An added advantage is that ARC OUT reduces target burn in time and material loss This feature also prevents energy from being dumped into hot spots by sensing a drop in i...

Page 18: ...mpedance increases with the removal of excess ions the power supply automatically crosses over to the previously selected method of output regulation power or voltage TimiQg and current magnitudes can be adjusted to protect sensitive targets and system components 1 7 Artisan Technology Group Quality Instrumentation Guaranteed 888 88 SOURCE www artisantg com ...

Page 19: ...gh this is not the optimum configuration The reason is related to safety most people associate the braided shield layer of a coaxial cable with a ground connection Ifwe shipped products with no internal ground it is conceivable that a system could be configured with a lethal voltage on the coaxial cable s sheath This would be extremely dangerous because ofthe possibility that people could unknowin...

Page 20: ...uld be checked as part of a periodic maintenance schedule to ensure continued optimum performance and safety Whenever a system is configured in this manner it is recommended that secondary dielectric shielding be installed over all parts ofthe coaxial cable and connectors that are exposed When this connection degrades as it will over time the system could become unsafe as described in the two prec...

Page 21: ...rough Anode MDX r ____ t Optional Grounded Substrate Rgure 1 2 Optimum grounding configuration negative output Insulated Feedthrough Anode MDX Chamber r 1 r Substrate Optional Grounded Substrate Agure 1 3 Optimum grounding configuration positive output 1 11 Artisan Technology Group Quality Instrumentation Guaranteed 888 88 SOURCE www artisantg com ...

Page 22: ...s type When using the MDX in this configuration it is again very important to provide a good chassis ground for each power supply Further all power supply chassis grounds should be connected at one common point All interconnecting power supply output lines and connectors must be fully insulated to protect personnel from accidental exposure to potentially lethal voltages Insulated Feedthrough MDX D...

Page 23: ...n damage the typical de magnetron power supply There is no need to put a filter between the RF tuner output and the chamber because Advanced Energy tuners provide a de block The purpose of this type of installation is to elevate the potential on the biased substrate With proper installation and programming an Advanced Energy RFX can control the developed de bias on the substrate see the operating ...

Page 24: ...nsulated Feedthrough Power Supply Tuner RF Filter Target Substrate _j Alternate Method Figure 1 5 Typical configuration for de sputtering with RFbias 1 14 MDX DC Artisan Technology Group Quality Instrumentation Guaranteed 888 88 SOURCE www artisantg com ...

Page 25: ...ld only be used with extreme caution if there is no way to mount the tuner directly to the vacuum feedthrough The impedance transformation that takes place within the interconnect cable can create large circulating currents on this cable The power dissipated is a function of 1 2R losses This formula shows that any increase in circulating current greatly increases the losses in the cable In light o...

Page 26: ... copper strap Avoid using braid the fine strands within the braid form a highly inductive path and may melt from overheating Also avoid using stainless steel hardware steel is a poor conductor at high frequencies because of its ferromagnetic properties Brass hardware is most commonly used because brass is a good conductor and is readily available Power Supply Rgure 1 6 Typical configuration for RF...

Page 27: ... interface Control of output regulation ramp time output on off or target select can be split between the User port and the control panel or between the User port and the Host port The value that remains constant when the MDX is producing output can be power current or voltage An output level up to the unit s maximum rated output can be programmed for power current or voltage One of eight target l...

Page 28: ...ee page 5 5 for a discussion ofthe fast ramp range or a run time 0 01 99 min 0 01 99 sec with fast ramp specify how long output can be out of setpoint without triggering an alarm 0 01 2 55 min or program a target life 1 9900 kWh The faults that will cause the MDX to shut off output are interlock input power over temperature and out of setpoint if this feature is activated Other conditions that cau...

Page 29: ...is Per Output Ripple Output Ripple Power System 0 5000 w 1 0 10 000 w 1 0 15 000 w 2 0 20 000 w 2 0 25 000 w 3 0 30 000 w 3 Output Display Accuracy Target Accumulator Methods of Control 1 19 Voltage rms Frequency 5 50 kHz 2 100kHz 2 100kHz 2 100kHz 2 100kHz 2 100kHz Within 2 of actual output level or 0 2 of maximum rated output level whichever is greater Target life is displayed in 1 kWl increment...

Page 30: ...n and ensure that the macimum ambient temperature is not exceeded Minimum 25 C maximum 55 C Minimum 25 C maximum 55 C for short periods of up to 24 hr the maximum is 70 C Air gas minimum 0 C maximum 35 C Coolant Flow Parameters Contamination Cooling air should be free of corrosive vapors and particles conductive particles and particles that could become conductive after exposure to moisture Humidi...

Page 31: ...is in voltage regulation see page 4 3 MDX20K MDX25K MDX30K Maximum Output Current Low Impedance Low Z 25 00A 37 50A 50 00A 62 50A 75 00A 20 00A 30 00A 40 00A 50 00A 60 00A 15 50 A 23 50A 31 00 A 38 75A 46 50A Maximum Output Current Standard Impedance Standard Z 20 00A 30 00A 40 00A 50 00A 60 00A 16 00 A 24 00A 32 00A 40 00A 48 00A 12 50 A 18 75 A 25 00A 31 25 A 37 50A Maximum Output Current High I...

Page 32: ...ol Panels 2 15 Status Indicator LEDs Passive Front Panel 2 16 LEOs on Switches 2 17 Digital Meter LEOs 2 21 Messages 2 23 Interfacing 2 25 Control Panel Controls 2 25 User Port Functions 2 31 Host Port 2 33 Transmission Parameters 2 33 Requests for Data 2 34 S status change Commands 2 36 Commands To Set Variables 2 38 Responses to Requests for Interlock Status 2 40 Responses to Requests for System...

Page 33: ...e de voltage is applied to bus capacitors through soft start circuitry This bus provides de voltage to the inverter section The input section also supplies 120 V ac to the housekeeping and inverter sections Housekeeping Supply The housekeeping supply section provides 24 V de to power the logic circuitry and control panel Inverter The inverter section converts de to pulse width modulated 25 kHz ac ...

Page 34: ...nsformer Ripple Choke Output Rectifier Bridge l ___ v _____ J L__ __j y Rgure 2 2 Illustration ofswitching theory Upper Transistor Current Flow Lower Transistor Current Flow Rgure 2 3 Detail ofFig 2 2 illustrating current flow through switching transistors dashed lines represent flow 2 4 Artisan Technology Group Quality Instrumentation Guaranteed 888 88 SOURCE www artisantg com ...

Page 35: ...iding status information to the operator through all interfaces and for controlling the input section Control Panel Display The display on the control panel communicates RS 232 operator supplied inputs to the logic control section and provides the operator with status information Remote Interfaces Both remote interfaces communicate operator supplied inputs to the logic control section from the Hos...

Page 36: ...mphenol 83 822 or atwo pin terminal block Remote Control Panel Connector Connections for a remote Advanced Energy display panel are made through a 25 pin female D subminiature connector See page 3 26 for details on making this connection An MDX with a full function front panel that is a control panel that is an integrated part of the unit will not function correctly if a remote panel is connected ...

Page 37: ... a digital signal A bar over a signal name indicates that the signal is true when low Pin Name Description Refer to CS1 D output used with pin 20 0 15 V p 3 18 OUTPUT D output 0 15 V p 3 18 SETPOINT D output 0 15 V p 3 18 TARGETO D input used with pins 34 and 35 p 3 18 0 15 v I REG D input used with pin 6 0 15 V p 3 18 PREG D input used with pin 5 0 15 V p 3 19 ON D input 0 15 V p 3 19 OUT OF SETP...

Page 38: ...t 0 5 V p 3 21 27 LEVEL IN A input 0 5 V p 3 21 28 unassigned 29 AUXJ OUT A output 0 5 V p 3 21 30 KWHOUT A output 0 5 V p 3 22 31 LEVEL OUT A output 0 5 V p 3 22 32 REF A 5 V reference level only 5 rnA max p 3 22 33 unassigned 34 TARGET2 D input used with pins 4 and 35 p 3 22 0 15 v 35 TARGET1 D input used with pins 4 and 34 p 3 22 0 15 v 36 IN COM D common used interchangeably with p 3 22 pin 19...

Page 39: ...ssigned Description data common data from MDX data to MDX data set ready connect to pin 7 data common Cathode Port Minipanel This port which appears only on the minipanel see the foldout at the end of this chapter provides external indication of what target counter has been selected with the CATHODE switches on the front ofthe minipanel The illustration on the next page shows internal relays with ...

Page 40: ...e possible target life counters is selected Master Slave Interface Connectors MASTER INTERCONNECT is a 15 pin male D subminiature connector which appears on MDX master units SLAVE INTERCONNECT is a 15 pin female D subminiature connector which appears on MDX slave units Stand alone MDXs do not have an interconnect port Refer to page 3 28 and page 4 49 for more information 2 11 Artisan Technology Gr...

Page 41: ...the signal goes low Indicates that an arc has been detected i e the impedance ofthe chamber dropped enough to cause the amount of current produced by the MDX to reach the built in overcurrent trip point when the signal goes low Indicates that programmed target life for selected target life counter has ended when the signal goes low Varying 0 5 V signal representing the output voltage Varying 0 5 V...

Page 42: ...w provides details Status Indicator LED Functional Status ARC Lights to indicate that the impedance of the chamber dropped enough to cause the amount of current produced by the MDX to reach the built in overcurrent trip point indicates that an arc has been assumed and the ARC OUT circuit has been activated An alarm will also sound RAMP Lights when output is ramping toward setpoint flashes when ram...

Page 43: ...ded and OUTPUT OFF has been pressed thus resetting the unit see page 2 17 flashes when connection to ground is interrupted indicating that output has been turned off Note This LED is not on the minipanel however output will be turned off if this condition exists Status Indicator LEDs Passive Front Panel POWER ARC OUTPUT SETPOINT TEMP 2 16 Lights to indicate that the breaker is on indication is for...

Page 44: ...r the following conditions MDX is powered up in program or lock mode control is returned to the control panel from the Host port the MODE key switch is moved from OFF to LOCK or PROG User pin 14 OFF D is not connected to User pin 19 INTLK COM D an inter1ock condition has not been satisfied the EMERGENCY STOP button has been pushed In general pressing OUTPUT OFF will reset the MDX causing the LED t...

Page 45: ...d without pressing the LEVEL switch Lights when RAMP switch is held in Ondicating that the displayed ramp time can be modified Also the LED on the SETPT switch lights and the MINUTES LED associated with the right digital meter lights bottom meter on the minipanel If you momentarily press SETPT the LED on the RAMP switch will go out and the SETPT and MINUTES LEOs will flash indicating that you can ...

Page 46: ...ing a ramp counting up during a run If no run time is programmed the counter will simply count the number of minutes the unit has run Lights to indicate that the Host port has control of the MDX Note If any of the other three REMOTES LEOs are lit see next paragraph the User port will have overriding control of the corresponding function Light to indicate that the User port has control of the corre...

Page 47: ...when pressed to indicate that adjustments made with the MODIFY knob will have finer resolution Light when selected indicating the selected target life counter press 1 for counter 1 press 2 for counter 2 press both 1 and 2 for counter 3 Artisan Technology Group Quality Instrumentation Guaranteed 888 88 SOURCE www artisantg com ...

Page 48: ...ect KW for both Lights when selected with one of the ACTUAL toggle switches the lighted pushbutton switch that is labeled DISPLAY on the minipanel controls the top digital meter the switch labeled ACTUAL DISPLAY controls the bottom meter the actual output voltage will be displayed on one of the digital meters or on both digital meters if you select VOLTS for both Lights when selected with one of t...

Page 49: ... the counter was selected from either the control panel or a host controller 2 22 Is associated with the right digital meter bottom digital meter on the minipanel Rule ofthumb This LED flashes for anything relating to run time is statically lit for anything relating to ramp time Flashes 1 to indicate that the out of setpoint timer can be modified AMPS LED and SETPT LEOs will also flash see discuss...

Page 50: ...er It will clear when the righthand or bottom message is cleared The MDX has failed the internal software test run the test again One or more control panel switches is stuck Communication failure between MDX control panel microprocessor and internal MDX microprocessor will clear itself if communication is restored Out of setpoint shutdown Output was turned off because the MDX was not able to produ...

Page 51: ... 14 E 17 2 24 Internal MDX bus voltage is too high press OUTPUT OFF to dear message Internal MDX bus voltage is too low press OUTPUT OFF to dear message Artisan Technology Group Quality Instrumentation Guaranteed 888 88 SOURCE www artisantg com ...

Page 52: ...ower voltage or current value will be displayed On the minipanel the lighted pushbutton switch affects the top meter Turns off output resets the interlock string after the interlock conditions have been satisfied When the OUTPUT OFF LED is flashing see page 2 17 pressing OUTPUT OFF will cause it to stop flashing except if OFF D User pin 14 is not connected to I JNTLK COM User pin 19 or if any of t...

Page 53: ...r which provides finer resolution During a pause in a ramp the MODIFY knob can be used to adjust the output to a level anywhere between 0 and the maximum output for the unit The MODIFY knob can also be used to control the output level after the output has reached the programmed setpoint o e the unit is neither ramping nor pausing Allows an output setpoint to be programmed Press and hold this switc...

Page 54: ...the amount of time the MDX has been programmed to run before shutting off the output Pressing the SETPT and LEVEL switches simultaneously causes the setpoint level to be displayed continuously until RIGHT DISPLAY ACTUAL is pressed Press and hold the SETPT and POWER switches simultaneously to display the maximum output power in kilowatts the impedance option and the tap number to be displayed see p...

Page 55: ...hows how much time remains before the MDX automatically shuts off the output See page 4 15 for a discussion of using and disabling the run timer function REMOTES HOST Determines whether the MDX is controlled from the control panel or the Host port Press the switch to transfer control between these interfaces VVhen control is transferred from the Host port to the control panel the OUTPUT OFF LED wi...

Page 56: ...h to transfer control between this interface and whatever other interface has control control panel or Host port 1 hen control is transferred from the User port to the control panel the OUTPUT OFF LED will flash Press the OUTPUT OFF switch to cancel the flashing before pressing the OUTPUT ON switch TARGET DANGER The OUTPUT OFF switch will turn output off even if the unit is under control of the Us...

Page 57: ...lays available on the digital meters and running the test function All setpoint values method of regulation and site of control that were specified in PROG program mode are retained but cannot be changed from the control panel Provides full access from all interfaces to all functions settings and parameters EMERGENCY STOP button Opens the contactor immediately and shuts off output when pushed in W...

Page 58: ...t setpoint monitoring output parameters and status cannot use diagnostic features Three of the REMOTES switches can be used in any combination to give control to the User port When the LEVEL LED is lit both method of regulation power current voltage and setpoint can be specified from the User port by using pins 5 6 and 27 Wlen the RAMP LED is lit a ramp time can be set by using pin 26 When the ON ...

Page 59: ...ve 0 3 has an arc been detected has programmed target life ended what is output voltage what is output power what is output current how much time remains on the target life counter what is the setpoint level 2 32 Associated pins pin2 pin3 pins 1 20 pin 21 pin22 pin 23 pin 24 pin25 pin30 pin 31 Artisan Technology Group Quality Instrumentation Guaranteed 888 88 SOURCE www artisantg com ...

Page 60: ...arameters RS 232 ASCII format 1200 baud even parity 1 start bit 7 data bits two stop bits Host pin 6 DSR must be connected to Host pin 7 COM before the MDX will recognize communication on the Host port The MDX sends data through Host pin 2 TXD this pin must be connected to pin 3 on the RS 232 host computer s connector The MDX receives data through Host pin 3 RXD this pin must be connected to pin 2...

Page 61: ...e run time counter has been set to shut the MDX off 7800K 0865L 0133M 2501N 0265P 0010Q after 6 30 min for time a decimal point is implied between the second and third digits Status of interlock string see Tables 2 4 and 2 6 to interpret response also whether an out of setpoint shutdown has occurred In this case output is off because User pin 14 is high and the water vacuum and auxilial interlock ...

Page 62: ... target number was selected here the 1 means that it was selected from either the front panel or host computer A 0 would mean that the target was selected from the User port V cr DDDDV 0430V Actual output voltage 430 V Actual Voltage W cr DDDDW 0300W Actual output power 3 kW for power a decimal point is Actual Power implied between the second and third digits Z cr DDDDZ 1 0600Z Maximum output that...

Page 63: ...ost port S9 cr return full control from Host 1 2 port to control panel SA cr transfer control of setpoint 1 2 and method of regulation from Host port to User port SB cr transfer control of setpoint 1 2 and method of regulation from User port to Host port SC cr transfer control of ramp timer 1 2 from Host port to User port SD cr transfer control of ramp timer 1 2 from User port to Host port SE cr t...

Page 64: ...l of host computer On response to a system status request bit 3 1 for the fourth character 3 Setpoint level is not under control of the User port in response to a system status request bit 2 0 for the fourth character 2 37 Artisan Technology Group Quality Instrumentation Guaranteed 888 88 SOURCE www artisantg com ...

Page 65: ... point between second and third digits is implied Sets ramp timer decimal point between second and third digits is implied 00 01 99 00 shown in hundredths of minutes specify ROOOO to disable this function Sets value 0001 9900 shown in kilowatt hours for the target life counter that has been selected with Userpins 4 34 and 35 specify TOOOO to disable this function Sets out of setpoint timer 0 01 2 ...

Page 66: ...onse to a system status request S cr must be 0 3 or 8 8 i e the setpoint must not be under control of the User interface 3 The fourth character of the response to a system status request S cr must be 0 1 4 5 8 9 C or D i e the ramp timer must not be under control of the User interface 2 39 Artisan Technology Group Quality Instrumentation Guaranteed 888 88 SOURCE www artisantg com ...

Page 67: ...acter if bit 3 1 if bit 2 1 if bit 1 1 if bit 0 1 2 40 emergency stop activated output is off because User pin 14 OFF D is high water inter1ock condition has not been met vacuum inter1ock condition has not been met auxiliary inter1ock condition has not been met NA NA control panel key switch set to OFF internal MDX bus voltage is too low below factory set limit internal MDX bus voltage is too high...

Page 68: ... in power regulation MDX is in current regulation MDX is in voltage regulation ramp has been paused an arc has been sensed this bit will not reset until the S cr command is sent ramp is in progress plasma is indicated ramp Of any is complete and output setpoint level has been reached output is on output has been turned on either 1 the inter1ock string is broken 2 host remote control was requested ...

Page 69: ...er1ock status requests K cr Table 2 4 and system status requests S cr Table 2 5 into binary numbers Hex Character Bit3 Bit2 Bit 1 BitO 0 0 0 0 0 1 0 0 0 1 2 0 0 1 0 3 0 0 1 1 4 0 1 0 0 5 0 1 0 1 6 0 1 1 0 7 0 1 1 1 8 1 0 0 0 9 1 0 0 1 A 1 0 1 0 B 1 0 1 1 c 1 1 0 0 D 1 1 0 1 E 1 1 1 0 F 1 1 1 1 2 42 Artisan Technology Group Quality Instrumentation Guaranteed 888 88 SOURCE www artisantg com ...

Page 70: ...K cr 7800K K confirmation of command letter 7 1 go to Table 2 6 and find 7 in the first column look across the other columns to see that 7 means that bits 2 1 and 0 are set to 1 2 go to Table 2 4 and look under first character bit 2 1 so User pin 14 is high bit 1 1 so the water interlock is not satisfied bit 0 1 so the vacuum interlock is not satisfied 8 1 go to Table 2 6 and find 8 in the first c...

Page 71: ...o Table 2 6 and find 4 in the first column look across the other columns to see that 4 means that bit 2 1 2 go to Table 2 5 and look under third character bit 2 1 so either 1 the interlock string is broken send the K cr command to request the interlock status 2 host remote control was requested from the host controller merely send SO cr to reset see Table 2 2 or 3 the specified run time is over 8 ...

Page 72: ...RGENCY STOP OUTPUT REGULATION REMOTES MODE 0 OFF ON POWER CURRENT I VEI RAMP HOST L VEI RAMP ON PROO LOCI OFF 0 a o LW 0 L oLTAOE j MDX 208 Standard Control Panel Front VIew 0 TI rmtJ I 1 CATHODE MODIFY 0 _ DISPLAY E tP N 0 L IK LIIIIL 0 OUTPUT REGULATION REiotOTES c EJ I I 1 TARCET DISPLAY LIIIIL 011 X Qll 0 0 0 MDX Minfpanel Front View Artisan Technology Group Quality Instrumentation Guaranteed ...

Page 73: ...Ill S M1S y A 12111 II 5 311 10 Lh TO 2110 II 5 31 10 f1ID PIWIES 0 HZ 110 10 3 110 10 3 MDX 208 5K Rear View Tile front view Ia tile Mme a the front view of the MDX 201 atandard control panel Artisan Technology Group Quality Instrumentation Guaranteed 888 88 SOURCE www artisantg com ...

Page 74: ...il l NEUT 50 CIOHZ 111 15 MI S IATIS v A Ill 1201 11 5 111 10 10 2110 11 5 111 10 FJQ HZ flJ fA flJ fA I ON OFF 0 0 PtMSES 0 3 3 MDX 208 Rear View 0 0 MDX Minipanel Rear VIew Artisan Technology Group Quality Instrumentation Guaranteed 888 88 SOURCE www artisantg com ...

Page 75: ... 000000000000 0 0 MDX Remote Control Panel Rear View The front view Ia the aame a the front view of the MDX 208 atandard control panel Artisan Technology Group Quality Instrumentation Guaranteed 888 88 SOURCE www artisantg com ...

Page 76: ... C 120 VK GND L 208V 311 _j NEUT 50 80HZ YOLlS 1M S WAllS FREQ v A kW HZ 208 5 rJJ fiJ ll 10 10 10 1 II 5 50 fiJ Jl 10 J J 0 0 MDX 208 Master Rear View Artisan Technology Group Quality Instrumentation Guaranteed 888 88 SOURCE www artisantg com ...

Page 77: ...C 1 120 VAC CHD ___ 208V 311 NEUT 0 HZ 0 WllS Ill S IAT1S PIMSES v A IIW Ill 11111 11 5 MJ rlJ 3 311 10 tt m 1310 11 5 MJ rll J 311 10 MDX 208 Slave Rear View Artisan Technology Group Quality Instrumentation Guaranteed 888 88 SOURCE www artisantg com ...

Page 78: ...PART II OPERATING YOUR MDX MAGNETRON DRIVE Artisan Technology Group Quality Instrumentation Guaranteed 888 88 SOURCE www artisantg com ...

Page 79: ...or User remote Control 3 18 Signal Descriptions User 110 Pins 3 19 Wiring Options 3 24 Three wire Control 3 24 Two wire Control 3 24 External Monitoring of Output 3 25 External Programming of Ramp Timer Setpoint 3 26 Normal lnter1ock Connection 3 26 Cheater Plug 3 27 Connecting a Remote Control Panel 3 27 Display Bypass Plug 3 28 Connecting for Master Slave Operation 3 28 Disconnecting 3 29 First ...

Page 80: ...ntainer for submitting necessary claims to the carrier Design Considerations All MDX models are designed to mount in a standard 19 inch 48 26 cm rack by means ofthe rack ears attached to the power supply The MDX is an air cooled power supply so it is important to ensure that adequate ventilation is provided Later in this section you will find discussions of spacing and cooling requirements for bot...

Page 81: ...between the fan grills on the rear of the MDX and the enclosure must be 9 inches 229 mm with adequate ventilation see pages 3 9 through 3 11 1 25 mm minimum clearance to top of rock 1 25 mm minimum clearance between units _J L1 25 mm minimum clearance from enclosure to rock each side Figure 3 1 Illustration oftop side and inter unit clearance requirements for MDXunits stacked in a cabinet 3 7 Arti...

Page 82: ...29 mm mioim m cl j from rear of fan to rear of rack Figure 3 2 Illustration ofrear dearance requirements for MDXunits stacked in a cabinet 3 8 Artisan Technology Group Quality Instrumentation Guaranteed 888 88 SOURCE www artisantg com ...

Page 83: ...circulating back and becoming input air exhaust the hot air from the cabinet with minimal airflow restriction You will also need to add air baffles to the rack to prevent exhaust air from recirculating 8 ffl a e I I I I 1 L J Rgure 3 3 Graphic representation ofthe view looking down on the top ofan MDXin a rack The arrows show the direction ofair flow 3 9 Artisan Technology Group Quality Instrument...

Page 84: ...ts x 30 square inches per unit One method would be to perforate a total area of 180 square inches 1161 cm2 on the side or rear of the cabinet For the exhaust fan however it is preferable to locate the opening entirely on the rear of the cabinet An important consideration during cabinet design is the need for a physical barrier separating the hot exhaust air from the inlet air used for cooling To b...

Page 85: ...ower supplies PREPARING FOR USE Cabinet exhaust area letakto air each side power supplies Figure 3 4 Illustration of the cooling pattern for six MDX units enclosed in a cabinet 3 11 Artisan Technology Group Quality Instrumentation Guaranteed 888 88 SOURCE www artisantg com ...

Page 86: ...nce ground the chassis stud to the chamber ground In multi unit configurations master slave combinations providing from 20 kW to 80 kV 1 the MDX will operate more reliably and be less sensitive to spurious noise if both the MDX chassis and the system are grounded The preferred method of chassis grounding is to daisy chain a flat copper braid of AWG 14 equivalency between units To further reduce no...

Page 87: ...ly power until these changes are made Tum to page 4 47 for instructions The line input connection is provided by means of a five position high current feedthrough tenninal block TB on the rear panel see next page Labels on the TB input tenninal shield and below each tenninal position show line A B C neutral 120 V ac NEUl and protective earth ground connections GND A specific phase rotation is not ...

Page 88: ... derived from Y connected sources By bringing the neutral lead to the power supply 120 V ac is obtained between terminal 3 and terminal 4 ofthe input terminal block see the illustration on the next page This 120 V ac is used to power the intemallogic of the power supply The power supply will not function without this 120 V ac input WARNING If you have a Y connected source but choose to use an auxi...

Page 89: ...ection Auxiliary Transformer I Input power terminal block 2 positions rooNc Tl I CONNECT I 0 3 MDX Aux II 4 250 VA Max I Ground 5 I L_ Delta Connection I Input power terminal block 2 positions 3 MDX Aux Jll 4 250 VA Max I Ground 5 I L_ 3 16 Artisan Technology Group Quality Instrumentation Guaranteed 888 88 SOURCE www artisantg com ...

Page 90: ...or Amphenol 83 822 which AE provides The cable for the output connection is not included with the MDX but can be purchased from AE separately Upon request a two pin terminal block is also available UHF Female provided Terminal Block optional Sleeve Assembly providled 3 17 Artisan Technology Group Quality Instrumentation Guaranteed 888 88 SOURCE www artisantg com ...

Page 91: ...Control Control is given to the User port if the MODE key switch is set to PROG or LOCK and one or more of the REMOTES switches is selected A detailed description of each signal begins on the next page Following that are several wiring diagrams that illustrate three and two wire control external output monitoring external ramp timer and setpoint programming the normal interlock connection and the ...

Page 92: ... will ramp up to whatever setpoint has been specified the OUTPUT LED on the front panel will also light It will sink 35 rnA and should be referenced to OUT COM D pin 37 It is internally pulled up to 15 V through a 10 kn resistor and its impedance is 100 n pin 3 SETPOINT D This 0 15 Voutput signal indicates that the output is equal to the requested setpoint by going low the SETPOINT LED on the fron...

Page 93: ... master slave operation pin 9 OUT COM A This signal is a dedicated return to internal system ground then to chassis ground and finally to protective earth ground All analog outputs should be referenced to this pin pin 10 IN COM A This signal is a dedicated return to internal system ground then to chassis ground and finally to protective earth ground All analog inputs should be referenced to this p...

Page 94: ... signal supplies 15 V de to the status LEOs on passive displays both master and slave units It will source a maximum of 100 rnA pin 19 INTLK COM D This common is used interchangeably with INCOM D pin 36 It is a dedicated return to internal system ground then to chassis ground and finally to protective earth ground We recommend that all signals in the inter1ock string be referenced to this pin pin ...

Page 95: ...resenting output power 5 V 2 maximum rated output for the supply 5000 Wfor an MDX 5K 10 000 Wfor an MDX 10K etc see table on page 1 19 It should be referenced to OUT COM A pin 9 its impedance is 100 n It will sink and source 50 rnA pin 25 I OUT A This output provides a fully buffered 0 5 V signal representing output current the supply can produce 5 V 2 10 A for a standard MDX 5K 20 A for a standar...

Page 96: ...erence 5 V 10 mV It should be referenced to IN COM A pin 10 its impedance is 100 n Note Limit current to 5 rnA pin 33 unassigned pin 34 TARGET 2 0 This input signal is used in conjunction with pins 4 and 35 TARGET 0 0 and TARGET 1 0 to specify one of eight possible targets The MDX microprocessor uses this information to keep track ofthe kilowatt usage for all eight targets Note An open input defau...

Page 97: ...h as a relay to control the MDX rather than using one device to control the on function and one device to control the off function this method may be more convenient for you VVhen pins 7 and 14 are connected to Userpin 19 INTLK COM D the output will tum on immediately after the OUTPUT OFF switch is released and REMOTES ON is selected DANGERI Remember that pressing and releasing OUTPUT OFF to reset...

Page 98: ...age power or current level the MDX is producing For each ofthe outputs 5 V represents full rated output that is for a standard MDX 5K 1000 V 5000 W or 10 A see tables on pages 1 19 and 1 21 for values produced by other models V OUT A 23 P OUT A 24 I OUT A 25 OUT COM A 9 Figure 3 7 Wiring diagram for externally monitoring the output 3 25 Artisan Technology Group Quality Instrumentation Guaranteed 8...

Page 99: ...terlock Connection The following figure shows how to wire ifyou want to take advantage ofthe inter1ock lines by connecting them to sensors For example AUX D can be used to warn if a door is open VAC D to indicate if the chamber contains a vacuum and WATER D to warn of problems with the cooling system for the magnetron Ifany connection is open the inter1ock string is broken and output will not come...

Page 100: ...9 Figure 3 10 Wiring diagram for the cheater plug Connecting a Remote Control Panel You can connect an Advanced Energy controVdisplay panel to your MDX with a 25 pin female D subminiature connector The corresponding port on the MDX rear panel is labeled DISPLAY Do not connect a remote panel to this port if your MDX has a full function front panel Note that this connector was designed for connectin...

Page 101: ...49 through 4 51 The information below and on the next page is meant for quick reference only Connect input power to each chassis just as you would for the 1OK model refer to page 3 13 Interconnect the master and slave units with the supplied 30 inch multi conductor cable by attaching its 15 pin connectors to the connectors on each MDX rear panel INTERCONNECT MASTER or INTERCONNECT SLAVE Since the ...

Page 102: ...oltage sources before opening it for any adjustment replacement maintenance or repair l L vgu_KN_ON_ DANGERI Internal components may remain live for 1 min after the MDX has been disconnected Make sure replacement fuses are ofthe same rating and specific type as those being replaced 3 29 Artisan Technology Group Quality Instrumentation Guaranteed 888 88 SOURCE www artisantg com ...

Page 103: ... LED to stop blinking it will still be lit 6 Tum the MODE key switch to PROG Select a regulation mode POWER CURRENT VOLTAGE see page 4 3 7 To set ramp rate press RAMP and hold while using the MODIFY knob The value will be displayed on the right display A vernier adjustment is also available if you need to set the rate in smaller increments see the discussion of control panel controls in the second...

Page 104: ... RAMP and PLASMA LEOs will light The output will ramp to the selected setpoint level causing the RAMP LED to go out the SETPOINT LED to light and the end of ramp alarm to sound 10 Press the OUTPUT OFF switch any time to turn off output 3 32 Artisan Technology Group Quality Instrumentation Guaranteed 888 88 SOURCE www artisantg com ...

Page 105: ...Timer 4 15 Out of setpoint Timer 4 16 Lock Mode 4 19 Remotes 4 21 Host 4 10 User 4 23 Level 4 23 Ramp 4 24 On Off 4 24 Target 4 24 Tap Selection 4 27 Tap changing Procedure Detailed 4 37 Tap changing Procedure Abbreviated 4 43 Impedance Options 4 45 Line Voltage Changes 4 47 Master Slave Operation 4 49 Setpoint LEOs 4 51 4 1 Artisan Technology Group Quality Instrumentation Guaranteed 888 88 SOURCE...

Page 106: ...ever the setpoint will be set to zero Method of regulation can be selected from any active interface See page 4 23 for User port control and page 4 21 for Host port control Power Power regulation is selected from the control panel by pressing the POWER switch under the REGULATlON label the LED on the switch will light From a host computer send the S4 cr command see page 2 36 to select power regula...

Page 107: ... CURRENT switches under the REGULATION label both LEOs on the switches will light From a host computer send the S6 cr command see page 2 36 to select voltage regulation From the User interface both pin 5 I REG D and pin 6 P REG D must be high 4 4 Artisan Technology Group Quality Instrumentation Guaranteed 888 88 SOURCE www artisantg com ...

Page 108: ...es 2 15 through 2 22 To see what target life counter is active Make sure the LED is lit on the RIGHT DISPLAY ACTUAL switch press this switch if the LED is not lit Toggle to the KWH LED on the right meter with the RIGHT DISPLAY ACTUAL switch on the minipanel the DISPLAY switch affects the bottom meter Press the SETPT switch momentarily the LED on the switch will light 11 vo u_ __ SHOULD KNOW lfthe ...

Page 109: ...nue to flash Enter another target life value see previous page or disable the function by turning the MODIFY knob to the left until four hyphens appear on the right or bottom meter Host Interface Three requests for data see table on page 2 34 elicit information relating to target control functions G cr The fourth digit in the response to this command is the number of the selected target life count...

Page 110: ...1 high high low 2 high low high 3 high low low 4 low high high 5 low high low 6 low low high 7 low low low llaJ vo u A SHOULD KNOW A target life counter selected with the User pins will be active when 0 is selected from the control panel with the MODIFY knob Parameters that can be monitored from the User port are Parameter The number ofthe active target life counter 0 3 Whether programmed target l...

Page 111: ...he right or bottom meter when the SETPT switch LED is lit The SETPOINT status indicator LED see page 2 15 or 2 16 lights when output is equal to the programmed setpoint it flashes and alarm sounds when the output is not equal to the programmed setpoint This LED only lights or flashes when the PLASMA LED is lit Host Interface Five requests for data see table on page 2 34 elicit information relating...

Page 112: ...3 21 Parameters that can be monitored from the User port are Parameter Setpoint level Whether programmed output setpoint level has been attained Ramp Timer User pins pin 31 pin3 You can program the amount oftime 600 ms 99 min also see discussion of fast ramp page 5 5 the MDX will take to reach the programmed output setpoint from the control panel a host controller or the User port You can cause a ...

Page 113: ...timer from the User port to the Host port Pausing During a Ramp Ifoutput is being produced and a ramp is in progress you can cause the ramp to pause Fig 4 1 The MDX will continue to produce output at the level it had reached when the pause was requested During the ramp pause you can change the value ofthe output level from 0 to the maximum output for your unit The MDX will immediately produce outp...

Page 114: ...e S2 cr command to pause the ramp 1a Optional Use LDDDD cr command to request a new setpoint 2 Send the S3 cr command to resume the ramp Pause Release Pause Ramp Time Setpoint Rgure 4 1 Graphic representation ofa ramp pause no adjustment to the output level is made during the pause _YO_U ____ SHOULD KNON You can disable the ramp timer by turning the MODIFY knob to the left until four hyphens appea...

Page 115: ...vel has been adjusted upward during the pause but is still ower than the setpoint Pause Ramp Time Setpoint Rgure 4 3 Graphic representation ofa ramp pause the output level has been adjusted during the pause so that it is greater than the original setpoint 4 13 Artisan Technology Group Quality Instrumentation Guaranteed 888 88 SOURCE www artisantg com ...

Page 116: ...I I I I I I Release Pause Romp Time Setpoint Rgure 4 4 Graphic representation ofa ramp pause the output level has been adjusted downward during the pause 4 14 Artisan Technology Group Quality Instrumentation Guaranteed 888 88 SOURCE www artisantg com ...

Page 117: ...e OUTPUT OFF switch will flash and an alarm will sound Pressing OUTPUT OFF will stop the flashing and silence the alarm YO U 1 SHOULD KNO N You can disable the run timer by turning the MODIFY knob to the left until four hyphens appear on the meter During a run the timer counts up and the MINUTES LED will flash during a ramp the timer counts down and the MINUTES LED will be statically lit Host Inte...

Page 118: ...ight or bottom meter 3 Use the MODIFY knob to alter the value displayed on the right or bottom meter 4 Release the CURRENT switch YO U_ __ SHOULD KNOW You can disable the out of setpoint timer by tuming the MODIFY knob to the left until four hyphens appear on the meter This allows an out of setpoint condition to be continued indefinitely If output has been shut off because the programmed setpoint ...

Page 119: ...l tell you how much time the MDX will operate out of setpoint before it shuts off the output K cr The response to this command will indicate if an out of setpoint shutdown has occurred The variable setting command see table on page 2 38 used to set the out of setpoint timer QDDDD cr 4 17 Artisan Technology Group Quality Instrumentation Guaranteed 888 88 SOURCE www artisantg com ...

Page 120: ...and the active interface that were specified in program mode are retained but cannot be changed All functions are still available from the User interface providing LEVEL RAMP and or ON were selected from the control panel before the key switch was set to LOCK All functions are also still available from the Host interface Qncluding the ability to give control of specific functions to the User inter...

Page 121: ...ansferring control among the interfaces if you are also using a control panel and or the User port A more detailed description of these functions can be found in the Program Mode section which begins on page 4 5 See page 2 33 for transmission parameters and conditions that must be satisfied The pin description table for the Host port appears on page 2 10 Several commands can be used 1 to elicit a ...

Page 122: ...transfer control of the method of output regulation pins 5 and 6 and output setpoint level pin 27 to the User port see detailed description of User pins beginning on page 3 18 From the Host interface use command SA cr to transfer control ofthese parameters to the User port see S commands page 2 36 To select voltage regulation both pin 5 I REG D and pin 6 P REG D must be high To select power regula...

Page 123: ...etailed description of User pins beginning on page 3 18 From the Host interface use command SE cr to transfer control of this parameter to the User port see S commands page 2 36 YO U_ __ SHOULD KNOW Use pin 7 ON D to tum output on Use pin 14 OFF D to tum output off see discussion of two wire and three wire control on page 3 23 OFF D will override all commands and force the MDX to shut off output p...

Page 124: ...arget life counter from the control panel with the MODIFY knob Use pins 1 and 20 to check the number of the active target life counter 0 3 Use pin 22 to see if programmed target life has ended Use pin 30 to see how much time remains on the target life counter 4 25 Artisan Technology Group Quality Instrumentation Guaranteed 888 88 SOURCE www artisantg com ...

Page 125: ...tage tap will work best for your process We recommend that you run your process as close to the center of a tap range as possible this minimizes the possibility of variations in load impedance exceeding the limits ofthe tap The chamber impedance may vary widely from process to process If you have a wide range of chamber impedances or use a broad range of target materials you will probably have a b...

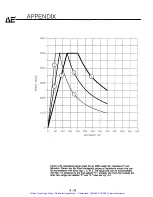
Page 126: ...get over its useful life The voltage and current values for the target when it is new and then at EOTL have been plotted on Fig 4 5 page 4 31 Notice that the impedance at both target stages falls within the boundaries oftap 1 You can go a step farther and calculate the impedance for the target at both stages by using the calculation Target Impedance arpe oltag arge uffen _vo_u ____ SHOULD KNOW Ify...

Page 127: ...fe this value is lower than in Example 1 target when new 580 V target at end of target life EOTL 450 V To calculate the operating currents use Current wer oage current for newtarget current at EOTL 9 2 kW_1586A 580V 9 2 kW 20 44 A 450 v Now you have the voltage range and current range for the target over its useful life The voltage and current values for the target when it is new and then at EOTL ...

Page 128: ...hen the maximum current for the tap is reached Another option is to reduce the power level until the SETPOINT LED once again is statically lit indicating that the MDX is operating within limits A third possibility is to use an MDX model that produces more power The two impedances have been plotted on Fig 4 9 page 4 35 which shows the impedance boundaries for the three taps available on the MDX 15K...

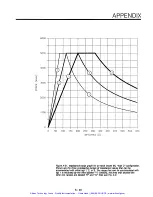
Page 129: ... 17 18 19 20 21 AMPS Rgure 4 5 Graph with the voltage and current values plotted for the Example 1 target both when it is new and when it is near the end ofits usefullife The impedances at both target stages fall within the boundaries oftap 1 Nota The shading represents an impedance area not covered by the MDX when it is regulating voltage 4 31 Artisan Technology Group Quality Instrumentation Guar...

Page 130: ... r r r r I t J r r 1 II 0 10 20 30 40 50 60 70 80 90 100 110 120 130 140 150 160 170 180 190 200 IMPEDANCE Q Rgure 4 6 Graph with the impedances plotted for the Example 1 target both when itis new and when it is near the end ofits useful life 4 32 Artisan Technology Group Quality Instrumentation Guaranteed 888 88 SOURCE www artisantg com ...

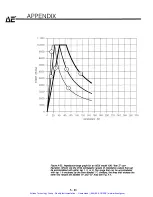
Page 131: ...16 17 18 19 20 21 AMPS Figure 4 7 Graph with the voltage and current values plotted for the Example 2 target both when it is new and when it is near the end ofits usefullife EOTL The EOTL current is out ofthe range oftap 1 Note The shading represents an impedance area not covered by the MDX when it is regulating voltage 4 33 Artisan Technology Group Quality Instrumentation Guaranteed 888 88 SOURCE...

Page 132: ...1 J i I v r r t 1 r r r r t f rJ 0 10 20 30 40 50 60 70 80 90 100 11 0 120 130 140 150 160 170 180 190 200 IMPEDANCE Q Rgure 4 8 Graph INith the impedances plotted for the Example 2 target both when it is new and when it is near the end ofits useful life 4 34 Artisan Technology Group Quality Instrumentation Guaranteed 888 88 SOURCE www artisantg com ...

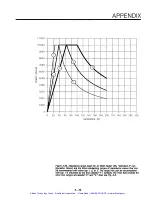
Page 133: ...0 80 90 100 110 120 130 140 150 IMPEDANCE 0 Rgure 4 9 Graph with the voltage and current values plotted for the Example 2 target both when it is new and when it is nearthe end ofits usefullife EOTL Since we have switched to an MDXmodel capable ofproducing 15 000 W both target stages fall within the boundaries oftap 1 4 35 Artisan Technology Group Quality Instrumentation Guaranteed 888 88 SOURCE ww...

Page 134: ... MF1 and MF2 cables from the motherboard WARNINGI Label the output wires before you disconnect them so that you can reconnect them exactly as they were Improper connec tions will reverse the polarity of the power supply possibly damaging attached hardware 4 Now remove the five screws six screws on MDX units with two power modules that secure the logic tray to the chassis 5 Lift the logic tray stra...

Page 135: ...board Figure 4 10 Tap select boardplaced correctly to select tap 1 for an MDXwith two power modules the board will be shorterin units with onlyone power module 4 38 Artisan Technology Group Quality Instrumentation Guaranteed 888 88 SOURCE www artisantg com ...

Page 136: ...J1 pin 1 and J1 pin 3 J2 pin 7 and J2 pin 8 J1 pin 6 and J1 pin 7 For 1OK models also check J101 pin 1 and J101 pin 3 J102 pin 7 and J102 pin 8 J101 pin 6 and J101 pin 7 1o Secure the logic tray to the chassis with the five screws six on models with two power modules that you removed earlier 11 Change the microprocessor tap selection by moving the plug on P2 to the appropriate position see the fig...

Page 137: ...d FORWARD DRIVE on the safety shield are lighted there is one set oftwo on 5K models two sets of two on 10K models The MDX is now ready to test 15 Specify that the method of output regulation is power see page 4 3 set the output level at 0 2 kW 16 Tum on the output and monitor the yellow LEOs that are under the DRIVE COMMAND label on the large safety shield on the left side ofthe predrive board fo...

Page 138: ...e output Negative output Transductor board 6 El 6 EleP 6 El El 6 66 Logic tray Rgure 4 12 Exploded illustration showing the relative positions ofsome ofthe printed circuit boards inside the MDX chassis 4 41 Artisan Technology Group Quality Instrumentation Guaranteed 888 88 SOURCE www artisantg com ...

Page 139: ...BC 5 I I I I r I 1 1 I I II ATM 25 II I I I I SOFT II ATM 25 I I I START I I I I I CPU RUN I IFUSE BOARD I I REAR REAR I I DRIVE DRIVE I I g ARD ARD I I TM 25 f I I I I II ATM 25 I I IEI I I ILOGIC I L _j 1 oEr 1 roP I AxP w l f lAx r i1 DRIVE COt AMAND DRIVE COt AMAND I I SHUTDOWN SHUTDOWN I I I I L L _jP _J Rgure 4 13 The MDXsafety shield 4 42 Artisan Technology Group Quality Instrumentation Gua...

Page 140: ...t tap positions and correct voltage range power module 1 power module 2 6 Reinstall logic tray 7 Move the jumper at P2 on the motherboard to the desired tap position 8 Check connections on predrive board 9 Reinstall cables and reconnect output wires 10 Replace safety shield 11 Tum on line power 12 Check green LEOs 13 Specify power regulation 14 Tum on output and check yellow LEOs on predrive board...

Page 141: ...inations are shown in the appendix Below is a table that shows the maximum current that can be produced at each tap It also shows the range of output voltages available at each tap when the unit is in voltage regulation If current or power regulation has been selected the MDX may actually produce a higher voltage in order to reach the current or power setpoint MDX 10K MDX 15K MDX20K MDX25K MDX30K ...

Page 142: ...chassis as you look from the front panel end into the top ofthe MDX Three boards the transductor logic and predrive plug into the motherboard see the illustration on page 4 41 also see the safety shield illustration on page 4 42 The motherboard is mounted on the logic tray 3 Remove the four screws from the transductor board the PC board directly under the INSTRUMENTATION label on the large safety ...

Page 143: ...the table below Input Line Voltage 200 V ac three phase 208 V ac three phase DC Bus OV Trip Level 315V 333V 1 tolerance ofthe trip level voltage DC Bus UV Trip Level 226V 238V 4 Re install the transductor board and replace the four screws that secure it 5 Re install the safety shield and replace the oval head screws that secure it re install the top cover and replace the six screws that secure it ...

Page 144: ... conductor cable with 15 pin connectors supplied to the connectors on each MDX rear panel MASTER INTERCONNECT or SLAVE INTERCONNECl Note The connectors on the ends of the cable are different on each end so that they cannot be incorrectly connected To ensure reliable operation and less sensitivity to noise ground both the MDX chassis and the system by daisy chaining a flat copper braid between unit...

Page 145: ...er to load 1 11111111111 3rf Multiconductor cable _ 0 0 0 0 Figure 4 15 Rear view of an interconnected master and slave MDX system 4 50 Artisan Technology Group Quality Instrumentation Guaranteed 888 88 SOURCE www artisantg com ...

Page 146: ... unless all SETPOINT LEOs are lit Ifthe master unit is at setpoint Q e it is producing its portion ofthe required output the ACTUAL value displayed on the control panel meter will always be the requested setpoint level due to an internal assumption made by the master unit It is possible however that the slave unit is not producing its portion ofthe required output or that its breaker has not been ...

Page 147: ...USING THE SPECIAL FEATURES OPTIONS CONTENTS ARC CHECt TM 5 3 Fast Ramp 5 5 Contactor Hold 5 7 5 1 Artisan Technology Group Quality Instrumentation Guaranteed 888 88 SOURCE www artisantg com ...

Page 148: ...cleared in 50 rns ARC CHECK takes over ARC CHECK takes control and reduces the MDX s output level to zero and then ramps the output to the maximum current available with the unit s present tap setting see table on page 4 45 Ifthis current is enough to remove the short output voltage rises When the voltage or powe reaches the operating conditions ofthe previously selected method of output regulatio...

Page 149: ...ll use when fast ramp is specified can be adjusted with an internal potentiometer which is set at the factoJY to your specification To make the adjustment yourself 1 Tum the MODE key switch to OFF 2 Remove the black metal top cover by removing the six black screws 3 Remove the smoke colored safety shield by removing the black oval head screws The logic tray covers about three quarters ofthe expose...

Page 150: ...ed frequency calculated using the fonnula Ramp Tme 1024 divided by frequency at TP 2 Use R3 to make fine adjustments 7 Tum offthe main circuit breaker 8 Replace the safety shield and top cover 5 6 Artisan Technology Group Quality Instrumentation Guaranteed 888 88 SOURCE www artisantg com ...

Page 151: ...o open the contactors You select one of the contactor hold options with a switch on the motherboard using the following procedure DANGER Make sure that the input power to the MDX has been removed before attempting this procedure The MDX must be without input power for 1 min to allow all capacitors to discharge 1 Remove the black metal top cover by removing the six black screws 2 Remove the smoke c...

Page 152: ...through the logic board Replace the screws that hold the logic board in place 6 Replace the smoke colored safety shield by replacing the oval head screws 7 Re install the top cover and replace the six screws Rgure fr2 Illustration sho Mng location ofS5 switch on the motherboard refer to Fig 4 13 which shows the relative positions ofthe printed circuit boards on page 4 48 5 8 Artisan Technology Gro...

Page 153: ...PART Ill LEARNING MORE ABOUT YOUR MAGNETRON DRIVE Artisan Technology Group Quality Instrumentation Guaranteed 888 88 SOURCE www artisantg com ...

Page 154: ...that should be expected with a specifiC system or process a power supply manufacturer cannot In any case you can determine de bias by measuring it yourself with a high voltage probe DANGER Lethal high voltage and high current potentials are present during the measurement of de bias Extreme caution is required to ensure the safety of yourself and of those working with you Carelessness can cause sev...

Page 155: ...of available de biases If resolution of the de bias control is more important set your system up for a typical process before you measure de bias The new microprocessor controlled generators will calibrate the de bias over a smaller power cross section thus providing a higher resolution over a smaller area of operation Since what is best for one application will not necessarily be best for another...

Page 156: ...r documents are mandated by your local authorities This note is intended to provide a broad overview of grounding issues and considerations AC and DC Grounding In the real world there is a significant difference between the techniques used to provide a good de ground and those used to provide a good ac ground Just because a system has a very low de resistance to earth ground does not at all imply ...

Page 157: ...rrect training before setting up and maintaining high energy electrical equipment While significant numbers of RF problems are caused by improper grounding of RF power supplies used in a process all plasma systems produce some RF energy that must be taken into acount when the system is designed As examples Plasma arcs are like small lightening bolts that cause broad band RF interference a plasma c...

Page 158: ...es inadequate decoupling rarely encountered software conditions or timing coincidences can produce upsets that seem to occur randomly On the other hand some noise sources can produce upsets downright periodically Nevertheless the more difficult it is to characterize an upset as to cause and effect the more likely it is to be a noise problem Types and Sources of Electrical Noise The name given to e...

Page 159: ...nsients in the circuit which are what actually cause the upset Arcs and sparks occur in plasma chambers electron beam systems and magnetron sputtering systems in associated equipment such as electric motors and switches and in static discharges Electric motors that have commutator bars produce an arc as the brushes pass from one bar to the next De motors and the universal ac dc motors that are use...

Page 160: ... through a couple of inches of straight wire Two inches of straight wire has about 50 nH of inductance That s not very much but using 50 nH for L and 4 A nsec for dildt gives an L dildt drop of about 200 V Recent observations by W M King suggest even faster rise times Fig 28 and the occurrence of multiple discharges during a single discharge event Obviously ESD sensitivity needs to be considered i...

Page 161: ... Consider the wire to be part of a loop which contains in addition to the wire a voltage source that represents the difference in potential between the two ground points and you have the classical ground loop By extension the term is used to refer to any unwanted and often unexpected currents in a ground line Figure 3 Illustration of a ground loop Radiated and Conducted Noise Radiated noise is noi...

Page 162: ...urrent won t flow unless it can flow in a closed loop This simple fact is sometimes temporarily forgotten by the overworked engineer who has spent the past several years mastering the intricacies of the DO loop the timing loop the feedback loop and maybe even the ground loop g YOU_ __ SHOULD KNOYV The simple current loop probably owes its apparent demise to the invention of the ground symbol By a ...

Page 163: ...upling so shielding against it amounts to shielding against electric fields As will be seen this is relatively easy Inductive coupling is magnetic field coupling so shielding against it is shielding against magnetic fields This is a little more difficult Strangely enough this type of shielding does not in general inwlve the use of magnetic materials RF shielding the classical metallic barrier agai...

Page 164: ... inserted between PCBs printed circuit boards to eliminate most of the capacitive coupling among them cs Noise II Victim Source Circuit L a Capacitive Coupling _ Faraday Shield Noise II f 1 Victim Source Circuit b Electrostatic Shielding Figure 4 Use of Faraday shield Shielding Against Inductive Coupling With inductive coupling the physical mechanism involved is a magnetic flux density B from some...

Page 165: ...y I flowing in the center conductor is cancelled by the field produced by 1 flowing in the shield To the extent that the cable is ideal in producing zero external magnetic field it is immune to inductive pickup from external sources The cable effectively adds zero area to the loop This is true only ifthe shield carries the same current as does the center conductor R Figure 5 External to the shield...

Page 166: ...ve against both generation and reception of EMI v s v s R a Shield Has No Effect High frequency Current Path R L_________ I ____ _ J Low frequency Current Path b Two Return Paths Figure 6 Use ofcoaxial cable Note that we have now introduced the infamous ground loop problem as shown in Fig 7A Fortunately a digital system has some built in immunity to moderate ground loop noise In a noisy environmen...

Page 167: ... around the center conductor at every cross section ofthe cable Ot isn t then field cancellation external to the shield is incomplete Since field cancellation is incomplete the effective area added to the loop by the cable isn t zero Second in the cheaper method the feed and return wires can be twisted together This not only maintains their proximity but the noise picked up in one twist tends to c...

Page 168: ...f a whip antenna the EIH ratio is higher than 377 n which means it s mainly an E field generator A wire wrap post can be a whip antenna Interference from a whip antenna would be by electric field coupling which is basically capacitive coupling Methods to protect a circuit from capacitive coupling such as a Faraday shield would be effective against RF interference from a whip antenna A gridded grou...

Page 169: ...ss effective if the shield is ferromagnetic and 2 that low frequency fields are easier to block than high frequency fields This is shown in Fig 8 a g c C o pp e Jr i 100 9 75 c Q 0 Q i 0 50 25 0 O Q1 0 1 10 100 1000 10 000 Frequency Kilohertz Figure 8 E field shielding Copper and aluminum both have the same permeability but copper is slightly more conductive and so provides slightly greater reflec...

Page 170: ...e EMI could be 90 H field in which case the reflection Joss is irrelevant It would be advisable then to beef up the absorption Joss at the expense of reflection Joss by choosing steel A better conductor than steel might be Jess expensive but it would also be ineffective CD U 300 II Plane Wave cu 250 c cu 200 0 cu I w 150 I I 0 I c 0 100 Reflection i a i 50 VI Aboorptlan s 0 __ 0 1 0 01 0 1 10 100 ...

Page 171: ...n Fig 11 the shield loses much of its effectiveness As can be seen in Fig 11 the severity of the detour has less to do with the area ofthe hole than it does with the geometry of the hole Comparing Fig 11C with Fig 11D shows that a long narrow discontinuity such as a seam can cause more RF leakage than a line of holes with larger total area A person who is responsible for designing or selecting rac...

Page 172: ...nclosure or chassis and ifthe black wire develops a short to the enclosure there will be a shock hazard to operating personnel unless the enclosure itself is earth grounded Ifthe enclosure is earth grounded a short results in a blown fuse rather than a hot enclosure The earth ground connection to the enclosure is called a safety ground The advantage ofthe three wire power system is that it distrib...

Page 173: ...ice provides a low impedance path for both de artd ac In many areas the soil is very dry and has high electrical resistance This is cured by providing a grid of stakes or a mat of copper wires and a means of continually wetting the earth around the stakes or grid In the past the earth around the ground stake was saturated with copper sulfate However the toxicity of copper sulfate combined with its...

Page 174: ...ine cause variations in the ground potential of the other circuits Given that the currents in a digital system tend to be spiked and that the common impedance is mainly inductive reactance the variations could be bad enough to cause bit errors in high current or particular1y noisy situations The parallel connection eliminates common ground impedance problems but uses a lot of wire Other disadvanta...

Page 175: ...nnects to things like motors and relays The hardware ground is the safety ground connection to chassis racks and cabinets It s a mistake to use the hardware ground as a return path for signal currents because it s fair1y noisy for example it s the hardware ground that receives an ESD spark and tends to have high resistance due to joints and seams Quiet Signal Ground Noisy and High Current Hardware...

Page 176: ...ity connection is usually not a quality ground Ground line 8 provides the primary system earth ground connection Current return 9 ensures a current return path for the power supply output and should not be confused with the ground lines 1 through 8 See the typical applications discussed on pages 1 9 through 1 16 for instructions on how to connect this line with the earth ground tenninal 9r Anolog ...

Page 177: ...ure 16 Separate ground for multiplexed LED display Figure 17 shows right and wrong ways to make ground connections in racks Note that the safety ground connections from panel to rack are made through ground straps not panel screws Rack 1 correctly connects signal ground to rack ground only at the single reference point Rack 2 incorrectly connects signal ground to rack ground at two points creating...

Page 178: ...ifonnly through its bulk While this effect tends to increase the impedance of a given conductor it also indicates the way to minimize impedance to manipulate the shape ofthe cross section so as to provide more surface area For its bulk braided cable is almost pure surface Depending on the length of the cable and the actual frequencies involved there may be situations where braided cable is not des...

Page 179: ...es floors or equipment faces Special methods must be used to ensure that there is a solid earth ground in systems that produce or use RF energy A terminal intended to ensure by means of a special connection the grounding earthing of part of an apparatus when proper1y connected to an earth electrode The conductor that is used to establish ground and that connects a piece of equipment or device to t...

Page 180: ...ng from radiated electromagnetic energy that enters equipment Symbol Z Unit ohm n The total opposition offered by a circuit to the flow of ac current It may be expressed as a vector sum of resistance the real part and reactance the imaginary part or as a magnitude and phase angle Capacitive reactance increases as frequency decreases inductive reactance increases as frequency increases Symbol R Uni...

Page 181: ...iety EMC Education Committee 345 East 47th Street New York NY 10017 Phone 212 752 6800 Don l lhite Consultants Inc International Training Centre P 0 BoxD Gainesville VA 22065 Phone 703 347 0030 The EMC Education committee has available a videotape Introduction to EMC A Video Training Tape by Henry Ott Don l lhite Consultants offers a series oftraining courses on many different aspects of electroma...

Page 182: ...H 1976 Noise Reduction Techniques in Electronic Systems New York Wiley 5 1981 Interference Technology Engineers Master ITEM Directory and Design Guide R and B Enterprises P 0 Box 328 Plymouth Meeting PA 19426 6 Smith L Nov 1979 A watchdog Circuit for Microcomputer Based Systems Digital Design pp 78 79 7 TranZorb Quick Reference Guide General Semi conductor Industries P O Box 3078 Tempe AZ 85281 8 ...

Page 183: ...ing internal troubleshooting Whenever you make a change to the MDX output or need to check anything inside the power supply first turn off the output and the circuit breaker Problem Fault Indication Control panel LEOs off circuit breaker on INTERLOCK LEOs flashing Output won t tum on from control panel Output won t tum on from User 1 0 port FAIL E 01 message FAIL E 02 message FAIL E 10 message FAI...

Page 184: ...ervice Check cables from mother board to control panel If no problem found contact AE Customer Service Contact AE Customer Service Preliminary checks Verify 208 V ac three phase input at tenninal block neutral required Verify 120 V ac between 3 ac and 4 neutraO on input tenninal block Replace Fa turn on circuit breaker Trbl 3 Turn off circuit breaker Artisan Technology Group Quality Instrumentatio...

Page 185: ...vice Verify User pins 12 and 19 connected to each other Verify system interlock Contact AE Customer Service Verify User pms 13 and 19 connected to each other Verify User pins 11 and 19 connected to each other Trbl 4 Verify system interlock Contact AE Customer Service Contact AE Customer Service Verify system interlock Artisan Technology Group Quality Instrumentation Guaranteed 888 88 SOURCE www ar...

Page 186: ...OG press REMOTES ON switch once Trbl 5 These conditions must exist before output can be turned on from the Advanced Energy MDX control panel All inter1ock conditions must be satisfied The REMOTES ON switch LED must be out not lit User pin 14 must be low Press OUTPUT ON switch Go to Troubleshooting Chert 12 Contact AE Customer Service no Artisan Technology Group Quality Instrumentation Guaranteed 8...

Page 187: ... conditions must be satisfied The REMOTES ON switch LED must be lit User pins 7 and 14 must go low to tum on output Contact AE Customer Service Refer to MDX manual for host operation Trbl 6 Contact AE Customer Service Go to Troubleshooting Chart 2 Verify User pins 7 and 14 go low when on command is sent to MDX Check system wiring and controller for correct operation If output doesn t turn on conta...

Page 188: ...to clear this message by pressing the OUlPUT OFF switch or turning the circuit breaker off and then on Contact AE Customer Service if the problem continues Trbl 7 Artisan Technology Group Quality Instrumentation Guaranteed 888 88 SOURCE www artisantg com ...

Page 189: ...tes that one or more control panel switches are stuck on Make sure all switches are unstuck and then press the OUTPUT OFF switch to clear the message Contact AE Customer Service if the problem continues Trbl 8 Artisan Technology Group Quality Instrumentation Guaranteed 888 88 SOURCE www artisantg com ...

Page 190: ... reason for this is noise Try the following Check the ac input line for noise and a good sine wave Check the grounds and minimize induced noise Check the routing and connection ofthe remote display cable Plug in connectors Turn on circuit breaker Turn off circuit breaker Contact AE Customer Service Trbl 9 Correct ground connections Reroute cables Artisan Technology Group Quality Instrumentation Gu...

Page 191: ...fied amount oftime Possible causes The operator specified time that the MDX can be out of setpoint is too short for output to tum on Either the operator specified time that the MDX can be out of setpoint is too short for the process or there is a problem with the process Turn on circuit breaker and press OUTPUT OFF switch once Enter setpoint level and turn an output Press OUTPUT OFF switch once to...

Page 192: ...tage is within AE s recommended specifications see user manua and check ground connections 2 Check the soft start fuse F1 on the fuse board inside the MDX 3 Make sure that the main contactor closes when output is turned on you should hear a loud snap when the contactor closes 4 Check the MF1 and MF2 plug connections on the motherboard 5 Check for the following sequence when output is turned on a L...

Page 193: ...ck ac input line voltage and grounds Turn off circuit breaker remove top cover safety shield locate soft start fuse Go to Trbl 12 See things to trl 3 See things to try 5 Contact AE Customer Service Replace soft start fuse lf1 try again Verify MF1 and W2 connections to the motherboard yes Contact AE Customer Service Correct Mf1 and W2 connections Go to Artisan Technology Group Quality Instrumentati...

Page 194: ... to try 1 Check that the ac input line voltage meets AE s recommended specification see user manuaQ 2 Check the ground connections 3 Check for the following sequence when output is turned on a LED 1 yellow on the logic PCB lights b the main contactor closes Oisten for loud snap c LED 2 red on the logic PCB lights If one or more of these things don t happen contact AE Customer Service See things to...

Page 195: ...nded specifications see user manua 2 Check the ground connections 3 Check for the following sequence when output is turned on a LED 1 yellow on the logic PCB lights b the main contador closes listen for loud snap c LED 2 red on the logic PCB lights Ifone or more ofthese things don t happen contad AE Customer Service the cause may be a failed power module A troubleshooting flowchart appears on the ...

Page 196: ...e continued See things to try 3 Verify MF2 connection on motherboard Replug or repair connection Trbl 15 no no Contact AE Customer Service Turn off circuit breaker Discharge Iorge capacitors at left chassis Remove F3 F4 F5 F8 25 A fuses on fuse board of left chassis Turn on circuit breaker press OUTPUT OFF switch once turn on output Foiled power module yes Contact AE Customer Service Artisan Techn...

Page 197: ...ontact AE Customer Service Turn on circuit breaker Press OUTPUT OFF switch once select setpoint turn on output Disconnect output cable at MDX output Enter setpoints turn on output observe actual voltage display in power reg Contact AE Customer Service Trbl 16 See causes 1 1 2 and 1 3 Correct fault Contact AE Customer Service Try a different supply known to function Original supply faulty Artisan T...

Page 198: ...maximum current rating for the selected voltage tap has been exceeded the power rating for the system has been exceeded the maximum voltage rating for the selected voltage tap has been exceeded a slave unit s SETPOINT LED is off not lit a slave unit s interconnect cable is not correctly installed Turn on circuit breaker Contact AE Customer Service Connect cable Check interconnect cable installatio...

Page 199: ...ontact AE Customer Service Check for open connections to lood Contact M AE Customer Service Trbl 18 Note These are some additional conditions that may cause the displayed voltage to be 1023 V The connection to the chamber may have been made incorrectly A fault in the chamber may not be allowing the plasma to ignite The chamber pressure may not be correct Select octuol current to be M displayed Con...

Page 200: ... voltage to be displayed If controlling level from remote user verify correct level to UDX If no problem found contact AE Customer Service Check for open connections to load Contact AE Customer Service Trbl 19 Select actual current displayed Contact AE Customer Service Artisan Technology Group Quality Instrumentation Guaranteed 888 88 SOURCE www artisantg com ...

Page 201: ...h The INTERLOCK LED and the OUTPUT OFF switch LED will flash when an inter1ock line is high A condition has occurred that is causing E 12 E 13 E 14 or E 17 to be displayed Control has been switched either to or away from a host controller Output always shuts offwhen host remote control is either selected or de selected The intake air temperature has exceeded 450C The TEMP LED will flash Advanced E...

Page 202: ...e note below Go to Correct host control Trbl 21 Check intake air temperature to UDX Go to Troubleshooting Chart 1 Check intake air flow Contact AE Customer Service Reduce intake air temperature Correct intake air flow Go to 1 1 A Note Output shuts offwhenever host remote control is either selected or de selected that is whenever you transfer control either to or away from a host Artisan Technology...

Page 203: ...APPENDIX Artisan Technology Group Quality Instrumentation Guaranteed 888 88 SOURCE www artisantg com ...

Page 204: ...on Each numbered envelope shows the boundaries for each of the three available taps The impedance ranges for the taps are shown by the four labeled arrows Note The voltage may actually be slightly higher than shown here if the MDX is operating in current or power regulation See the impedance range graph in Fig A 19 A 3 Artisan Technology Group Quality Instrumentation Guaranteed 888 88 SOURCE www a...

Page 205: ...con figuration Each numbered envelope shows the boundaries for each of the three available taps The impedance ranges for the taps are shown by the four labeled arrows Note The voltage may actually be slightly higher than shown here if the MDX is operating in current or power regulation See the impedance range graph in Fig A 20 A 4 Artisan Technology Group Quality Instrumentation Guaranteed 888 88 ...

Page 206: ...figuration Each numbered envelope shows the boundaries for each of the three available taps The impedance ranges for the taps are shown by the four labeled arrows Note The voltage may actually be slightly higher than shown here if the MDX is operating in cu ent or power regulation See the impedance range graph in Fig A 21 A 5 Artisan Technology Group Quality Instrumentation Guaranteed 888 88 SOURC...

Page 207: ...figuration Each numbered envelope shows the boundaries for each of the three available taps The impedance ranges for the taps are shown by the four labeled arrows Note The voltage may actually be slightly higher than shown here if the MDX is operating in current or power regulation See the impedance range graph in Fig A 22 A 6 Artisan Technology Group Quality Instrumentation Guaranteed 888 88 SOUR...

Page 208: ...guration Each numbered envetope shows the boundaries for each of the three available taps The impedance ranges for the taps are shown by the four labeled arrows Note The voltage may actually be slightly higher than shown here if the MDX is operating in current or power regulation See the impedance range graph in Fig A 23 A 7 Artisan Technology Group Quality Instrumentation Guaranteed 888 88 SOURCE...

Page 209: ...h Z con figuration Each numbered envelope shows the boundaries for each of the three available taps The impedance ranges for the taps are shown by the four labeled arrows Note The voltage may actually be slightly higher than shown here if the MDX is operating in current or power regulation See the impedance range graph in Fig A 24 A 8 Artisan Technology Group Quality Instrumentation Guaranteed 888...

Page 210: ... Z con figuration Each numbered envelope shows the boundaries for each of the three available taps The impedance ranges for the taps are shown by the four labeled arrows Note The voltage may actually be slightly higher than shown here if the MDX is operating in current or power regulation See the impedance range graph in Fig A 25 A 9 Artisan Technology Group Quality Instrumentation Guaranteed 888 ...

Page 211: ...5K standard z con figuration Each numbered envelope shows the boundaries for each of the three available taps The impedance ranges for the taps are shown by the four labeled arrows Note The voltage may actually be slightly higher than shown here if the MDX is operating in current or power regulation See the impedance range graph in Fig A 26 A 10 Artisan Technology Group Quality Instrumentation Gua...

Page 212: ...igh zn con figuration Each numbered envelopen shows the boundaries for each of the three available taps The impedance ranges for the taps are shown by the four labeled arrows Note The voltage may actually be slightlv higher than shown here if the MDX is operating in current or power regulation See the impedance range graph in Fig A 27 A 11 Artisan Technology Group Quality Instrumentation Guarantee...

Page 213: ...figuration Each numbered envelope shows the boundaries for each of the three available taps The impedance ranges for the taps are shown by the four labeled arrows Note The voltage may actually be slightly higher than shown here I the MDX is operating in current or power regulation See the impedance range graph in Fig A 28 A 12 55 Artisan Technology Group Quality Instrumentation Guaranteed 888 88 S...

Page 214: ... figuration Each numbered envelopen shows the boundaries for each of the three available taps The impedance ranges for the taps are shown by the four labeled arrows Note The voltage may actually be slightly higher than shown here if the MDX is operating in current or power regulation See the impedance range graph in Fig A 29 A 13 Artisan Technology Group Quality Instrumentation Guaranteed 888 88 S...

Page 215: ...h z con figuration Each numbered envetope shows the boundaries for each of the three available taps The impedance ranges for the taps are shown by the four labeled arrows Note The voltage may actually be slightly higher than shown here if the MDX is operating in current or power regulation See the impedance range graph in Fig A 30 A 14 55 Artisan Technology Group Quality Instrumentation Guaranteed...

Page 216: ...ion Each numbered envelope shows the boundaries for each of the three available taps The impedance ranges for the taps are shown by the four labeled arrows Note The voltage may actually be slightly higher than shown here if the MDX is operating in current or power regulation See the impedance range graph in Fig A 31 A 15 Artisan Technology Group Quality Instrumentation Guaranteed 888 88 SOURCE www...

Page 217: ...Z con figuration Each numbered envelope shows the boundaries for each of the three available taps The impedance ranges for the taps are shown by the four labeled arrows Note The voltage may actually be slightly higher than shown here if the MDX is operating in current or power regulation See the impedance range graph in Fig A 32 A 16 Artisan Technology Group Quality Instrumentation Guaranteed 888 ...

Page 218: ...uration Each numbered envelope shows the boundaries for each of the three available taps The impedance ranges for the taps are shown by the four labeled arrows Note The voltage may actually be slightly higher than shown here if the MDX is operating in current or power regulation See the impedance range graph in Fig A 33 A 17 Artisan Technology Group Quality Instrumentation Guaranteed 888 88 SOURCE...

Page 219: ...0K low Z con figuration Each numbered envelope shows the boundaries for each of the three available taps The impedance ranges for the taps are shown by the four labeled arrows Note The voltage may actually be slightly higher than shown here if the MDX is operating in cu ent or power regulation See the impedance range graph in Fig A 34 A 18 Artisan Technology Group Quality Instrumentation Guarantee...

Page 220: ... Z con figuration Each numbered envelope shows the boundaries for each of the three available taps The impedance ranges for the taps are shown by the four labeled arrows Note The voltage may actually be slightly higher than shown here if the MDX is operating in current or power regulation See the impedance range graph in Fig A 35 A 19 Artisan Technology Group Quality Instrumentation Guaranteed 888...

Page 221: ...gh Z con figuration Each numbered envelope shows the boundaries for each of the three available taps The impedance ranges for the taps are shown by the four labeled arrows Note The voltage may actually be slightly higher than shown here if the MDX is operating in current or power regulation See the impedance range graph in Fig A 36 A 20 Artisan Technology Group Quality Instrumentation Guaranteed 8...

Page 222: ... configuration Shown are the three overlapping ranges of impedance values that can be accomodated with either tap 1 2 or 3 The range that can be accomodated with tap 1 is enclosed by the lines labeled 1 similarly the lines that enclose the other two ranges are labeled 2 and 3 n Also see Fig A 1 A 21 Artisan Technology Group Quality Instrumentation Guaranteed 888 88 SOURCE www artisantg com ...

Page 223: ... 5K standard z con figuration Shown are the three overlapping ranges of impedance values that can be accomodated with either tap 1 2 or 3 The range that can be accomodated with tap 1 is enclosed by the lines labeled 1 similarly the lines that enclose the other two ranges are labeled 2 and 3 Also see Fig A 2 A 22 Artisan Technology Group Quality Instrumentation Guaranteed 888 88 SOURCE www artisant...

Page 224: ...odei5K high Z configuration Shown are the three overlapping ranges of impedance values that can be accomodated with either tap 1 2 or 3 The range that can be accomodated with tap 1 is enclosed by the lines labeled 1 similarly the lines that enclose the other two ranges are labeled 2 and 3 Also see Fig A 3 A 23 Artisan Technology Group Quality Instrumentation Guaranteed 888 88 SOURCE www artisantg ...

Page 225: ... graph for an MDX modei10K low Z con figuration Shown are the three overlapping ranges of impedance values that can be accomodated with either tap 1 2 or 3 The range that can be accomodated with tap 1 is enclosed by the lines labeled 1 similarly the lines that enclose the other two ranges are labeled 2 and 3 Also see Fig A 4 A 24 Artisan Technology Group Quality Instrumentation Guaranteed 888 88 S...

Page 226: ...r an MDX modei10K standard zn con figuration Shown are the three overlapping ranges of impedance values that can be accomodated with either tap 1 2 or 3 The range that can be accomodated with tap 1 is enclosed by the lines labeled 1 similarly the lines that enclose the other two ranges are labeled n2 and 3 n Also see Fig A 5 A 25 Artisan Technology Group Quality Instrumentation Guaranteed 888 88 S...

Page 227: ...mpedance range graph for an MDX modei10K high Z con figuration Shown are the three overlapping ranges of impedance values that can be accomodated with either tap 1 2 or 3 The range that can be accomodated with tap 1 is enclosed by the lines labeled 1 similarly the lines that enclose the other two ranges are labeled 2 and 3 Also see Fig A 6 A 26 Artisan Technology Group Quality Instrumentation Guar...

Page 228: ... graph for an MDX modei15K low Z con figuration Shown are the three overlapping ranges of Impedance values that can be accomodated with either tap 1 2 or 3 The range that can be accomodated with tap 1 is enclosed by the lines labeled 1 similarly the lines that enclose the other two ranges are labeled 2 and 3 Also see Fig A 7 A 27 Artisan Technology Group Quality Instrumentation Guaranteed 888 88 S...

Page 229: ...graph for an MDX modei15K standard z con figuration Shown are the three overlapping ranges of impedance values that can be accomodated with either tap 1 2 or 3 The range that can be accomodated with tap 1 is enclosed by the lines labeled 1 similarly the lines that enclose the other two ranges are labeled 2 and 3 Also see Fig A 8 A 28 Artisan Technology Group Quality Instrumentation Guaranteed 888 ...

Page 230: ...27 Impedance range graph for an MDX model 15K high Z con figuration Shown are the three overlapping ranges of impedance values that can be accomodated with either tap 1 2 or 3 The range that can be accomodated with tap 1 Is enclosed by the lines labeled 1 similarly the lines that enclose the other two ranges are labeled 2 and 3 Also see Fig A 9 A 29 Artisan Technology Group Quality Instrumentation...

Page 231: ...IMPEDANCE Q Figure A 28 Impedance range graph for an MDX model 201 low Z con figuration Shown are the three overlapping ranges of impedance values that can be accomodated with either tap 1 2 or 3 The range that can be accomodated with tap 1 is enclosed by the lines labeled 1 similarly the lines that enclose the other two ranges are labeled 2 and 3 Also see Fig A 10 A 30 Artisan Technology Group Qu...

Page 232: ...CE Q Figure A 29 Impedance range graph for an MDX model 20K standard Z con figuration Shown are the three overlapping ranges of impedance values that can be accomodated with either tap 1 2 or 3 The range that can be accomodated with tap 1 is enclosed by the lines labeled 1 similarly the lines that enclose the other two ranges are labeled 2 and 3 Also see Fig A 11 A 31 Artisan Technology Group Qual...

Page 233: ...160 170 IMPEDANCE Q Figure A 30 Impedance range graph for an MDX model 20K high Z con figuration Shown are the three overlapping ranges of impedance values that can be accomodated with either tap 1 2 or 3 The range that can be accomodated with tap 1 is enclosed by the lines labeled 1 similarly the lines that enclose the other two ranges are labeled 2 and 3 Also see Fig A 12 A 32 Artisan Technology...

Page 234: ...MPEDANCE Q Figure A 31 Impedance range graph for an MDX modei25K low zn con figuration Shown are the three overlapping ranges of impedance values that can be accomodated with either tap 1 2 or 3 The range that can be accomodated with tap 1 is enclosed by the lines labeled 1 similarly the lines that enclose the other two ranges are labeled 2 and 3 n Also see Fig A 13 A 33 Artisan Technology Group Q...

Page 235: ...0 IMPEDANCE Q Figure A 32 Impedance range graph for an MDX model 25K standard Z con figuration Shown are the three overlapping ranges of impedance values that can be accomodated with either tap 1 2 or 3 The range that can be accomodated with tap 1 is enclosed by the lines labeled 1 similarly the lines that enclose the other two ranges are labeled 2 and 3 Also see Fig A 14 A 34 Artisan Technology G...

Page 236: ... 90 100 11 0 120 130 IMPEDANCE Q Figure A 33 Impedance range graph for an MDX model 25K high Z con figuration Shown are the three overlapping ranges of impedance values that can be accomodated with either tap 1 2 or 3 The range that can be accomodated with tap 1 is enclosed by the lines labeled 1 similarly the lines that enclose the other two ranges are labeled 2 and 3 Also see Fig A 15 A 35 Artis...

Page 237: ...90 100 110 IMPEDANCE Q Figure A 34 Impedance range graph for an MDX model 30K low zn con figuration Shown are the three overlapping ranges of impedance values that can be accomodated with either tap 1 2 or 3 The range that can be accomodated with tap 1 is enclosed by the lines labeled 1 similarly the lines that enclose the other two ranges are labeled 2 and 3 n Also see Fig A 16 A 36 Artisan Techn...

Page 238: ...0 1DO 110 IMPEDANCE Q Figure A 35 Impedance range graph for an MDX model 30K standard Z con figuration Shown are the three overlapping ranges of impedance values that can be accomodated with either tap 1 2 or 3 The range that can be accomodated with tap 1 is enclosed by the lines labeled 1 similarly the lines that enclose the other two ranges are labeled 2 and 3 Also see Fig A 17 A 37 Artisan Tech...

Page 239: ...J _ __ I rl 10 20 30 40 50 60 70 80 90 100 110 IMPEDANCE Q Figure A 36 Impedance range graph for an MDX model 30K high Z con figuration Shown are the three overlapping ranges of impedance values that can be accomodated with either tap 1 2 or 3 The range that can be accomodated with tap 1 is enclosed by the lines labeled 1 similarly the lines that enclose the other two ranges are labeled 2 and 3 Al...

Page 240: ... are returned without authorization from AE Customer Service and that are found to be functional will not be covered under the warranty see warranty statement below That is you will have to pay a retest and calibration fee and all shipping charges Upgrading Units AE s products are continually changing as ways to improve them are discovered AE is happy to upgrade older units so that they reflect re...

Page 241: ... digital I O port cathode port host RS 232 port input power master slave interface output remote control panel contactor hold function cooling requirements current regulation de bias design considerations disconnecting display bypass plug 3 10 3 27 1 9 1 12 1 10 2 8 3 17 2 10 2 10 3 18 2 7 3 14 2 11 3 28 2 7 3 17 2 7 3 27 5 7 3 9 4 3 6 3 3 5 3 29 3 28 error messages 2 23 1 1 Artisan Technology Gro...

Page 242: ...interfacing control hierarchy Host port minipanel controls minipanel rear panel rear panel remote control panel rear view standard control panel controls User port line voltage changes lockmode 1 2 2 10 2 47 2 33 2 33 4 21 1 5 2 25 2 33 2 25 2 45 2 47 2 47 2 49 2 25 2 45 2 31 4 47 4 19 Artisan Technology Group Quality Instrumentation Guaranteed 888 88 SOURCE www artisantg com ...

Page 243: ...controls ramptimer remote operation Host port commands to set variables key to translating hexadecimal characters requests for data responses to requests for interlock status responses to requests for system status S status change commands translating responses to status requests run timer 1 3 INDEX 4 53 4 55 2 23 2 10 2 21 2 17 4 17 1 5 1 21 4 43 1 5 4 3 1 18 2 16 4 49 2 16 4 11 4 3 4 9 4 5 4 10 ...

Page 244: ...heory of operation transmission parameters typical applications basic magnetron sputtering de sputtering with RF bias de biased RF sputtering User port connector location pin description table signal descriptions user remote control method of output regulation on off output setpoint level ramp target 1 4 3 19 4 9 3 5 3 7 1 17 1 19 3 31 2 23 2 21 2 13 2 15 2 16 2 17 4 27 4 37 4 43 4 5 4 24 2 3 2 33...

Page 245: ...l service in house repair center WE BUY USED EQUIPMENT Sell your excess underutilized and idle used equipment We also offer credit for buy backs and trade ins www artisantg com WeBuyEquipment REMOTE INSPECTION Remotely inspect equipment before purchasing with our interactive website at www instraview com LOOKING FOR MORE INFORMATION Visit us on the web at www artisantg com for more information on ...

Reviews: