background image

4

Hardware Installation and Operation

Phone Operation in 

AdvanceCommunicator™

Once the phone is inserted into the AdvanceCommunicator™ cradle, you 
will be able to operate it without the application software included.

Placing Phone Calls

To place a phone call while the phone is in the AdvanceCommunicator™:

1

  Dial the phone number using the key pad, speed dial, voice, or any 

other dialling option supported by your phone.

2

  If the AdvanceCommunicator™ handset is resting in place, the call will 

be conducted using the built-in speaker phone.

3

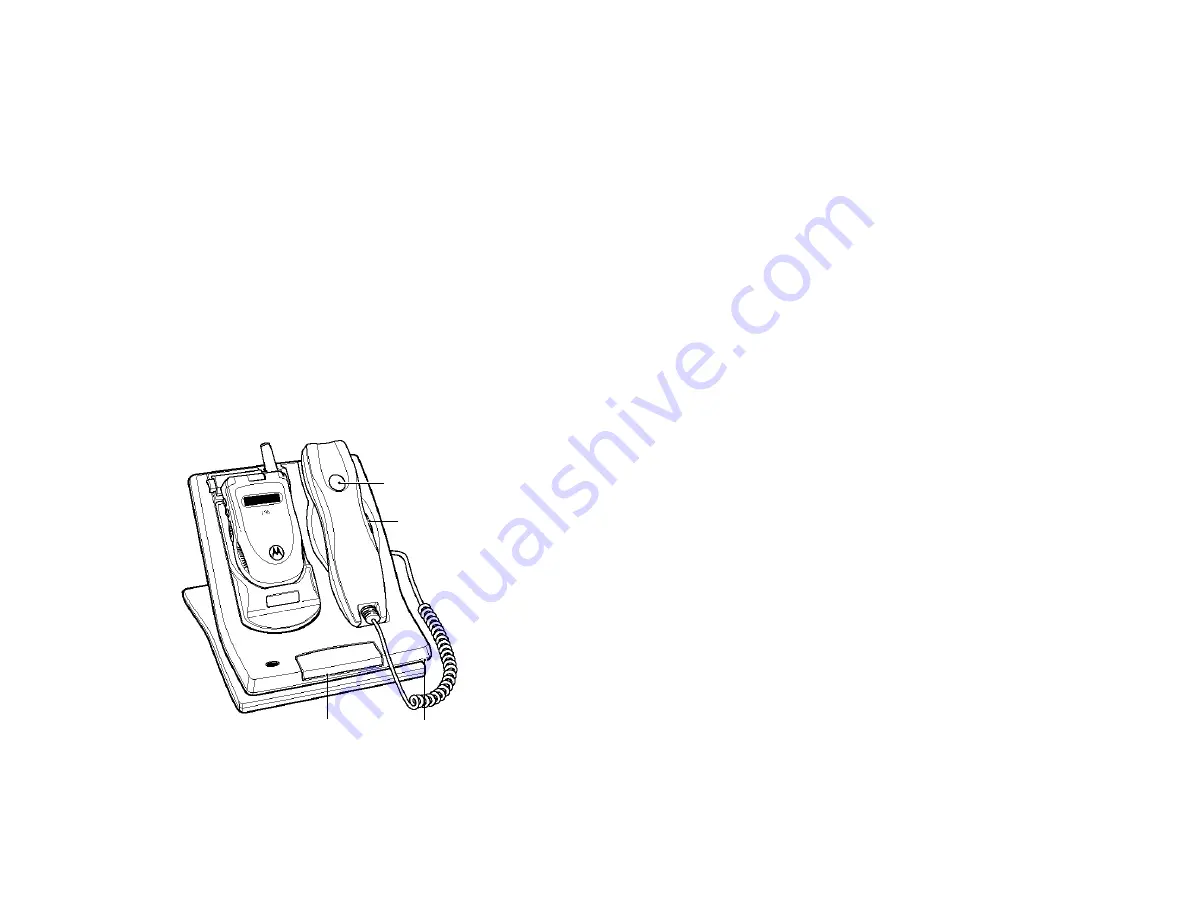
  Talk to the general direction of the microphone, located at the front of 

the AdvanceCommunicator™ base. The voice of the person on the other 
side of the line, will be heard through the speaker located under the 
handset.

PTT

PTT

Speaker

Microphone

4

  At any point during the call, you will be able to pick up the handset and 

continue as if it was a standard phone.

Note:

  When using the handset, you can switch to Bidirectional 

communication mode by pressing the PTT button at the front 
of the AdvanceCommunicator™ or on the back of handset while 
picking up the handset.


The voice transfer from the speaker to the handset will take 2 

seconds, during which the LED indicator will change to orange. 
After the transfer is completed, the LED indicator will change to 
flashing green.


It is advisable to use this mode only for phone calls.


This mode is not active when the AdvanceCommunicator™ is in 

remote operation by the application.

Receiving Phone Calls

To receive a phone call while the phone is in the AdvanceCommunicator™:

1

  Open the phone flip

-or-

  Press on the PTT button at the front of the AdvanceCommunicator™.

Note:

  If the PTT button is pressed for too long, the incoming call will 

be disconnected.

2

  Talk in the general direction of the microphone, located at the front of 

the AdvanceCommunicator™ base. The voice of the person on the other 
side of the line, will be heard through the speaker located under the 
handset.

3

  At any point during the call, you will be able to pick up the handset and 

continue as if it was a standard phone.

Ending a Call

To end a call:

1

  Press on the PTT button at the front of the AdvanceCommunicator™ for 

at least 2 seconds, 

-or-

  Press 

e

 on the phone's key pad, 

-or-

  Close the phone's flip.

Summary of Contents for AdvanceCommunicator

Page 1: ...AdvanceTec AdvanceCommunicator Desktop Communication Kit User Manual for iDEN Condor i60c i90c and i95cl and Falcon i730 i830 i833 and i860 phone models ...

Page 2: ...Activity Log SMS 12 Dial Box Alert Send 13 Phone Book History 13 General section 14 On Screen Keypad 14 First Start 14 Communication Initialization 15 Application Phone Book 15 Adding Records to the Phone Book 15 Deleting Phone Book Record 18 Importing the Phone s Contacts List 18 Phone Book Contents 19 Phone Calls 20 Dial 20 Turbo Dial 20 Answering Calls 21 Private and Group Calls 21 Call Alert 2...

Page 3: ... includes the following components Base station with a suitable cradle for iDEN Condor i60c i90c and i95cl and Falcon i730 i830 i833 and i860 cellular phone models Phone hand set 12VDC Power adaptor Local antenna RS232 data cable Motorola part NKN6544 to connect the base station to a PC computer for Condor phone models only DB15 data cable to connect the base station to a PC computer for Falcon ph...

Page 4: ...ator Antenna Port Power Socket Handset Socket Comm Socket Falcon i730 i830 i833 and i860 Condor i60 i90c and i95cl After connecting the AdvanceCommunicator base to the power supply the base station will perform a series of internal tests During these tests the color of the LED indicator will change At the end of the test series the LED indicator will display a flashing red signal 5 In order to remo...

Page 5: ... at the back of the phone is not removed the phone may not lock into it s correct position in the cradle and may cause communication and operating problems 2 If the iDEN phone is of the Falcon series i730 i830 i833 and i860 and you intend to use the AdvanceTecCommunicator base with the AdvanceTec Communicator application you will need to connect the Audio Cable included in your communication kit b...

Page 6: ... of the AdvanceCommunicator or on the back of handset while picking up the handset The voice transfer from the speaker to the handset will take 2 seconds during which the LED indicator will change to orange After the transfer is completed the LED indicator will change to flashing green It is advisable to use this mode only for phone calls This mode is not active when the AdvanceCommunicator is in r...

Page 7: ...n Using the Handset 1 Pick up the handset press and hold the PTT button on the back of the handset and talk into the handset 2 After you have finished talking release the PTT button and listen Volume Control You can control the volume level of the AdvanceCommunicator by using the phone s volume control buttons located on the left side of the phone Recording Calls The AdvanceCommunicator allows you ...

Page 8: ...The installer will start preparing the files needed for the installation process and a welcoming message will be displayed Please confirm that all applications are terminated and press OK to continue 3 Select the install location The default location is C Program Files AdvanceTecPhone To change the location suggested as default press on Change Directory At the displayed navigation window select your...

Page 9: ...th the installed component Press Yes to keep the newer version or No to replace it You can also select No to All in order to define that each time the installer encounters a newer file it will be replaced Selecting No to All may cause compatibility problems with other installed application therefore we advise you to always select Yes 6 At the end of the installation process the installer will displa...

Page 10: ...t menu is displayed release the mouse button 2 Go into Programs and select AdvaceTec Communicator 3 Using the right mouse button grab and drag the AdvanceTec Communicator label from the menu to the Desktop or into the Application Bar at the bottom 4 Release the right mouse button and from the popup menu that appears select Copy Here or Create Shortcut s Here The operating system will create the sh...

Page 11: ... use of an enhanced phone book and presenting a detailed activity log Combining the AdvanceTec Communicator application with the AdvanceCommunicator kit will turn your PC into a friendly flexible and easy to use communication center Application Structure The application window is divided to eight sections Menus Status Lines Activity Log SMS Group SMS Sending SMS Dial Box and Alert Send Phone Book H...

Page 12: ...ord to the application Phone Book Note You can not synchronize contact and group entries added to the application Phone Book with the phone s Contacts Import Phone Contact List Using this command will import all the phone book entries from your phone and append them to the application Phone Book entries Note You can import and append entries from several iDEN phones use by you organization to the ...

Page 13: ...t will be displayed in the status line Status Lines The Status Lines section is located at the top of the window and includes four status fields Communication Status This field displays the communication status between the application and the hardware When communication with the hardware is down the field will light up in red and No Reply from Hardware message will be displayed Phone Status This field...

Page 14: ...nitialization result This list allows you not only to keep track of the communication activities performed but also to dial send call alert to any phone number logged or add them to the application Phone Book Note The application Activity Log is saved for each activity day You can browse the Activity Log History by usin the History Show History command This will display the History section replaci...

Page 15: ...n Phone Book and Turbo Dial Mode this section displays the Phone Book entries list and 12 Turbo Dial buttons to which you can assign any phone private or group number from the Phone Book records Record Details Display Mode When in Record Details mode this section displays the record details of the selected record and allows browsing and editing them Activity Log History Display Mode When in Activi...

Page 16: ...appear Note If you selected the wrong port you can always change the settings by accessing Options Settings Communication Channel and selecting the correct serial port General section The displayed information in this section varies according to the activity mode of the application Mode Displayed Info General SMS and Voice messages counters are displayed at the bottom of the section Turbo Dial edi...

Page 17: ...lication Phone Book 1 From the menus select Phone Book Add Contact or In the Phone Book section press the Add Contact Button 2 At the Record Details fields displayed in the Phone Book section enter the appropriate record details Name The name of the person or any identifying name that you would like to assign the record You can not assign the same name to two Phone Book records Trying to do so will...

Page 18: ...s record Note The sound file should be in WAV format After selecting the sound file you will be prompted to name and save it In the save dialog the default saving location is in the Sounds directory under the application directory and the default name assigned to the image file is the name of the record it is being assign to Note When assigning a sound file to a record the application may loose commun...

Page 19: ...lication may loose communication with the phone Communication will be restored at the end of the process To display the image from within the Record Details press on the icon next to the Picture field To Hide the image click on it Note A textual note line assigned to the record Exit Exits the Record Details mode back to the Phone Book display without saving the changes If changes were made to this ...

Page 20: ... double click on it The section display will change and display the Record Details 3 Press the Delete button A confirmation message will be displayed Press Yes to delete the record or No to cancel and keep the record Importing the Phone s Contacts List The AdvanceTec Communicator application lets you to import the contacts from the iDEN phone installed in the AdvanceCommunicator cradle To import th...

Page 21: ...ighlight the entry row in the list 2 Double click on the entry row to display the entry details in the section below the list If you need to edit the entry details you can do it now 3 Press the Store button the press Exit A saved entry will be designated as Saved in the Number column of the Contacts from Phone Memory list Saving All the Imported Entries in the Phone Book To save all the imported c...

Page 22: ...Book or logged in the current Activity Log 1 Place the mouse cursor in the phone number field of the Dial Box section the bottom field of the section or Using the mouse enter the phone number by clicking the numeric keys of the On Screen Keypad To delete the last digit entered click the button To clear the number field double click or click and hold the button 2 Press s in the On Screen Keypad Turbo ...

Page 23: ...fields will be displayed in the General Section to the left of the Turbo Dial buttons 2 To delete the assigned phone number click the Delete button 3 Click the Save button Answering Calls To answer incoming calls Open the flip or If the phone flip is open press s or B under Yes or Click the s key in the On Screen Keypad or Press the Space Key of the computer keyboard Private and Group Calls Call Aler...

Page 24: ...l the Space key of the computer keyboard can also be used as a PTT button SMS Messages Note This feature depends on the availability of the MO SMS service from you cellular service provider Sending an SMS message from the phone is a routine activity but not a very convenient one to perform The AdvanceTec Communicator application allows you to Send SMS message to a single recipient Send SMS message...

Page 25: ... field located above the Name List to locate the record 3 Double click the record to display the Record Details 4 Using drag and drop drag the mobile phone number or the phone number from the Record Details section and drop it into the recipients list in the Group SMS section The phone number and record name will be added to the recipients list of the SMS Group 5 To log in the new recipient click t...

Page 26: ...mport Phone Messages button will change to Abort Messages Import Click this button to abort the import process 3 The SMS messages list will be imported and displayed in the Incoming Messages list Reading SMS Messages To read the contents of SMS message in the Incoming Messages list From the Incoming Messages list select the message you would like to read The contents of the selected message will b...

Page 27: ... of the current activity day 2 Using the Day Month and Year lists at the bottom of the section select the date for which you would like to display the Activity Log History If you select a date that doesn t have a saved history the field containing the wrong date value will be marked in red and a No history for this date message will be displayed next to it Exporting Activity Log History You can exp...

Page 28: ... Update 3 In the displayed Open dialog select the update file The default location displayed in the dialog is the HardwareUpdate directory under the application directory 4 To start the update process disconnect the power adaptor from the AdvanceCommunicator base then re connect it 5 At the end of the update process the message Update Succeeded Please Wait will be displayed and the application will...

Page 29: ...tion can not turn the phone off during initialization The phone s flip is closed Open the phone s flip and press the power button During communication initialization you get a message to manually turn off the phone Sound is not transferred to handset The handset plug is not properly connected to the AdvanceCommunicator base Unplug the handset from the AdvanceCommunicator base then plug back until lock...

Page 30: ...ows are registered trademarks of Microsoft AdvanceCommunicator is a registered trademark of AdvanceTec All other product names or services mentioned in this user s guide are the property of their respective trademark owners ...

Reviews: