12
EKI-7708 Series User Manual
2.3.1.1
Installing the DIN-Rail Mounting Kit
1.
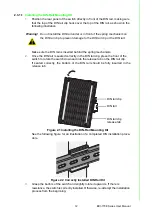
Position the rear panel of the switch directly in front of the DIN rail, making sure
that the top of the DIN rail clip hooks over the top of the DIN rail, as shown in the
following illustration.
Make sure the DIN rail is inserted behind the spring mechanism.
2.
Once the DIN rail is seated correctly in the DIN rail clip, press the front of the
switch to rotate the switch down and into the release tab on the DIN rail clip.
If seated correctly, the bottom of the DIN rail should be fully inserted in the
release tab.
Figure 2.1 Installing the DIN-Rail Mounting Kit
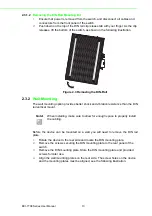
See the following figure for an illustration of a completed DIN installation proce-
dure.
Figure 2.2 Correctly Installed DIN Rail Kit
3.
Grasp the bottom of the switch and slightly rotate it upwards. If there is
resistance, the switch is correctly installed. Otherwise, re-attempt the installation
process from the beginning.
Warning!
Do not install the DIN rail under or in front of the spring mechanism on
the DIN rail clip to prevent damage to the DIN rail clip or the DIN rail.
DIN rail clip
DIN rail
DIN rail clip
release tab
Summary of Contents for EKI-7708 Series
Page 14: ...Chapter 1 1Product Overview ...
Page 23: ...Chapter 2 2Switch Installation ...
Page 39: ...Chapter 3 3Configuration Utility ...
Page 45: ...Chapter 4 4Managing Switch ...
Page 161: ...Chapter 5 5Troubleshooting ...

