background image

vii

HPC-7120 User Manual

/ 用户手册


请先参考本手册。如果仍找不到方案,请搜集和故障有关的所有信息和问题,汇同你
手边的资料,给您的经销商打电话。我们的经销商都是接受过专业培训的。通过您提
供的产品信息,他们会为您提供所需要的技术支持。事实上,多数问题都是很微小的,
都可以在电话上解决。
此外,在每个工作日,研华工程师都为客户提供免费的技术支持。关于研华任意一款
产品安装和操作方面的应用需求或具体信息,我们都时刻准备着为您提供相关的建
议。

我們衷心希望您購買的產品能夠發揮最大的性能。如果您遇到技術問題,我們隨時準
備為您提供幫助。關於常見問題,您可以在產品文件中找到滿意答案。這些答案通常
比我們可以在電話上給您提供的答案更為詳細。
請先參考本手冊。如果仍找不到答案,請收集和故障有關的所有資訊和問題,會同你
手邊的資料,與經銷商聯絡。我們的經銷商都是接受過專業培訓的。透過您提供的產
品資訊,他們會為您提供所需要的技術支援。事實上,多數問題都是很微小的,可以
直接透過電話解決。
此外,在上班時間內,研華工程師都為客戶提供免費的技術支援。關於研華任意一款
產品安裝和操作方面的應用需求或具體資訊,我們都時刻準備著為您提供相關的建
議。

Product Warranty

/ 产品质量保证 / 產品保固


Advantech warrants to you, the original purchaser, that each of its products will be
free from defects in materials and workmanship for two years from the date of pur-
chase. 

This warranty does not apply to any products which have been repaired or altered by
persons other than repair personnel authorized by Advantech, or which have been
subject to misuse, abuse, accident or improper installation. Advantech assumes no
liability under the terms of this warranty as a consequence of such events.

Because of Advantech’s high quality-control standards and rigorous testing, most of
our customers never need to use our repair service. If an Advantech product is defec-
tive, it will be repaired or replaced at no charge during the warranty period. For out-
of-warranty repairs, you will be billed according to the cost of replacement materials,
service time and freight. Please consult your dealer for more details.

If you think you have a defective product, follow these steps:

1.

Collect all the information about the problem encountered. (For example, CPU 
speed, Advantech products used, other hardware and software used, etc.) Note 
anything abnormal and list any onscreen messages you get when the problem 
occurs.

2.

Call your dealer and describe the problem. Please have your manual, product, 
and any helpful information readily available.

3.

If your product is diagnosed as defective, obtain an RMA (return merchandise 
authorization) number from your dealer. This allows us to process your return 
more quickly.

4.

Carefully pack the defective product, a fully-completed Repair and Replacement 
Order Card and a photocopy proof of purchase date (such as your sales receipt) 
in a shippable container. A product returned without proof of the purchase date 
is not eligible for warranty service.

5.

Write the RMA number visibly on the outside of the package and ship it prepaid 
to your dealer.

Summary of Contents for HPC-7120

Page 1: ...User Manual HPC 7120 1U Short depth Server Chassis for EATX ATX MicroATX Motherboard 1U EATX ATX MicroATX 1U EATX ATX MicroATX...

Page 2: ...ed in any form or by any means without the prior written permission of Advantech Co Ltd Information provided in this manual is intended to be accurate and reliable How ever Advantech Co Ltd assumes no...

Page 3: ...F it may damage the equipment 9 The openings on the enclosure are for air convection Protect the equipment from overheating DO NOT COVER THE OPENINGS 10 Make sure the voltage of the power source is co...

Page 4: ...disconnect the power cord from your chassis whenever you work with the hardware Do not make connections while the power is on Sensitive electronic components can be damaged by sudden power surges 20...

Page 5: ...v HPC 7120 User Manual 17 18 FCC 15 1 2 19 20 21 22 CCC 1 2 3 4 5 6 7 8 0 C 32 F 40 C 104 F 9 10 11 12 13 14 15 16 17 18 FCC 15 1 2...

Page 6: ...the best performance possible from your products If you run into technical difficulties we are here to help For the most frequently asked questions you can easily find answers in your product documen...

Page 7: ...of replacement materials service time and freight Please consult your dealer for more details If you think you have a defective product follow these steps 1 Collect all the information about the prob...

Page 8: ...tact your distributor or sales repre sentative immediately We have carefully inspected the product mechanically and electrically before shipment It should be free of marks and scratches and in perfect...

Page 9: ...ix HPC 7120 User Manual...

Page 10: ...HPC 7120 User Manual x...

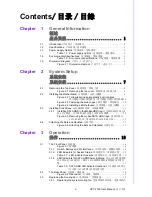
Page 11: ...gure 2 4 Installing a Motherboard 11 2 3 Installing Disk Drives 11 2 3 1 Installing SATA HDD in the Mobile HDD tray HDD SATA HDD SATA 12 Figure 2 5 Removing the mobile SATA HDD trays SATA HDD SATA HDD...

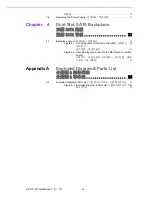
Page 12: ...SATA SATA 21 4 1 Backplane Layout 22 Figure 4 1 Front side layout connect to the HDD HDD HDD 22 Figure 4 2 Rear side layout connect to the RAID card or mother board RAID RAID 22 Appendix A Exploded Di...

Page 13: ...Chapter 1 1 General Information...

Page 14: ...high or low the temperature is inside the chassis A wide range of standard computing peripherals can be integrated with these chassis to accommodate robust applications in rugged environments 24 hour...

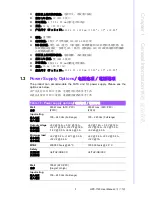
Page 15: ...supply Please see the options as below FATX 1U FATX 1U Table 1 1 Power supply options Watt 350 W max ATX PFC FATX 250 W max ATX PFC FATX Input rating 100 240 Vac Full range 100 240 Vac Full range Outp...

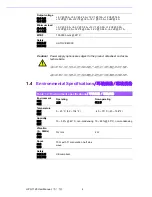
Page 16: ...12 V 0 05 A 5 Vsb 0 1 A MTBF 100 000 hours 25 C Safety UL TUV CB CCC Caution Power supply options are subject to the product datasheet on Advan tech website Table 1 2 Environment specifications Enviro...

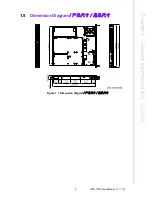
Page 17: ...5 HPC 7120 User Manual Chapter 1 General Information 1 5 Dimension Diagram Figure 1 1 Dimension diagram...

Page 18: ...HPC 7120 User Manual 6...

Page 19: ...Chapter 2 2 System Setup...

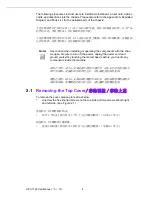
Page 20: ...7120 A HPC 7120 A 2 1 Removing the Top Cover To remove the cover please proceed as below 1 Unscrew the five knurled screws on the top side and two screws at both right and left side see Figure 2 1 1...

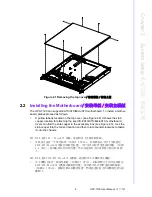
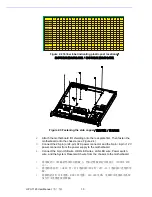
Page 21: ...low label is located on the top cover see Figure 2 2 It shows the stub copper location for attaching the specific EATX ATX MicroATX motherboard Users can find the stub copper in the accessory box see...

Page 22: ...TX power connector and the 8 pin 4 pin 12 V power connector from the power supply to the motherboard 4 Connect the 9 pin USB wire HDD LED wires LAN LED wire Power switch wire and the System Reset swit...

Page 23: ...8 4 12 V 4 9 USB HDD LED LAN LED Figure 2 4 Installing a Motherboard 2 3 Installing Disk Drives The HPC 7120 comes with two easy to maintain 2 5 SATA HDD trays Please refer to the following instructi...

Page 24: ...e chassis 2 Slide one SATA disk drive into the proper location in the tray and fix it with 4 screws 3 Return and push the HDD tray to the chassis until the handle of tray is moving back Right shift th...

Page 25: ...nd Handles There is a pair of ears and handles in the accessory box If you need to install them please refer to Figure 2 11 to simply fasten them to the front right and front left mounting ears with t...

Page 26: ...HPC 7120 User Manual 14...

Page 27: ...Chapter 3 3 Operation...

Page 28: ...s switch to turn the system power on or off Please use system shutdown or press this switch for few seconds to turn off the sys tem ATX power System Reset button Press this button to reboot the system...

Page 29: ...SATA HDD LED 3 2 Table 3 1 LED Indicator functions LED Description Blue Red Power System Power Normal N A HDD LED Hard Disk Drive Activity Data Access N A LAN LAN1 LAN2 status LAN1 LAN2 LAN1 LAN2 Norm...

Page 30: ...I O 1 I O 3 3 1 I O 1 I O 3 3 Figure 3 2 Rear panel There is a ground screw with a washer located on the lower right of the rear panel when properly grounded this protects the system in case of elect...

Page 31: ...lug the power cord from the power supply 2 Remove the top cover 3 Unplug the 20 pin or 24 pin ATX power connector and 4 pin 8 pin 12 V power connector from the motherboard as well as the power connect...

Page 32: ...herboard And plug other power connectors to the disk drives and peripherals 7 Return the top cover Then plug in the power cord HPC 7120 1 FATX 1U 1 2 3 20 24 ATX 4 8 12 V 4 2 3 9 5 6 20 24 ATX 4 8 12...

Page 33: ...Chapter 4 4 Dual Slot SATA Backplane SATA SATA...

Page 34: ...HPC 7120 User Manual 22 4 1 Backplane Layout Figure 4 1 Front side layout connect to the HDD HDD HDD Figure 4 2 Rear side layout connect to the RAID card or motherboard RAID RAID...

Page 35: ...Appendix A A Exploded Diagram Parts List...

Page 36: ...HPC 7120 User Manual 24 A 1 Exploded Diagram Parts List Figure A 1 Exploded Diagram Parts List...

Page 37: ...25 HPC 7120 User Manual Appendix A Exploded Diagram Parts List...

Page 38: ...No part of this publication may be reproduced in any form or by any means electronic photocopying recording or otherwise without prior written permis sion of the publisher All brand and product names...

Reviews: