background image

HPC-7120 User Manual

/ 用户手册

viii

从购买之日起,研华为原购买商提供两年的产品质量保证。但对那些未经授权的维修
人员维修过的产品并不予提供质量保证。研华对于不正确的使用、灾难、错误安装产
生的问题有免责权利。
如果研华产品出现故障,在质保期内我们提供免费维修或更换服务。对于出保产品,
我们将会酌情收取材料费、人工服务费用。请联系相关销售人员了解详细情况。
如果您认为您购买的产品出现了故障,请遵循以下步骤:

1.

收集您所遇到的问题的信息 (例如,CPU 主频、使用的研华产品及其它软件、硬
件等)。请注意屏幕上出现的任何不正常信息显示。

2.

打电话给您的供货商,描述故障问题。请借助手册,产品和任何有帮助的信息。

3.

如果您的产品被诊断发生故障,请从您的供货商那里获得 RMA (Return 
Material Authorization) 序列号。这可以让我们尽快地进行故障产品的回收。

4.

请仔细地包装故障产品,并在包装中附上完整的售后服务卡片和购买日期证明

(如销售发票)。我们对无法提供购买日期证明的产品不提供质量保证服务。

5.

把相关的 RMA 序列号写在外包装上,并将其运送给销售人员。

從購買之日起,研華為原購買商提供兩年的產品品質保證。但對那些未經授權的維修
人員維修過的產品,並不進行品質保證。研華對於不正確的使用、天災、錯誤安裝產
生 的問題有免責權利。
如果研華產品出現故障,在保固期內我們提供免費維修或更換服務。對於超過保固期
之產品, 我們將會酌收材料費、人工服務費用。請聯繫您的銷售人員瞭解詳細情況。
如果您認為您購買的產品出現了故障,請遵循以下步驟:

1.

收集您所遇到的問題資訊 (例如,CPU 頻率、使用的研華產品及其它軟體、硬 
體等)。請注意螢幕上出現的任何不正常資訊顯示。

2.

打電話給您的供應商,描述故障問題。請參考手冊,產品和任何有幫助的資訊。

3.

如果您的產品被診斷發生故障,請從您的供應商那裏獲得 RMA (Return Mate

-

rial Authorization) 序號。這可以讓我們儘快地進行故障產品的回收。

4.

請細心包裝故障產品,並在包裝中附上完整的售後服務卡片和購買日期證明 

(如銷售發票)。我們對無法提供購買日期證明的產品不提供保固服務。

把相關的 RMA 序號寫在外包裝上,並將其運送給銷售人員。

Initial Inspection

/ 初始检查 / 初始檢查

When you open the carton, please make sure that the following materials have been
shipped:

Chassis

User Manual

Warranty Card

Accessory box with a package of screws (for fastening the motherboard, disk 
drives, ears and handles, etc.), and a pair of ears and handles.

If any of these items are missing or damaged, contact your distributor or sales repre-
sentative immediately. We have carefully inspected the product mechanically and
electrically before shipment. It should be free of marks and scratches and in perfect
working order upon receipt. As you unpack the product, check it for signs of shipping
damage. (For example, damaged box, scratches, dents, etc.) If it is damaged or it
fails to meet the specifications, notify our service department or your local sales rep-
resentative immediately. Also, please notify the carrier. Retain the shipping carton
and packing material for inspection by the carrier. After inspection, we will make
arrangements to repair or replace the unit.

Summary of Contents for HPC-7120

Page 1: ...User Manual HPC 7120 1U Short depth Server Chassis for EATX ATX MicroATX Motherboard 1U EATX ATX MicroATX 1U EATX ATX MicroATX...

Page 2: ...ed in any form or by any means without the prior written permission of Advantech Co Ltd Information provided in this manual is intended to be accurate and reliable How ever Advantech Co Ltd assumes no...

Page 3: ...F it may damage the equipment 9 The openings on the enclosure are for air convection Protect the equipment from overheating DO NOT COVER THE OPENINGS 10 Make sure the voltage of the power source is co...

Page 4: ...disconnect the power cord from your chassis whenever you work with the hardware Do not make connections while the power is on Sensitive electronic components can be damaged by sudden power surges 20...

Page 5: ...v HPC 7120 User Manual 17 18 FCC 15 1 2 19 20 21 22 CCC 1 2 3 4 5 6 7 8 0 C 32 F 40 C 104 F 9 10 11 12 13 14 15 16 17 18 FCC 15 1 2...

Page 6: ...the best performance possible from your products If you run into technical difficulties we are here to help For the most frequently asked questions you can easily find answers in your product documen...

Page 7: ...of replacement materials service time and freight Please consult your dealer for more details If you think you have a defective product follow these steps 1 Collect all the information about the prob...

Page 8: ...tact your distributor or sales repre sentative immediately We have carefully inspected the product mechanically and electrically before shipment It should be free of marks and scratches and in perfect...

Page 9: ...ix HPC 7120 User Manual...

Page 10: ...HPC 7120 User Manual x...

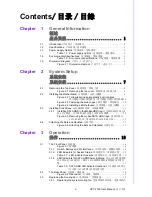
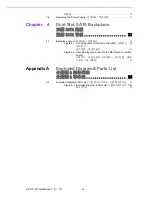
Page 11: ...gure 2 4 Installing a Motherboard 11 2 3 Installing Disk Drives 11 2 3 1 Installing SATA HDD in the Mobile HDD tray HDD SATA HDD SATA 12 Figure 2 5 Removing the mobile SATA HDD trays SATA HDD SATA HDD...

Page 12: ...SATA SATA 21 4 1 Backplane Layout 22 Figure 4 1 Front side layout connect to the HDD HDD HDD 22 Figure 4 2 Rear side layout connect to the RAID card or mother board RAID RAID 22 Appendix A Exploded Di...

Page 13: ...Chapter 1 1 General Information...

Page 14: ...high or low the temperature is inside the chassis A wide range of standard computing peripherals can be integrated with these chassis to accommodate robust applications in rugged environments 24 hour...

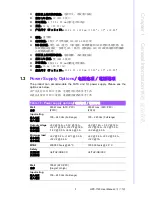
Page 15: ...supply Please see the options as below FATX 1U FATX 1U Table 1 1 Power supply options Watt 350 W max ATX PFC FATX 250 W max ATX PFC FATX Input rating 100 240 Vac Full range 100 240 Vac Full range Outp...

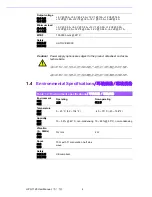
Page 16: ...12 V 0 05 A 5 Vsb 0 1 A MTBF 100 000 hours 25 C Safety UL TUV CB CCC Caution Power supply options are subject to the product datasheet on Advan tech website Table 1 2 Environment specifications Enviro...

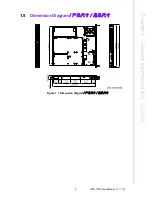
Page 17: ...5 HPC 7120 User Manual Chapter 1 General Information 1 5 Dimension Diagram Figure 1 1 Dimension diagram...

Page 18: ...HPC 7120 User Manual 6...

Page 19: ...Chapter 2 2 System Setup...

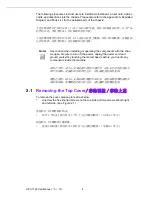
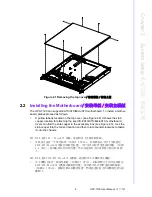
Page 20: ...7120 A HPC 7120 A 2 1 Removing the Top Cover To remove the cover please proceed as below 1 Unscrew the five knurled screws on the top side and two screws at both right and left side see Figure 2 1 1...

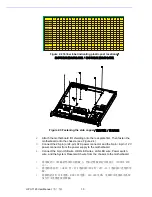
Page 21: ...low label is located on the top cover see Figure 2 2 It shows the stub copper location for attaching the specific EATX ATX MicroATX motherboard Users can find the stub copper in the accessory box see...

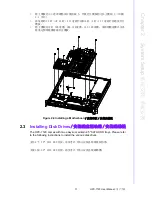
Page 22: ...TX power connector and the 8 pin 4 pin 12 V power connector from the power supply to the motherboard 4 Connect the 9 pin USB wire HDD LED wires LAN LED wire Power switch wire and the System Reset swit...

Page 23: ...8 4 12 V 4 9 USB HDD LED LAN LED Figure 2 4 Installing a Motherboard 2 3 Installing Disk Drives The HPC 7120 comes with two easy to maintain 2 5 SATA HDD trays Please refer to the following instructi...

Page 24: ...e chassis 2 Slide one SATA disk drive into the proper location in the tray and fix it with 4 screws 3 Return and push the HDD tray to the chassis until the handle of tray is moving back Right shift th...

Page 25: ...nd Handles There is a pair of ears and handles in the accessory box If you need to install them please refer to Figure 2 11 to simply fasten them to the front right and front left mounting ears with t...

Page 26: ...HPC 7120 User Manual 14...

Page 27: ...Chapter 3 3 Operation...

Page 28: ...s switch to turn the system power on or off Please use system shutdown or press this switch for few seconds to turn off the sys tem ATX power System Reset button Press this button to reboot the system...

Page 29: ...SATA HDD LED 3 2 Table 3 1 LED Indicator functions LED Description Blue Red Power System Power Normal N A HDD LED Hard Disk Drive Activity Data Access N A LAN LAN1 LAN2 status LAN1 LAN2 LAN1 LAN2 Norm...

Page 30: ...I O 1 I O 3 3 1 I O 1 I O 3 3 Figure 3 2 Rear panel There is a ground screw with a washer located on the lower right of the rear panel when properly grounded this protects the system in case of elect...

Page 31: ...lug the power cord from the power supply 2 Remove the top cover 3 Unplug the 20 pin or 24 pin ATX power connector and 4 pin 8 pin 12 V power connector from the motherboard as well as the power connect...

Page 32: ...herboard And plug other power connectors to the disk drives and peripherals 7 Return the top cover Then plug in the power cord HPC 7120 1 FATX 1U 1 2 3 20 24 ATX 4 8 12 V 4 2 3 9 5 6 20 24 ATX 4 8 12...

Page 33: ...Chapter 4 4 Dual Slot SATA Backplane SATA SATA...

Page 34: ...HPC 7120 User Manual 22 4 1 Backplane Layout Figure 4 1 Front side layout connect to the HDD HDD HDD Figure 4 2 Rear side layout connect to the RAID card or motherboard RAID RAID...

Page 35: ...Appendix A A Exploded Diagram Parts List...

Page 36: ...HPC 7120 User Manual 24 A 1 Exploded Diagram Parts List Figure A 1 Exploded Diagram Parts List...

Page 37: ...25 HPC 7120 User Manual Appendix A Exploded Diagram Parts List...

Page 38: ...No part of this publication may be reproduced in any form or by any means electronic photocopying recording or otherwise without prior written permis sion of the publisher All brand and product names...

Reviews: