


HPC-7400 User Manual
/ 用户手册
viii
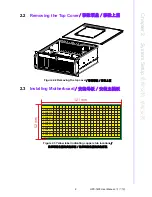
2.
Call your dealer and describe the problem. Please have your manual, product,
and any helpful information readily available.
3.
If your product is diagnosed as defective, obtain an RMA (return merchandise
authorization) number from your dealer. This allows us to process your return
more quickly.
4.
Carefully pack the defective product, a fully-completed Repair and Replacement
Order Card and a photocopy proof of purchase date (such as your sales receipt)
in a shippable container. A product returned without proof of the purchase date
is not eligible for warranty service.
5.
Write the RMA number visibly on the outside of the package and ship it prepaid
to your dealer.
从购买之日起,研华为原购买商提供两年的产品质量保证。但对那些未经授权的维修
人员维修过的产品并不予提供质量保证。研华对于不正确的使用、灾难、错误安装产
生的问题有免责权利。
如果研华产品出现故障,在质保期内我们提供免费维修或更换服务。对于出保产品,
我们将会酌情收取材料费、人工服务费用。请联系相关销售人员了解详细情况。
如果您认为您购买的产品出现了故障,请遵循以下步骤:
1.
收集您所遇到的问题的信息 (例如,CPU 主频、使用的研华产品及其它软件、硬
件等)。请注意屏幕上出现的任何不正常信息显示。
2.
打电话给您的供货商,描述故障问题。请借助手册,产品和任何有帮助的信息。
3.
如果您的产品被诊断发生故障,请从您的供货商那里获得 RMA (Return
Material Authorization) 序列号。这可以让我们尽快地进行故障产品的回收。
4.
请仔细地包装故障产品,并在包装中附上完整的售后服务卡片和购买日期证明
(如销售发票)。我们对无法提供购买日期证明的产品不提供质量保证服务。
5.
把相关的 RMA 序列号写在外包装上,并将其运送给销售人员。
從購買之日起,研華為原購買商提供兩年的產品品質保證。但對那些未經授權的維修
人員維修過的產品,並不進行品質保證。研華對於不正確的使用、天災、錯誤安裝產
生 的問題有免責權利。
如果研華產品出現故障,在保固期內我們提供免費維修或更換服務。對於超過保固期
之產品, 我們將會酌收材料費、人工服務費用。請聯繫您的銷售人員瞭解詳細情況。
如果您認為您購買的產品出現了故障,請遵循以下步驟:
1.
收集您所遇到的問題資訊 (例如,CPU 頻率、使用的研華產品及其它軟體、硬
體等)。請注意螢幕上出現的任何不正常資訊顯示。
2.
打電話給您的供應商,描述故障問題。請參考手冊,產品和任何有幫助的資訊。
3.
如果您的產品被診斷發生故障,請從您的供應商那裏獲得 RMA (Return Mate
-
rial Authorization) 序號。這可以讓我們儘快地進行故障產品的回收。
4.
請細心包裝故障產品,並在包裝中附上完整的售後服務卡片和購買日期證明
(如銷售發票)。我們對無法提供購買日期證明的產品不提供保固服務。
5.
把相關的 RMA 序號寫在外包裝上,並將其運送給銷售人員。
Summary of Contents for HPC-7400
Page 10: ...HPC 7400 User Manual x...
Page 13: ...Chapter 1 1 General Information...
Page 18: ...HPC 7400 User Manual 6...
Page 19: ...Chapter 2 2 System Setup...
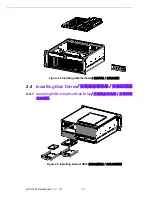
Page 23: ...11 HPC 7400 User Manual Chapter 2 System Setup Figure 2 6 Installing the optical disk drive...
Page 26: ...HPC 7400 User Manual 14...
Page 27: ...Chapter 3 3 Operation...
Page 32: ...HPC 7742 User Manual 20...