background image

ix

HPC-7400 User Manual

/ 用户手册


Initial Inspection

/ 初始检查 / 初始檢查

When you open the carton, please make sure that the following materials have been
shipped:

Chassis

User Manual

Warranty Card

Accessory box with a package of screws (for fastening the motherboard, slim-
type optical disk drive, other disk drives, ear handles, etc.), a pair of keys, a pair 
of ear handles and 7 pcs 

If any of these items are missing or damaged, contact your distributor or sales repre-
sentative immediately. We have carefully inspected the product mechanically and
electrically before shipment. It should be free of marks and scratches and in perfect
working order upon receipt. As you unpack the product, check it for signs of shipping
damage. (For example, damaged box, scratches, dents, etc.) If it is damaged or it
fails to meet the specifications, notify our service department or your local sales rep-
resentative immediately. Also, please notify the carrier. Retain the shipping carton
and packing material for inspection by the carrier. After inspection, we will make
arrangements to repair or replace the unit.

打开包装时,用户需确认包装中含有下面所列各项:

机箱

用户手册

质保卡

附件盒,包括一袋螺丝 (用于固定母板、薄型光驱、其它磁盘驱动器、耳柄及
把手等)、1 对钥匙、1 对耳柄和 7 个橡胶垫

若有任何不符,请与经销商联系。装货前,我们已全面仔细检查过产品。因此您购买
的产品应当是完好无损且运转正常的。在您打开产品的包装时,请检查是否有破损痕
迹 (例如,包装箱损坏,划痕,凹痕等) 。如果产品有破损或者不符合规格,请立即
联系我们的服务部门或您的销售商。同时也要通知搬运人员。请保留包装箱及包装材
料以备搬运人员检查。检查之后,我们会给您提供维修或更换服务。

打開包裝時,用戶需確認包裝中含有下所列各項:

機箱

用戶手冊

品質保證卡

附件盒,包括一袋螺絲 (用於固定母板、薄型光碟機、其它磁碟機、耳翼及把
手等)、1 對鑰匙、1 對耳翼把手和 7 個橡膠墊

若任何不符,請立即與經銷商聯繫。裝貨前,我們已全面仔細檢查過產品。因此您購
買的產品應當是完好無 損且運轉正常的。在您打開產品的包裝時,請檢查是否有破損
痕跡 (例如,包裝箱損壞,刮痕,凹痕等) 。如果產品有破損或者不符合規格,請立
即聯繫我們 的服務部門或您的銷售商。同時也要通知搬運人員。請保留包裝箱及包裝
材料以備搬 運人員檢查。檢查之後,我們會給您提供維修或更換服務。

Summary of Contents for HPC-7400

Page 1: ...User Manual HPC 7400 4U Compact Rackmount Tower Server Chassis for EATX ATX Motherboard EATX ATX 4U EATX ATX 4U...

Page 2: ...ted in any form or by any means without the prior written permission of Advantech Co Ltd Information provided in this manual is intended to be accurate and reliable How ever Advantech Co Ltd assumes n...

Page 3: ...F it may damage the equipment 9 The openings on the enclosure are for air convection Protect the equipment from overheating DO NOT COVER THE OPENINGS 10 Make sure the voltage of the power source is co...

Page 4: ...n 20 CAUTION Always completely disconnect the power cord from your chassis whenever you work with the hardware Do not make connections while the power is on Sensitive electronic components can be dama...

Page 5: ...v HPC 7400 User Manual 17 18 CD IEC 60825 19 FCC 15 1 2 20 21 22 1 2 3 4 5 6 7 8 0 C 32 F 40 C 104 F 9 10 11 12 13 14 15 16 CLASS I LASER PRODUCT KLASS I LASER PRODUKT...

Page 6: ...he factory floor you can be assured that your product will provide the reliability and ease of operation for which the name Advantech has come to be known Your satisfaction is our primary concern Here...

Page 7: ...ree from defects in materials and workmanship for two years from the date of pur chase This warranty does not apply to any products which have been repaired or altered by persons other than repair per...

Page 8: ...return more quickly 4 Carefully pack the defective product a fully completed Repair and Replacement Order Card and a photocopy proof of purchase date such as your sales receipt in a shippable containe...

Page 9: ...e sentative immediately We have carefully inspected the product mechanically and electrically before shipment It should be free of marks and scratches and in perfect working order upon receipt As you...

Page 10: ...HPC 7400 User Manual x...

Page 11: ...cover 9 2 3 Installing Motherboard 9 Figure 2 3 Yellow label indicating copper stub locations 9 Figure 2 4 Installing a Motherboard 10 2 4 Installing Disk Drives 10 2 4 1 Installing HDD or Optical Dis...

Page 12: ...tor functions 17 3 2 2 LED Indicators for SAS SATA HDD Power Status SAS SATA LED SAS SATA LED 17 Table 3 2 SAS SATA HDD LED indicator functions SAS SATA LED SAS SATA LED 17 3 3 The Rear Panel 18 Figur...

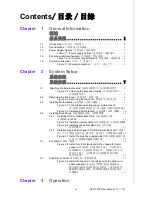
Page 13: ...Chapter 1 1 General Information...

Page 14: ...ystem status such as Power HDD and LAN to minimize system downtime Mean while system fan s rotation speed increases or decreases depending on high or low temperature inside the chassis to minimize sys...

Page 15: ...D LED LAN I O USB USB 3 0 USB 3 8 cm x 8 cm 142 CFM PWM 2 6cm 1 TBD W x H x D 482 x 177 x 448 mm 19 x 7 0 x 17 6 2 5 25 HDD 2 3 5 HDD 2 LED LED LAN I O USB USB 3 0 USB 3 8 cm x 8 cm 142 CFM PWM 2 6cm...

Page 16: ...the product data sheet on Advantech website Table 1 2 Environment specifications Environment Operating Non operating Temperature 0 40 C 32 104 F 40 70 C 40 158 F Humidity 10 95 40 C non condensing 10...

Page 17: ...5 HPC 7400 User Manual Chapter 1 General Information 1 5 Dimension Diagram Figure 1 1 Dimension diagram 508 50 448 426 465 482 177 101 60 74 92 92 92 81 20...

Page 18: ...HPC 7400 User Manual 6...

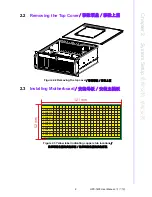
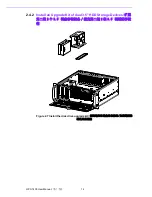
Page 19: ...Chapter 2 2 System Setup...

Page 20: ...taching the ears and handles Note Use caution when installing or operating the components with the chas sis open Be sure to turn off the power unplug the power cord and ground yourself by touching the...

Page 21: ...re 2 2 Removing the top cover 2 3 Installing Motherboard Figure 2 3 Yellow label indicating copper stub locations A B C F F1 G R S H H1 J J1 K K1 L L1 M M1 X Y Y1 Z ASMB 822 ASMB 784 ASMB 782 ASMB 781...

Page 22: ...HPC 7400 User Manual 10 Figure 2 4 Installing a Motherboard 2 4 Installing Disk Drives 2 4 1 Installing HDD or Optical Disk Drive Figure 2 5 Installing internal HDD...

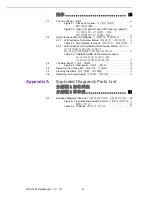
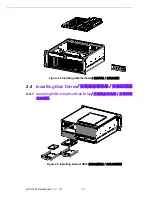
Page 23: ...11 HPC 7400 User Manual Chapter 2 System Setup Figure 2 6 Installing the optical disk drive...

Page 24: ...HPC 7400 User Manual 12 2 4 2 Install an Upgrade Kit of dual 3 5 HDD Storage Devices 2 3 5 2 3 5 Figure 2 7 Install the disk drive upgrade kit...

Page 25: ...Chapter 2 System Setup 2 5 Foot Stand Figure 2 8 Install four foot stands under the chassis for tower usage 4 4 2 6 Slide Rail or Pallet Figure 2 9 Install the chassis in the cabinet with the slide r...

Page 26: ...HPC 7400 User Manual 14...

Page 27: ...Chapter 3 3 Operation...

Page 28: ...nterfaces Momentary Power switch Press this switch to turn the system power on or off Please use system shutdown or press this switch for few seconds to turn off the sys tem ATX power System Reset but...

Page 29: ...System Power Normal Abnormal Hard Disk Hard Disk Drive Activity Data access No light LAN LAN1 LAN2 status LAN1 LAN2 LAN1 LAN2 Normal No light Data transmit through LAN LAN LAN Blinking Table 3 2 SAS S...

Page 30: ...HPC 7742 User Manual 18 3 3 The Rear Panel Figure 3 3 Rear panel 3 4 Replacing the Cooling Fan Figure 3 4 Replacing the system cooling fan without removing the top cover...

Page 31: ...Chapter 3 Operation 3 5 Cleaning the Filters Figure 3 5 Removing the Filters 3 6 Replacing the Power Supply Figure 3 6 Replacing the power supply module Figure 3 7 Power cord plugs should have same or...

Page 32: ...HPC 7742 User Manual 20...

Page 33: ...Appendix A A Exploded Diagram Parts List...

Page 34: ...HPC 7400 User Manual 22 A 1 Exploded Diagram Parts List Figure A 1 Exploded Diagrams Parts List 19 20 17 15 14 7 12 10 6 8 5 4 3 2 1 9 11 13 16 18 21 22 23 24 25 26 27 28 29 30...

Page 35: ...5 System fan cover 20 Top cover 6 System fan 21 Upper layer chassis 7 Handle 22 Internal HDD handle 8 Rackmount ear 23 Internal HDD tray 9 System fan guard 24 Internal HDD tray housing 10 Door frame H...

Page 36: ...No part of this publication may be reproduced in any form or by any means electronic photocopying recording or otherwise without prior written permis sion of the publisher All brand and product names...

Reviews: