background image

HPC-7483 User Manual

/ 用户手册

2

1.1

Introduction/

产品简介 / 產品簡介

The HPC-7483 series is a 4U short-depth rackmount / tower chassis designed for
digital surveillance, video, AOI, workstation or telecom applications which have
higher storage demand in space-sensitive environment. With the latest industrial
design, the HPC-7483 represents a breakthrough from the traditional, rigid concept
of industrial PCs, and provides users with both a high-performance and a state-of-
the-art operating platform. This series supports versatile EATX/ATX motherboards,
with a highly efficient redundant power supply. The series provides eight 3.5"/2.5"
HDD trays and a bracket for two internal 2.5" HDD. HPC-7483 can also provide addi-
tional three 5.25" space for 5.25" ODD and 3.5" HDD converter box. which provide
flexibility to empower customer product solutions. Meanwhile, system fan's rotation
speed increases or decreases depending on high or low temperature inside the chas-
sis, to minimize system noise while light system loading. A wide range of standard
computing peripherals can be integrated with these chassis to accommodate robust
applications in rugged environments, 24 hours a day, 7 days a week.

HPC-7483 系列 4U 上架式及直立式两用服务器级工业机箱,专为有大量储存需求的数位
监视系统、影像处理、自动化检测设备、工作站或网络通讯等等应用而设计,适用于
使用者环境有空间限制的需求。HPC-7483 打破了工业电脑传统的刻板形象,采用最新
的工业外观设计,为用户提供了高性能、最尖端的操作平台。该系列支持 EATX/ATX 母
板和高效率冗余电源。HPC-7483 提供了 8 个 3.5"/2.5" HDD 抽取盒以及内置 2 个 2.5"
硬盘托架。额外的 3 个 5.25" 空间则可提供给 5.25" 光驱或是 3.5" 硬盘转接盒使用,
能够为资料存储提供灵活的解决方案。系统风扇还能依据机箱内温度的高低而增减转
速以便在低系统负载时有效降低噪音。该系列机箱还可集成广泛的标准电脑周边设
备,从而满足了各种应用在苛刻环境下 7 天 24 小时无间断运行。

HPC-7483 系列 4U 上架式及直立式兩用伺服器級工業機箱,專為有大量儲存需求的數位
監視系統、影像處理、自動化檢測設備、工作站或網路通訊等等應用而設計,適用於
使用者環境有空間限制的需求。HPC-7483 打破了工業電腦傳統的刻板形象,採用最新
的工業外觀設計,為用戶提供了高性能、最尖端的操作平臺。該系列支援 EATX/ATX 母
板和高效率備援電源。HPC-7483 提供了 8 個 3.5"/2.5" HDD 抽取盒以及內置 2 個 2.5"
硬碟托盤。額外的 3 個 5.25" 空間則可提供給 5.25" 光碟機或是 3.5" 硬碟轉接盒使用,
能夠為資料存儲提供靈活的解決方案。系統風扇還能依據機箱內溫度的高低而增減轉
速以便在低系統負載時有效降低噪音。該系列機箱還可整合廣泛的標準電腦週邊設
備,從而滿足了各種應用在苛刻環境下 7 天 24 小時無間斷運行。

1.2

Specifications

/ 产品规格 / 產品規格

Construction:

 Heavy-duty steel

Disk Drive Capacity:

 Eight 3.5"/2.5" and three 5.25" disk drive bay (front), a 

bracket for two 2.5" internal HDD

LED Indicators:

 For Power, HDD activity, LAN and error status.

Switch and Buttons on Front Panel:

 Power switch and system reset button

Front I/O Interfaces:

 Dual USB ports (USB 3.0)

Cooling System:

 Three 12 cm x 12 cm (226 CFM) middle PWM fans; two 

optional 6cm rear fans

Weight: 

43Kg (full configuration)

Dimensions (W x H x D):

 435 x 177 x 673 mm (17.1" x 7.0" x 26.5") 

Summary of Contents for HPC-7483

Page 1: ...User Manual HPC 7483 4U Compact Rackmount Tower Server Chassis for EATX ATX Motherboard EATX ATX 4U EATX ATX 4U...

Page 2: ...tted in any form or by any means without the prior written permission of Advantech Co Ltd Information provided in this manual is intended to be accurate and reliable How ever Advantech Co Ltd assumes...

Page 3: ...F it may damage the equipment 9 The openings on the enclosure are for air convection Protect the equipment from overheating DO NOT COVER THE OPENINGS 10 Make sure the voltage of the power source is co...

Page 4: ...n 20 CAUTION Always completely disconnect the power cord from your chassis whenever you work with the hardware Do not make connections while the power is on Sensitive electronic components can be dama...

Page 5: ...v HPC 7483 User Manual 17 18 CD IEC 60825 19 FCC 15 1 2 20 21 22 1 2 3 4 5 6 7 8 0 C 32 F 40 C 104 F 9 10 11 12 13 14 15 16 CLASS I LASER PRODUCT KLASS I LASER PRODUKT...

Page 6: ...he factory floor you can be assured that your product will provide the reliability and ease of operation for which the name Advantech has come to be known Your satisfaction is our primary concern Here...

Page 7: ...ree from defects in materials and workmanship for two years from the date of pur chase This warranty does not apply to any products which have been repaired or altered by persons other than repair per...

Page 8: ...return more quickly 4 Carefully pack the defective product a fully completed Repair and Replacement Order Card and a photocopy proof of purchase date such as your sales receipt in a shippable containe...

Page 9: ...ative immediately We have carefully inspected the product mechanically and electrically before shipment It should be free of marks and scratches and in perfect working order upon receipt As you unpack...

Page 10: ...HPC 7483 User Manual x...

Page 11: ...ver 8 Figure 2 2 Removing the top cover 8 2 3 Installing Motherboard 9 Figure 2 3 Yellow label indicating copper stub locations 9 Figure 2 4 Installing a Motherboard 9 2 4 Installing Disk Drives 10 2...

Page 12: ...ATA LED SAS SATA LED 15 3 3 The Rear Panel 15 Figure 3 2 Rear panel 15 3 4 Replacing the Power Supply 16 Appendix A Exploded Diagram Parts List 17 A 1 Exploded Diagram Parts List 18 Figure A 1 Explode...

Page 13: ...Chapter 1 1 General Information...

Page 14: ...Meanwhile system fan s rotation speed increases or decreases depending on high or low temperature inside the chas sis to minimize system noise while light system loading A wide range of standard comp...

Page 15: ...6cm 43 W x H x D 435 x 177 x 673 mm 17 1 x 7 0 x 26 5 1 3 Power Supply Options Table 1 1 Power supply options Watt 1000W 110V 1200W 220V 1 1 redundant 1000W 110V 1800W 220V 1 1 redundant Input rating...

Page 16: ...nvironment specifications Environment Operating Non operating Temperature 0 40 C 32 104 F 40 70 C 40 158 F Humidity 10 95 40 C non condensing 10 95 60 C non condensing Vibration 5 500Hz 1G rms 2 G Sho...

Page 17: ...5 HPC 7483 User Manual Chapter 1 General Information 1 5 Dimension Diagram Figure 1 1 Dimension diagram...

Page 18: ...HPC 7483 User Manual 6...

Page 19: ...Chapter 2 2 System Setup...

Page 20: ...2 Removing the Top Cover Figure 2 2 Removing the top cover Note Use caution when installing or operating the components with the chas sis open Be sure to turn off the power unplug the power cord and...

Page 21: ...herboard Figure 2 3 Yellow label indicating copper stub locations Figure 2 4 Installing a Motherboard A B C F F1 G R S H H1 J J1 K K1 L L1 M M1 X Y Y1 Z ASMB 822 ASMB 784 ASMB 782 ASMB 781 ASMB 813 AS...

Page 22: ...Manual 10 2 4 Installing Disk Drives 2 4 1 Installing HDD or Optical Disk Drive Figure 2 5 Installing Disk Drives 2 4 2 Install Internal 2 5 HDD Storage Devices 2 5 2 5 Figure 2 6 Install the interna...

Page 23: ...Chapter 2 System Setup 2 5 Foot Stand Figure 2 7 Install four foot stands under the chassis for tower usage 4 4 2 6 Slide Rail or Pallet Figure 2 8 Install the chassis in the cabinet with the slide r...

Page 24: ...HPC 7483 User Manual 12...

Page 25: ...Chapter 3 3 Operation...

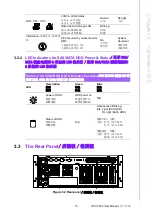
Page 26: ...h for few seconds to turn off the sys tem ATX power System Reset button Press this button to reboot the system Dual USB 3 0 ports For connecting a wide range of USB devices for data transfer backup or...

Page 27: ...2 LAN1 LAN2 Normal No light Data transmit through LAN LAN LAN Blinking Information PEF occurred by motherboard s BMC BMC PEF BMC PEF NA System Abnormal Table 3 2 SAS SATA HDD LED indicator functions S...

Page 28: ...HPC 7483 User Manual 16 3 4 Replacing the Power Supply Figure 3 3 Replacing the power supply module Figure 3 4 Power cord plugs should have same orientation in the socket...

Page 29: ...Appendix A A Exploded Diagram Parts List...

Page 30: ...HPC 7483 User Manual 18 A 1 Exploded Diagram Parts List Figure A 1 Exploded Diagrams Parts List...

Page 31: ...2 5 3 5 HDD Tray 2 5 3 5 2 5 3 5 14 Rear plate 4 5 25 Device Housing 5 25 5 25 15 Top cover 5 System Intrusion switch 16 Expansion card hold on bar 6 Front USB3 0 ports USB3 0 USB3 0 17 Chassis base 7...

Page 32: ...HPC 7483 User Manual 20...

Page 33: ...Appendix B B Optional rear fan module assemble SOP...

Page 34: ...HPC 7483 User Manual 22 B 1 Optional rear fan module assemble SOP 1 Remove the remarked bracket 2 Make those four fan cables pass through the hole and put on the cable protect plastic ring...

Page 35: ...Manual Appendix B Optional rear fan module assemble SOP 3 Make those two fan power cables connected to the compatible connectors 4 Install the last big 4P connector to the place CN8 of system power bo...

Page 36: ...M connector to motherboard fan header if motherboard fan header is not enough leave fan PWM free is also ok but fan module will run as full speed PWM PWM 6 Find those cables and follow the picture to...

Page 37: ...ser Manual Appendix B Optional rear fan module assemble SOP 7 Screw the module on the HPC 7483 chassis HPC 7483 HPC 7483 8 There are total 5 screws for rear fan module please check the place from belo...

Page 38: ...HPC 7483 User Manual 26...

Page 39: ...Appendix C C Power board cable instruction...

Page 40: ...or 8pin 12V connector of PCIe slot PCIe 4 8 12V PCIe 4 8 12V 1700025828 01 1 Default in accessory box CN2 8P connector to 6 2 connector for GPU card power 8P 6 2 GPU 8P 6 2 GPU 1700025829 01 1 Option...

Page 41: ...GND 2 Black GND 3 Black GND 4 Black GND 5 Yellow 12VDC 6 Yellow 12VDC 7 Yellow 12VDC 8 Yellow 12VDC Table C 2 CN2 3 4 5 6 7 Pin number Color Signal 1 Yellow 12VDC 2 Yellow 12VDC 3 Yellow 12VDC 4 Black...

Page 42: ...No part of this publication may be reproduced in any form or by any means electronic photocopying recording or otherwise without prior written permis sion of the publisher All brand and product names...

Reviews: