51
ITA-2000 User Manual
/ 用户手册
Chapter 5
S
ystem
Setup
系统安装
5.1.2
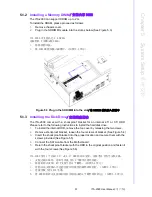
Installing a Memory DIMM
/ 安装内存 DIMM
The ITA-2000 can support DRAM up to 2 G.
To install the DRAM, please proceed as follows
1.
Remove chassis cover.
2.
Plug in the SODIMM module into the slot as below (See Figure 5.3)
ITA-2000 可支持高达 2 G DRAM。
请按照以下步骤安装 DRAM。
1.
移除机箱顶盖。
2.
将 SODIMM 模块插入插槽中。(如图 5.3 所示)
Figure 5.3 Plug in the SODIMM into the slot
/ 将 SODIMM 模块插入插槽中
5.1.3
Installing the Disk Drive
/ 安装磁盘驱动
The ITA-2000 comes with a shockproof bracket for an internal 2.5” or 3.5” HDD.
Please refer to the following instructions to install the hard disk drive.
1.
To install the internal HDD, remove the top cover by releasing the two crews.
2.
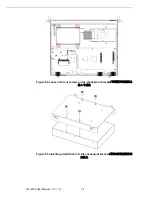
Remove shockproof bracket, loosen the four screws of bracket. (See Figure 5.4)
3.
Insert the shockproof bracket into the proper location and secure them with the
screws provided.(See Figure 5.5)
4.
Connect the SATA cable from the Motherboard.
5.
Return the shockproof bracket with the HDD in the original position and fasten it
with the four screws.(See Figure 5.6)
ITA-2000 带有 1 个内部 2.5”或 3.5”HDD 防冲击支架。请参考以下指导安装 HDD。
1.
安装内部 HDD 时,请卸下顶盖上的 2 个螺丝并将其移除。
2.
移除防冲击支架,卸下支架上的 4 个螺丝。(如图 5.4 所示)
3.
将防冲击支架插入合适的位置并用提供的螺丝将其固定。(如图 5.5 所示)
4.
连接母板上的 SATA 电缆。
5.
将 HDD 和防冲击支架放回原位并用原来的 4 个螺丝将其固定。(如图 5.5 所示)
Summary of Contents for ITA-2000
Page 8: ...ITA 2000 User Manual viii...
Page 12: ...ITA 2000 User Manual xii...
Page 16: ...ITA 2000 User Manual 4 1 5 Dimension Diagram Figure 1 1 Dimension diagram...
Page 28: ...ITA 2000 User Manual 16...
Page 29: ...Chapter 3 3 BIOS Operation BIOS This chapter describes how to set BIOS configuration data BIOS...
Page 60: ...ITA 2000 User Manual 48...
Page 61: ...Chapter 5 5 System Setup This chapter introduces the instal lation process...
Page 67: ...Appendix A A Programming the Watchdog Timer...
Page 79: ...Appendix B B Examples of the CAN Transfer tool CAN...

