background image

59

MIO-5270 User Manual

Appendix B

S

ystem

Assignment

B.3

Interrupt assignments

Table B.3: Interrupt assignments

Interrupt#

Interrupt source

IRQ0

Interval timer

IRQ1

Keyboard

IRQ2

Interrupt from controller 2 (cascade)

IRQ3

COM2

IRQ4

COM1

IRQ5

EC Watch DOG

IRQ6

Reserved

IRQ7

COM3

IRQ8

RTC

IRQ9

Reserved

IRQ10

Reserved

IRQ11

COM4

IRQ12

Reserved

IRQ13

Math Coprocessor

IRQ14

Primary IDE

IRQ15

Secondary IDE

Summary of Contents for MIO-5270

Page 1: ...User Manual MIO 5270 ...

Page 2: ...inge ments of the rights of third parties which may result from its use Acknowledgements AMD is a trademark of Advanced Micro Devices Award is a trademark of Award Software International Inc VIA is a trademark of VIA Technologies Inc IBM PC AT PS 2 and VGA are trademarks of International Business Machines Cor poration Microsoft Windows is a registered trademark of Microsoft Corp RTL is a trademark...

Page 3: ... messages you get when the problem occurs 2 Call your dealer and describe the problem Please have your manual product and any helpful information readily available 3 If your product is diagnosed as defective obtain an RMA return merchandise authorization number from your dealer This allows us to process your return more quickly 4 Carefully pack the defective product a fully completed Repair and Re...

Page 4: ...m The exact wording of any error messages Warnings Cautions and Notes Document Feedback To assist us in making improvements to this manual we would welcome comments and constructive criticism Please send all such in writing to support advan tech com Warning Warnings indicate conditions which if not observed can cause personal injury Caution Cautions are included to help you avoid damaging hardware...

Page 5: ...tartup Manual CD ROM Manual Driver Utility 1 x Mini Jumper 10pcs package P N 9689000002 Model Number Description MIO 5270D S6A1E AMD T56N 1 65G Dual Core HudsonM1 MIO 5270D S0A1E AMD T40E 1 0G Dual Core HudsonM1 MIO 5270S S0A1E AMD T40R 1 0G Single Core HudsonM1 MIO 5270S S0A1E MIO 5270D S0A1E MIO 5270D S6A1E CPU AMD T40R 1 0G SC AMD T40E 1 0G DC AMD T56N 1 65G DC L2 Cache 512 KB L2 512 KB L2 1 MB...

Page 6: ...p on it Do not place anything over the power cord 10 All cautions and warnings on the equipment should be noted 11 If the equipment is not used for a long time disconnect it from the power source to avoid damage by transient overvoltage 12 Never pour any liquid into an opening This may cause fire or electrical shock 13 Never open the equipment For safety reasons the equipment should be opened only...

Page 7: ...ACED REPLACE ONLY WITH THE SAME OR EQUIVALENT TYPE RECOMMENDED BY THE MANUFACTURER DISCARD USED BATTERIES ACCORDING TO THE MANUFACTURER S INSTRUCTIONS The sound pressure level at the operator s position according to IEC 704 1 1982 is no more than 70 dB A DISCLAIMER This set of instructions is given according to IEC 704 1 Advantech disclaims all responsibility for the accuracy of any statements con...

Page 8: ...MIO 5270 User Manual viii ...

Page 9: ...Board Dimensions 13 Figure 2 3 Board Dimension Layout Component Side 13 Figure 2 4 Board Dimension Layout Solder Side 13 Figure 2 5 I O Connectors Mechanical Drawing 14 Chapter 3 BIOS Settings 15 3 1 Entering Setup 16 3 2 Main Setup 17 3 2 1 System date System time 17 3 3 Advanced BIOS Features Setup 18 3 3 1 PCI Subsystem Settings Configuration 19 3 3 2 ACPI Settings Configuration 20 3 3 3 CPU Co...

Page 10: ...I O Ports 58 Table B 1 System I O Ports 58 B 2 1st MB memory map 58 Table B 2 1st MB memory map 58 B 3 Interrupt assignments 59 Table B 3 Interrupt assignments 59 Appendix C Watchdog Timer Sample Code 61 C 1 EC Watchdog Timer sample code 62 Appendix D AMD G Series 63 ...

Page 11: ...Chapter 1 1 General Information ...

Page 12: ...Hz on MIO 5270D S6A1E T40E Dual Core 1 0GHz on MIO 5270D S0A1E T40R Single Core 1 0GHz on MIO 5270S S0A1E L2 Cache T56N 1MB T40E T40R 512KB System Chipset AMD G series A50M FCH BIOS AMI EFI 32 Mbit System Memory 1 x 204 pin SODIMM socket DDR3 up to 4GB T56N up to DDR3 1333 MHz T40E T40R up to DDR3 1066 MHz Power Management APM1 2 ACPI support SSD mSATA CFast Watchdog Timer 255 levels timer interva...

Page 13: ...dual channels 48 bit T56N 2560 x 1600 60 Hz T40E T40R 1920 x 1200 60 Hz Pixel clock rate 80MHz HDMI Supports 1920 x 1080p 60 Hz 36bpp Supports HDMI 1 3 using TMDS data encoding Dual Independent Display VGA LVDS VGA HDMI HDMI LVDS CPU Process 40nm FSB T56N DDR3 1333 MHz T40E T40R DDR3 1066 MHz Memory SODIMM DDR3 up to 4G T56N DDR3 1333 MHz T40E T40R DDR3 1066 MHz VGA Memory Up to 512MB of dynamic v...

Page 14: ... VGA T56N 2560 x 1600 T40E T40R 1920 x 1200 LVDS LVDS supports single channel 24 bit dual channels 48 bit T56N 2560 x 1600 60Hz T40E T40R 1920 x 1200 60Hz Pixel clock rate 80MHz HDMI Supports 1920 x 1080p 60Hz 36bpp Supports HDMI 1 3 using TMDS data encoding Dual independent display VGA LVDS VGA HDMI HDMI LVDS South Bridge Control Hub Hudson M1 RS 232 3 RS 232 422 485 1 K B 1 Mouse 1 USB 6 x USB 2...

Page 15: ...rammable 1 255 sec min Hardware monitor CPU Temperature input Current input Voltage Power saving Deep sleep S5 mode Smart Fan Back light control FAN 1 Smart FAN Support 2 Programmable automatic fan monitor based on temperature 3 Reserve CPU FAN Power Connector x 1 Pin2 12 V Pin3 Fan speed signal input Board information Running HR Boot record Ethernet Chipset GbE1 Realtek 8111E VB GR 10 100 1000 Mb...

Page 16: ...erature 0 60 C 32 140 F 1 3 4 2 Operating Humidity Operating Humidity 0 90 Relative Humidity non condensing 1 3 4 3 Storage Temperature Standard products 0 60 C Storage temperature 40 85 C 1 3 4 4 Storage Relative Temperature Standard products 0 60 C Relative humidity 95 60 C Phoenix products 20 80 C Relative humidity 95 60 C Platinum Phoenix products 40 85 C Relative humidity 95 60 C Condition Po...

Page 17: ...Chapter 2 2 Hardware Installation ...

Page 18: ...procedure 2 1 Jumpers 2 1 1 Jumper List 2 1 2 Jumper Settings J1 Clear CMOS J2 Auto Power On Setting J3 LCD Power J5 COM2 Setting J1 Clear CMOS Part Number 1653003101 Footprint HD_3x1P_79_D Description PIN HEADER 3x1P 2 0mm 180D M DIP 2000 13 WS Setting Function 1 2 Normal 2 3 Clear COMS J2 Auto Power On Setting Part Number 1653002101 Footprint HD_2x1P_79_D Description PIN HEADER 2 1P 180D M SQUAR...

Page 19: ...se a jumper you connect the pins with the clip To open a jumper you remove the clip Sometimes a jumper will have three pins labeled 1 2 and 3 In this case you would connect either pins 1 and 2 or 2 and 3 J3 LCD Power Part Number 1653003201 Footprint HD_3x2P_79_D Description PIN HEADER 3 2P 180D M 2 0mm DIP SQUARE WO Pb Setting Function 1 3 3 3V 3 5 5V 3 4 12V J5 COM2 Setting Part Number 1653003260...

Page 20: ...damaging the computer always turn off the power supply before setting jumpers to clear CMOS Before turning on the power sup ply set the jumper back to 3 0 V Battery On CN1 Power Switch CN2 Inverter Power Output CN3 Reset CN4 SATA Power CN5 SATA 1 CN6 SATA 2 CN7 RS422 485 CN8 GPIO CN10 DDR3 SODIMM Socket CN12 Internal USB CN13 SMBus CN14 RJ45 Ethernet x 2 CN17 48 bits LVDS Panel CN18 External USB 1...

Page 21: ...ware Installation 2 3 Mechanical 2 3 1 Jumper and Connector Location Figure 2 1 Jumper and Connector Layout Component Side ESBC Jensen Li CN5 CN6 CN7 CN4 CN2 CN3 CN1 FAN1 CN22 CN14 CN23 CN13 CN17 CN20 CN19 CN18 Power LED CN12 J1 J2 J3 CN10 ...

Page 22: ...MIO 5270 User Manual 12 Figure 2 2 Jumper and Connector Layout Solder Side CN31 CN28 CN24 CN8 CN25 CN26 CN29 J5 CFast Socket MIOe Audio GPIO COM 1 2 COM 3 4 PCIe Mini card BIOS J5 ...

Page 23: ...13 MIO 5270 User Manual Chapter 2 Hardware Installation 2 3 2 Board Dimensions Figure 2 3 Board Dimension Layout Component Side Figure 2 4 Board Dimension Layout Solder Side ...

Page 24: ...MIO 5270 User Manual 14 Figure 2 5 I O Connectors Mechanical Drawing 7 75 5 87 9 28 4 20 6 70 9 99 5 14 6 00 7 90 8 30 26 30 45 58 76 09 111 92 130 81 139 50 18 54 39 62 75 69 112 82 ...

Page 25: ...Chapter 3 3 BIOS Settings ...

Page 26: ...nformation is stored in battery backed CMOS so it retains the Setup information when the power is turned off 3 1 Entering Setup Turn on the computer and check for the patch code If there is a number assigned to the patch code it means that the BIOS supports your CPU If there is no number assigned to the patch code please contact an Advantech application engineer to obtain an up to date patch code ...

Page 27: ...at can be configured Grayed out options cannot be configured options in blue can The right frame displays the key legend Above the key legend is an area reserved for a text message When an option is selected in the left frame it is highlighted in white Often a text message will accom pany it 3 2 1 System date System time Use this option to change the system time and date Highlight System Time or S...

Page 28: ... go to the sub menu for that item You can display an Advanced BIOS Setup option by highlighting it using the Arrow keys All Advanced BIOS Setup options are described in this section The Advanced BIOS Setup screens are shown below The sub menus are described on the following pages Launch PXE OpROM Enable or disable boot option for legacy network devices Launch Storage OpROM Enable or disable boot o...

Page 29: ... priority PCI Latency Timer This item allows you to select the 32 64 96 128 160 192 224 248 PCI bus clocks VGA Palette Snoop Enabled or disable VGA palette registers snooping PERR Generation Enabled or disable PCI device to generation PERR SERR Generation Enabled or disable PCI device to generation SERR PCI Express Settings Change PCI express device detail settings ...

Page 30: ...MIO 5270 User Manual 20 3 3 2 ACPI Settings Configuration ACPI Sleep State Select the ACPI state used for system suspend S3 Video Repost Enable or disable video repost ...

Page 31: ...is item allows you to provide P state level PPC Adjustment This item allows you to provide _PPC object NX Mode This item allows you to enable or disable the No execute page protection func tion SVM Mode This item allows you to enable or disable the CPU virtualization C6 Mode This item allows you to auto or disable C6 function Cpb Mode This item allows you to auto or disable CPB Node 0 Information ...

Page 32: ...MIO 5270 User Manual 22 3 3 4 IDE Configuration IDE Configuration Display SATA Port0 SATA Port1 SATA Port2 SATA Port3 information 3 3 5 USB Configuration ...

Page 33: ... time out USB mass storage device starts unit command time out Device power up delay Maximum time the device will take before it properly report itself to the host con troller 3 3 6 Embedded Controller Configuration Embedded Controller Configuration EC iManager WatchDog IRQ This item allows you to select IRQ number for watchdog EC Power Saving Mode This item allows you to select normal or deep sle...

Page 34: ...tem allows you to select the watchdog timer 3 3 7 Super I O Configuration Serial Port1 Port2 Port3 Port4 address This item allows you to select serial port1 port4 of base addresses Serial Port1 Port2 Port3 Port4 IRQ This item allows you to select serial port1 port4 of IRQ Auto Flow Control For Serial Port1 This item allows you to enable or disable auto flow control function ...

Page 35: ... MIO 5270 User Manual Chapter 3 BIOS Settings 3 4 Chipset Configuration North Bridge Detail for North Bridge items Display Config Select Detail for display items South Bridge Detail for South Bridge items ...

Page 36: ...3 4 1 North Bridge Configuration GFX Configuration Details of LAN1 LAN2 and PSPP Policy items Memory Configuration Details of Bank Interleaving IOMMU Mode and Memory Clock items Node 0 Information Details of memory information ...

Page 37: ... Display Configuration Select LVDS This item allows you to enable or disable LVDS function HDMI This item allows you to enable or disable HDMI function LVDS setting of customized define please refer to the document on CD ROM Chrontel EEPROM Adjust SOP PDF ...

Page 38: ...ptions for SATA configuration SB USB Configuration Options for SB USB configuration SB GPP Port Configuration Options for SB GPP port configuration SB HD Azalia Configuration Options for SB HD Azalia MINI Card M SATA This item allows you to select MINI card or M SATA ...

Page 39: ...et to Disabled the BIOS displays normal POST messages If Enabled an OEM Logo is shown instead of POST messages Fast Boot This item allows BIOS to skip certain tests while booting This will decrease the time needed to boot the system GateA20 Active This item allows you to select Upon request or Always Option ROM Messages Sets display mode for option ROM Interrupt 19 Capture This item allows option ...

Page 40: ...etup from the MIO 5270 Setup main BIOS setup menu All Security Setup options such as password protection and virus protection are described in this section To access the sub menu for the following items select the item and press Enter Change Administrator User Password ...

Page 41: ...llows you to rest system setup without saving any changes Save Changes This item allows you to save changes done so far to any of the options Discard Changes This item allows you to discard changes done so far to any of the options Restore Defaults This item allows you to restore load default values for all the options Save as User Defaults This item allows you to save the changes done so far as u...

Page 42: ...MIO 5270 User Manual 32 ...

Page 43: ...Chapter 4 4 MIOe Installation ...

Page 44: ... Cooler in the white box inside the package Please be careful remove the release paper from the thermal pad before installation 2 There are six screws inside the white box please install DRAM in the SO DIMM socket first then screw the heatsink as below Four long screws are for the heat sink two shorter screws are for the main board 3 There are six standoff s on the MIOe module which can also can b...

Page 45: ...Appendix A A Pin Assignments ...

Page 46: ...P Pin Pin Name 1 PSIN 2 GND CN2 Inverter Power Output Part Number 1655000453 Footprint WHL5V 2M 24W1140 Description WAFER BOX 2 0mm 5P 180D M DIP WO Pb JIH VEI Pin Pin Name 1 12V 2 GND 3 ENABKL 4 VBR 5 5V CN3 Reset Part Number 1655302020 Footprint WF_2P_79_BOX_R1_D Description WAFER BOX 2P 2 0mm 180D M DIP A2001WV2 2P Pin Pin Name 1 RESET 2 GND ...

Page 47: ...int WF_4P_98_BOX_R1_D Description WAFER BOX 4P 2 50mm 180D M DIP 24W1170 04S10 01 Pin Pin Name 1 5V 2 GND 3 GND 4 12V CN5 SATA 1 Part Number 1654007578 Footprint SATA_7P_WATF 07DBN6SB1U Description Serial ATA 7P 1 27mm 180D M SMD WATF 07DBN6SB1U Pin Pin Name 1 GND 2 TX 3 TX 4 GND 5 RX 6 RX 7 GND ...

Page 48: ...B1U Description Serial ATA 7P 1 27mm 180D M SMD WATF 07DBN6SB1U Pin Pin Name 1 GND 2 TX 3 TX 4 GND 5 RX 6 RX 7 GND CN7 RS422 485 Part Number 1655304032 Footprint WF_5P_49_BOX_85205 Description WAFER 5P 1 25mm 180D M SMD 85205 05701 Pin Pin Name 1 422RX 2 422RX 3 422 485TX 4 422 485TX 5 GND ...

Page 49: ... A Pin Assignments CN8 GPIO Part Number 1653004099 Footprint HD_5x2P_79_23N685B 10M10 Description BOX HEADER 5x2P 2 00mm 180D M SMD 23N685B 10M10 Pin Pin Name 1 5V 2 GPIO4 3 GPIO0 4 GPIO5 5 GPIO1 6 GPIO6 7 GPIO2 8 GPIO7 9 GPIO3 10 GND ...

Page 50: ...MIO 5270 User Manual 40 CN10 DDR3 SODIMM Socket Part Number 1651001648 Footprint DDR3_204P_2 2013311 1 Description DDR3 SODIMM H 9 2mm 204P SMD 2 2013311 1 Pin Pin Name ...

Page 51: ...Footprint HD_5x2P_79_N10 Description PIN HEADER 2x5P 2 0mm 180D M SMD 21N22050 Pin Pin Name 1 5V 2 5V 3 A_D 4 B_D 5 A_D 6 B_D 7 GND 8 GND 9 GND CN13 SMBus Part Number 1655904020 Footprint FPC4V 125M Description WAFER 4P 1 25mm 180D M SMD 85205 04001 Pin Pin Name 1 GND 2 SMB_DAT 3 SMB_CLK 4 5V ...

Page 52: ... 4 BI_DC GHz 5 BI_DC GHz 6 RX 10 100 BI_DB GHz 7 BI_DD GHz 8 BI_DD GHz CN17 48 bits LVDS Panel Part Number 1653920200 Footprint SPH20X2 Description B B Conn 40P 1 25mm 90D SMD DF13 40DP 1 25V Pin Pin Name 1 3 3V 5V or 12V 2 3 3V 5V or 12V 3 GND 4 GND 5 3 3V 5V or 12V 6 3 3V 5V or 12V 7 LVDS0_D0 8 LVDS1_D0 9 LVDS0_D0 10 LVDS1_D0 11 GND 12 GND 13 LVDS0_D1 14 LVDS1_D1 15 LVDS0_D1 16 LVDS1_D1 17 GND 1...

Page 53: ...ppendix A Pin Assignments 20 LVDS1_D2 21 LVDS0_D2 22 LVDS1_D2 23 GND 24 GND 25 LVDS0_CLK 26 LVDS1_CLK 27 LVDS0_CLK 28 LVDS1_CLK 29 GND 30 GND 31 NC 32 NC 33 GND 34 GND 35 LVDS0_D3 36 LVDS1_D3 37 LVDS0_D3 38 LVDS1_D3 39 NC 40 NC ...

Page 54: ...External USB Part Number 1654009513 Footprint USB_8P_UB1112C 8FDE 4F Description Pin Pin Name 1 5V 2 D 3 D 4 GND CN19 External USB Part Number 1654009513 Footprint USB_8P_UB1112C 8FDE 4F Description Pin Pin Name 1 5V 2 D 3 D 4 GND ...

Page 55: ...MI Conn 19P 0 5mm 90D M SMD QJ51193 FFB4 7F Pin Pin Name 1 TMDS Data2 2 TMDS Data2 Shield 3 TMDS Data2 C 4 TMDS Data1 5 TMDS Data1 Shield 6 TMDS Data1 C 7 TMDS Data0 8 TMDS Data0 Shield 9 TMDS Data0 C 10 TMDS Clock 11 TMDS Clock Shield 12 TMDS Clock C 13 Reserved 14 Reserved 15 SCL 16 SDA 17 DDC Ground 18 5V Power 19 Hot Plug Detect ...

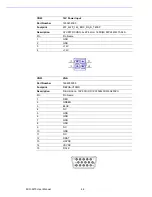
Page 56: ...ption ATX PWR CONN 2x2P 4 2mm 180D M DIP 24W4310 04S Pin Pin Name 1 GND 2 GND 3 12V 4 12V CN23 VGA Part Number 1654000055 Footprint DBVGA VF5MS Description D SUB Conn 15P 90D F DIP 070242FR015S200ZU Pin Pin Name 1 RED 2 GREEN 3 BLUE 4 NC 5 GND 6 GND 7 GND 8 GND 9 NC 10 GND 11 NC 12 DDAT 13 HSYNC 14 VSYNC 15 DCLK ...

Page 57: ...P 2 00mm 180D M SMD 23N685B 10M10 Pin Pin Name 1 LOUTR 2 LINR 3 GND 4 GND 5 LOUTL 6 LINL 7 GND 8 GND 9 MIC1R 10 MIC1L CN25 COM1 COM2 Part Number 1653004793 Footprint HD_10x2P_79_23N685B 20M10 Description Pin Pin Name 1 DCD1 2 DSR1 3 RXD1 4 RTS1 5 TXD1 6 CTS1 7 DTR1 8 RI1 9 GND 10 GND 11 DCD2 12 DSR2 13 RXD2 14 RTS2 15 TXD2 16 CTS2 17 DTR2 18 RI2 ...

Page 58: ...26 COM3 COM4 Part Number 1653004793 Footprint HD_10x2P_79_23N685B 20M10 Description Pin Pin Name 1 DCD3 2 DSR3 3 RXD3 4 RTS3 5 TXD3 6 CTS3 7 DTR3 8 RI3 9 GND 10 GND 11 DCD4 12 DSR4 13 RXD4 14 RTS4 15 TXD4 16 CTS4 17 DTR4 18 RI4 19 GND 20 GND ...

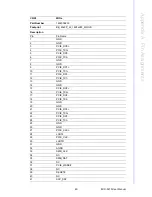
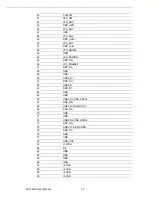
Page 59: ...X0 4 PCIE_TX0 5 PCIE_RX0 6 PCIE_TX0 7 GND 8 GND 9 PCIE_RX1 10 PCIE_TX1 11 PCIE_RX1 12 PCIE_TX1 13 GND 14 GND 15 PCIE_RX2 16 PCIE_TX2 17 PCIE_RX2 18 PCIE_TX2 19 GND 20 GND 21 PCIE_RX3 22 PCIE_TX3 23 PCIE_RX3 24 PCIE_TX3 25 GND 26 GND 27 PCIE_CLK 28 LOUTL 29 PCIE_CLK 30 LOUTR 31 GND 32 AGND 33 SMB_CLK 34 NC 35 SMB_DAT 36 NC 37 PCIE_WAKE 38 NC 39 RESET 40 NC 41 SLP_S3 ...

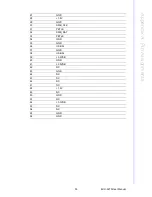
Page 60: ...ND 54 LPC_SERIRQ 55 DDP_D0 56 LPC_FRAME 57 DDP_D0 58 GND 59 GND 60 USB0_D 61 DDP_D1 62 USB0_D 63 DDP_D1 64 GND 65 GND 66 USB1_D USB_SSTX 67 DDP_D2 68 USB1_D USB_SSTX 69 DDP_D2 70 GND 71 GND 72 USB2_D USB_SSRX 73 DDP_D3 74 USB2_D USB_SSRX 75 DDP_D3 76 GND 77 GND 78 USB_OC 79 12VSB 80 NC 83 GND 84 GND 85 GND 86 GND 87 5VSB 88 5VSB 89 5VSB 90 5VSB ...

Page 61: ...al Appendix A Pin Assignments CN29 PCIe Mini Card Holder Part Number 1654002539 Footprint FOX_AS0B226 S68K7F_HOLDER Description MINI PCI Express 52P 6 8mm 90D SMD AS0B226 S68K7 Pin Pin Name 1 GND 2 GND 3 GND 4 GND 5 NC 6 NC ...

Page 62: ...t FOX_AS0B226 S68K7F Description MINI PCI Express 52P 6 8mm 90D SMD AS0B226 S68N7 Pin Pin Name 1 WAKE 2 3 3VSB 3 NC 4 GND 5 NC 6 1 5V 7 NC 8 NC 9 GND 10 NC 11 REFCLK 12 NC 13 REFCLK 14 NC 15 GND 16 NC 17 NC 18 GND 19 NC 20 NC 21 GND 22 PERST 23 PERn0 24 3 3VSB 25 PERp0 26 GND ...

Page 63: ... Assignments 27 GND 28 1 5V 29 GND 30 SMB_CLK 31 PETn0 32 SMB_DAT 33 PETp0 34 GND 35 GND 36 USB D 37 GND 38 USB D 39 3 3VSB 40 GND 41 3 3VSB 42 NC 43 GND 44 NC 45 NC 46 NC 47 NC 48 1 5V 49 NC 50 GND 51 NC 52 3 3VSB 53 NC 54 NC 55 GND 56 GND ...

Page 64: ... Part Number 1653004402 Footprint CFAST_24P_N7E24 Description CFast 24P 1 27mm 90D M SMD N7E24 M516RA 50 Pin Pin Name PC1 CDI PC2 GND PC3 NC PC4 NC PC5 NC PC6 NC PC7 GND PC8 NC PC9 NC PC10 NC PC11 NC PC12 NC PC13 3 3V PC14 3 3V PC15 GND ...

Page 65: ...dix A Pin Assignments PC16 GND PC17 CDO S1 GND S2 TX S3 TX S4 GND S5 RX S6 RX S7 GND FAN1 CPU FAN Part Number 1655003010 Footprint W_3V_2 54mm Description Wafer 2 54mm 3P 180D M DIP W LOCK 22 27 2031 Pin Pin Name 1 GND 2 PWM 3 TACH ...

Page 66: ...MIO 5270 User Manual 56 ...

Page 67: ...Appendix B B System Assignment ...

Page 68: ...0 0BF 0C0 0DF DMA controller 170h 177h IDE Controller 1F0h 1F7h IDE Controller 299h 29Ah EC HM Index port and Data port 29Ch 29Dh EC Index port and Data port 2E8 2EF Serial port 4 2F8 2FF Serial port 2 3E8 3EF Serial port 3 3F8 3FF Serial port 1 Table B 2 1st MB memory map Addr Range Hex Device F0000h FFFFFh System ROM D0000h EFFFFh Unused reserved for Ethernet ROM C0000h CEFFFh Expansion ROM for ...

Page 69: ...assignments Interrupt Interrupt source IRQ0 Interval timer IRQ1 Keyboard IRQ2 Interrupt from controller 2 cascade IRQ3 COM2 IRQ4 COM1 IRQ5 EC Watch DOG IRQ6 Reserved IRQ7 COM3 IRQ8 RTC IRQ9 Reserved IRQ10 Reserved IRQ11 COM4 IRQ12 Reserved IRQ13 Math Coprocessor IRQ14 Primary IDE IRQ15 Secondary IDE ...

Page 70: ...MIO 5270 User Manual 60 ...

Page 71: ...Appendix C C Watchdog Timer Sample Code ...

Page 72: ...ov dx EC_Command_Port mov al 89h Write EC HW ram out dx al mov dx EC_Command_Port mov al 5Fh Watchdog reset delay time low byte 5Eh is high byte index out dx al mov dx EC_Data_Port mov al 30h Set 3 seconds delay time out dx al mov dx EC_Command_Port mov al 89h Write EC HW ram out dx al mov dx EC_Command_Port mov al 57h Watch dog event flag out dx al mov dx EC_Data_Port mov al 04h Reset event out d...

Page 73: ...Appendix D D AMD G Series ...

Page 74: ... specific 3rd party applications Target List of Supported 3rd Party Applications Adobe Flash Player 10 1 ArcSoft SimHD Plug in ArcSoft MediaConverter 4 ArcSoft MediaConverter 7 ArcSoft Total Media Theatre 3 ArcSoft Total Media Theatre 4 CyberLink MediaShow 5 CyberLink MediaShow Espresso 5 5 CyberLink MediaEspresso 6 CyberLink PowerDVD 9 CyberLink PowerDVD 10 CuberLink PowerDirector 7 CuberLink Pow...

Page 75: ...65 MIO 5270 User Manual Appendix D AMD G Series ...

Page 76: ...ations are subject to change without notice No part of this publication may be reproduced in any form or by any means electronic photocopying recording or otherwise without prior written permis sion of the publisher All brand and product names are trademarks or registered trademarks of their respective companies Advantech Co Ltd 2011 ...

Reviews: