background image

32

Microwaving

Advantium Oven

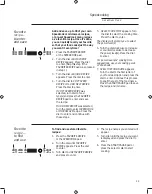
Defrost by 

food type

Auto Defrost automatically sets the 

defrosting times and power levels to 

give even defrosting results for meats, 

poultry and fish weighing up to 6 

pounds.
1.   Remove food from the package 

and place it on a microwave-safe 

dish.

2.   Press the DEFROST pad.
3.   Turn the dial to DEFROST BY FOOD 

TYPE. Press the dial to enter.

4.  Turn the dial to select food type. 

Press the dial to enter.

5.   Turn the dial to the food weight, 

using the Conversion Guide at right. 

For example, dial 1.2 for 1.2 pounds 

(1 pound, 3 oz.). Press the dial to 

enter.

6.   Press the dial or START/PAUSE pad 

to start defrosting. 

7.   Turn the food over when the oven 

signals TURN FOOD OVER. 

   Remove defrosted meat or shield 

warm areas with small pieces of foil 

for even defrosting.

   After defrosting, most meats need  

to stand 5 minutes to complete 

defrosting. Large roasts should 

stand for about 30 minutes. 

Conversion Guide
If the weight of food is stated in pounds 

and ounces, the ounces must be 

converted to tenths (.1) of a pound.


Weight of Food   Enter Food Weight 


in Ounces 

(tenths of a pound)

 1–2 

.1

 3 

.2

 4–5 

.3

 6–7 

.4

 8 

.5

 9–10 

.6

 11 

.7

 12–13 

.8

 14–15 

.9

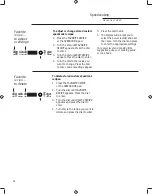
Use Time Defrost to defrost for a 

selected length of time.
1.   Press the DEFROST pad.
2.   Turn the selector dial to DEFROST 

BY TIME. Press the dial to enter.

3.   Turn the dial to select the time you 

want. Press the dial to enter.

4.   Press the dial or START/PAUSE pad 

to start defrosting.

5.   Turn the food over when the oven 

signals TURN FOOD OVER. 

Power level is automatically set at 3,  

but can be changed. To change the 

power levels, see the Microwave Power 

Level(s) section. You can defrost small 

items quickly by raising the power level 

after entering the time. Power level 7 

cuts the total defrosting time  

in about half; power level 10 cuts  

the total time to about 1/3. When 

defrosting at high power levels, food 

will need more frequent attention  

than usual.

Defrost by 

time

Summary of Contents for Advantium ZSC120 J Series

Page 1: ...Owner s Manual Advantium 120V Speedcook Oven For Models ZSC1000 ZSC1001 ZSC1201 ZSC1202 49 40736 MFL38211634 01 15 GE monogram com ...

Page 2: ...lockout 38 Clock 17 36 Delay Start 36 Display ON OFF 36 Help 37 Reminder 36 Review 36 Scroll speed 36 Timer 38 Care and Cleaning Cleaning the inside 39 Cleaning the outside 40 Cooking trays and baking sheet 40 Removable turntable 39 Troubleshooting Problem Solver 41 42 Customer Service Service phone numbers 43 Warranty Back Cover Consumer Information Advantium Oven Introduction Your new Monogram A...

Page 3: ...e people who serviced your appliance Explain why you are not pleased In most cases this will solve the problem NEXT if you are still not pleased write all the GHWDLOV LQFOXGLQJ RXU SKRQH QXPEHU WR Manager Customer Relations GE Appliances Appliance Park Louisville KY 40225 Consumer Information Advantium Oven Before using your oven Read this manual carefully It is intended to help you operate and ma...

Page 4: ...ning instructions in the Care and Cleaning of the Oven section of this manual To reduce the risk of fire in the oven cavity R QRW RYHUFRRN IRRG DUHIXOO DWWHQG DSSOLDQFH ZKHQ paper plastic or other combustible materials are placed inside the oven while microwave cooking 5HPRYH ZLUH WZLVW WLHV DQG PHWDO KDQGOHV IURP SDSHU RU plastic containers before placing them in the oven R QRW XVH WKH RYHQ IRU V...

Page 5: ...te para el fin previsto como se describe en este manual No utilice químicos ni vapores corrosivos en este aparato Este horno está específicamente diseñado para calentar secar o cocinar alimentos y bebidas y no está diseñado para usarse en n laboratorio ni para uso industrial No almacene ningún elemento directamente sobre la superficie del horno de microondas cuando éste se encuentre en funcionamie...

Page 6: ...UCTIONS When microwaving place all foods and containers on the clear glass tray Do not pop popcorn in your oven unless in a special microwave popcorn accessory or unless you use popcorn labeled for use in microwave ovens Do not boil eggs in this oven Pressure will build up inside egg yolk and will cause it to EXUVW SRVVLEO UHVXOWLQJ LQ LQMXU Do not operate the oven without food inside This may cau...

Page 7: ...oltaico apriete el botón táctil CANCEL OFF BORRAR APAGAR y corrija el problema Horno Advantium INSTRUCCIONES DE SEGURIDAD IMPORTANTES Cuando utilice el microondas coloque WRGRV ORV DOLPHQWRV FRQWHQHGRUHV HQ OD EDQGHMD de vidrio transparente No cocine palomitas de maíz en el horno a menos que se coloquen en un accesorio de palomitas de maíz para microondas especial o a menos que utilice palomitas d...

Page 8: ...fing or toasting Cookware will become hot Oven mitts will be needed to handle the cookware Do not use coverings containers or cooking roasting bags made of foil plastic wax or paper when speedcooking Do not cover the turntable wire oven rack trays or any part of the oven with metal foil This will cause arcing in the oven Use the non stick metal tray in the same way you would use a shallow baking p...

Page 9: ...es cuando se hornea asa calienta activa o tuesta algo Los recipientes de cocina se tornarán muy calientes Se requerirán guantes de cocina protectores para manipular los recipientes de cocina No utilice tapas recipientes ni bolsas de cocción asado fabricadas de láminas de metal plástico cera o papel cuando cocine con la función de cocción rápida No cubra la base giratoria parrilla de alambre EDQGHM...

Page 10: ...ent plastic wrap so steam can escape Not all plastic wrap is suitable for use in microwave ovens Check the package for proper use Boilable cooking pouches and tightly closed plastic bags should be slit pierced or vented as directed by package If they are not plastic could burst during or immediately after cooking possibly UHVXOWLQJ LQ LQMXU OVR SODVWLF VWRUDJH containers should be at least partial...

Page 11: ...ar cortando la envoltura plástica para que pueda escapar el vapor No todas las cubiertas plásticas son adecuadas SDUD KRUQRV PLFURRQGDV HD HQ OD FDMD ODV instrucciones correspondientes Se deben cortar perforar o ventilar como se LQGLFD HQ OD FDMD ODV EROVDV GH FRFLQD KHUYLEOHVµ y bolsas plásticas cerradas herméticamente De lo contrario el plástico puede reventarse durante o inmediatamente después ...

Page 12: ...Because of potential safety hazards under certain conditions we strongly recommend against the use of an adapter plug However if you still elect to use an adapter where local codes permit a TEMPORARY CONNECTION may be made to a properly grounded wall receptacle by the use of a UL listed adapter which is available at most local hardware stores The larger slot in the adapter must be aligned with the...

Page 13: ...esivo sobre el adaptador y conduce finalmente a una falla de la terminal del adaptador con conexión a tierra Deberá solicitar a un electricista calificado el reemplazo del tomacorriente de 2 cables por uno de 3 cables con conexión a tierra antes de usar el electrodoméstico ADAPTADORES DE ENCHUFE INSTRUCCIONES DE TOMA DE TIERRA Este electrodoméstico debe estar conectado a WLHUUD 6L VH SURGXMHUD XQ ...

Page 14: ...nt food is thoroughly cooked Stir food to distribute the heat evenly Be careful to prevent scalding when warming formula The container may feel cooler than the formula really is Always test the formula before feeding the baby Do not attempt to deep fry in the oven Oversized foods or oversized metal utensils should not be inserted in a microwave toaster oven as they may create a fire or risk of ele...

Page 15: ... tapa Asegúrese de cocinar bien toda la comida del bebé Remueva los alimentos para distribuir el calor uniformemente Tenga cuidado de evitar las escaldaduras al calentar la fórmula El recipiente puede sentirse más frío de lo que la fórmula realmente está Revise siempre la fórmula antes de alimentar al bebé Nunca intente freír en abundante aceite en el microondas Alimentos o utensilios de metal de ...

Page 16: ... Foods cook evenly and fast retaining their natural moisture Getting to know Advantium Turntable The turntable rotates to ensure even cooking Controls The oven control contains preset recipes Turn and press dial makes menu selection easy Halogen Lamp and Ceramic Heaters One 500 watt halogen bulb and one 700 watt ceramic heater cook food from above One 375 watt ceramic heater cooks food from below ...

Page 17: ...f food category you want Press the dial to enter it 4 Turn the dial to select the specific food Press the dial to enter it 5 Turn the dial to select the amount size and or doneness if required the oven will prompt you Press the dial after each selection 6 Once the display shows ADJUST TIME OR START either press the dial or start pad to start cooking Press CANCEL OFF at any time to stop cooking Mic...

Page 18: ...asserole egg 7x11 Coffee Cake French Toast Pancakes frozen Hashbrown Patties Rolls refrigerated Sausage Biscuit Sausage Strudel frozen Sweet Rolls Danish Turnovers Waffles frozen Desserts Brownies Cakes mix 9x13 Cobbler fresh 7x11 Coffee Cake Cookies Pie fresh fruit Rolls refrigerated Turnovers Entree Burritos frozen Chimichanga Casserole Egg Rolls frozen Enchilada fresh Lasagna Meatloaf 9x5 Quesi...

Page 19: ...n rack and place them on the non stick metal tray when baking on two levels broiling or toasting foods Clear Glass Tray Place on the turntable when using the microwave features Place food or microwave safe cookware directly on the tray Upper Halogen Lamp Ceramic Heater Operates when using speedcook or broil Window Allows cooking to be viewed while keeping microwaves confined in the oven Door Handl...

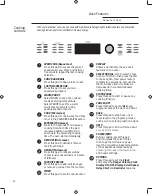
Page 20: ...his pad to reheat servings of previously cooked foods or a plate of leftovers FAVORITE RECIPE Press this pad to add edit change or remove a recipe from the memory TIMER Press this pad to set the minute timer DISPLAY Shows and instructs the use of all features on the oven SELECTOR DIAL Turn to select Press to enter First turn then press the dial to make option food power level or temperature select...

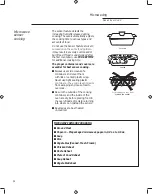
Page 21: ... place when using the oven Put food directly on the non stick metal tray to speedcook SPEEDCOOK PRE SET FOOD SELECTIONS Appetizers Desserts Pizza Sandwich Breads Entrees Potatoes Seafood Breakfast Meats Poultry Side Dish To use a pre set speedcook menu Early in a speedcook program you will see OPTIMIZING COOK TIME on the display The oven automatically senses the electrical voltage level in your ho...

Page 22: ...pad or the selector dial to start cooking Use this time saving feature for cooking repetitive items like cookies or appetizers NOTE The last program used is stored for two hours Resume feature 1 If your food needs to cook a bit longer you can restart the oven by pressing the START PAUSE pad or selector dial 2 RESUME COOKING will be displayed and the oven will restart immediately at 10 of the origi...

Page 23: ...ttom Select a lower setting for less browning on the bottom 1 Press the SPEEDCOOK pad and turn the dial to select FOOD MENU or FAVORITE RECIPE or press CUSTOM SPEEDCOOK to manually set power level and timer Press the dial to enter 2 Turn the dial to select a food time or power level as prompted Press the dial to enter 3 To change the power level when prompted by the display turn the dial clockwise...

Page 24: ...rt cooking For power level and cooking time suggestions use your cooking guide or cook book Speedcook cookware Follow cookware suggestions on the oven display or in the Cookbook or Cooking guide Cookware will become hot because of heat transferred from the heated food Oven mitts will be needed to handle the cookware Place food directly on the non stick metal tray when cooking unless prompted by th...

Page 25: ...to enter and continue with these steps 5 SELECT COOK TIME appears Turn the dial to select the cooking time Press the dial to enter The display will prompt you to select the power level s 6 Turn the dial clockwise to increase or counterclockwise to decrease the power level s Press the dial to enter For power level and cooking time suggestions use your cooking guide or cook book 7 SPELL THE FOOD NAM...

Page 26: ...settings appear 5 Press the dial to edit 6 The display will prompt you to select the power level s and edit the name Turn the dial and press to enter the appropriate settings For power level and cooking time suggestions use your cooking guide or cook book To delete stored custom speedcook recipes 1 Press the FAVORITE RECIPE or the SPEEDCOOK pad 2 Turn the dial until FAVORITE RECIPE appears Press t...

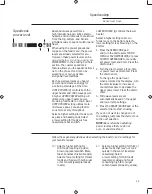
Page 27: ... is on Lights When the oven is on light may be visible around the door or outer case The halogen lights will dim and cycle on and off during a speedcook cycle sometimes even at full power levels This is normal The oven senses the KHDW OHYHO DQG DGMXVWV DXWRPDWLFDOO Oven Heat No preheating time is required during Speedcook cycles The oven begins cooking immediately The door and inside of the oven w...

Page 28: ...will signal and turn off To preheat 1 When the prompt shows PREHEAT THE OVEN turn the dial to YES Press the dial or press START PAUSE to begin cooking The oven starts preheating immediately Do not place the food in the oven You will be prompted to enter the cook time after the oven is preheated 2 When the oven is finished preheating it will signal If you do not open the door within 1 hour the oven...

Page 29: ...F MEDIUM 160 195 F HIGH 195 230 F 4 Turn the dial to select the level of moisture you want See the chart and tips below Press the dial to enter If the oven door is opened during warming PAUSE will appear in the display Close the door and press START PAUSE To Crisp Stale Items Place food or dishes directly on the black metal tray Preheat on LOW setting and select CRISP Check crispness after 45 minu...

Page 30: ...wave COOK DEFROST or REHEAT pad If no selection is made within 15 seconds the display will revert back to the time of day 2 Turn the dial to find the food you want to cook defrost or reheat Press the dial to enter 3 Turn the selector dial to select the type amount weight and or size As required the oven will prompt you Press the dial after each selection 4 Press the dial or the START PAUSE pad to ...

Page 31: ...ave power level s 1 First follow directions for COOK BY TIME COOK BY TIME 1 2 DEFROST BY TIME or EXPRESS 2 Press the POWER TEMP pad 3 Turn the dial clockwise to increase and counterclockwise to decrease the power level Press the dial to enter 4 Press the dial or the START PAUSE pad to start cooking You can change the power level before or during a cooking program Here are some examples of uses for...

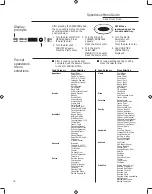
Page 32: ...ing Large roasts should stand for about 30 minutes Conversion Guide If the weight of food is stated in pounds and ounces the ounces must be converted to tenths 1 of a pound Weight of Food Enter Food Weight in Ounces tenths of a pound 1 2 1 3 2 4 5 3 6 7 4 8 5 9 10 6 11 7 12 13 8 14 15 9 Use Time Defrost to defrost for a selected length of time 1 Press the DEFROST pad 2 Turn the selector dial to DE...

Page 33: ...ld be partially uncovered Family size prepackaged frozen dinners can be defrosted and microwaved If the food is in a foil container transfer it to a microwave safe dish Foods that spoil easily should not be allowed to sit out for more than one hour after defrosting Room temperature promotes the growth of harmful bacteria For more even defrosting of larger foods such as roasts use DEFROST BY TIME B...

Page 34: ...ers and cover them with lids or vented plastic wrap Never use tight sealing plastic FRQWDLQHUV WKH FDQ SUHYHQW VWHDP from escaping and cause food to overcook Be sure the outside of the cooking containers and the inside of the oven are dry before placing food in the oven Beads of moisture turning into steam can mislead the sensor Beverages are best heated uncovered Microwaving Advantium Oven Microw...

Page 35: ...he oven is too hot then it will automatically change to time cooking To shorten or lengthen the cook time wait until the time countdown shows in the display Then turn the dial to add or subtract time If you open the door while SENSOR Cooking SENSOR ERROR will appear Close the door press START PAUSE to begin again Notes about the Reheat program Reheated foods may have wide variations in temperature...

Page 36: ...ollow the display directions to set the Delay Start time and feature you wish to delay Beeper Volume 8VH WKLV IHDWXUH WR DGMXVW WKH YROXPH of the beeper You can even turn it off Press the OPTIONS pad turn the dial to select BEEPER VOLUME press the dial to enter and follow the display directions Scroll Speed Is the message scroll too slow or too fast Change it Press the OPTIONS pad turn the dial to...

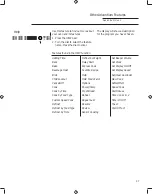
Page 37: ... Heat Broil Child Lockout Cancel Off Cook Cook by Time Cook by Food Type Custom Speed Cook Defrost Defrost by Food Type Defrost by Time Defrost by Weight Delay Start Express Cook Favorite Recipe Help Hold Food Warm Options Power Temp Proof Bread Reheat Repeat Last Resume Review Sensor Cooking Set Beeper Volume Set Clock Set Display On Off Set Display Speed Set Clear Reminder Slow Cook Soften Melt ...

Page 38: ...n from too much heat inside the oven cavity It automatically turns on at low speed if it senses too much heat The fan will automatically turn off when the internal parts are cool It may stay on for 30 minutes or more after the oven control is turned off Automatic fan You may lock the control panel to prevent the oven from being accidentally started or used by children Press and hold CANCEL OFF for...

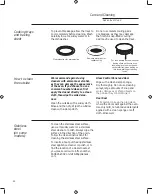
Page 39: ... performance Some spatters can be removed with a paper towel others may require a warm soapy cloth Remove greasy spatters with a sudsy cloth then rinse with a damp cloth Do not use abrasive cleaners or sharp utensils on oven walls Never use a commercial oven cleaner on any part of your oven Do not clean the inside of the oven with metal scouring pads Pieces can break off the pad causing electrical...

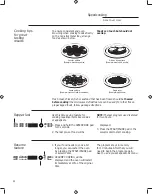
Page 40: ...um baking sheet on the wire oven rack and place them on the non stick metal tray when baking on two levels broiling or toasting foods Clear glass tray for microwaving Non stick metal tray for speedcooking Cooking trays and baking sheet To prevent breakage allow the trays to cool completely before cleaning Wash carefully in warm sudsy water or in the dishwasher Do not use metal scouring pads or abr...

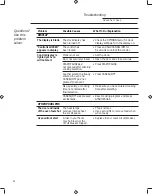
Page 41: ...rowave COOKING The oven makes Clicks and fans blowing These sounds are normal unusual sounds are normal The relay while cooking board is turning the components on and off Smoke comes out Food is high in fat Smoke is normal when cooking of the oven when content Aerosol spray high fat foods I open the door used on the pans Food is not fully Programmed times GMXVW WLPH IRU GRQHQHVV RU DGMXVW cooked o...

Page 42: ... start START PAUSE pad Press START PAUSE not pressed after entering cooking selection Another selection already Press CANCEL OFF entered in oven and CANCEL OFF pad not pressed to cancel it Size quantity or cooking Make sure you have entered cooking time not entered after time after selecting final selection CANCEL OFF was pressed Reset cooking program and press accidentally START PAUSE OTHER PROBL...

Page 43: ...Service Contracts In the USA 800 626 2224 In Canada 800 561 3344 You can have the secure feeling that GE Consumer Service will still be there after your ZDUUDQW H SLUHV 3XUFKDVH D FRQWUDFW ZKLOH RXU ZDUUDQW LV VWLOO LQ HIIHFW DQG RX OO UHFHLYH D VXEVWDQWLDO GLVFRXQW LWK D PXOWLSOH HDU FRQWUDFW RX UH DVVXUHG RI IXWXUH VHUYLFH DW WRGD V SULFHV Parts and Accessories In the USA 800 626 2002 In Canada ...

Page 44: ...sible for a trip charge or you may be required to bring the product to an Authorized GE Service Location for service In Alaska the warranty excludes the service calls to your home Some states do not allow the exclusion or limitation of incidental or consequential damages so the above limitation or exclusion may not apply to you This warranty gives you specific legal rights and you may also have ot...

Reviews: