background image

System Installation 


1.


Choose the mounting location for the CAM150 commercial camera on 
the rear of the vehicle. We recommend a position as high as possible 
and in the center of the vehicle.  

2.


Choose a suitable place in the vehicle cabin to mount the 5.6” LCD 
Screen. We recommend dash mounting in the corner of the vehicle. 

3.


Examine the vehicle to determine the best way to run the power wires 
to: LCD monitor, accessory power, the reverse lights and to the camera 
at the rear of the vehicle.   

4.


Attach the screen to the dash using the supplied 3M adhesive pad or 
mounting screws. The mounting bracket has been designed to be bent 
to match the shape of the mounting location. 

5.


Attach the camera to the rear of the vehicle using the supplied 
mounting screws of bolts. 

6.


Run the extension cable from the camera to the front of the vehicle.  

7.


Run the wiring harness from the LCD monitor and connect up with the 
Camera extension cable. 

8.


Attach reverse & accessory power wires. 

9.


Connect your reversing camera. 


Note: When using an Advent CCS System, the signal and power for the 
camera will be supplied through the monitor extension cable. Please also 
note that the microphone in the camera will be played on the speaker built 
into the LCD monitor. 
 

10.


Connect the LCD Monitor to the harness. 

11.


Power up and adjust on screen settings. 


NOTE: To adjust monitor and volume  settings


press the menu button on 

screen to cycle through the menu options. 

Summary of Contents for CCS562

Page 1: ...itor Installation Manual Features 5 6 High Resolution LCD Monitor Built in Speaker Two video inputs Fully Adjustable Auto brightness adjustment Commercial camera with Infra Red Capability and Built in...

Page 2: ...2 Table of Contents Warnings 3 Product Description 4 Packing List 4 System Installation 5 Wiring Diagram 7 Specifications 9 Troubleshooting 9...

Page 3: ...unauthorized modifications or damage to the product may result in electrical shock Handle all components with care Inspect regularly for damage to components and cabling 2 You are responsible for ens...

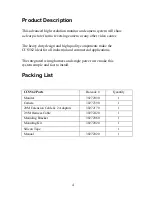
Page 4: ...make the CCS562 ideal for all industrial and commercial applications The integrated wiring harness and single power wire make this system simple and fast to install Packing List CCS562 Parts Barcode...

Page 5: ...ed to be bent to match the shape of the mounting location 5 Attach the camera to the rear of the vehicle using the supplied mounting screws of bolts 6 Run the extension cable from the camera to the fr...

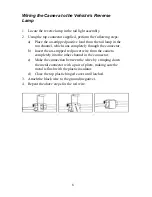
Page 6: ...ch runs completely through the connector b Insert the un stripped red power wire from the camera completely into the other channel in the connector c Make the connection between the wires by crimping...

Page 7: ...7 Wiring Diagram Note The power and signal will be provided through a single cable from the monitor...

Page 8: ...r is attached to orange wire 2 Check that accessory power is attached to red wire 3 Check that black is attached to vehicle body ground 4 Check fuse and if blown ONLY replace is fuse of same amperage...

Page 9: ...7...

Page 10: ...8 2008 Audiovox Electronics Corp 150 Marcus Blvd Hauppauge N Y 11788...

Reviews: