6
Before first use
WARNING!
Risk of injury!
Improper set-up and use of the cot may result in
injury.
− Set the cot up on a level and nonskid surface.
− Do not stand or jump on the cot. The cot can
tip over easily.
− Make sure that children do not play with or
on the cot.
− The cot may only be used by one person at a
time.
− Do not exceed the cot’s load bearing capacity
of 265 lbs (120 kg).
WARNING!
Fire hazard!
The cover of the cot consists of a flammable
material. If the cot is too close to an intense heat
source (e.g. a camp fire), the cover could melt or
burn.
− Keep the cot away from fire and other heat
sources.
NOTICE!
Risk of damage!
Improper handling of the cot may damage it.
− Shield the cot from weathering effects such
as rain, direct exposure to sun or dampness.
Before first use
Checking the cot and scope of
delivery
NOTICE!
Risk of damage!
If you are not cautious when opening the
packaging with a sharp knife or other pointy
objects, you may quickly damage the cot.
− Be very careful when opening.
1. Take the cot out of the packaging.
2. Check to make sure that the delivery is complete
(see
Fig. A
).
3. Check whether the cot
2
or the individual parts
are damaged. If this is the case, do not use the
cot. Contact the manufacturer at the service
address specified on the warranty card.
Use
Setting up the cot
CAUTION!
Risk of injury!
Improper set-up and use of the cot may result in
injury.
− When setting up the cot, make sure not
to squash your fingers. If possible, wear
suitable work gloves.
1. Position the cot
2
‘on end’ (upright) in front of
you and fold the legs of the cot out to the side
(see
Fig. B
).
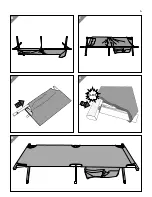
2. Fold the outer legs all the way up (see
Fig. C
).
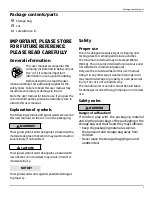
3. Fold out the legs of the cot so that the bed
surface is stretched out (see
Fig. D
).
4. Once folded-out, turn the cot over (see
Fig. E
).
The bed surface is now facing up.
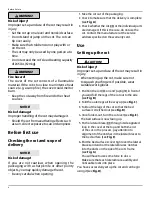
5. Push a lateral brace
3
through its designated
loop in the cover at the top and bottom end
of the cot. In the process, pay attention to
alignment of the notches in the lateral braces to
the bed surface (see
Fig. F
).
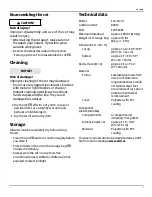
6. Pull the bed surface’s cover tight over the lateral
braces and anchor the lateral braces’ notches
into the ducts on the side of the cot’s frame
(see
Fig. G
).
You will have to use some force to do so.
Make sure that each lateral brace audibly and
noticeable locks into place.
You have successfully set up the cot and can begin
using it (see
Fig. H
).
Summary of Contents for 94812
Page 3: ...A 1 2 3 B C 3 ...
Page 4: ...D E F H G 4 ...


