background image

Cleaning

10

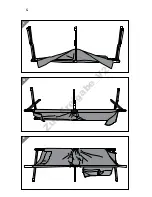
1. Position the cot 

2

 ‘on end’ (upright) in front of you and fold the legs of the 

cot out to the side (see 

Fig. B

). 

2. Fold the outer legs all the way up (see 

Fig. C

). 

3. Fold out the legs of the cot so that the bed surface is stretched out  

(see 

Fig. D

). 

4. Once folded-out, turn the cot over (see

 Fig. E

).

The bed surface is now facing up.

5. Push a lateral brace 

3

 through its designated loop in the cover at the top 

and bottom end of the cot. In the process, pay attention to alignment of the 

notches in the lateral braces to the bed surface (see 

Fig. F

). 

6. Pull the bed surface’s cover tight over the lateral braces and anchor the 

lateral braces’ notches into the ducts on the side of the cot’s frame  

(see 

Fig. G

).

You will have to use some force to do so. Make sure that each lateral brace 

audibly and noticeable locks into place.  

You have successfully set up the cot and can begin using it (see 

Fig. H

).

Disassembling the cot 

 CAUTION!

Risk of injury!

Improper disassembly and use of the cot may result in injury.


− When taking the cot apart, make sure not to squash your 

fingers. If possible, wear suitable work gloves. 


− Reverse the steps described in the chapter “Setting up the cot” to disassem-

ble the cot.

Cleaning

NOTICE!

Risk of damage!

Improper handling of the cot may damage it.


− Do not use any aggressive cleaners, brushes with metal or nylon 

bristles, or sharp or metallic cleaning utensils such as knives, 

hard scrapers and the like. They could damage the surfaces.

Zur_Freigabe_V2

Summary of Contents for FLX-CB-01

Page 1: ...ID 07177 m y hansecontrol c o m CERTIFIED User friendly Manual User Manual Manual del usuario English 06 Espa ol 13 CAMPING COT CATRE PARA ACAMPAR Z u r _ F r e i g a b e _ V 2...

Page 2: ...e instruction manual 7 Explanation of symbols 7 Safety 7 Proper use 7 Safety notes 8 First use 9 Checking the cot and scope of delivery 9 Use 9 Setting up the cot 9 Disassembling the cot 10 Cleaning 1...

Page 3: ...3 A B 1 2 3 Z u r _ F r e i g a b e _ V 2...

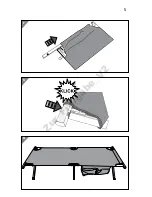
Page 4: ...4 D C E Z u r _ F r e i g a b e _ V 2...

Page 5: ...5 H F G Z u r _ F r e i g a b e _ V 2...

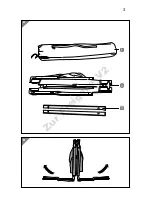
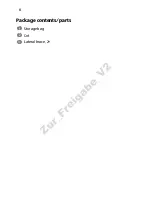
Page 6: ...6 Package contents parts 1 Storage bag 2 Cot 3 Lateral brace 2 Z u r _ F r e i g a b e _ V 2...

Page 7: ...he cot or on the packaging WARNING This signal symbol word designates a hazard with a moderate degree of risk which may lead to death or severe injury if not avoided CAUTION This signal symbol word de...

Page 8: ...Improper set up and use of the cot may result in injury Set the cot up on a level and nonskid surface Do not stand or jump on the cot The cot can tip over easily Make sure that children do not play w...

Page 9: ...e the cot Be very careful when opening 1 Take the cot out of the packaging 2 Check to make sure that the delivery is complete see Fig A 3 Check whether the cot 2 or the individual parts exhibit damage...

Page 10: ...eral braces notches into the ducts on the side of the cot s frame see Fig G You will have to use some force to do so Make sure that each lateral brace audibly and noticeable locks into place You have...

Page 11: ...1 Article number 96122 Maximum total load approx 265 lbs 120 kg Weight incl storage bag approx 18 lbs 8 kg 5 Dimensions L W H set up folded approx 74 8 29 1 16 9 190 74 43 cm approx 37 7 9 5 9 94 20 1...

Page 12: ...d wrappers in the recyclable waste Disposing of the cot Should the cot no longer be capable of being used at some point in time dispose of it in accordance with the regulations in force in your city o...

Page 13: ...n de s mbolos 15 Seguridad 16 Uso apropiado 16 Indicaciones de seguridad 16 Primer uso 17 Comprobar el catre y el volumen de suministro 17 Uso 18 Montar el catre 18 Desmontar el catre 18 Limpieza 19...

Page 14: ...Contenido piezas 14 Contenido piezas 1 Bolsa de almacenamiento 2 Catre 3 Travesa o 2 Z u r _ F r e i g a b e _ V 2...

Page 15: ...tre Conserve el manual del usuario para su uso en el futuro Si entrega el catre a un tercero entr guele necesariamente este manual del usuario Descripci n de s mbolos En este manual de instrucciones e...

Page 16: ...neo Indicaciones de seguridad ADVERTENCIA Riesgo de asfixia Si los ni os juegan con el material de embalaje y meten la cabeza en las bolsas de pl stico del embalaje o en la bolsa de almacenamiento pue...

Page 17: ...s rayos solares directos y la humedad Primer uso Comprobar el catre y el volumen de suministro AVISO Riesgo de da os Si abre el embalaje con un cuchillo afilado o con otros objetos puntiagudos sin ten...

Page 18: ...frontal y en los pies del catre meta un travesa o 3 por el pasador previsto en la funda Tenga en cuenta la orientaci n de las muescas en los travesa os con respecto a la superficie del catre v ase la...

Page 19: ...ve 2 Seque el catre con un pa o seco Almacenamiento Todas las piezas se deben secar del todo antes de su almacenamiento Limpie y seque bien el catre 2 antes de guardarlo Guarde todas las piezas del ca...

Page 20: ...nual del usuario tambi n se puede descargar como archivo PDF en nuestro sitio web www aldi de Eliminaci n Eliminaci n del embalaje Elimine el embalaje por tipos de material El cart n y las l minas han...

Page 21: ...Z u r _ F r e i g a b e _ V 2...

Page 22: ...Z u r _ F r e i g a b e _ V 2...

Page 23: ...ALDI INC BATAVIA IL 60510 WWW ALDI US USA YEAR WARRANTY A OS DE GARANT A 2 AFTER SALES SUPPORT SERVICIO POSVENTA MODEL NO DEL MODELO FLX CB 01 96122 05 2018 Service 801service net 1 866 558 8096 USA...

Reviews: