Use
12
NOTICE!
Risk of damage!
Strong wind or a storm may pull the tent out of the anchors and
damage it.
− Set the tent up so that the wind can blow away over the tent
from the back of the tent.
− In addition to the pegs, use the guy lines to secure the tent
and protect it against the wind.
− In the event of intense rain or wind, close the side ventilating
windows by folding the spacers in. Use the hook and loop fas-
teners on the tent to fix the ventilating windows in place.
NOTICE!
Risk of damage!
The tent’s tarp may tear if it is drawn too tight.
− Do not excessively tighten the tent tarp.
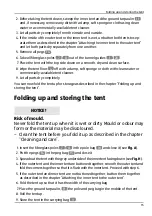
• The rear channel ends of the tunnel guides on the outer tent have
been sewn shut so that the tent can be set up by one person.
• Set up the tent before a trip to familiarise with the tent’s construction.
• The net insert in the inner tent permits adequate ventilation and,
at the same time, prevents insects from getting into the tent.
• Once you are finished setting up, make sure that the pegs are
secure and that they do not protrude from the ground.
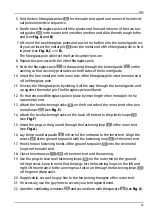
1. Select a suitable, level set-up location where you can properly secure the tent with
the pegs
14
and the guy lines
2
(see
Fig. A
).
2. Take the tent, the three fibreglass poles
7
/
8
and the pegs out of the carrying
bag
9
.
3. Spread the tent out so that the grey underside of the inner tent is facing down at
the set-up location. Make sure that the entrance
3
of the inner tent is pointing in
the desired direction.
4. If the inner tent is not buttoned onto the outer tent, button the inner and outer
tent together as described in the chapter “Attaching the inner tent to the outer
tent”. If the inner tent is already buttoned to the outer tent, proceed with step 5.


