AE TECHRON MULTI-AMP CONFIGURATION GUIDE
20
Information subject to change
97-8002465_09-19-14
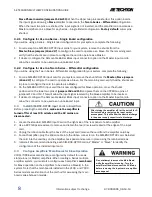
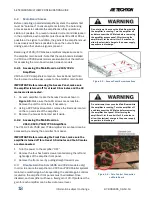
Figure 4.9 – Terminating the Amplifier Input
Ensure that the inputs of all of the amplifiers are terminated
3.
by using a resistor-terminated barrier block connector (see
Figure 4.9
) or similar device.
4.6
Verify Interlock Operation
Power up each amplifier by switching to ON the front-panel
1.
ON/OFF switch (2105/7224) or the back-panel AC Mains
Switch/Circuit Breaker to the ON (up) position
(2110/2120/7548/7796 amplifiers).
Allow each amplifier to power up and come to Ready state. When Ready, the amplifier Ready and Run
2.
LEDs will be lit. Note: Some amplifiers that have been custom-configured may require that you press the
Enable button to bring the amplifier to the Ready state.
On the first amplifier only, press the Stop button to place the amplifier in Standby mode.
3.
Verify that all amplifiers in the system enter Standby mode (Standby LED is lit).
4.
4.7
Adjust DC Offset
Power down all amplifiers.
1.
Remove the amplifiers’ Access Panels (2105/7224) or
2.
front panel (2110/2120/7548/7796) to access the main
board for each amplifier (see
Sections 4.2.1 and 4.2.2
).
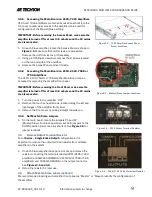
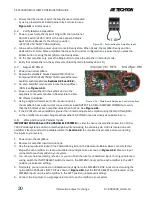
On each amplifier main board, locate the Amp Offset
3.
(R65) (see
Figure 4.10
).
Power up all amplifiers in the system and run the
4.
amplifiers for several minutes in Ready state to allow
DC offsets to stabilize.
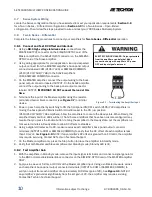
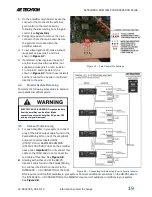
Using a digital voltmeter set to DC, measure across
5.
the amplifier’s back-panel output connector terminals (OUTPUT to COM or SAMPLED COMMON) to verify
that the DC offset of each amplifier is less than 5 mVdc. See
Figure 4.11.
If the DC offset for any amplifier is greater than 5 mVdc, adjust each amplifier using the Amp Offset (R65)
6.
on the amplifier main board. Adjust each amplifier’s DC offset to read as closely as possible to zero.
4.8
Wire and Connect Parallel Inputs
IMPORTANT FOR 2105 and 7224 PARALLEL SYSTEMS:
In order to ensure the amplifiers used in a 2105 or
7224 Parallel system maintain a matched gain while operating, the variable gain controls located on each
amplifier’s front panel must be disabled. Refer to
Section 4.3
to complete this process before connecting
the inputs to your system.
Power down the amplifiers.
1.
Remove all amplifier input terminations.
2.
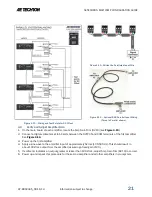
Use the jump wires included in the Parallel Wiring Kit and the Removable Barrier Block connectors that
3.
ship with each amplifier to create a paralleled input signal wire as shown in
Figure 4.12.
Wire one input
connector for each amplifier in your system.
You can use balanced wiring (shown), or you can build the wire for unbalanced input. If using unbalanced
4.
wiring, switch the INPUT SELECT switch located on the SIM-BNC input card on each amplifier to the LEFT
position (unbalanced setting).
Alternately, you can connect an unbalanced input signal to the SIM-BNC’s BNC input connector using the
5.
optional BNC PARALLEL INPUT KIT as shown in
Figure 4.13.
Set the INPUT SELECT switch located on the
SIM-BNC input card on each amplifier to the LEFT position (unbalanced setting).
Connect the input wire to a signal generator and to each amplifier in your system.
6.
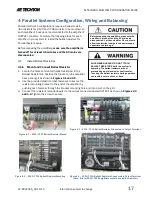
Figure 4.10 – Main Board Balancing Control Locations


