96-8006123_11-03-2021
Information subject to change
21
8302 OPERATOR’S MANUAL – SECTION 6
been selected (see the
Advanced Configuration
section of the product manual for more informa
-
tion). The resulting circulating currents will waste
power and may damage the amplifiers.
6.4.2
Parallel Multi-amp Configuration
To configure and connect two amplifiers for opera
-
tion in a parallel configuration, begin by designat
-
ing one amplifier as the Master amplifier, and the
other amplifier as a Follower amplifier. Consider
placing a “Master” or “Follower” label on each am
-
plifier’s back panel to clarify the amplifier designa
-
tion during setup and operation.
Testing Setup
The two amplifiers will be connected in a parallel
configuration
except for the OUTPUT terminals,
which will be left open.
Complete the following steps to configure and con
-
nect the two amplifiers for gain testing.
1.
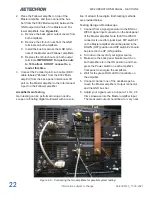
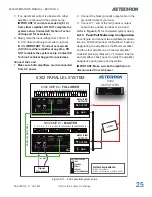
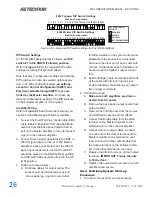
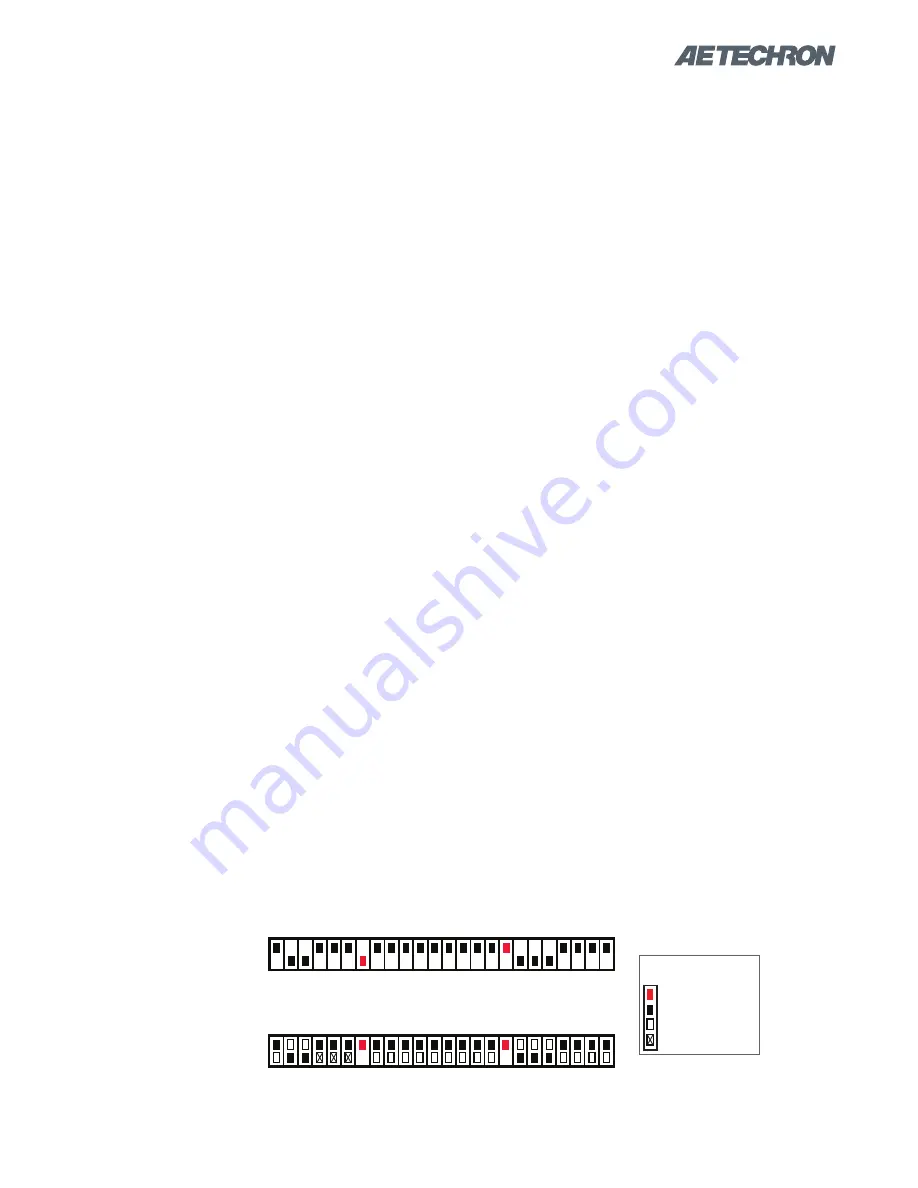
Refer to
Figure 6.7
to configure each am
-
plifer’s DIP switches for parallel operation. On
the amplifier designated as Follower,
set DIP
switch #7 in the DOWN (Follower) position.
On both amplifiers,
set DIP switch #17 in the
UP (Electronic Gain Matching ON) position.
Note that other configuration settings con
-
trolled by DIP switches can also be selected
before operation. In an 8302 multi-amp system,
all settings except for Control Configura-
tion (SW#7) and Electronic Gain Matching
(SW#17) are controlled by the Master ampli
-
fier.
For these additional configurations, setting
of the DIP switches on the Follower amplifier is
not required.
6.4.1 Multiamp Safety Principles
Following these basic principles will help to ensure
the safety of your equipment and personnel.
One Master Amplifier
Multi-amp configurations require one amplifier
configured as a Master amplifier, and the second
amplifier in the system configured as a Follower
amplifier.
Use Only 8302 Amplifiers
Use only AE Techron 8302 amplifers to construct
a 8302 multiamp system. Do not combine different
models of AE Techron amplifiers in the same sys
-
tem or use amplifiers made by another manufac
-
turer in a 8302 multiamp system. Such improper
connections could damage the amplifiers.
Use Proper Output Wiring
Select wire appropriate for your application, load
and expected output. Parallel systems with a low-
impedance load running high-current, continuous-
duty applications may require 1/0 AWG or more.
Please refer to an AWG wire sizes chart or the
equivalent to determine the appropriate wire for
your application.
Wire rating
refers to the allowable voltage han
-
dled by the wire. In configuring Push/Pull systems
for increased voltage, make sure that the wire
insulation on output wiring is appropriate for the
expected output voltage. Wire length should also
be limited to 20 feet to minimize voltage drop.
Never directly connect one amplifier’s OUTPUT
terminal to another amplifier’s OUTPUT terminal,
unless the Electronic Gain Matching option has
8302 Follower DIP Switch Settings
Parallel Configuration
1 2 3 4 5 6 7 8 9 10 11 12 13 14 15 16 17 18 19 20 21 22 23 24
8302 Master DIP Switch Settings
Parallel Configuration
1 2 3 4 5 6 7 8 9 10 11 12 13 14 15 16 17 18 19 20 21 22 23 24
KEY FOR DIP SWITCH
SETTINGS:
REQUIRED
DEFAULT
OPTIONAL
NOT RECOMMENDED
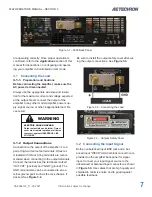
Figure 6.7 – Required DIP switch settings for parallel amplifiers
Summary of Contents for 8302
Page 2: ......

