24
:: Tuning Tips (cont.)
Rear Hub Spacing:
You have 3 options for rear hub spacing, FORWARD, MIDDLE, & BACK. The kit setting is FORWARD, which provides
the most rear traction and will be used most often. For improved handling in bumps or rhythm sections, try moving the
hubs to MIDDLE or BACK. This can also make the car handle better in 180 turns.
Rear Anti-Roll Bar:
The #9780 B44 anti-roll bar kit (a.k.a. swaybar) allows you to add roll resistance to the rear end with minimal effect on
handling over bumps and jumps. The anit-roll bar is very helpful when trying to tune the suspension. The black bar is the
softest (.047” wire) and the silver (.055” wire) is the standard. It is popular to run a rear anti-roll bar in 4wd to help the
car square up more out of turns.
Rear Arm Hole:
The inner hole in the arm tends to work the best over the bumps and jump sections. Changing to the outer hole in the
rear arm will tend to make the rear end feel more “locked in” and less responsive. Making this change to the outer hole
requires you to remove the downtravel limiters from the rear shocks.
Setup Sheets:
Most often, the best way to get your car handling right is to go to our website www.rc10.com and click on the links
to Setup Sheets, then RC10B44.1 setups. Our team of professional drivers help develop these setups at National
events. Also, most drivers have a “base” setup that they use as a starting point for every event. Try running some of our
base setups OR look for track conditions and tires that are similar to your local track and mimic that setup. Remember,
each adjustment has a purpose, so copy everything from the setup sheet and then make adjustments based on the
recommendations in this manual.
Battery Setup:
The B44.1 is designed to use LiPo saddle pack batteries. Follow your ESC and battery manufacturer’s
recommendations for wiring.
Rear Ride Height:
The rear ride height setting you should use most often is 20 mm (the rear arms appear level when looking from the
rear). Check the ride height by lifting up the entire car about 8-12 inches off the bench and drop it. After the suspension
“settles” into place, raise or lower the shock collars as necessary until there is 20 mm gap from the bottom of the
chassis to the ground. Note: Check the ride height gap at the rear end of the carbon fiber chassis, not at the rear
chassis plate which is raised for more ground clearance. The chassis should look level from the side.
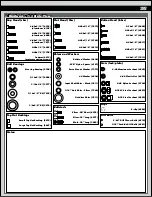
Steering Servo Chart
Associated
* Not all servo’s are listed
* Make sure servo linkage clears the servo through full travel
in both directions. Use #7336 servo spacers to adjust the
servos position
XP-1015, XP-1313
F
F
F
F
A
A
H
H
J
J
J
# 9180
servo arm
94102
HS-5625MG, HS-5645MG, HS625MG, HS645MG
Z4725, Z4750, Z2750, Z8450, Z8550, NES-4750
Z250, Z550
S9204, S9250, S9450, S148
S3003, S9202, S9101
S9404
94738, 94157, 94158, 94257, 94258, 94357,
94358, 94452, 94453, 94751, 94755
HS-322HD, HS-325HB, HS-965, HS-985MG,
HS-5965, HS-5985MG, HS-425BB, HS-422
PS-401, PS-2001, PS-2004, PS-2015, PS-2173,
PS-2174, PS-2123, PS-2143, PS-2144
Airtronics
Airtronics
Hitec
Hitec
JR
JR
Futaba
Futaba
Futaba
KO
Summary of Contents for B44.1
Page 1: ...9 10 ...
Page 34: ...34 Notes ...


