background image

  24 

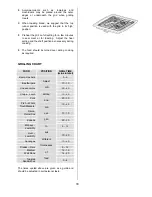
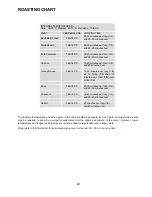
ROASTING CHART 


INTERNAL TEMPERATURES – 
Rare : 50-60°C; Medium : 60-70°C; Well done : 70-80°C 

MEAT 

TEMPERATURE  COOKING TIME 

Beef/ Beef boned 

160-180°C 

20-35 minutes per ½kg (1lb) 
and 20-35 minutes over 


Mutton/Lamb 

160-180°C 

25-35 minutes per ½kg (1lb) 
and 25-35 minutes over 


Pork/Veal/Ham 

160-180°C 

30-40 minutes per ½kg (1lb) 
and 30-40 minutes over 


Chicken 

160-180°C 

15-20 minutes per ½kg (1lb)  
and 20 minutes over 


Turkey/Goose 

160-180°C 

15-20 minutes per ½kg (1lb) 
up to 3½kg (7lb) then 10 
minutes per ½kg (1lb) over  
3½kg (7lb) 


Duck 

160-180°C 

25-35 minutes per ½kg (1lb) 
and 25-30 minutes over 


Pheasant 

160-180°C 

35-40 minutes per ½kg (1lb)  
and 35-40 minutes over 


Rabbit 

160-180°C 

20 minutes per ½kg (1lb)  
and 20 minutes over 


The roasting temperatures and times given in the chart should be adequate for most joints, but slight adjustments 
may be required to allow for personal requirements and the shape and texture of the meat.  However, lower 
temperatures and longer cooking times are recommended for less tender cuts or larger joints. 
 
Wrap joints in foil if preferred, for extra browning uncover for the last 20 – 30 min. cooking time. 
 

Summary of Contents for D77000GF

Page 1: ...D77000GF Slip In Dual Fuel Multifunction Double Oven Installation and Operating Instructions PERFEKT IN FORM UND FUNKTION ...

Page 2: ...system This appliance has been designed for domestic use to cook edible foodstuffs only and must not be used for any other purposes Take great care when heating fats and oils as they will ignite if they become too hot When you are lighting any burner check that it is lit before you leave the appliance When turning off a burner do not leave the appliance until the flame has gone out Never place pla...

Page 3: ...nce 30 Cleaning the Control Knobs and Handles 30 Removing and Replacing the Wirework Runners 30 Cleaning the Hob 31 When Replacing Hotplate Burner Parts 31 Cleaning the Shelves Wirework Runners and Grill Oven Furniture 31 Cleaning Inside the Grill and Oven Compartments 32 Cleaning the Door s 33 Replacing an Interior Lighting Bulb 34 Something Not Working 35 Service and Spare Parts 36 Guarantee Con...

Page 4: ...4 DESCRIPTION OF THE APPLIANCE SLIP IN DUEL FUEL MULTIFUNCTION DOUBLE OVEN Main Oven Control Panel Second Oven Grill Electronic Timer ...

Page 5: ...ture Control D Electronic Timer E Main Oven Multifunction Selector Defrost Bottom Heat Pizza Fan Roasting PROFI Hot air Conventional Cooking Main Oven Grill Interior Lighting F Main Oven Temperature Control G Hotplate Control H Hotplate Control I Main Oven Indicator Neon J Second Oven Grill Indicator Neon G A C D B F E H I J ...

Page 6: ...ere applicable or oven s is switched on The indicator neon will glow It may turn on and off during use to show that the setting is being maintained If the neon does not operate as the instructions indicate the controls have been incorrectly set Return all controls to zero and reset following the instructions for the required setting CONDENSATION AND STEAM When food is heated it produces steam simi...

Page 7: ...ould be pressed separately 2 HOW TO SET THE COUNTDOWN The Countdown gives an audible reminder at the end of any period of cooking This cooking period may be up to 2 hrs 30 mins It is not part of the automatic control To set press the Selector Control button until the Countdown indicator neon is illuminated the display reads 0 00 as Fig 3 To set the correct time duration depress the increase contro...

Page 8: ...required length of cooking time is displayed e g 2 hrs 15 mins as Fig 7 If necessary depress the decrease control until the correct time interval is achieved The maximum cooking time is 10 hours iv Release the buttons The Cook Time indicator neon will be illuminated Remember this must be completed within 5 seconds of first pressing the Selector Control button v To set the End Time Press the Select...

Page 9: ... until the display reads 0 00 as Fig 12 ii Release the buttons The Cook Time indicator neon will flash and after 5 seconds return to the time of day iii Turn off the oven controls 5 TO RETURN THE APPLIANCE TO MANUAL At the end of a timed cooking period the indicator neon will flash and an alarm will sound for up to 2 minutes i To stop the sound press any of the three buttons as Fig 13 ii The displ...

Page 10: ...own 2 Push the control knob in fully and turn to the left to the highest setting This is shown by a large flame symbol 3 The ignition will not function if the control knob is not fully depressed 4 When the burner has lit adjust the setting as required Warning If the control knob is not depressed immediately a build up of gas may cause the flame to spread If you close the lid of the appliance while...

Page 11: ...verhang the appliance Lift pans on and off the pan supports Do not slide them across the hob Any spillage should be removed from the lid before opening Do not leave accidental spillage on the hob or removable parts The spillage should be wiped up and the parts washed and carefully dried as soon as the hob pan supports and burner parts are cool enough to touch A flat based Wok will stand stable on ...

Page 12: ...hes may be evident as the grill cleans itself The second oven cannot be operated when the grill is in use THE GRILL PAN AND HANDLE The grill pan is supplied with a removable handle To attach the handle press the button on the handle with the thumb and insert the lip into the widest part of the bracket Slide the handle towards the left and release the button Ensure the handle is correctly located T...

Page 13: ...ing meats When toasting bread use the shelf in position 5 with the grid in the high position Preheat the grill on a full setting for a few minutes before sealing steaks or toasting Adjust the heat setting and the shelf as necessary during cooking The food should be turned over during cooking as required GRILLING CHART FOOD POSITION GRILL TIME mins in total Bacon Rashers 5 6 Beefburgers 10 15 Chick...

Page 14: ... illuminate The indicator neon will glow It may turn ON and OFF during use to show that the setting is being maintained The cooling fan for the controls may operate after a time The grill cannot be operated when the second oven is in use Do not place dishes tins and trays directly on the oven base as it becomes very hot and damage will occur TO FIT THE SECOND OVEN SHELF The shelf should be fitted ...

Page 15: ... onto the oven base and to help reduce cleaning The material and finish of the baking tray and dishes used affect base browning Enamelware dark heavy or non stick utensils increase base browning Shiny aluminium or polished steel trays reflect the heat away and give less base browning Because of the smaller cooking space and lower temperatures shorter cooking times are sometimes required Be guided ...

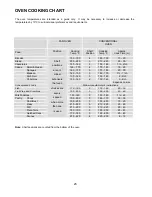
Page 16: ...oods Follow manufacturer s instructions Fish 3 170 190 20 30 Fish Pie Potato Topped 2 190 200 20 25 Fruit Pies Crumbles 2 190 200 40 50 Milk Puddings 3 140 150 1 2h Pasta Lasagne etc 3 170 180 40 45 Pastry Choux 3 180 190 30 35 Eclairs Profiteroles 3 170 180 20 30 Flaky Puff Pies 3 210 220 25 40 Shortcrust Mince Pies 3 190 200 15 20 Meat Pies 3 190 210 25 35 Quiche Tarts Flans 3 180 200 25 45 Roas...

Page 17: ...eration This is quite normal The grill may be used with the door open or with the door closed HINTS AND TIPS Most foods should be placed on the grid in the grill pan to allow maximum circulation of air to lift the food out of the fats and juices Adjust the grid and grill pan runner position to allow for different thicknesses of food Position the food close to the element for faster cooking and fur...

Page 18: ...uring cooking The food should be turned over during cooking as required GRILLING CHART FOOD POSITION GRILL TIME mins in total Bacon Rashers 5 6 Beefburgers 10 15 Chicken Joints 30 40 Chops Lamb 15 20 Pork 20 30 Fish Whole Trout Mackerel 15 25 Fillets Plaice Cod 10 15 Kebabs 20 30 Kidneys Lamb Pig 8 12 Liver Lamb Pig 10 20 Sausages 15 20 Steaks Rare 6 12 Medium 12 16 Well Done 14 20 Toasted Sandwic...

Page 19: ... the conventional oven For best results cook on one level USING CONVENTIONAL COOKING Turn the main oven multifunction selector to Conventional Cooking Turn the main oven temperature control to the required setting THINGS TO NOTE The cooling fan for the controls may operate after a time The interior lighting will illuminate If an automatic programme has been set the oven fan and light do not come o...

Page 20: ...nt room around the baking tray or dish to allow for maximum circulation Stand dishes on a suitably sized baking tray on the shelf to prevent spillage onto the oven base and to help reduce cleaning The material and finish of the baking tray and dishes used will affect the degree of base browning Enamelware dark heavy or non stick utensils increase base browning Shiny aluminium or polished steel tra...

Page 21: ...ING TEMPERATURES Fan oven cooking generally requires lower temperatures than conventional cooking Follow the temperatures recommended in the cooking chart As a guide reduce temperatures by about 20 C 25 C for your own recipes using a conventional oven BATCH BAKING The fan oven cooks evenly on both shelf levels especially useful when batch baking USING PROFI HOT AIR COOKING Turn the main oven multi...

Page 22: ...bottom upwards When cooking more than one dish in the fan oven place dishes centrally on different shelves rather than cluster several dishes on one shelf this will allow the heat to circulate freely for the best cooking results When batch baking one type of food e g Victoria sandwich cakes those of similar size will be cooked in the same time It is recommended that when baking larger quantities t...

Page 23: ...40 150 3 160 170 1 1 h Rich Fruit 130 140 3 150 160 2 2 h Christmas 130 140 2 130 140 3 4 h depends on size Convenience Foods Follow manufacturer s instructions Fish 170 190 3 170 190 20 30 Fruit Pies and Crumbles 190 200 3 190 200 40 60 Milk Puddings 130 140 3 130 140 1 2h Pastry Choux 190 200 3 160 170 30 35 Shortcrust 190 200 3 190 200 15 20 Flaky 210 220 3 210 220 25 40 Puff 210 220 3 210 220 ...

Page 24: ... to 3 kg 7lb then 10 minutes per kg 1lb over 3 kg 7lb Duck 160 180 C 25 35 minutes per kg 1lb and 25 30 minutes over Pheasant 160 180 C 35 40 minutes per kg 1lb and 35 40 minutes over Rabbit 160 180 C 20 minutes per kg 1lb and 20 minutes over The roasting temperatures and times given in the chart should be adequate for most joints but slight adjustments may be required to allow for personal requir...

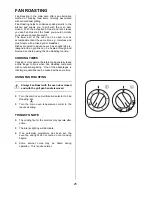
Page 25: ...be heated through and browned on the top using the Fan Roasting function COOKING TIMES Cooking is more gentle therefore food generally takes a little longer to cook when Fan Roasting compared with conventional grilling One of the advantages is that larger quantities can be cooked at the same time USING FAN ROASTING Always Fan Roast with the oven door closed and with the grill pan handle removed Tu...

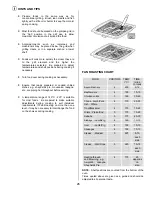
Page 26: ...ssaka lasagne etc are piping hot throughout before serving A temperature range of 140 C 220 is suitable for most foods Be prepared to make suitable adjustments during cooking to suit individual requirements If Fan Roasting on more than one level it may be necessary to interchange the food on the shelves during cooking FAN ROASTING CHART FOOD POSITION TEMP C TIME mins In total Bacon Rashers 4 200 8...

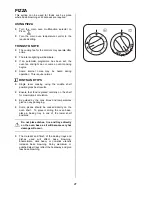
Page 27: ...ND TIPS Single level cooking using the middle shelf position gives best results Ensure that food is placed centrally on the shelf for maximum air circulation Be guided by the cook times and temperatures given on any packaging Some pizzas should be cooked directly on the oven shelf To prevent soiling the oven base place a baking tray in one of the lower shelf positions Do not place dishes tins and ...

Page 28: ...oven temperature control to the required setting THINGS TO NOTE The interior lighting will illuminate The indicator neon will glow It may turn ON and OFF during use to show that the setting is being maintained The cooling fan for the controls may operate after a time If an automatic cooking programme is set the oven fan and oven light do not come on until cooking begins Do not place dishes tins an...

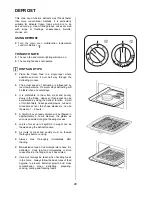
Page 29: ... meat and poultry slowly in the fridge However this process can be accelerated by using the defrost function Small or thin fish fillets frozen peeled prawns cubed or minced meat liver thin chops steaks etc can be thawed in 1 2 hours A 1kg 2 lb oven ready chicken will be thawed in approximately 5 hours Remove the giblets as soon as possible during the thawing process Joints of meat up to 2kg 4 lb i...

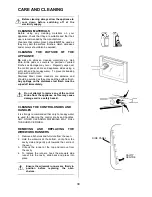
Page 30: ... cream cleaners are abrasive and should be avoided as they may dull the surface finish Any spillage on the stainless steel finish must be wiped off immediately Do not attempt to remove any of the control knobs from the appliance as this may cause damage and is a safety hazard CLEANING THE CONTROL KNOBS AND HANDLES It is strongly recommended that only hot soapy water is used for cleaning the contro...

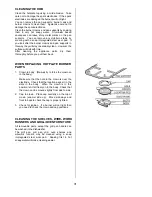
Page 31: ...hly before you put them back WHEN REPLACING HOTPLATE BURNER PARTS 1 Crown to body Do not try to force the crown on to the body Make sure that the hole in the crown is over the electrode Check that the location pegs sit in the slots in the body When the crown is in this position let it fall freely on to the body Check that the crown can be moved slightly from side to side 2 Cap to crown Place cap c...

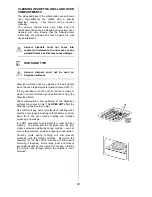
Page 32: ... oven for an hour or two per week to ensure continued good performance from the Stayclean finish Slight discolouration and polishing of the Stayclean surfaces may occur in time This DOES NOT affect the Stayclean properties in any way Use minimal if any extra oil or fat when roasting meat potatoes only require brushing with fat before cooking Extra fat in the oven during roasting will increase spla...

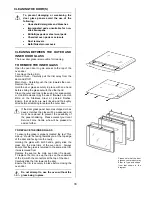
Page 33: ... are well rinsed and thoroughly dried before attempting to replace the outer door If the door glass panel becomes chipped or has deep scratches the glass will be weakened and must be replaced to prevent the possibility of the panel shattering Please contact your local Service Force Centre who will be pleased to advise further TO REPLACE THE INNER GLASS To ensure the glass is properly located the t...

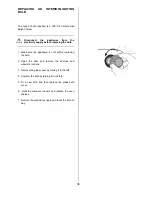
Page 34: ...Make sure the appliance is cool before replacing the bulb 2 Open the door and remove the shelves and wirework runners 3 Remove the glass cover by turning it to the left 4 Unscrew the bulb by turning it to the left 5 Fit a new bulb and then replace the glass bulb cover 6 Refit the wirework runners and replace the oven shelves 7 Restore the electricity supply and reset the time of day ...

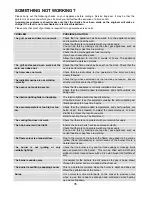
Page 35: ...tures and shelf positions are being used The interior lighting bulb may need replacing The interior lighting fails to illuminate If the Main Oven is set for automatic cooking the interior lighting will illuminate when the cook time begins Check that the recommended temperatures and shelf positions are being used Be prepared to adjust the temperature up or down slightly to achieve the results you w...

Page 36: ...ou will need to give the following details 1 Your name address and post code 2 Your telephone number 3 Clear and concise details of the fault 4 The model and serial number of the appliance found on the rating plate 5 The purchase date Please note that a valid purchase receipt or guarantee documentation is required for in guarantee service calls CUSTOMER CARE DEPARTMENT For general enquires concern...

Page 37: ... person not authorised by us All service work under this guarantee must be undertaken by a Service Force Centre Any appliance or defective part replaced shall become the Company s property This guarantee is in addition to your statutory and other legal rights Home visits are made between 8 30 am and 5 30 pm Mon Fri excluding bank holidays Visits may be available outside these hours in which case a...

Page 38: ...hotplate level Rc B S P female Electrical connection 230 240 V 50 Hz Mains connected at rear centre of appliance using at least 6mm2multi core PVC insulated cable LOADING INFO Electric ovens Voltage 230 240 Volts AC 50Hz Wattage 4 4 4 8kW LOADING INFO Gas hotplate Natural Gas R H F R H R L H R L H F Heat Input 1 0kW 1 9kW 1 9kW 3 4kW 3412 Btu h 6483 Btu h 6483 Btu h 11600 Btu h Injector marking 07...

Page 39: ...cable Do not alter the electrical circuitry of this appliance PROVISION FOR VENTILATION This appliance is not connected to a combustion products evacuation device It shall be installed and connected in accordance with the current installation regulations Particular attention shall be given to the relevant requirements regarding ventilation The room containing the appliance should have an air suppl...

Page 40: ...n 20m3 or in a bathroom shower room or garage It is essential that the appliance is positioned as Fig 1 a Shelves wall cabinets and cooker hoods must be fitted a minimum of 650mm directly above the top of the hotplate or greater for cooker hoods if recommended by manufacturers instructions and 400mm above the hotplate when fitted in line with the outside of the appliance If the units are intended ...

Page 41: ...res are used ensure they are suitably sheathed to leave 10mm bare wire to fit into the terminal Clamp bare wires into the relevant terminal Fig 2 and check they are held by tugging each one in turn Ensure all screws are securely tightened Clamp the mains cable securely ensuring 5mm of the outer insuation is inside the terminal block and that the wires are not taut but not so slack as to cause any ...

Page 42: ... It is recommended that if the appliance is to be installed with a flexible supply pipe a stability chain be fitted and is available from your supplier see Important Safety Requirements These instructions should be read in conjunction with any leaflet packed with the stability chain 1 Place the appliance in its intended position and level appliance 2 Mark a position 100mm from the top of the rear ...

Page 43: ...ored to the hotplate when the tap is turned on CHECKING THE SECOND OVEN 1 Ensure the oven door is closed 2 Turn the second oven grill selector to second oven 3 Turn on the second oven thermostat to the highest setting 4 Ensure that the oven is heating up by checking firstly that the oven neon illuminates 5 After a short period the heat from the oven element may be felt with the oven door open CHEC...

Page 44: ...e This instruction booklet is accurate at the date of printing but will be superseded if specifications or appearance are changed AEG ELECTROLUX MAJOR APPLIANCES ADDINGTON WAY LUTON BEDFORDSHIRE LU4 9QQ TELEPHONE 0870 5 350350 To buy accessories consumables and spare parts at our online shop please visit http www aeg electrolux co uk Part Number 349103500 ...

Reviews: