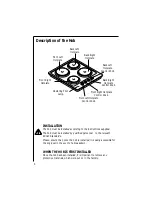
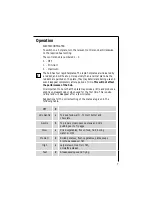
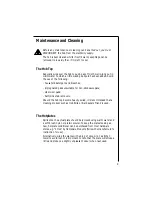
background image

AUS ERFAHRUNG GUT

111 K - W/D/G

Electric hob
Table de cuisson électrique

Operating Instructions
Notice d’utilisation

Summary of Contents for 111 K

Page 1: ...AUS ERFAHRUNG GUT 111 K W D G Electric hob Table de cuisson électrique Operating Instructions Notice d utilisation ...

Page 2: ...aging before using the hob Ensure that the electrical supply complies with the type stated on the rating plate Do not attempt to modify the hob in any way Child Safety This hob is designed to be operated by adults Do not allow children to play near or with the hob The hob gets hot when it is in use Children should be kept away until it has cooled Children can also injure themselves by pulling pans...

Page 3: ... when cooking with oil and fats Never use plastic or aluminium foil dishes on the hob Perishable food plastic items and areosols may be affected by heat and should not be stored above or below the hob unit Service This hob should only be repaired or serviced by an authorised Service Engineer and only genuine approved spare parts should be used Environmental Information After installation please di...

Page 4: ...10 Service and Spare Parts 11 Guarantee Conditions 12 Instructions for the Installer 12 Engineer technical data 13 Important safety requirements 14 Location 14 Installation 15 Building over a cupboard or drawer 16 Building over a kitchen unit with door 16 Fitting the hob to the worktop 17 Electrical connections 18 Permanent Connection 19 Supply Cable Specifications 19 Wiring diagram 20 ...

Page 5: ...ives 73 23 EEC 90 683 EEC 93 68 EEC 89 336 EEC 90 396 EEC current edition Guide to Use the instructions The following symbols will be found in the text to guide you throughout the Instructions Safety Instructions Step by step instructions for an operation Hints and Tips i ...

Page 6: ...sily accessible for the engineer in the event of a breakdown WHEN THE HOB IS FIRST INSTALLED Once the hob has been installed it is important to remove any protective materials which were put on in the factory Operating Pilot Lamp Back Left Hotplate Front Left Hotplate Back Right Hotplate Control Knob Front Right Hotplate Control Knob Front Right Hotplate Back Right Hotplate Back Left Hotplate Cont...

Page 7: ...ffect the performance of the hob It is important to note that the plate may smoke a little and produce a slightly unpleasant odour when used for the first time This is quite normal and will disappear after a few minutes Suggestions for the correct setting of the plates are given in the following table OFF 0 Very Gentle To keep food warm To melt butter and chocolate Gentle 1 To prepare cream sauces...

Page 8: ...hort while before you finish cooking and the final stage will be completed on the accumulated heat Similarly stews etc cooked in well covered saucepans cook at lower temperature which is more economical Ensure pans are large enough to avoid liquids being split onto the plates Never leave the plates on without a pan on them or with an empty pan on them Take care never to lean or reach over a hot el...

Page 9: ...l wool pads bath sink stain removers Should the hob top become heavily soiled it is recommended that a cleaning product such as Hob Brite or Bar Keepers Friend is used The Hotplates Spills onto the actual plate should be removed using warm water and a soft brush nylon or plastic scourer To keep the plates looking as new hotplate conditioner can be purchased from most hardware stores e g 4 Hob by H...

Page 10: ...k the correct control knob has been turned Check the plate is clean and dry Check the cooking pan is the correct size for the plate Check the cooking pan has a flat bottom Check the setting is correct for the type of cooking If after all these checks your hob still does not operate correctly contact your local AEG Service Force Centre Please note that it will be necessary to provide proof of purch...

Page 11: ...let 5 Date of purchase If you require spare parts or an engineer contact your local Service Force Centre by telephoning 0870 5 929 929 Your call will be routed to your local Service Force Centre CUSTOMER CARE For general enquiries concerning your AEG appliance and for further information on AEG products contact our Customer Care Department by letter or telephone as follows Customer Care Department...

Page 12: ...t extend the guarantee period for the appliance Parts removed during guarantee repairs become property of AEG 6 The purchaser s statutory rights are not affected by this guarantee European Guarantee If you should move to another country within Europe then your guarantee moves with you to your new home subject to the following qualifications The guarantee starts from the date you first purchased yo...

Page 13: ...ness 30 mm SUPPLY CONNECTIONS Electric 230 240V 50Hz supply HEATING ELEMENTS RATING Rapid Front Left Hotplate Ø 180 mm 2090 W Rapid Back Left Hotplate Ø 145 mm 1570 W Rapid Back Right Hotplate Ø 180 mm 2090 W Rapid Front Right Hotplate Ø 145 mm 1570 W Total Rating 7320 W Instructions for the Installer Engineer technical data ...

Page 14: ...ered as a Class Y appliance according to Fire Risk Regulations Minimum distances detailed below must be observed The hob may be located in a kitchen a kitchen diner or bed sitting room but not in a bathroom or shower room Before making the cut out in the worktop ensure that there is a minimum distance of 55 mm between the rear edge of the hob and the wall A minimum distance of 100 mm must be left ...

Page 15: ... the relevant British Standards The manufacturer will not accept liability should the above instructions or any of the other safety instructions incorporated in this book be ignored Cut Out Size The dimensions of the cut out are given in the diagram 550 470 580 500 55 min FO 2109 ...

Page 16: ...ram 3 The panel fitted under the hob a should be easily removable to allow easy access if technical assistance is needed The space behind the kitchen unit b can be used for connections Building over a cupboard or drawer If the hob is to be installed above a cupboard or drawer it will be necessary to fit a heat resistant board below the base of the hob on the underside of the work surface It is als...

Page 17: ...eft in this seal in order to prevent spillage near the hob seeping into the cabinet below 1 Place the sealing gasket all around the edge of the cut out 2 Place the hob into the cut out and secure it by means of the relevant fixing clamps and screws as shown in the diagram 3 Remove the excess seal The edge of the hob forms a double seal which prevents the ingress of liquids FO 0199 a Seal ...

Page 18: ...flexible supply cord must be fitted in accordance with the specification given in the relevant tables 1 Remove the mains terminal cover plate from the underside of the hob to expose the mains terminal block 2 Loosen the two cable clamp screws and lift the top section of the clamp enough to allow the cable to be passed through 3 Connect the red live wire to the terminal which is marked with the num...

Page 19: ...tion it is necessary that you install a double pole switch between the hob and the electricity supply mains with a minimum gap of 3 mm between the switch contacts and of a type suitable for the required load in compliance with the current electric regulations The switch must not break the yellow and green earth cable at any point Ensure that the hob supply cord does not come into contact with surf...

Page 20: ...20 Wiring diagram 4 3 2 1 4 3 1 2 5 P 2 P 1 P 3 1 4 3 2 1 4 3 1 2 5 P 2 P1 P 3 2 4 3 2 1 4 3 1 2 5 P 2 P 1 P 3 3 4 3 2 1 4 3 1 2 5 P2 P1 P3 4 PLATE Ø 180 Ø 180 R Ø 145 R Ø 145 N L L 4 1 3 ...

Reviews: