background image

13

Disconnection of AUTOMAX:

If you do not wish to use AUTOMAX, 
observe the following procedure:
1. Turn the control button to A

OFF

.

2. Then turn the control button to the  
    required setting.

Setting the large zone on the 
double zones

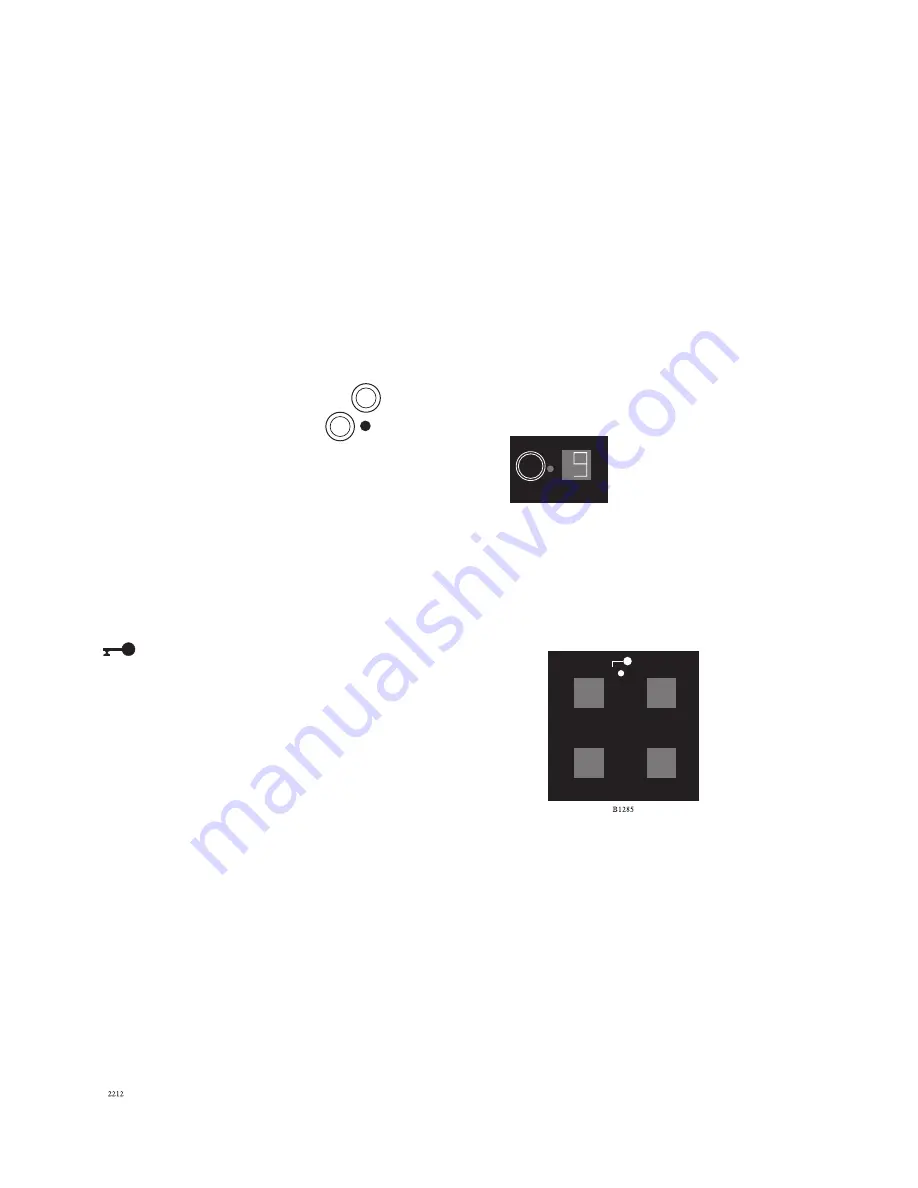
1. Turn the control button to
    The display will show:
2. Then turn the control button to the    
    required setting (e.g. setting 9).

If you wish to disconnect the large 
zone, turn off the zone and then turn 
the control button to the required 
setting.


Child safety device

Connection and disconnection of the 
child safety device is described in the 
section entitled “Before use”.
When the child safety device is 
activated the display will show:

Summary of Contents for 6510K7-M

Page 1: ...1 INSTRUCTION BOOK GB 6510K7 m CA 949600473 ...

Page 2: ...re of the operating instructions enables you to use them as a reference manual The first part of the operating instructions contains a general description of your new product Then follows a short introduction of the things to do before you use the Hob for the first time The section How to use describes how the Hob is used in everyday life Use this section until you are familiar with your new Hob T...

Page 3: ...e of 17 Splashquard 17 Stainless steel surfaces 18 The ceramic glass hob 18 Service 24 Before calling service technical advice 24 Deep fat frying 26 AEG Euro line appliances 28 Euro line appliances will not pay when the following occurs 29 Service and repair 30 For the installer Mounting 20 Electrical installation 22 Technical data 23 Unpacking 23 Table of contents 1 2 Step by step Safety informat...

Page 4: ... when not in use Do not use the hob if it is damaged in any way contact your local AEG Service Centre Never use plastic or aluminium dishes on the hob Never leave the hob unattended while deep fat frying or heating fats and oils The appliance is not intended for use by young children or infirm persons without supervision Child Safety Young children should be supervised to ensure that they do not p...

Page 5: ...5 Description of the product Control button CHEC Panel Controlbutton for operations ...

Page 6: ... are using and the setting at which you have set the zone Cooking zones There are two single zones and two double zones CHEC control Information about how to use the CHEC control function can be found in the section entitled Operation instructions The CHEC control function allows electronic control of the zones CHEC control enables you to set the heat with great precision which means that you do n...

Page 7: ...o turn on a zone turn the 2 control buttons to at the same time You must then activate one of the zones within 10 seconds The light under the symbol in the display will disappear You can disconnect the child safety device permanently as follows 1 Turn the 2 control buttons to and return to 0 2 Turn one of the 2 control buttons immediately to S A F E Before use ...

Page 8: ...will make it easier to clean the surface as well as preventing substances from being burnt onto the surface This is what to do 1 Pour a few drops of ceramic cleaning detergent such as vitroclen onto a piece of kitchen roll and rub the detergent into the entire surface 2 Polish the surface with a clean cloth until it is dry ...

Page 9: ...at is step free for all plates on a scale from 1 to 9 1 Represents lowest heat 9 Represents maximum heat 0 Represents OFF Double cooking zone Small circle When you control on the cooking section it will always be the small circle that is controled on Choose the wanted temperature From small to big circle both circles are on Turn the button past 0 Turn back to the wanted temperature From big to sma...

Page 10: ...l knobs are continuously adjustable from 1 to 9 9 is the highest setting There is AUTOMAX control of all settings enabling you to set the setting required from the outset Please see the table of settings The 14 and 18 cm zones are suitable for boiling and preparing small and medium sized portions The 21 cm zone is suitable for frying and for boiling and preparing large portions The oval zone is su...

Page 11: ...rs 8 1 hours 9 1 hours When the autostop function is activated the display will show The zones cannot be used Turn all the control buttons to 0 The zones can now be used Automax AUTOMAX supplies the zone with full heat for a specific period and then adjusts down to the setting you have chosen When you turn on a zone AUTOMAX starts automatically The display alternates between A and the setting chos...

Page 12: ...ch there is full power for each setting and the functions for which each setting is suitable Setting Full power time minutes Function 1 1 minute Melting simmering 2 3 minutes Melting simmering 3 5 minutes Boiling 4 6 5 minutes Boiling 5 8 5 minutes Boiling 6 2 5 minutes Frying 7 3 5 minutes Frying 8 4 5 minutes Deep frying 9 Deep frying Recommended settings when using AUTOMAX ...

Page 13: ...s 1 Turn the control button to The display will show 2 Then turn the control button to the required setting e g setting 9 If you wish to disconnect the large zone turn off the zone and then turn the control button to the required setting Child safety device Connection and disconnection of the child safety device is described in the section entitled Before use When the child safety device is activa...

Page 14: ...the 2 buttons to at the same time 2 Use one of the zones within 10 seconds The light under the symbol in the display will disappear You can disconnect the child safety device permanently as follows 1 Turn the 2 control buttons to and return to 0 2 Turn one of the 2 control buttons immediately to S A F E ...

Page 15: ... the item in question upside down on a work top and positioning a ruler on the base A curved base both inwards and outwards will prolong the cooking time and increase the energy consumption The saucepan should match the cooking zone or be slightly larger Remember that a large saucepan can also hold small quantities If the diameter of the base is too small the energy consumption will increase and a...

Page 16: ... to reduce cleaning and prevents scratching the hob glass Wipe off spills whilst the hob is warm Select the highest setting for the cooking zones until the food is brought to the boil then reduce the setting Use saucepans with an even base An uneven based saucepan may increase the electricity consumption by up to 50 The saucepan should match the cooking zone or be slightly larger Use a tightly fit...

Page 17: ...shguard as shown in the diagram 2 Lift the splashguard straight up 3 Clean the top surface as described in cleaning the steel surface Be aware of the two retaining pegs which are sharp 4 Replace the splashguard in position ENSURE that it is fitted the correct way round Never use hard or sharp implements to lift off the splashguard Do not wash the splashguard in a dishwasher The hob must not be use...

Page 18: ...ramic hob is still hot If the ceramic hob is allowed to cool it may become damaged A dirty ceramic hob decreases the heat transfer between cooking zones and cookware After use the cooking zones should be wiped with a damp cloth with washing up liquid For severe soiling you can follow these steps 1 Remove stains etc with the ceramic hob scraper 2 Make sure that the ceramic hob has cooled down Use a...

Page 19: ...foodstuff containing sugar including natural sugar as these can create permanent pockmarks and craters on the ceramic surface After scraping polish thoroughly with the cleaning agent supplied with the unit Utensils which have been in contact with the above mentioned melted materials must be cleaned throughly before used again on the ceramic top hob unit Defects in the ceramic surface which can be ...

Page 20: ...ry underneath must be at least 47 mm Fixing Screw the fixing brackets out to such an extent that they can be turned in under the work top Tighten the brackets on to the work top with an ordinary screwdriver Cut out measurements One rectangular hole is sawn out for the appliance combination chosen The depth of the cut out for any unit is 490 mm Length of hole sum of all units externally measured le...

Page 21: ...ed moulding which is incorporated in the hob units flanges The units externally measured length 145 mm Cooker hood 290 mm Two zone standard electric hob Two zone ceramic top electric hob Two burner gas hob Grill Fryer Wok 580 mm Four zone ceramic top electric hob Four burner gas hob 725 mm Four zone ceramic top electric hob ...

Page 22: ...o interference with any of the unit s electrical parts The cable is mounted in the pegs as shown Unscrew the cover while connecting the cables A unit led directly to the power point or the outlet rose More units may be connected via one or more junction boxes The cable must be connected via an external switch with a contact separation of at least 3 mm in each pole Please observe these instructions...

Page 23: ...rmity with the lowvoltage directive 73 23 EEC and the EMC directive 89 336 EEC Unpacking Check that the hob has no faults and is undamaged on delivery Transport damage Any damage from transport which you have not carried out yourself must be reported to the retailer within one week of receipt You will find the serial number of the hobs the nameplate Write the serial number on the cover of these op...

Page 24: ...t the same time If the hob is connected to a 10 Amp fuse group the risk of overloading will be considerable The cooking utensils must match the size of the cooking zone Check that the cooking utensils have level bases by holding them against the edge of the work top for example Bring a litre of water to the boil in a saucepan with a lid The cooking zone should be adjusted to the highest setting Th...

Page 25: ... 10 seconds Turn all the control display shows buttons to 0 The zones can now be used S A F E If after all these checks your hob still does not operate correctly contact your local AEG Service Centre In guarantee customers should ensure that the above checks have been made as the engineer will make a charge if the fault is not a mechanical or electrical breakdown Please note that it will be necess...

Page 26: ... 3 Testing the temperature of the oil It is advisable to use a thermometer to test the temperature of the oil Alternatively drop a small cube of bread into oil which should brown in just under a minute if the oil is at the correct temperature or 190 C 4 Cooking the food Lower the food gently into the oil Do not add too much food at once or the temperature of the oil will be reduced and may result ...

Page 27: ...ll affect the flavour setting properties and colour of the jam 6 To test jam for setting If a jam thermometer is available boil the jam to 140 C Marmalade should be boiled to 106 C If no thermometer is available remove the pan from the heat place a sample of jam on a cold dish and cool quickly i e in a freezer or frozen food compartment of a refrigerator When cold and if it is ready it should crin...

Page 28: ...med by authorized service agents or service companies EXCEPTIONS EURO LINE APPLIANCES WILL NOT PAY FOR THE FOLLOWING SERVICE CALLS 1 To install or correct the installation of an appliance 2 To instruct the use of an appliance 3 To replace house fuses re set circuit breakers or correct house wiring 4 To correct house plumbing 5 To clean drains filters or garbage disposers 6 To repair an appliance i...

Page 29: ...km 30 miles or if the travel time is in excess of 30 minutes from the nearest service center Any excess to this will not be covered by the warranty In no event will Euro Line be responsible for incidental or consequential damages For warranty service and parts contact EURO PARTS Service will be provided during normal business hours Should you have a service problem that is not resolved locally con...

Page 30: ..._ Date of purchase __________________ You should also retain the original purchase receipt to support any claim made under the warranty We suggest you staple the receipt to this page If service is required contact the Service Center EURO PARTS CANADA EURO PARTS USA Tel 1 800 678 8352 Tel 1 800 561 4614 Fax 1 519 528 5001 Fax 1 519 528 5001 DISTRIBUTED BY EURO LINE APPLIANCES 2150 WINSTON PARK DRIV...

Page 31: ...________________ ____________ City _______________ Prov __________________ Postal Code ______________ Signature ________________________ ___________ Purchase Date _________ Invoice No ____________ Purchased from ______________________________ RETURN THIS FOR VALIDATION _________________________ EURO LINE APPLIANCES 2150 Winston Park Drive Unit 20 Oakville ON L6H 5V1 _________________________ ...

Page 32: ...32 325 88 6740 Rev 1 113 ...

Reviews: