background image

7

Description of the Appliance

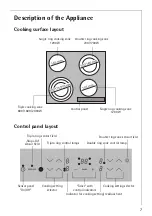
Cooking surface layout


Control panel layout

Triple cooking zone
800/1600/ 2300W

Double ring cooking zone

700/1700W

Single ring cooking zone

1200W

Control panel

Single ring cooking zone

1200W

Cooking setting 

selector

„Stop+Go“

sensor field

Triple-ring sensor field

Sensor panel

”On/Off”

“Timer” with 

control indicators

Double ring zone sensor field

Cooking setting selector

Triple-ring control lamps

Double ring zone control lamp

Indicator for cooking setting/ residual heat

Summary of Contents for 66201 KF-N

Page 1: ...66201 KF N Ceramic hob Installation and Operating Instructions ...

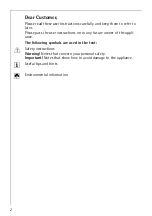
Page 2: ...ase pass the user instructions on to any future owner of the appli ance The following symbols are used in the text 1 Safety instructions Warning Notes that concern your personal safety Important Notes that show how to avoid damage to the appliance 3 Useful tips and hints 2 Environmental information ...

Page 3: ...ecting 10 Keep warm setting 10 Switching the triple ring zone on and off 11 Switching the double ring cooking zone off and on 12 STOP GO function 13 Switching off a cooking zone 14 Residual Heat Indicator 14 Cooking using the automatic warm up function 15 Cooking without the automatic warm up function 16 Child safety lock 17 Timer 19 Uses tables and tips 23 Pans 23 Advice on cooking with and witho...

Page 4: ...4 Installation Instructions 29 Installation proud of the work surface 30 Assembly 31 Warranty conditions 34 Service and Spare Parts 35 ...

Page 5: ... surface or as a storage sur face Additions or modifications to the appliance are not permitted Child safety Small children must be kept away from the appliance Only let older children work on the appliance under supervision General safety The appliance may only be installed and connected by trained regis tered service engineers Built in appliances may only be used after they have built in to suit...

Page 6: ...pliance must be switched off and cooled down For safety reasons the cleaning of the appliance with steam jet or high pressure cleaning equipment is not permitted How to avoid damage to the appliance The ceramic glass can be damaged by objects falling onto it The edge of the ceramic glass can be damaged by being knocked by the cookware Cookware made of cast iron cast aluminium or with damaged bot t...

Page 7: ...ngle ring cooking zone 1200W Control panel Single ring cooking zone 1200W Cooking setting selector Stop Go sensor field Triple ring sensor field Sensor panel On Off Timer with control indicators Double ring zone sensor field Cooking setting selector Triple ring control lamps Double ring zone control lamp Indicator for cooking setting residual heat ...

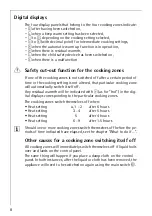
Page 8: ...l automatically switch itself off Any residual warmth will be indicated with h as for hot in the dig ital displays corresponding to the particular cooking zones The cooking zones switch themselves off when 3 Should one or more cooking zones switch themselves off before the pe riods of time indicated have elapsed see the chapter What to do if Other causes for a cooking zone switching itself off All...

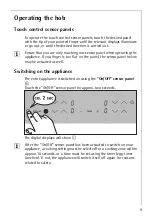
Page 9: ...s too flat on the panel the sensor panel below may be actuated as well Switching on the appliance The entire appliance is switched on using the On Off sensor panel I Touch the On Off sensor panel for approx two seconds The digital displays will show 3 After the On Off sensor panel has been actuated to switch on your appliance a cooking setting must be selected for a cooking zone within approx 10 s...

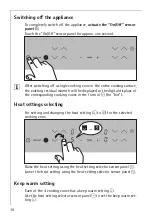
Page 10: ...ayed in the digital displays of the corresponding cooking zones in the form of h for hot Heat settings selecting For setting and changing the heat setting u to Ç for the selected cooking zone Raise the heat setting using the heat setting selector sensor panel Lower the heat setting using the heat setting selector sensor panel Keep warm setting Each of the 4 cooking zones has a keep warm setting u ...

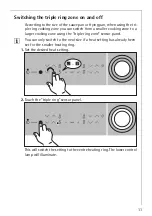
Page 11: ... a smaller cooking zone to a larger cooking zone using the triple ring zone sensor panel 3 You can only switch to the next size if a heat setting has already been set for the smaller heating ring 1 Set the desired heat setting 2 Touch the triple ring sensor panel This will switch the setting to the centre heating ring The lower control lamp will illuminate ...

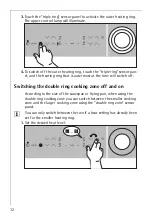
Page 12: ...most at the time will switch off Switching the double ring cooking zone off and on According to the size of the saucepan or frying pan when using the double ring cooking zone you can switch between the smaller cooking zone and the larger cooking zone using the double ring zone sensor panel 3 You can only switch between the two if a heat setting has already been set for the smaller heating ring 1 S...

Page 13: ...tched to the keep warm setting The control light for the Stop Go sensor panel will illuminate The keep warm setting will be indicated in the display with u When the Stop Go sensor panel is actuated again the cooking set tings that were previously selected are reset and the control light goes out 3 The timer is not stopped by the Stop Go function If an automatic warm up function was selected in the...

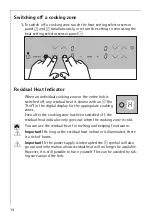
Page 14: ...splay for the appropriate cooking zones Even after the cooking zone has been switched off the residual heat indicator only goes out when the cooking zone is cold 2 You can use the residual heat for melting and keeping food warm 1 Important As long as the residual heat indicator is illuminated there is a risk of burns 1 Important If the power supply is interrupted the h symbol will also go out and ...

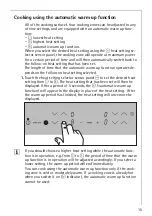
Page 15: ...Touch the heat setting selector sensor panel to set the desired heat setting from to Æ The heat setting that has been set will then be displayed After a period of 5 seconds the a automatic warm up function will appear in the display in place of the heat setting After the warm up period has finished the heat setting will once more be displayed 3 If you should choose a higher heat setting while the ...

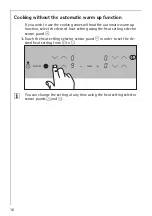
Page 16: ...the automatic warm up function select the desired heat setting using the heat setting selector sensor panel 1 Touch the heat setting selector sensor panel in order to set the de sired heat setting from Ç to 3 You can change the setting at any time using the heat setting selector sensor panels and ...

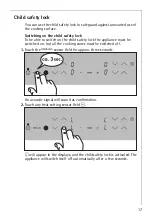
Page 17: ...e child safety lock the appliance must be switched on but all the cooking zones must be switched off 1 Touch the sensor field for approx three seconds An acoustic signal will sound as confirmation 2 Touch any heat setting sensor field l will appear in the displays and the child safety lock is activated The appliance will switch itself off automatically after a few seconds ...

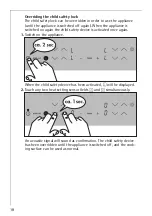
Page 18: ... again the child safety device is activated once again 1 Switch on the appliance When the child safety device has been activated l will be displayed 2 Touch any two heat setting sensor fields and simultaneously An acoustic signal will sound as confirmation The child safety device has been overridden until the appliance is switched off and the cook ing surface can be used as normal ...

Page 19: ...tivated l will be displayed 2 Touch the sensor field for approx three seconds An acoustic signal will sound as confirmation 3 Touch any heat setting sensor field The displays will become dark and the child safety device is switched off The appliance will switch itself off automatically after a few sec onds ...

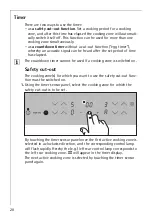
Page 20: ...tdown timer cannot be used if a cooking zone is switched on Safety cut out The cooking zone s for which you want to use the safety cut out func tion must be switched on 1 Using the timer sensor panel select the cooking zone for which the safety cut out is to be set By touching the timer sensor panel once the first active cooking zone is selected in a clockwise direction and the corresponding contr...

Page 21: ...cooking time for any of these cooking zones it must be selected using the timer sensor panel and the corresponding control lamp will then flash rapidly To reset the remaining cooking time the desired cooking zone must be selected using the timer sensor panel The corresponding control lamp will then flash more rapidly The settings are reset using the or timer setting sensor panels After the set per...

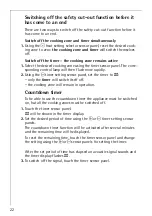
Page 22: ...l set the timer to 00 only the timer will switch itself off the cooking zone will remain in operation Countdown timer To be able to use the countdown timer the appliance must be switched on but all the cooking zones must be switched off 1 Touch the timer sensor panel 00 will be shown in the timer display 2 Set the desired period of time using the or timer setting sensor panels The countdown timer ...

Page 23: ...produce permanent scratching if the pan is slid across the surface When cold pan bases are normal ly bowed slightly inwards con cave They should never be bowed outwards convex If you wish to use special types of pan e g a pressure cooker sim mering pan wok etc please ob serve the manufacturer s instructions 2 Energy saving tips Always position pots and pans before switching on the cooking zone Whe...

Page 24: ...mplings pasta dishes with large amounts of liquid cooking with pressure cookers very large quantities of soup stew with more than 2 litres of liquid General notes When cooking without the automatic warm up function we recom mend the use of a high heat setting to warm up the food using the and then leave the dish to finish cooking at an appropriate lower heat setting Take special note of the result...

Page 25: ...1 min 1 When cooking without the automatic function the warm up period can be individu ally selected Cooking method Examples for use 9 Warming Sautéing Frying Warming large amounts of liquid boiling noodles searing meat browning goulash braising meat 8 4 5 Intensive fry ing Steak sirloin hash browns sausages pancakes griddle cakes 7 3 5 6 2 0 Frying Schnitzel chops liver fish rissoles fried eggs 5...

Page 26: ...ce at an angle 2 Remove residues by sliding the blade over the surface 3 Wipe the appliance with a damp cloth and a little washing up liquid 4 Rub the appliance dry using a clean cloth Scrapers and cleaners for glass ceramic and stainless steel can be purchased in specialist shops 3 Remove stubborn residues with a cleaner for glass ceramic or stainless steel 3 Scratches or dark stains on the glass...

Page 27: ...the fuse in the house wiring fuse box is intact If the fuses trip a number of times please call an authorised electrician the appliance is properly switched on the control lamps in the control panel are illuminated the relevant cooking zone is switched on the cooking zones are set at the desired settings the cooking zones safety switchoff function has been activated see Safety chapter you cannot s...

Page 28: ...s in the elec tronic equipment or for reasons related to safety the appliance is not responding when a sensor panel is actuated The appliance will not respond to a sensor panel being actuated if you are simultaneously touching another sensor panel that is not part of a combination If you request a visit from customer service because of an error made in operating the appliance a visit from a custom...

Page 29: ...nocked off the rings when doors and win dows are opened 1 WARNING Risk of injury from electrical current The electrical mains terminal is live Observe connection schematic Observe electrical safety rules Ensure anti shock protection through correct installation by a quali fied electrician The appliance must be connected to the electrical supply by a quali fied electrician 1 IMPORTANT Risk of injur...

Page 30: ... self adhesive sealing tape supplied all the way round the lower edge of the cooking surface along the outer edge of the glass ceramic panel Do not stretch it The cut ends should lie in the middle of one side When you have cut it to length add a few mm press the two ends flush up against one another Width 590 mm Depth 520mm Height 47mm ...

Page 31: ...31 Assembly ...

Page 32: ...32 ...

Page 33: ...33 ...

Page 34: ...or removable parts of glass or plastic Costs incurred for calls to put right an appliance which is improperly installed or calls to appli ances outside the United Kingdom Appliances found to be in use within a commercial environment plus those which are subject to rental agreements Products of AEG manufacture which are not marketed by AEG European Guarantee If you should move to another country wi...

Page 35: ...ur name address including post code 2 Your telephone number 3 Clear and concise details of the fault 4 The model and serial number of the appliance found on the rating plate 5 The purchase date Please note that a valid purchase re ceipt or guarantee documentation is required for in guarantee service calls Customer Care For general enquiries concerning your AEG appliance or for further in formation...

Page 36: ...Group products such as refrigerators cookers washing machines vacuum cleaners chain saws and lawn mowers are sold each year to a value of approx USD 14 billion in more than 150 countries around the world Hier Typenschild aufkleben nur für Werk AEG Hausgeräte GmbH Postfach 1036 D 90327 Nürnberg http www aeg hausgeraete de Copyright by AEG 822 924 720 A 280104 01 Subject to change without notice ...

Reviews: