background image

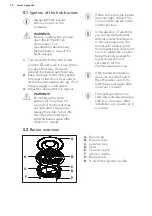
5.1 

Ignition of the hob burners

Always light the burner

before you put on the

cookware.

WARNING!

Be very careful when you use

open fire in the kitchen

environment. The

manufacturer declines any

responsibility in case of the

flame misuse.

1.

Turn the knob for the hob to the
position   and push it down. When

you push the knob, the spark

generator activates automatically.

2.

Keep the knob for the hob pushed

for equal or less than 10 seconds to

let the thermocouple warm up. If not,

the gas supply is interrupted.

3.

Adjust the flame after it is regular.

WARNING!

Do not keep the knob

pushed for more than 10

seconds. If the burner does

not light after 10 seconds,

release the knob, turn it into

the off position and try to

light the burner again after

minimum 1 minute.

If after some tries the burner

does not light, check if the

crown and its cap are in the

correct position.

In the absence of electricity

you can ignite the burner

without an electrical device.

In this case approach the

burner with a flame, push

the relevant knob down and

turn it to maximum position.

Keep the knob pushed for

equal or less than 10

seconds to let the

thermocouple warm up.

If the burner accidentally

goes out, turn the knob to

the off position and try to

light the burner again after

minimum 1 minute.

The spark generator can

start automatically when you

switch on the mains, after

installation or a power cut. It

is normal.

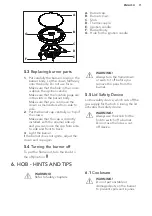
5.2 

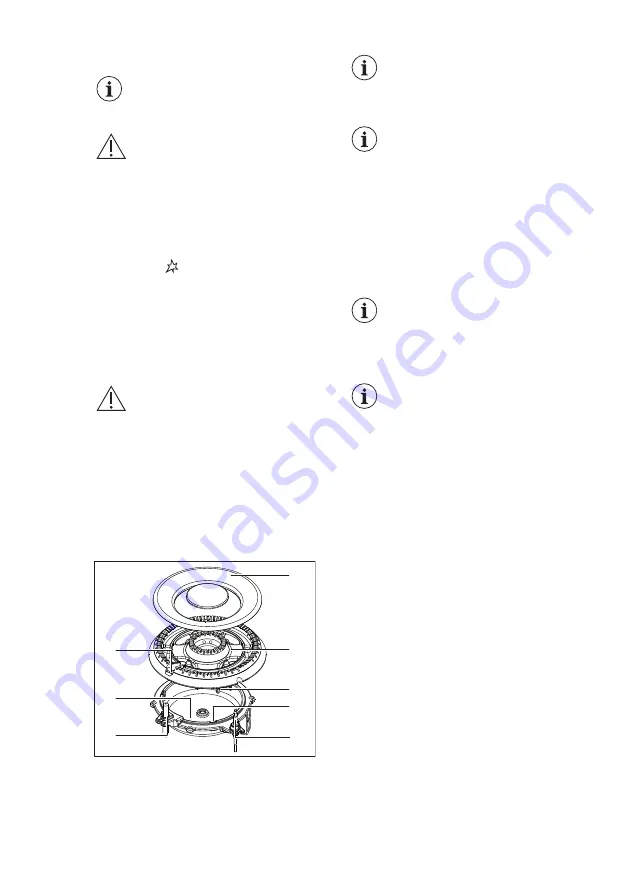
Burner overview

A

B

C

H

G

F

E

D

A.

Burner cap

B.

Burner crown

C.

Location peg

D.

Slots

E.

Thermocouple

F.

Ignition candle

G.

Burner body

H.

Hole for the ignition candle

www.aeg.com

10

Summary of Contents for 948 905 160

Page 1: ...USER MANUAL EN User Manual Cooker CGB6130ACM ...

Page 2: ...few minutes reading to get the very best from it Visit our website for Get usage advice brochures trouble shooter service information www aeg com webselfservice Register your product for better service www registeraeg com Buy Accessories Consumables and Original spare parts for your appliance www aeg com shop CUSTOMER CARE AND SERVICE Always use original spare parts When contacting our Authorised ...

Page 3: ...hazards involved Children between 3 and 8 years of age and persons with very extensive and complex disabilities shall be kept away from the appliance unless continuously supervised Children of less than 3 years of age should be kept away from the appliance unless continuously supervised Do not let children play with the appliance Keep all packaging away from children and dispose of it appropriatel...

Page 4: ...cleaner to clean the appliance Do not use harsh abrasive cleaners or sharp metal scrapers to clean the glass door or the glass of hinged lids of the hob since they can scratch the surface which may result in shattering of the glass Metallic objects such as knives forks spoons and lids should not be placed on the hob surface since they can get hot Remove any spillage from the lid before opening Let...

Page 5: ...ll the appliance in a safe and suitable place that meets installation requirements Parts of the appliance carry current Close the appliance with furniture to prevent touching the dangerous parts The sides of the appliance must stay next to appliances or units with the same height Do not install the appliance adjacent to a door or under a window This prevents hot cookware to fall from the appliance...

Page 6: ...ke sure that the ventilation openings are not blocked Do not let the appliance stay unattended during operation Deactivate the appliance after each use Be careful when you open the appliance door while the appliance is in operation Hot air can release Do not operate the appliance with wet hands or when it has contact with water Do not use the appliance as a work surface or as a storage surface WAR...

Page 7: ... panels can break Replace immediately the door glass panels when they are damaged Contact the Authorised Service Centre Be careful when you remove the door from the appliance The door is heavy Fat and food remaining in the appliance can cause fire Clean regularly the appliance to prevent the deterioration of the surface material Make sure the cavity and the door are wiped dry after each use Steam ...

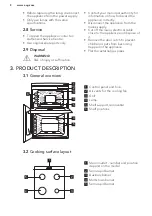
Page 8: ...from the mains supply Cut off the mains electrical cable close to the appliance and dispose of it Remove the door catch to prevent children or pets from becoming trapped in the appliance Flat the external gas pipes 3 PRODUCT DESCRIPTION 3 1 General overview 6 1 1 2 3 4 5 3 2 1 2 4 5 4 5 3 1 Control panel and hob 2 Air vents for the cooling fan 3 Grill 4 Lamp 5 Shelf support removable 6 Shelf posit...

Page 9: ... initial position 4 2 Setting and changing the time You must set the time before you operate the oven When you connect the appliance to the electrical supply or after a power cut flashes Press the or to set the correct time After approximately 5 seconds the flashing stops and the display shows the time of day To change the time press again and again until starts to flash 4 3 Preheating Preheat the...

Page 10: ... off position and try to light the burner again after minimum 1 minute If after some tries the burner does not light check if the crown and its cap are in the correct position In the absence of electricity you can ignite the burner without an electrical device In this case approach the burner with a flame push the relevant knob down and turn it to maximum position Keep the knob pushed for equal or...

Page 11: ...ctly installed with the enamel side up and you can move the cap from side to side and front to back 3 Light the burner If the burner does not ignite adjust the crown and cap again 5 4 Turning the burner off To put the flame out turn the knob to the off position WARNING Always turn the flame down or switch it off before you remove the pans from the burner 5 5 Lid Safety Device Lid has safety device...

Page 12: ...e not resistant to washing in a dishwasher They must be washed by hand 1 Remove the pan supports to easily clean the hob Be very careful when you replace the pan supports to prevent the hob top from damage 2 After you clean the pan supports make sure that they are in correct positions 3 For the burner to operate correctly make sure that the arms of the pan supports are aligned with the centre of t...

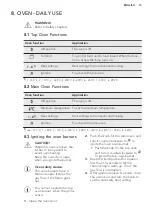
Page 13: ...170 C 3 185 C 4 205 C 5 225 C 6 240 C 7 255 C 8 260 C 8 3 Igniting the oven burners CAUTION When the oven is active the lid has to be opened to avoid over heating Keep the oven door open when you ignite the burner Oven safety device The oven burners have a thermocouple It stops the gas flow if the flame goes out You cannot operate the top oven burner when the grill is active 1 Open the oven door 2...

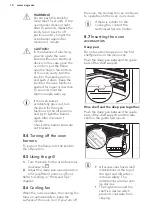
Page 14: ...off position 8 5 Using the grill 1 Turn the knob for the oven functions clockwise to 2 Adjust the deep pan runner position to fit in different portions of food Refer to Grilling in Hints and Tips chapter 8 6 Cooling fan When the oven operates the cooling fan turns on automatically to keep the surfaces of the oven cool If you turn off the oven the cooling fan can continues to operate until the oven...

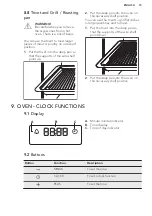
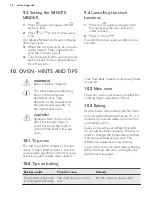
Page 15: ...ep pan into the oven on the necessary shelf position You can use the trivet to grill flat dishes in large quantities and to toast 1 Put the trivet into the deep pan so that the supports of the wire shelf point down 2 Put the deep pan into the oven on the necessary shelf position 9 OVEN CLOCK FUNCTIONS 9 1 Display A B C A Minute minder indicator B Time display C Time of day indicator 9 2 Buttons Bu...

Page 16: ...o avoid this place the food in centre of the shelf in the gas oven 10 1 Top oven The top oven is the smaller of the two ovens It has 3 shelf positions Use it to cook smaller quantities of food It gives especially good results when used to cook fruitcakes sweets and savoury flants or quiche 10 2 Main oven The main oven is particularly suitable for cooking larger quantities of food 10 3 Baking Use t...

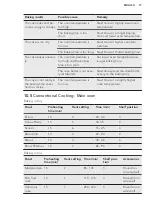
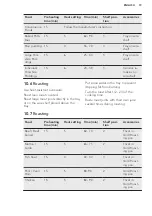
Page 17: ...ke batter is not even ly distributed Next time spread the cake batter evenly on the baking tray The cake is not ready in the baking time speci fied in a recipe The oven temperature is too low Next time set a slightly higher oven temperature 10 5 Conventional Cooking Main oven Baking in tray Food Preheating time min Heat setting Time min Shelf position Éclairs 15 4 20 30 3 Choux Pastry 15 5 30 35 3...

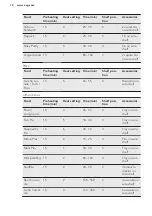
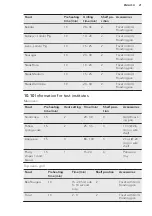
Page 18: ...lans 15 5 45 55 4 Round tin on wire shelf Other dishes Food Preheating time min Heat setting Time min Shelf posi tion Accessories Pasta Lasagne etc 15 4 35 45 3 Tray on wire shelf Fish Pie 15 5 30 40 3 Tray on wire shelf Shepherd s Pie 15 6 40 50 3 Tray on wire shelf Mince Pies 15 4 15 25 3 Tins on wire shelf Meat Pies 15 1 30 40 3 Tray on wire shelf Milk pudding 15 2 90 120 3 Tray on wire shelf S...

Page 19: ...st large meat joints directly in the tray or on the wire shelf placed above the tray Put some water in the tray to prevent dripping fat from burning Turn the roast after 1 2 2 3 of the cooking time Baste meat joints with their own juice several times during roasting 10 7 Roasting Food Preheating time min Heat setting Time min Shelf posi tion Accessories Beef Beef boned 15 5 60 70 2 Trivet in Grill...

Page 20: ... position as recommended in the grilling table Always set the deep pan to collect the fat into the first shelf position Grill only flat pieces of meat or fish The grilling area is set in centre of the shelf 10 9 Grilling Full Grill Food Preheating time min Grilling time min Shelf po sition Accessories Bacon 10 20 30 2 Trivet in Grill Roasting pan Chicken joints 10 30 40 2 Trivet in Grill Roasting ...

Page 21: ...one 10 20 30 2 Trivet in Grill Roasting pan 10 10 Information for test institutes Main oven Food Preheating time min Heat setting Time min Shelf posi tion Accessories Small cake 15 2 20 30 4 Grill Roast ing pan Fatless sponge cake 15 2 25 35 3 1 tin Ø 26 cm on wire shelf Apple pie 15 3 80 100 3 2 tins Ø 20 cm on wire shelf Pastry stripes short bread 15 1 15 20 4 Patisserie tray Top oven grill Food...

Page 22: ... control panel with the same precautions 11 3 Catalytic cleaning CAUTION Do not clean the catalytic surface with oven sprays abrasive cleaning agents soap or other cleaning agents This will damage the catalytic surface Spots or discolouration of the catalytic surface have no effect on catalytic properties WARNING Keep children away when you clean the oven at a high temperature The oven surface bec...

Page 23: ...ples you see in the image The number of glasses can also be different 1 Open the door 2 Hold the door trim on the top edge of the door at the two sides and push inwards to release the clip seal 1 2 1 3 Pull the door trim to the front to remove it 4 Remove the glass panels To install the panels do the same steps in reverse 11 6 Removing and cleaning the door glasses main oven The door glass in your...

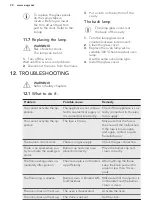
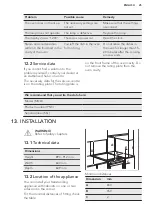
Page 24: ...o an electrical supply or it is connected incorrectly Check if the appliance is cor rectly connected to the elec trical supply You cannot activate the ap pliance The fuse is blown Make sure that the fuse is the cause of the malfunction If the fuse is blown again and again contact a quali fied electrician The burners do not work There is no gas supply Check the gas connection There is no spark when...

Page 25: ...on to the problem yourself contact your dealer or an Authorised Service Centre The necessary data for the service centre is on the rating plate The rating plate is on the front frame of the oven cavity Do not remove the rating plate from the oven cavity We recommend that you write the data here Model MOD Product number PNC Serial number S N 13 INSTALLATION WARNING Refer to Safety chapters 13 1 Tec...

Page 26: ...m from the appliance top surface then measure right 30 mm 2 Mark the position of the wall and this gives anchor point for the stability chain 30 mm 180 mm 13 5 Other technical data WARNING These instructions are only valid in the countries whose symbols appear on this booklet s cover Gas category I2H Gas supply G20 2H 20 mbar Voltage 220 240 V Frequency 50 Hz 13 6 Gas burners BURNER NORMAL POWER k...

Page 27: ...let gas pipe is fitted i e do not use the P T F E sealant tape When the installation is complete carry out a gas tightness test and make sure that the seal of each pipe fitting does not leak Use flexible tubing which comply with the BS 669 current edition A B C C D E WARNING The gas bayonet connector must be in the marked area Dimension mm A 250 B 680 C 50 D 250 E 580 13 8 Pressure test The Rapid ...

Page 28: ... the knob on 13 12 Electrical installation WARNING The manufacturer is not responsible if you do not follow the safety precautions from Safety chapters This appliance is supplied with a main plug and a main cable The spark generator is active all the time if the phases are not connected correctly WARNING The power cable must not touch the part of the appliance shaded in the illustration 14 ENERGY ...

Page 29: ...h cycle 4 86 MJ cycle Main oven 1 80 kWh cycle 6 46 MJ cycle Number of cavities 2 Heat source Gas Volume Top oven 36 l Main oven 83 l Type of oven Oven inside Freestanding Cooker Mass 62 6 kg EN 15181 Measuring method of the energy consumption of gas fired ovens 14 4 Oven Energy saving The oven contains features which help you save energy during everyday cooking General hints Make sure that the ov...

Page 30: ...5 ENVIRONMENTAL CONCERNS Recycle materials with the symbol Put the packaging in relevant containers to recycle it Help protect the environment and human health by recycling waste of electrical and electronic appliances Do not dispose of appliances marked with the symbol with the household waste Return the product to your local recycling facility or contact your municipal office www aeg com 30 ...

Page 31: ...ENGLISH 31 ...
Page 32: ...www aeg com shop 867338483 B 502018 ...

Reviews: