background image

A18FCS68

Original instructions

Summary of Contents for A18FCS68

Page 1: ...A18FCS68 Original instructions ...

Page 2: ...Important It is essential that you read the instructions in this manual before assembling operating and maintaining the product 6XEMHFW WR WHFKQLFDO PRGL FDWLRQV ...

Page 3: ...Rafter hook Handle insulated gripping surface Front handle Spindle lock button Dust pipe joint Lower guard handle Bevel adjustment knob Edge guide fence Outer flange Blade screw Blade Depth adjustment lock lever Battery port Hex key ...

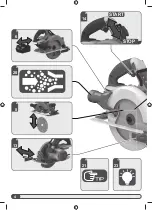
Page 4: ...4 6 20 8 13 14 START STOP 21 23 ...

Page 5: ...5 18 24 10 12 16 18 90 22 ...

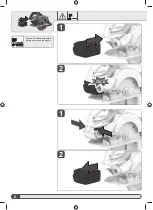
Page 6: ...6 1 1 1 1 1 2 1 2 click 1 Remove the battery pack before starting any work on the product ...

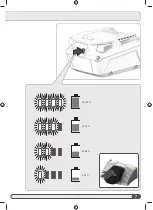
Page 7: ...7 75 100 50 75 25 50 0 25 ...

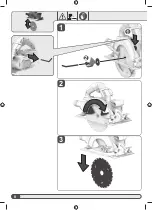
Page 8: ...8 1 2 3 1 2 1 ...

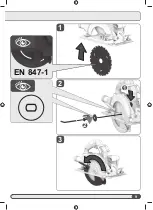
Page 9: ...9 1 2 3 1 2 EN 847 1 ...

Page 10: ...10 1 2 0 65 mm Adjust the cutting depth to the thickness of the workpiece Less than a full tooth of the blade teeth should be visible below the workpiece ...

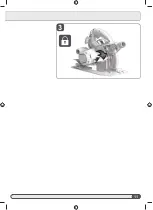
Page 11: ...11 3 ...

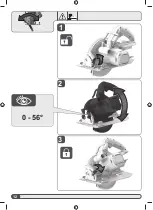
Page 12: ...12 1 2 3 0 56 1 ...

Page 13: ...13 1 2 3 1 1 2 2 0 18 cm 45 0 ...

Page 14: ...14 2 START STOP 1 RU VDIHW UHDVRQV WKLV SRZHU WRRO LV WWHG ZLWK D VZLWFK ORFN DQG WKH 2Q 2ႇ VZLWFK FDQQRW EH ORFNHG LQ WKH Ä2Q SRVLWLRQ ...

Page 15: ...15 Handle insulated gripping surface ...

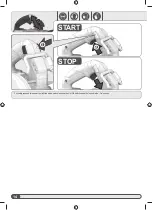
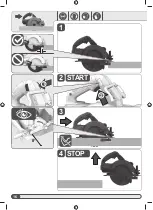
Page 16: ...16 1 1 1 1 3 4 2 START STOP 2 0 1 1 ...

Page 17: ...17 1 2 4 5 3 START 2 1 0 0 STOP 2 1 1 ...

Page 18: ...18 90 1 1 2 3 90 0 0 1 I D FRUUHFWLRQ RI WKH DQJOH RI WKH JXLGH SODWH to the saw blade is necessary use the correction screw ...

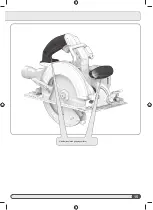
Page 19: ...19 1 4 ...

Page 20: ...20 1 2 2 1 3 ø 30 mm 1 Always connect the dust pipe joint to the circular saw before using Always connect the vacuum attachment to a standard vacuum hose ...

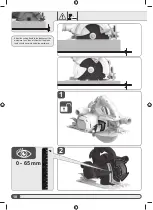
Page 21: ...21 max 65 mm 65 mm ...

Page 22: ...22 2 1 1 ...

Page 23: ...23 ...

Page 24: ...24 1 2 1 1 1 1 2 1 3 2 1 3 1 ...

Page 25: ...NSLHFH The guard cannot protect you from the blade below the workpiece GMXVW WKH FXWWLQJ GHSWK WR WKH WKLFNQHVV RI WKH ZRUNSLHFH Less than a full tooth of the blade teeth should be visible below the workpiece 1HYHU KROG WKH ZRUNSLHFH LQ RXU KDQGV RU DFURVV RXU OHJ ZKLOH FXWWLQJ 6HFXUH WKH ZRUNSLHFH WR D VWDEOH SODWIRUP It is important to support the work properly to minimise body exposure blade bi...

Page 26: ...e it is still stalled as doing so could trigger a sudden recoil with a high reactive force Determine why the product stalled and rectify this paying heed to the safety instructions Remove the battery pack before starting any work on the product Ambient temperature range for tool during operation is between 0 C DQG Ambient temperature range for tool storage is between 0 C and The recommended ambien...

Page 27: ...l and order the drawing at your local service agents or directly at 7HFKWURQLF QGXVWULHV XVWUDOLD 3W WG 32 R 0RXQW DYHUOH 9 7HO QR Australia 7HFKWURQLF QGXVWULHV 1 LPLWHG 32 R 3HQURVH 8 1 7HO QR 3 5 New Zealand MAINTENANCE 8VH RQO DFFHVVRULHV DQG VSDUH SDUWV 6KRXOG FRPSRQHQWV that have not been described need to be replaced contact one RI RXU VHUYLFH DJHQWV VHH RXU OLVW RI JXDUDQWHH VHUYLFH addres...

Page 28: ...verley VIC 3149 Australia Techtronic Industries N Z Limited Unit C 70 Business Parade South Highbrook Auckland 2013 New Zealand www aegpowertools com au www aegpowertools co nz AEG is a registered trade mark used under license from AB Electrolux publ 961096824 01B ...

Reviews: