background image

• This product contains a light source of

energy efficiency class G.

• Concerning the lamp(s) inside this

product and spare part lamps sold

separately: These lamps are intended

to withstand extreme physical

conditions in household appliances,

such as temperature, vibration,

humidity, or are intended to signal

information about the operational

status of the appliance. They are not

intended to be used in other

applications and are not suitable for

household room illumination.

2.5 Care and cleaning

WARNING!

Risk of injury or damage to

the appliance.

• Before maintenance, deactivate the

appliance and disconnect the mains

plug from the mains socket.

• This appliance contains hydrocarbons

in the cooling unit. Only a qualified

person must do the maintenance and

the recharging of the unit.

• Regularly examine the drain of the

appliance and if necessary, clean it. If

the drain is blocked, defrosted water

collects in the bottom of the

appliance.

2.6 Service

• To repair the appliance contact the

Authorised Service Centre. Use

original spare parts only.

• Please note that self-repair or non-

professional repair can have safety

consequences and might void the

guarantee.

• The following spare parts will be

available for 7 years after the model

has been discontinued: thermostats,

temperature sensors, printed circuit

boards, light sources, door handles,

door hinges, trays and baskets.

Please note that some of these spare

parts are only available to

professional repairers, and that not all

spare parts are relevant for all

models.

• Door gaskets will be available for 10

years after the model has been

discontinued.

2.7 Disposal

WARNING!

Risk of injury or suffocation.

• Disconnect the appliance from the

mains supply.

• Cut off the mains cable and discard it.

• Remove the door to prevent children

and pets to be closed inside of the

appliance.

• The refrigerant circuit and the

insulation materials of this appliance

are ozone-friendly.

• The insulation foam contains

flammable gas. Contact your

municipal authority for information on

how to discard the appliance

correctly.

• Do not cause damage to the part of

the cooling unit that is near the heat

exchanger.

3. INSTALLATION

WARNING!

Refer to Safety chapters.

ENGLISH

73

Summary of Contents for ADT2304

Page 1: ...USER MANUAL DE Benutzerinformation 2 Kühl Gefrierschrank FR Notice d utilisation 24 Réfrigérateur congélateur IT Istruzioni per l uso 46 Frigo Congelatore EN User Manual 69 Fridge Freezer ADT2304 ...

Page 2: ...en nicht vorhanden sind Bitte nehmen Sie sich ein paar Minuten Zeit um das Beste aus ihm herauszuholen Besuchen Sie uns auf unserer Website um Anwendungshinweise Prospekte Informationen zu Fehlerbehebung Service und Reparatur zu erhalten www aeg com support Registrieren Sie Ihr Produkt um einen erstklassigen Service zu erhalten www registeraeg com Um Zubehör Verbrauchsmaterial und Original Ersatzt...

Page 3: ...tändige Person beaufsichtigt werden oder von dieser Person Anweisungen erhalten haben wie das Gerät sicher zu bedienen ist und welche Gefahren bei nicht ordnungsgemäßer Bedienung bestehen Kinder zwischen 3 und 8 Jahren dürfen das Gerät be und entladen vorausgesetzt sie wurden ordnungsgemäß eingewiesen Dieses Gerät kann von Personen mit schweren und komplexen Behinderungen benutzt werden vorausgese...

Page 4: ...nen und zugängliche Ablaufsysteme Lagern Sie rohes Fleisch und Fisch in geeigneten Behältern im Kühlschrank so dass sie nicht mit anderen Lebensmitteln in Berührung kommen oder auf diese tropfen WARNUNG Halten Sie die Lüftungsöffnungen im Gerätegehäuse oder in der Einbaunische frei von Hindernissen WARNUNG Versuchen Sie nicht den Abtauvorgang durch andere als vom Hersteller empfohlene mechanische ...

Page 5: ...ndschuhe und festes Schuhwerk Stellen Sie sicher dass die Luft um das Gerät zirkulieren kann Warten Sie nach der Montage oder dem Wechsel des Türanschlags mindestens 4 Stunden bevor Sie das Gerät an die Stromversorgung anschließen So kann das Öl in den Kompressor zurückfließen Ziehen Sie den Stecker aus der Steckdose bevor Sie am Gerät arbeiten z B Wechsel des Türanschlags Stellen Sie das Gerät ni...

Page 6: ...rhanden sind Lüften Sie den Raum Achten Sie darauf dass keine heißen Gegenstände auf die Kunststoffteile des Geräts gelangen Geben Sie keine Softdrinks in das Gefrierfach Dadurch entsteht Druck auf den Getränkebehälter Lagern Sie keine brennbaren Gase und Flüssigkeiten im Gerät Platzieren Sie keine entflammbaren Produkte oder Gegenstände die mit entflammbaren Produkten benetzt sind im Gerät auf de...

Page 7: ...em Auslauf des Modells 7 Jahre lang vorgehalten Thermostate Temperatursensoren Platinen Lichtquellen Lichtquellen Türscharniere Backbleche und Körbe Bitte beachten Sie dass einige dieser Ersatzteile nur an Reparaturbetriebe geliefert werden können und nicht alle Ersatzteile für alle Modelle relevant sind Türdichtungen sind innerhalb von 10 Jahren nach Produkteinstellung des Modells erhältlich 2 7 ...

Page 8: ...ms für die Zirkulation der Kühlluft Platzbedarf insgesamt während des Betriebs H2 mm 1534 W3 mm 750 D3 mm 1123 Höhe Breite und Tiefe des Geräts einschließlich Griff plus des notwendigen Freiraums für die Zirkulation der Kühlluft zuzüglich des Platzes der notwendig ist um eine Türöffnung bis zu dem minimalen Winkel zu ermöglichen der die Entfernung der gesamten Innenausstattung erlaubt 3 2 Aufstell...

Page 9: ... und Geräteseite mit den Scharnieren ein damit sich die Tür weit genug öffnen lässt um die Innenausstattung herauszunehmen z B für die Reinigung Dieses Gerät ist für den Einsatz bei einer Umgebungstemperatur von 10 C bis 38 C vorgesehen Der ordnungsgemäße Betrieb des Geräts wird nur innerhalb des angegebenen Temperaturbereichs gewährleistet Wenn Sie Zweifel bezüglich der Installation des Geräts ha...

Page 10: ... oberen Türscharniers Stützen Sie die obere Tür mit Ihrer Hand ab Entfernen Sie das obere Scharnier drehen Sie es um bringen Sie die Schrauben und den Stift daran an Legen Sie das Scharnier beiseite 1 2 3 5 Heben Sie die obere Tür vorsichtig aus dem mittleren Scharnier um sie zu entfernen Legen Sie die obere Tür auf eine weiche Fläche Achten Sie darauf keine Unterlegscheiben zu verlieren die an de...

Page 11: ... Geräts und am Boden zu vermeiden 12 Entfernen Sie die beiden Schraubfüße und lösen Sie die Schrauben des unteren Scharniers 13 Bringen Sie das untere Scharnier umgedreht auf der gegenüberliegenden Seite mit den Schrauben an und schrauben Sie die Schraubfüße an 14 Setzen Sie das Loch der unteren Tür auf den Stift des unteren Scharniers Ziehen Sie die Schrauben fest 15 Bringen Sie das mittlere Scha...

Page 12: ...ringen Sie die Türausstattung an Warten Sie mindestens 4 Stunden bevor Sie das Gerät an das Stromnetz anschließen 4 BETRIEB 4 1 Bedienfeld 3sec 4 6 8 2 C 1 2 3 1 2 3 1 Temperaturanzeige 2 Anzeige Super Freeze 3 Einstellknopf 4 2 Einschalten Stecken Sie den Stecker in die Wandsteckdose 4 3 Ausschalten Schalten Sie das Gerät durch Ziehen des Netzsteckers aus der Steckdose aus 4 4 Temperaturregelung ...

Page 13: ... 24 Stunden bevor Sie die einzufrierenden Lebensmittel in das Gefrierfach hinein legen ein Halten Sie zum Einschalten der Super Freeze Funktion die Einstelltaste 3 Sekunden gedrückt Die Anzeige Super Freeze blinkt Diese Funktion endet automatisch nach 52 Stunden Sie können die Super Freeze Funktion vor Ihrer automatischen Abschaltung ausschalten Halten Sie dazu die Einstelltaste 3 Sekunden gedrück...

Page 14: ... Sie Lebensmittel in das Fach legen Lagern Sie die Lebensmittel mit einem Mindestabstand zur Tür von 15 mm VORSICHT Kam es zum Beispiel durch einen Stromausfall der länger dauerte als der auf dem Typenschild angegebene Wert siehe Lagerzeit bei Störung zu einem ungewollten Abtauen dann müssen die aufgetauten Lebensmittel sehr rasch verbraucht oder sofort gekocht und nach dem Abkühlen erneut eingefr...

Page 15: ... eine gute Qualität zu bewahren Besonders Obst und Gemüse sollte nach der Ernte eingefroren werden um alle Nährstoffe zu erhalten Frieren Sie keine Flaschen oder Dosen mit Flüssigkeiten insbesondere kohlensäurehaltige Getränke ein die Gefäße können beim Einfrieren explodieren Geben Sie keine heißen Lebensmittel in den Gefrierraum Vergewissern Sie sich dass sie auf Raumtemperatur abgekühlt sind bev...

Page 16: ...formationen auf der Verpackung 6 5 Lagerdauer im Gefrierfach Lebensmittel Lagerdauer Mona te Brot 3 Früchte außer Zitrusfrüchten 6 12 Gemüse 8 10 Reste ohne Fleisch 1 2 Molkereiprodukte Butter Weichkäse z B Mozzarella Hartkäse z B Parmesan Cheddar 6 9 3 4 6 Meeresfrüchte Fetthaltiger Fisch z B Lachs Makrele Fettarmer Fisch z B Dorsch Flunder Shrimps Muscheln und Miesmuscheln ohne Schale Gekochter ...

Page 17: ...d empfohlen exotische Früchte wie Bananen Mangos Papayas usw nicht im Kühlschrank aufzubewahren Gemüse wie Tomaten Kartoffeln Zwiebeln und Knoblauch sollten nicht im Kühlschrank aufbewahrt werden Butter und Käse Diese sollten stets in luftdichten Behältern verpackt sein oder in Aluminiumfolie bzw in Polyäthylenbeutel eingepackt werden um so wenig Luft wie möglich in der Verpackung zu haben Flasche...

Page 18: ...kühlen Ort VORSICHT Ein Temperaturanstieg der gefrorenen Lebensmittelpakete während des Abtauens kann deren Haltbarkeitsdauer verkürzen Berühren Sie gefrorene Lebensmittel nicht mit nassen Händen Die Hände können an den Lebensmitteln festfrieren 3 Entnehmen Sie die Eisschale 4 Lassen Sie die Tür offen Schützen Sie den Boden vor dem Abtauwasser z B mit einem Tuch oder einem flachen Behälter 5 Stell...

Page 19: ...er Kompressor arbeitet ständig Die Temperatur ist falsch eingestellt Siehe Kapitel Betrieb Es wurden viele Lebensmit tel gleichzeitig hineingelegt Warten Sie einige Stunden und prüfen Sie erneut die Temperatur Die Raumtemperatur ist zu hoch Siehe Kapitel Montage Die Lebensmittel die im Ge rät aufbewahrt werden wa ren zu warm Lassen Sie die Lebensmittel vor deren Aufbewahrung auf Raumtemperatur abk...

Page 20: ...erpacken Sie die Lebens mittel besser Die Temperatur ist falsch eingestellt Siehe Kapitel Betrieb Das Gerät ist voll von Le bensmitteln und auf die nied rigste Temperatur einge stellt Stellen Sie eine höhere Temperatur ein Siehe Kapi tel Betrieb Die Temperatur im Gerät ist zu niedrig und die Umge bungstemperatur ist zu hoch Stellen Sie eine höhere Temperatur ein Siehe Kapi tel Betrieb Wasser fließ...

Page 21: ...och Die Temperatur ist nicht rich tig eingestellt Stellen Sie eine höhere nied rigere Temperatur ein Die Tür ist nicht richtig ge schlossen Siehe Abschnitt Schließen der Tür Die Temperatur der Lebens mittel ist zu hoch Lassen Sie die Lebensmittel auf Raumtemperatur abküh len bevor Sie diese in das Kühlgerät legen Viele Lebensmittel werden gleichzeitig in das Kühlgerät gelegt Legen Sie weniger Lebe...

Page 22: ...chen Daten befinden sich auf dem Typenschild innen im Gerät sowie auf der Energieplakette Spannung 220 240 V Frequenz 50 Hz 11 INFORMATIONEN FÜR PRÜFINSTITUTE Die Installation und die Vorbereitung des Geräts für eine eventuelle EcoDesign Prüfung müssen mit EN 62552 übereinstimmen Die Lüftungsanforderungen die Einbaunische und die Mindestabstände sind in dieser Bedienungsanleitung in Kapitel 3 besc...

Page 23: ...e Garantieleistung entfällt bei Nichtbeachtung der Gebrauchsanweisung und Betriebsvorschriften unsachgerechter Installation sowie bei Beschädigung durch äussere Einflüsse höhere Gewalt Eingriffe Dritter und Verwendung von Nicht Original Teilen 13 UMWELTTIPPS Recyceln Sie Materialien mit dem Symbol Entsorgen Sie die Verpackung in den entsprechenden Recyclingbehältern Recyceln Sie zum Umwelt und Ges...

Page 24: ...in d utiliser au mieux votre appareil Consultez notre site pour Obtenir des conseils d utilisation des brochures un dépanneur des informations sur le service et les réparations www aeg com support Enregistrer votre produit pour un meilleur service www registeraeg com Acheter des accessoires consommables et pièces de rechange d origine pour votre appareil www aeg com shop SERVICE ET ASSISTANCE À LA...

Page 25: ...s enfants de 3 à 8 ans peuvent charger et décharger l appareil à condition qu ils aient reçu des instructions appropriées Cet appareil peut être utilisé par des personnes souffrant de handicaps très importants et complexes à condition qu elles aient reçu des instructions appropriées Les enfants de moins de 3 ans doivent être tenus à l écart de l appareil à moins d être surveillés en permanence Vei...

Page 26: ...s dans l enceinte de l appareil ou la structure intégrée ne soient pas obstrués AVERTISSEMENT N utilisez aucun dispositif mécanique ou autre pour accélérer le processus de dégivrage outre ceux recommandés par le fabricant AVERTISSEMENT Veillez à ne pas endommager le circuit réfrigérant AVERTISSEMENT N utilisez pas d appareils électriques à l intérieur des compartiments de conservation des aliments...

Page 27: ...sson N exposez pas l appareil à la pluie N installez pas l appareil dans un endroit exposé à la lumière directe du soleil N installez pas l appareil dans une pièce trop humide ou trop froide Lorsque vous déplacez l appareil veillez à le soulever par l avant pour éviter d érafler le sol 2 2 Branchement électrique AVERTISSEMENT Risque d incendie ou d électrocution AVERTISSEMENT Lorsque vous installe...

Page 28: ...n emballage adapté au contact avec des aliments avant de les placer dans le compartiment congélateur 2 4 Éclairage interne AVERTISSEMENT Risque d électrocution Ce produit contient une source lumineuse de classe d efficacité énergétique G Concernant la les lampe s à l intérieur de ce produit et les lampes de rechange vendues séparément Ces lampes sont conçues pour résister à des conditions physique...

Page 29: ...ise au rebut AVERTISSEMENT Risque de blessure ou d asphyxie Débranchez l appareil de l alimentation électrique Coupez le câble d alimentation et mettez le au rebut Retirez la porte pour empêcher les enfants et les animaux de s enfermer dans l appareil Le circuit frigorifique et les matériaux d isolation de cet appareil préservent la couche d ozone La mousse isolante contient un gaz inflammable Con...

Page 30: ... refroidissement Espace total requis en service H2 mm 1534 W3 mm 750 D3 mm 1123 hauteur largeur et profondeur de l appareil avec la poignée plus l espace nécessaire pour la libre circulation de l air de refroidissement plus l espace nécessaire pour autoriser l ouverture de la porte à l angle minimal permettant le retrait de tous les équipements internes 3 2 Emplacement Cet appareil n est pas desti...

Page 31: ... retirer les accessoires intérieurs par exemple pour le nettoyage Cet appareil est destiné à être utilisé à une température ambiante comprise entre 10 C et 38 C Seul le respect de la plage de températures spécifiée peut garantir un bon fonctionnement de l appareil En cas de doute concernant l emplacement d installation de l appareil veuillez contacter le vendeur notre service après vente ou le ser...

Page 32: ...enez la porte supérieure avec votre main Enlevez la charnière supérieure retournez la vissez les vis et la goupille dessus Mettez la charnière de côté 1 2 3 5 Soulevez délicatement la porte supérieure de la charnière du milieu pour la retirer Placez la porte supérieure sur une surface souple Faites attention à ne pas perdre les rondelles qui peuvent rester sur la porte 6 Dévissez la vis B et le bu...

Page 33: ...re en plaçant l orifice de la porte inférieure sur la goupille de la charnière inférieure Serrez les vis 15 Installez la charnière du milieu sur le côté gauche de l appareil en inversant sa position initiale 16 Placez l orifice supérieur de la porte inférieure sur la goupille de la charnière du milieu Serrez les vis 17 Installez la porte supérieure en plaçant l orifice inférieur de la porte sur la...

Page 34: ...4 Réglage de la température Pour régler la température appuyez plusieurs fois sur la touche de commande jusqu à obtenir la température souhaitée La température recommandée est de 4 C pour le réfrigérateur La plage de température peut varier entre 2 C et 8 C pour le réfrigérateur Choisissez le réglage en tenant compte du fait que la température à l intérieur de l appareil dépend de plusieurs facteu...

Page 35: ... 5 UTILISATION QUOTIDIENNE 5 1 Retrait et installation du balconnet de porte Pour retirer le balconnet de porte 1 Tenez le côté gauche du balconnet 2 Soulevez le côté droit du balconnet jusqu à ce qu il se libère de la fixation 3 Soulevez le côté gauche du balconnet et enlevez le Pour remettre le balconnet 1 Placez le balconnet à plat sur la porte 2 Poussez en même temps les deux côtés du balconne...

Page 36: ...écongelés ou cuisez les immédiatement puis laissez les refroidir avant de les recongeler 5 6 Décongélation Avant utilisation les aliments surgelés ou congelés peuvent être décongelés dans le compartiment réfrigérateur ou à température ambiante en fonction du temps disponible pour cette opération Les petites portions peuvent même être cuites sans décongélation préalable dans ce cas la cuisson durer...

Page 37: ...us leurs nutriments Ne congelez pas des bouteilles ou des canettes avec des liquides en particulier des boissons contenant du dioxyde de carbone elles pourraient exploser pendant la congélation N introduisez pas d aliments chauds dans le compartiment du congélateur Laissez les refroidir à température ambiante avant de les placer dans le compartiment Pour éviter d augmenter la température des alime...

Page 38: ...artiellement ne les recongelez pas Consommez les dès que possible Respectez la date d expiration et les informations de conservation sur l emballage 6 5 Durée de conservation pour le compartiment du congélateur Type d aliment Durée de conserva tion mois Pain 3 Fruits sauf agrumes 6 12 Légumes 8 10 Restes sans viande 1 2 Produits laitiers Beurre Fromage à pâte molle p ex mozzarella Fromage à pâte d...

Page 39: ...é et placez la sur l étagère en verre au dessus du bac à légumes Ne conservez la viande que 1 ou 2 jours au plus Fruits et légumes nettoyez soigneusement retirez la terre et placez les dans un bac spécial bac à légumes Il est conseillé de ne pas conserver les fruits exotiques tels que les bananes les mangues les papayes etc dans le réfrigérateur Les légumes tels que les tomates les pommes de terre...

Page 40: ...ranchez la fiche de la prise secteur 2 Sortez les denrées congelées enveloppez les dans plusieurs couches de papier journal et conservez les dans un endroit frais ATTENTION Une élévation de la température des denrées congelées pendant le dégivrage peut réduire leur durée de conservation Ne touchez pas les produits surgelés avec les mains humides Risque de gelures de la peau des mains au contact av...

Page 41: ...t Vérifiez que l appareil est stable Le compresseur fonctionne en permanence La température est mal ré glée Se reporter au chapitre Fonctionnement Trop d aliments ont été intro duits simultanément Attendez quelques heures et vérifiez de nouveau la tem pérature La température ambiante est trop élevée Reportez vous au chapitre Installation Les aliments placés dans l appareil étaient trop chauds Lais...

Page 42: ...x les ali ments La température est mal ré glée Se reporter au chapitre Fonctionnement L appareil est complètement chargé et réglé sur la tempé rature la plus basse Sélectionnez une températu re plus élevée Se reporter au chapitre Fonctionne ment La température réglée dans l appareil est trop basse et la température ambiante est trop élevée Sélectionnez une températu re plus élevée Se reporter au c...

Page 43: ...empératu re plus élevée plus basse La porte n est pas correcte ment fermée Reportez vous à la section Fermeture de la porte La température des aliments est trop élevée Laissez les aliments refroidir à température ambiante avant de les conserver Trop d aliments ont été con servés simultanément Conservez moins de pro duits en même temps L épaisseur du givre est su périeure à 4 5 mm Dégivrez l appare...

Page 44: ...sion 220 240 V Fréquence 50 Hz 11 INFORMATIONS POUR LES LABORATOIRES D ESSAIS L installation et la préparation de l appareil pour une vérification EcoDesign doivent être conformes à la norme EN 62552 Les exigences en matière de ventilation les dimensions des évidements et les dégagements arrière minimum doivent correspondre aux indications du chapitre 3 de cette notice d utilisation Veuillez conta...

Page 45: ...sont pas valables en cas d intervention d un tiers non autorisé de l emploi de pièces de rechange non originales d erreurs de maniement ou d installation dues à l inobser vation du mode d emploi et pour des dommages causés par des influences extérieures ou de force majeure 13 EN MATIÈRE DE PROTECTION DE L ENVIRONNEMENT Recyclez les matériaux portant le symbole Déposez les emballages dans les conte...

Page 46: ...assimo dal vostro elettrodomestico Visitate il nostro sito web per Ricevere consigli scaricare i nostri opuscoli eliminare eventuali anomalie ottenere informazioni sull assistenza e la riparazione www aeg com support Per registrare il vostro prodotto e ricevere un servizio migliore www registeraeg com Acquistare accessori materiali di consumo e ricambi originali per la vostra apparecchiatura www a...

Page 47: ...curezza dell apparecchiatura e se hanno compreso i rischi coinvolti I bambini di età compresa fra i 3 e gli 8 anni possono caricare e scaricare l apparecchiatura a condizione che siano stati istruiti debitamente Quest apparecchiatura può essere usata da persone con disabilità diffuse e complesse a condizione che siano state istruite debitamente Tenere i bambini al di sotto dei 3 anni lontani dall ...

Page 48: ...e che le aperture di ventilazione sia sull apparecchiatura che nella struttura da incasso siano libere da ostruzioni AVVERTENZA Non usare dispositivi elettrici o altri mezzi artificiali non raccomandati dal produttore allo scopo di accelerare il processo di sbrinamento AVVERTENZA Non danneggiare il circuito refrigerante AVVERTENZA Non utilizzare apparecchiature elettriche all interno dei comparti ...

Page 49: ...ta togliere la spina dalla presa di corrente Non installare l apparecchiatura in prossimità di radiatori fornelli forni o piani di cottura Non esporre l apparecchiatura alla pioggia Non installare l apparecchiatura dove sia esposta alla luce solare diretta Non installare questa apparecchiatura in aree troppo umide o troppo fredde Quando si sposta l apparecchiatura sollevarla dal bordo anteriore co...

Page 50: ...o precedentemente scongelato Attenersi alle istruzioni per la conservazione riportate sulla confezione del cibo surgelato Avvolgere gli alimenti con materiali per uso alimentare prima di metterli nello scomparto del congelatore 2 4 Illuminazione interna AVVERTENZA Pericolo di scosse elettriche Questo prodotto contiene una sorgente luminosa di classe di efficienza energetica G Per quanto riguarda l...

Page 51: ...bili per 10 anni dopo l interruzione del modello 2 7 Smaltimento AVVERTENZA Rischio di lesioni o soffocamento Staccare la spina dall alimentazione elettrica Tagliare il cavo di rete e smaltirlo Rimuovere la porta per evitare che bambini e animali domestici rimangano chiusi all interno dell apparecchiatura Il circuito refrigerante e i materiali di isolamento di questa apparecchiatura rispettano l o...

Page 52: ...esa la maniglia più lo spazio necessario per la libera circolazione dell aria di raffreddamento Spazio complessivo necessario duran te l uso H2 mm 1534 W3 mm 750 D3 mm 1123 l altezza la larghezza e la profondità dell apparecchiatura compresa la maniglia più lo spazio necessario per la libera circolazione dell aria di raffreddamento più lo spazio necessario per consentire l apertura della porta con...

Page 53: ...anza minima indicata nelle istruzioni di installazione ATTENZIONE Se si installa l apparecchiatura vicino a una parete fare riferimento alle istruzioni di installazione per capire la distanza minima tra la parete e il lato dell apparecchio dove le cerniere della porta devono fornire spazio sufficiente per aprire la porta quando l apparecchiatura interna viene rimossa ad es durante la pulizia Quest...

Page 54: ...parecchiatura 1 Controllare che l apparecchiatura sia in posizione eretta 2 Aprire entrambe le porte e rimuovere l attrezzatura della porta Fare riferimento al capitolo Utilizzo quotidiano Chiudere le porte 3 Con un cacciavite a lama sottile rimuovere il coperchio del foro della vite A e il coperchio della cerniera superiore B Metterli da parte A B 4 Rimuovere le viti dalla cerniera superiore dest...

Page 55: ...con cautela su un imballaggio di schiuma morbida o materiale simile per evitare di danneggiare il retro dell apparecchiatura e il pavimento 12 Rimuovere i due piedini regolabili e le viti della cerniera inferiore 13 Invertire la cerniera inferiore verso l altro lato dell apparecchio avvitare con viti e installare piedini regolabili 14 Installare la porta inferiore posizionando il foro della porta ...

Page 56: ... B sul lato superiore destro dell apparecchio dove si trovano i fori per le viti A B Installare l apparecchiatura della porta Attendere almeno 4 ore prima di collegare l apparecchiatura all alimentazione 4 FUNZIONAMENTO 4 1 Pannello di controllo 3sec 4 6 8 2 C 1 2 3 1 2 3 1 Spia della temperatura 2 Super Freeze spia 3 Tasto di controllo 4 2 Accensione Inserire la spina nella presa a muro 4 3 Spegn...

Page 57: ...ere premuto il tasto Comando per 3 secondi per attivare la funzione Super Freeze La spia Super Freeze lampeggia Questa funzione si interrompe in modo automatico dopo 52 ore La funzione Super Freeze può essere disattivata prima della sua fine automatica tenendo premuto il tasto Comando tasto per 3 secondi L indicatore Super Freeze si spegne 5 UTILIZZO QUOTIDIANO 5 1 Rimozione e installazione del ri...

Page 58: ... la funzione Super Freeze prima di introdurre gli alimenti Il cibo deve trovarsi ad una distanza di 15 mm dalla porta ATTENZIONE In caso di scongelamento accidentale ad esempio a causa di un interruzione di corrente se la corrente è rimasta spenta più a lungo del valore indicato sulla targhetta sotto tempo di risalita gli alimenti scongelati devono essere consumati rapidamente o cotti immediatamen...

Page 59: ...menti freschi in foglio di alluminio pellicola di plastica o sacchetti contenitori ermetici con coperchio Per congelare e scongelare in modo più efficace suddividere gli alimenti in piccole porzioni Si raccomanda di mettere etichette e date su tutti gli alimenti surgelati Questo aiuterà a identificare gli alimenti e a sapere quando devono essere utilizzati prima del loro deterioramento Il cibo dev...

Page 60: ...oni ottimali e lo sbrinamento potrebbe essere già iniziato Per limitare il processo di scongelamento acquistare i prodotti surgelati alla fine della spesa e trasportarli in un sacchetto termico e isolato Mettete i surgelati immediatamente nel congelatore dopo essere tornati dal negozio Se il cibo si è scongelato anche solo parzialmente non congelarlo di nuovo Consumarlo il prima possibile Rispetta...

Page 61: ...serirlo Per evitare lo spreco di cibo la nuova scorta di cibo dovrebbe essere sempre collocata dietro a quella vecchia 6 7 Consigli per la refrigerazione dei cibi Il comparto alimenti freschi è quello contrassegnato sulla targhetta dei dati con Carne tutti i tipi deve essere avvolta in appositi sacchetti e collocata sul ripiano di vetro sopra il cassetto delle verdure La carne può essere conservat...

Page 62: ...Non usare mai utensili metallici appuntiti per rimuovere la brina dall evaporatore in quanto potrebbero danneggiarlo Non usare dispositivi meccanici o altri mezzi artificiali non raccomandati dal produttore allo scopo di accelerare il processo di sbrinamento Circa 12 ore prima dello sbrinamento impostare una temperatura più bassa per accumulare una riserva di freddo sufficiente in caso di eventual...

Page 63: ...ONE DEI PROBLEMI AVVERTENZA Fare riferimento ai capitoli sulla sicurezza 8 1 Cosa fare se Problema Causa possibile Soluzione L apparecchiatura non fun ziona L apparecchiatura è spenta Accendere l apparecchiatu ra La spina non è collegata cor rettamente alla presa elettri ca Collegare correttamente la spina alla presa elettrica La presa elettrica non ha tensione Collegare un apparecchiatu ra elettr...

Page 64: ...re la porta La lampadina è difettosa Contattare il Centro di Assi stenza Autorizzato più vici no C è una quantità eccessiva di brina e ghiaccio La porta non è chiusa corret tamente Fare riferimento alla sezione Chiusura della porta La guarnizione è deformata o sporca Fare riferimento alla sezione Chiusura della porta Gli alimenti non sono stati avvolti in maniera idonea Avvolgere meglio gli alimen...

Page 65: ...sopra del com pressore Collegare lo scarico dell ac qua di sbrinamento alla va schetta di evaporazione Non è possibile impostare la temperatura La funzione Super Freeze è attiva Disattivare manualmente la Super Freezefunzione oppu re aspettare finché non si di sattiva automaticamente per impostare la temperatura Fare riferimento alla sezione Funzione Super Freeze La temperatura all interno dell ap...

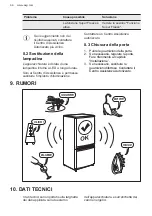
Page 66: ...stenza è permesso sostituire l impianto d illuminazione Contattare un Centro Assistenza autorizzato 8 3 Chiusura della porta 1 Pulire le guarnizioni della porta 2 Se necessario regolare la porta Fare riferimento al capitolo Installazione 3 Se necessario sostituire le guarnizioni difettose Contattare il Centro Assistenza Autorizzato 9 RUMORI SSSRRR CLICK HISSS BRRR BLUBB 10 DATI TECNICI I dati tecn...

Page 67: ...06 Mägenwil Tel 0848 848 111 Consulenza specialistica Vendita Badenerstrasse 587 8048 Zürich Tel 044 405 81 11 Garanzia Per ogni prodotto concediamo una garanzia di 2 anni a partire dalla data di consegna o dalla sua messa in funzione fa stato la data della fattura del certificato di garanzia o dello scontrino d acquisto Nella garanzia sono comprese le spese di manodopera di viaggio e del material...

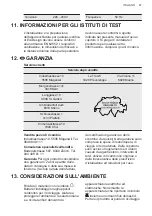
Page 68: ...pparecchi fuori uso In qualsiasi negozio che vende apparecchi nuovi oppure si restituiscono ai centri di raccolta ufficiali della SENS oppure ai riciclatori ufficiali della SENS La lista dei centri di raccolta ufficiali della SENS è visibile nel sito www erecycling ch www aeg com 68 ...

Page 69: ...te to Get usage advice brochures trouble shooter service and repair information www aeg com support Register your product for better service www registeraeg com Buy Accessories Consumables and Original spare parts for your appliance www aeg com shop CUSTOMER CARE AND SERVICE Always use original spare parts When contacting our Authorised Service Centre ensure that you have the following data availa...

Page 70: ...s provided that they have been properly instructed Children of less than 3 years of age should be kept away from the appliance unless continuously supervised Children should be supervised to ensure that they do not play with the appliance Children shall not carry out cleaning and user maintenance of the appliance without supervision Keep all packaging away from children and dispose of it appropria...

Page 71: ...ot use abrasive products abrasive cleaning pads solvents or metal objects When the appliance is empty for long period switch it off defrost clean dry and leave the door open to prevent mould from developing within the appliance Do not store explosive substances such as aerosol cans with a flammable propellant in this appliance If the supply cord is damaged it must be replaced by the manufacturer i...

Page 72: ...e sure that there is access to the mains plug after the installation Do not pull the mains cable to disconnect the appliance Always pull the mains plug 2 3 Use WARNING Risk of injury burns electric shock or fire The appliance contains flammable gas isobutane R600a a natural gas with a high level of environmental compatibility Be careful not to cause damage to the refrigerant circuit containing iso...

Page 73: ...ed Service Centre Use original spare parts only Please note that self repair or non professional repair can have safety consequences and might void the guarantee The following spare parts will be available for 7 years after the model has been discontinued thermostats temperature sensors printed circuit boards light sources door handles door hinges trays and baskets Please note that some of these s...

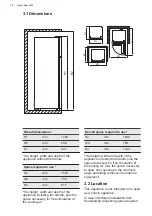
Page 74: ...irculation of the cooling air Overall space required in use H2 mm 1534 W3 mm 750 D3 mm 1123 the height width and depth of the appliance including the handle plus the space necessary for free circulation of the cooling air plus the space necessary to allow door opening to the minimum angle permitting removal of all internal equipment 3 2 Location This appliance is not intended to be used as a built...

Page 75: ...ternal equipment is removed e g when cleaning This appliance is intended to be used at ambient temperature ranging from 10 C to 38 C The correct operation of the appliance can only be guaranteed within the specified temperature range If you have any doubts regarding where to install the appliance please turn to the vendor to our customer service or to the nearest Authorised Service Centre It must ...

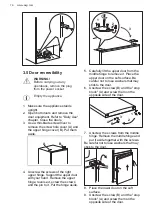
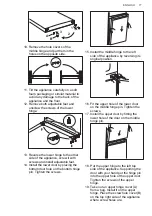
Page 76: ...pper hinge reverse it screw the screws and the pin to it Put the hinge aside 1 2 3 5 Carefully lift the upper door from the middle hinge to remove it Place the upper door on the soft surface Be careful not to lose washers that may stick to the door 6 Unscrew the screw B and the stop block A and screw them on the opposite side of the door 1 2 3 A B 7 Unscrew the screws from the middle hinge Remove ...

Page 77: ...hole on the bottom hinge pin Tighten the screws 15 Install the middle hinge to the left side of the appliance by reversing its original position 16 Fit the upper hole of the lower door on the middle hinge pin Tighten the screws 17 Install the upper door by fitting the lower hole of the door on the middle hinge pin 18 Put the upper hinge to the left top side of the appliance Supporting the door wit...

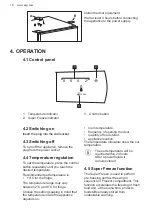
Page 78: ...ed set temperature is 4 C for the fridge The temperature range may vary between 2 C and 8 C for fridge Choose the setting keeping in mind that the temperature inside the appliance depends on room temperature frequency of opening the door quantity of food stored appliance location The temperature indicators show the set temperature The set temperature will be reached within 24 hours After a power f...

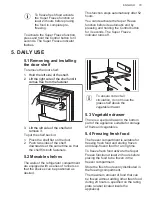
Page 79: ...es of the shelf downwards at the same time so that the shelf fits both fasteners 5 2 Movable shelves The walls of the refrigerator compartment are equipped with a series of runners so that the shelves can be positioned as desired To ensure correct air circulation do not move the glass shelf above the vegetable drawer 5 3 Vegetable drawer There is a special drawer in the bottom part of the applianc...

Page 80: ...sured in the configuration with the drawers in the bottom part of the appliance and shelves evenly distributed Position of the door bins does not affect energy consumption Do not open the door frequently or leave it open longer than necessary Freezer The colder the temperature setting the higher the energy consumption Fridge Do not set too high temperature to save energy unless it is required by t...

Page 81: ...ge of frozen food products Leave enough space around the food to allow air to circulate freely For adequate storage refer to food packaging label to see the shelf life of food It is important to wrap the food in such a way that prevents water humidity or condensation from getting inside 6 4 Shopping tips After grocery shopping Ensure that the packaging is not damaged the food could be deteriorated...

Page 82: ...ood inside the appliance Make sure it has cooled down at room temperature before inserting it To prevent food waste the new stock of food should always be placed behind the old one 6 7 Hints for food refrigeration Fresh food compartment is the one marked on the rating plate with Meat all types wrap in a suitable packaging and place it on the glass shelf above the vegetable drawer Store meat for at...

Page 83: ... damage it Do not use a mechanical device or any artificial means to speed up the thawing process other than those recommended by the manufacturer About 12 hours prior to defrosting set a lower temperature in order to build up sufficient chill reserve in case of any interruption in operation Defrost the freezer compartment when the frost layer reaches a thickness of about 3 5 mm To defrost freezer...

Page 84: ... plug is not con nected to the mains socket correctly Connect the mains plug to the mains socket correctly There is no voltage in the mains socket Connect a different electrical appliance to the mains sock et Contact a qualified elec trician The appliance is noisy The appliance is not suppor ted properly Check if the appliance stands stable The compressor operates continually Temperature is set in...

Page 85: ...on The gasket is deformed or dirty Refer to Closing the door section Food products are not wrap ped properly Wrap the food products bet ter Temperature is set incorrect ly Refer to Operation chapter Appliance is fully loaded and is set to the lowest tempera ture Set a higher temperature Refer to Operation chapter Temperature set in the appli ance is too low and the am bient temperature is too high...

Page 86: ...e door is not closed cor rectly Refer to Closing the door section The food products tempera ture is too high Let the food products tem perature decrease to room temperature before storage Many food products are stor ed at the same time Store less food products at the same time The thickness of the frost is greater than 4 5 mm Defrost the appliance The door has been opened often Open the door only ...

Page 87: ...240 V Frequency 50 Hz 11 INFORMATION FOR TEST INSTITUTES Installation and preparation of the appliance for any EcoDesign verification shall be compliant with EN 62552 Ventilation requirements recess dimensions and minimum rear clearances shall be as stated in this User Manual at Chapter 3 Please contact the manufacturer for any other further information including loading plans ENGLISH 87 ...

Page 88: ...lapse if the operating instructions and conditions of use are not adhered to if the product is incorrectly installed or in the event of damage caused by external influences force majeure intervention by third parties or the use of non genuine components 13 ENVIRONMENTAL CONCERNS Recycle materials with the symbol Put the packaging in relevant containers to recycle it Help protect the environment an...

Page 89: ......

Page 90: ......

Page 91: ......

Page 92: ...www aeg com shop 804182980 C 472021 ...

Reviews: