background image

15

Start/Pause(スタート / 一時停止) ボタン

を押し、本機を一時停止状態にします。

洗濯物を入れ、ドアを閉めて

(スタート/一時停止) ボタンを再び押し

Delay Start(スタート予約)ボタンを予約

時間が

 になるまで繰り返し押すと取り

消されます。 その後、Start/Pause(スター

 ボタンを押してください。

(スタート予約)ボタン

この機能は、プログラムの開始時間を

30分、60分、90分後および2〜19時間

後まで設定できます。設定した予約時間は

ディスプレイに表示されます。終了予定

時刻は予約時間に合わせて後ろにずれます。
※洗濯コースを設定し、Start/Pause(ス 

タート/一時停止)  ボタンを押す前で

なければ、選択することができません。

乾燥時間は次により異なります

最終脱水速度

乾燥レベル

洗濯物の種類

洗濯物の容量

推奨乾燥時間

衣類のシワや縮みを防ぐため、

過剰な乾燥は避けてください。

警告

洗濯物の乾燥が十分でない場合は、

短時間の乾燥を追加で設定してく

ださい。

乾燥洗濯工程の最終段階では、

温熱を使わずに(クールダウン

サイクル)、洗濯物の温度を冷まし

ます。

追加乾燥

“ ”

本洗いの前に洗濯物を予備洗いするときに

この機能を設定します。汚れのひどい衣類

の洗濯にお使いください。

設定すると予備洗いのマークが点灯します。

この機能を設定したら、洗剤ケース 

に洗剤を入れてください。このオプショ

ンを選ぶと洗濯時間が長くなります。

常時すすぎ追加機能

この機能は、洗剤 アレルギーをお持ちの

方や軟水地域にお住まいの方におすすめ

の機能です。設定すると、すすぎの工程

を2回追加します

新しいタオルなど毛羽立ちしやすい繊維

を乾燥した後は、” 10.4 ドラムの洗浄 ”

(33 ページ)をされる事をお奨めします。 

庫内に残った綿ぼこりを除去し、乾燥後

に他の衣類への付着を防ぎます。乾燥工

程の後は、都度、排水ポンプフィルター

を掃除してください。お手入れ方法につ

いては、“お手入れとクリーニングについ

て ”の項目をご覧ください。

綿ぼこり

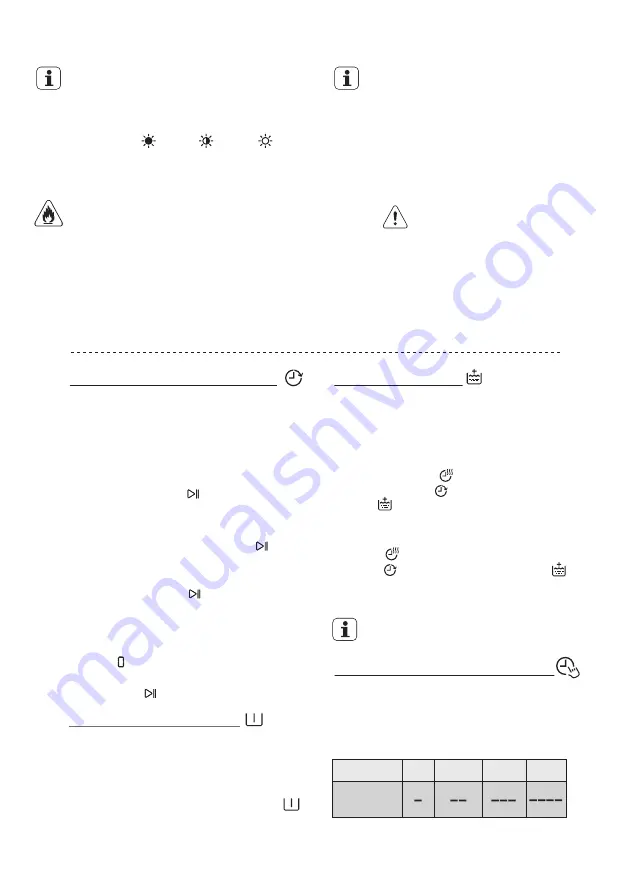
洗濯時間を調整できる機能です。

このボタンを、汚れの度合に応じて押すこ

とで、洗濯時間を減らしたり増やすこと

ができます。洗濯時間はディスプレイの

バーの数で表示されます。

本体の電源がオフになっても、

機能の設定は残ります。

汚れの程度

軽い 中程度 普通 ひどい

洗濯レベル

Delay Start

Prewash(

予備洗い)ボタン

Time Manager

( タイムマネージャー ) ボタン

(しっかり  / 普通  / 軽め   )

この機能を設定するには、“Dry Time  

(タイマー乾燥)


と “Delay 

ボタンをディスプレ

(ス

t

r

a

t

S

イに  マークが表示されるまで、同時

に押し続けます。

解除する時は、“Dry  Time(タイマー

乾燥)  ” と “Delay Start(スタート

予約)  ”ボタンをディスプレイの   

マークが消えるまで、同時に押し続け

ます。

スタート予約の取り消し:

ト/一時停止)

予約開始時間前に洗濯物を追加する場合:

Start/Pause

ます。

Summary of Contents for AWW12746

Page 1: ...AWW12746 取扱説明書 2 洗濯乾燥機 User Manual 50 Washer Dryer ...

Page 2: ... 凍結防止 ...

Page 3: ...用が正しく行われなかった場合の故障や事故については 責任を負いかねます のであらかじめご了承ください はじめに 本機を他の人に譲渡されるときは 必ず 取扱説明書 設置マニュアルを一緒にお渡しくだ ください 設置マニュアルがないと正しい設置が出来ません この取扱説明書には 製品が故障と思われるときに お客様がご自身でトラブルを解決する ための点検方法が書かれています 故障かな と思われるときには まず取扱説明書の 故障かな と思ったら をご覧ください 点検後も正常に動かなかったり 明らかに異常がある場合は給水栓を閉めて 電源プラグを抜くか専用ブレーカーを落とし安全を確保する 修理技術者以外は分解や改造および修理をしない 技術者以外の方が修理等を行う事はとても危険です お買い上げの販売店にご連絡ください 火災 事故 ケガ 感電 故障の恐れがあります お買い上げの販売店にご連絡ください 警告 警...

Page 4: ...ンセン トにはアース工事が必要 安全にお使いいただくために 200V コンセン トは 一つのブレーカーに 1 つしか取り付けられません ブレーカーは漏電遮断器内蔵の安全ブ レーカーを使用してください 200Vコンセントの設置には 専用ブレー カーから電源とアースを200V 20Aのコン 有資格者のみが行うことができる工事です 電源コー ドの取扱いに注意する 電源コー ドや電源プラグが痛んだり コンセン トの挿し込みがゆるいときは 電源プラグを抜くか専用ブレー カーを切り安全を確保する 改造しない 交換しない 傷つけない 固 定しない 束ねない 破損させない 無理 に曲げない 引っ張らない ねじらない 重 い物を乗せたり挟み込んだり しない 製品 で押しつけない 製品の上や下や側面に 押し込まない 火災 事故 ケガ 感電 故障の恐れ があります 火災 事故 ケガ 感電 故障の恐れが あります...

Page 5: ...海外で 使用しない 動作しません そのままにしておくと火災 故障の恐れがあります 電源プラグの刃および刃の取付面 にほこりが付着している場合は よく拭いて埃を取る 火災 故障の恐れがあります 濡れた手で電源プラグをコンセン トから抜き挿ししない 事故 ケガ 感電 ショートの恐れが あります お手入れの際は必ず電源プラグを コンセントから抜くか 専用ブ レーカーを落とす 事故 ケガ 感電 ショートの恐れが あります 電源プラグをコンセントから抜 く時は 必ずプラグを持つ 電源コードは引っ張らないでください 火災 事故 ケガ 感電 故障の恐れ があります お手入れの際に本体各部に直接 水をかけない 火災 事故 ケガ 感電 故障の恐れが あります 絶縁劣化による感電や漏電火災の原因に なります 灯油 ガソリン ベンジン シン ナー アルコール 油 溶剤 整髪剤などやそれらが付着した 洗濯物をドラ...

Page 6: ...に触れない 高温になっている場合があり 火傷の 恐れがあります 防水性および撥水性の洗濯物や 脱水中に異常振動が発生して 本体や 設置場所に損傷を与え 火災 事故 故 障の恐れがあります ジーンズ バスローブ バスタオル 等のかさばる物や 洗濯ネッ トに 入れた物は 1枚だけで洗わない 他の物と一緒に洗濯してください 脱水中に 異常振動が発生して 本機や設置場所に 損傷を与え 火災 事故 水漏れ 故障 の恐れがあります 乾燥工程を中断した後は 洗濯物 の取り出しに注意する 洗濯物と ドラムは高温になっている場合が あり 火傷の恐れがあります 脱水中に異常振動が発生して 本機や設 置場所に損傷を与え 火災 事故 水漏れ 故障の恐れがあります 1 これらの洗濯物は業務用洗濯機 コインラン ドリー をお使いください 防水性および撥水性のある洗濯物の例 介護用品の全て 寝袋 バッグ 耐水 スポーツ...

Page 7: ...に台を置かない ドラム内部への落下 ガラス部への接触 等で ケガ 火傷の恐れがあります 登らない ドアにぶら下がらない ケガ 火傷 故障の恐れがあります 製品の梱包材はお子様の近くに 置かない 子供だけで使わせたり 幼児の 手の届くところで使わない ドラムの中に落ちて ケガ 火傷の恐れ があります 設置者は設置完了後に設置マニュ アルのチェックリストに従い確認 する 設置不良で発生した火災 水漏れ 故障 は弊社では保証致しません リサイクルに出すときにはドアを 外す お子さまが閉じこめられる事故を起こし たり それ以外の危険な状況に陥ったりす ることを防ぎます 7 お子様などが閉じ込められる事故を防ぐために ドアロックダイアルのご使用を お奨めします 設定方法は 10 ページの ドアロックダイアル をご参照ください 洗剤や柔軟剤などはお子様の手が 届かない場所に置く させないこと を 周り...

Page 8: ...恐れがあります 洗 剤メーカーの指定した量以下でお使い下 さい ペットを庫内に入れない 庫内環境に慣れてしまうと 自ら庫内に 入って閉じ込められることがあります 小動 物が電気配線やホースをかじること で 感電 水漏れ 故障の ドアを閉める際には洗濯物をドア 水漏れ 故障 衣類を痛め 本機上部に洗剤や柔軟剤を入れた 容器を置かない こぼれた液体が本機に付くと 部品が 割れたり変色する恐れがあります 使用場所が 0 以下になる場所に は 設置したり使用しない 凍結により 故障や水漏れの恐れがあり ます ネジが緩んでいると水漏れして思わぬ 被害を招く恐れがあります 金属粉 金属片 硬貨や小物などは 必ず衣類から取り出して庫内に 入れる 感電 故障の 8 に挟まない そのまま洗濯すると ペットの死亡や 本機の故障の原因になることがあります 洗濯前に必ず給水栓を開いて ホースの接続を確認する 本機...

Page 9: ...お使いになった後は ドアを少 しだけ開けておいてください ドライクリーニング溶剤を使って本機で衣類を乾燥させないでください ガソリンやドライクリーニング溶剤 その他の可燃性の溶剤で洗わないでください アセトン アルコール ガソリン 灯油 剥離剤 テレビン油 ワックス ワックス除去剤など しみ抜きの処 理に可燃性の溶剤を使用した場合は 溶剤が乾いて臭いがとれてから洗濯機に入れてください 植物性油 食用油や整髪剤を含んだ衣類は 洗濯前に洗剤が入った温水で洗ってください 洗濯の 際は 低温乾燥機能を使って 洗濯物の温度を下げて洗ってください 熱いままの洗濯物は 本機 から出して重ねて置かないでください 植物性油や食用油などで汚れた洗濯物をドラム内に入れないでください 油のしみこんだ洗濯物は 乾燥中の熱により自然発火することがあります また乾燥後に積み重ねておくと 油の酸化により 乾燥させた洗濯物...

Page 10: ...ください ドア 水平調整用脚 前面 ドラムリフター ドアガラス 銘板 ステンレスドラム ドアロックダイアル 10 設定の解除 ダイアルの溝が垂直になるまで ダイアル を反時計回りに回します ドアが閉まるよ うになります ドアロックダイアル このダイアルを回すことで 本機のドアが閉まらなくなり お子様やペットが洗濯ドラムの中に 閉じ込められる事を防ぎます 設定方法 ドア内側のドアロックダイアルを時計回り に 押し込まずに 止まるまで回します ドアが閉まらなくなります 回しにくい場 合は 硬貨をお使いください ...

Page 11: ......

Page 12: ......

Page 13: ......

Page 14: ...所要時 間を合計したものになります コースの運転が終了すると 約10分間しわ防止工程に入ります この間 ディスプ レイの時間は と表示され ドアはロックされます 繊維の種類 乾燥容量 kg 推奨脱水速度 回転 推奨乾燥時間 時間 木綿 リネン バスローブ バスタオル等 タイマー乾燥オプションのガイドライン 4 2 5 3 5 2 1200 1200 1200 3 4 2 3 1 2 合成繊維 混紡 ジャンパー ブラウス 下着 家庭用リネン等 ウール 手洗いウール 2 5 1 1200 1200 2 3 1 1 1200 2 乾燥の度合い 繊維の種類 乾燥容量 しっかり タオル類に適する アイロンをかけずに洋服棚 にしまう衣類に適する 木綿 リネン バスローブ バスタオル等 4kgまで 4kgまで 4kgまで 普通 アイロンがけする衣類に適する 軽め 木綿 リネン バスローブ バスタオル等 ...

Page 15: ...い 設定すると予備洗いのマークが点灯します この機能を設定したら 洗剤ケース に洗剤を入れてください このオプショ ンを選ぶと洗濯時間が長くなります 常時すすぎ追加機能 この機能は 洗剤 アレルギーをお持ちの 方や軟水地域にお住まいの方におすすめ の機能です 設定すると すすぎの工程 を2回追加します 新しいタオルなど毛羽立ちしやすい繊維 を を乾燥した後は 10 4 ドラムの洗浄 33 ページ をされる事をお奨めします 庫内に残った綿ぼこりを除去し 乾燥後 に他の衣類への付着を防ぎます 乾燥工 程の後は 都度 排水ポンプフィルター を掃除してください お手入れ方法につ いては お手入れとクリーニングについ て の項目をご覧ください 綿ぼこり 洗濯時間を調整できる機能です このボタンを 汚れの度合に応じて押すこ とで 洗濯時間を減らしたり増やすこと ができます 洗濯時間はディスプレイの バ...

Page 16: ...ラム内 にスチームの発生が見られない事があり ますが これは 故障ではありません 洗濯 機の設置環境や使用環境の温度等によっ て 発生状況は異なります スチームは スチームオプションを選択 中に絶えず発生するものではありません スチームオプションに適した洗濯物量は 洗濯前の濡れていない洗濯物をドラムの 半分くらい入れた場合に より効果が見 込まれます スチームオプションが終了したあとの衣類 は温かくなりますが これは スチームの影 響によるもので正常な状況です スチームオプションを設定すると すすぎ 工程中の水温が上がります また 排水 ホースから蒸気が立ち上る事があります が これは故障ではありません このオプションが設定されると ディ スプレイ にマークが表示されます スチームは 衣類にあたるように立ち 上がります スチームオプションを選択すると 洗濯 物は スチームの効果で柔らかく仕...

Page 17: ...t Pause スタート 一時停止 ランプの点滅が止まります Add Clothes 衣類追加 コース運転中は 以下の手順で衣類を 追加してください Start Pause スタート 一時停止 ボ タンを押し コースを一時停止します Start Pause スタート 一時停 止 ランプが点灯している場合 のみ 衣類を追加できます ドアを開ける前に 洗濯機が完全に 停止するまで待ちます Start Pause スタート 一時停 止 ボタンをもう一度押し コー スの運転を再開します 衣類を足し ドアを閉めます はじめてお使いになる前に 4 1 2 3 7 本機の設置中または初めてお使いになる前に 本機内に少量の水が残ってることがあります これは 出荷前に工場で正常に作動するかを確認する最終機能検査を行った際の水であり 本機の性能に影響はありません ドラム内の水が高温の場合は 安 全のためドアが...

Page 18: ...濯物を一枚ずつドラム内に入れます できるだけ均等に広げるように入れて ください ドアを閉めます ドアパッキンの内側に何かが挟まって いないかを確認し 挟まっていたら 取り除いてください 4 洗濯物がドアとパッキンの間に挟まら ないようご注意ください 注意 5 2 洗剤ケース 1 洗剤ケースは3つに分かれています 洗剤や柔軟剤を入れる 柔軟剤用のケース 予備洗い用の洗剤ケース 予備洗いを設定したときは このケース に洗剤を入れます 洗濯用の洗剤ケース 全てのコースで このケースに洗剤を 入れます 重要 お使いになる前に ペー ジの 洗剤の種類と洗剤量 をお 読みください 27 粉末 液体洗剤用 フラップ 予備洗いおよび つけ置き洗い 用のケース 洗濯用の 洗剤ケース 柔軟剤用の ケース 柔軟剤はこのケースに入れます 25ページの 洗濯と乾燥のポイント をご覧ください ...

Page 19: ...2 必要に応じ 柔軟剤は マークの レーンに入れてください 洗剤ケースは閉じてください 注意 洗剤かす 柔軟剤 水分は洗剤 ケースに残りますので 定期的に 掃除し 残りかすを取り除くこと をお薦めします 洗剤等は 洗剤ケースの MAX マークを 超えて入れないでください 濃い柔軟剤をお使いになる際は 希釈 することをお奨めします 粉末 液体洗剤用フラップ 使用する洗剤が粉末か液体かにより フラップの位置を変更します フラップを下げる 液体洗剤用 フラップを 上げる 粉末洗剤用 工場出荷時 の設定 洗剤ケースを引き出し 洗剤の量に注意 しながら洗剤ケースの本洗い用レーン に入れます Prewash 予備洗い を行うときは マークの予備洗いレーンに 本洗いで 使用する洗剤のうちごく少量を振り分けて 入れてください ...

Page 20: ...をご覧ください 5 8 ドアを開けるには 注意 設定したコースにいずれのオプションも 組み合わせられない場合は ディスプレイ マークが点滅し ブザー音が 鳴ります 本機が作動中にコース選択ダイヤルを回 し他のコースを選ぶと 電源を切る オ フ 以外 ディスプレイの マークが 点滅し ブザー音が鳴って誤ったコース が設定されたことをお知らせします 本機は新しく設定されたコースの運転は 行いません 洗濯物や洗濯物の量に応じて 洗濯物を 最短の時間で洗いあがるように自動的に 設定が行われます ディスプレイには新たな時間が表示され ます Start Pause スタート 一時停止 ボタンを 押 し て コ ー ス の 運 転 を 開 始 し ま す Start Pause スタート 一時停止 ランプの 点滅が止まり 点灯します ディスプレイに は初期設定の運転所要時間が表示されます 5 4 洗濯を...

Page 21: ...するには Start Pause スタート 一時停止 ボタンを押します 排水し 設定さ れた最速の脱水速度で脱水します 必要に応じ Start Pause スタート 一時停止 ボタンを押す前に Spin ボタンを押して脱水速度を変 更します 排水のみ行いたい場合は No Spin も設定できます 2 コース選択ダイアルを オフ の位置ま で回し 本体の電源を切ります 3 本機は約18時間経つと自動的に排水 脱 水します Woolウールコースを除く 全てのマークとディスプレイが消 え 本体の電源がオフになります Start Pause スタート 一時停 止 ボタンのマークがゆっくり点 滅します いずれかのボタンを押し 本体の 電源を入れます 5 11自動スタンバイ機能 消費電力を抑えるため 本機は次の場合 に自動的に電源が切れます Start Pause スタート 一時停止 ボタンを押す前に...

Page 22: ......

Page 23: ...00 3 0 kg 1 5 kg 1200 1時間5分 1時間15分 1時間30分 1時間40分 1200 2 0 kg 1 0 kg 1200 55分 1時間5分 2時間 2時間20分 1200 4 0 kg 2 軽め バスローブ バスタオルのような大きな衣類だけを乾燥させるとき シーツのような大きな衣類だけを乾燥させるとき 2 1 シーツ テーブルクロス ワイシャツなど 3 0 kg 1 5 kg 1200 1200 1時間20分 1時間30分 50分間 1時間 脱水速度 希望の乾燥レベル 洗濯物の種類 洗濯物の量 乾燥工程後の静電気を防ぐために 洗濯時に柔軟剤のご使用をお奨めします コースの終了時点で洗濯物がまだ湿っているときは 乾燥を追加してください その場合は 衣類の縮みやしわを防ぐために 過度の乾燥を避けてください 乾燥時間は 次の状況により変わります 状況によって乾燥時間を調...

Page 24: ...を設定します ディスプレ イには洗濯 乾燥までの合計所要時間 が表示されます 4 Start Pause スタート 一時停止 ボタンを押し コースを開始します 残り時間は毎分更新され ディスプレ イに表示されます 5 コースの運転が完了したら コース選 択ダイアルを オフ の位置に回し 本 体の電源をオフにします 6 注意 運転コースによって選択できる乾燥の レベルが決まっています 15分間の乾燥を設定した場合 本機 では冷却工程のみとなります 軽め オプションを設定すると コースの運転が開始して約15分後に 洗濯物の種類や量に応じてディスプ レイの所要時間が調整されます ディスプレイには新しい時間が表示 されます 7 1 ノンストップコース オート乾燥を 7 2 ノンストップコース タイマー乾燥を 組み合わせる場合 ボタン 乾燥工程が完了後は 衣類は高温 になっています 安全のため ド ...

Page 25: ...濯物と別に洗 ってください 洗濯温度の目安 本機で一度に洗濯または乾燥できる洗濯 物の量の目安は次のようになります 水や電気の消費量は 最大容量でコース 運転を行う場合に最も効率が上がります 汚れのひどい洗濯物は 量を減らして 洗ってください 木綿 リネン 合成繊維 ドラム1 2以下 デリケートな 衣類 ウール ドラム1 3以下 最大容量 衣類に付いている取扱いマークやメーカー の洗濯方法の指示に従って 白物 色柄 物 合成繊維 デリケート ウールなどに 分けてください 水を含まない乾燥状態でドラム の3 4が目安 衣類の厚みや 質量などによって異なります 洗濯する前に 必ず衣類のラベルに表示さ されている適した洗濯温度を確認してく ださい 詳しくは28ページの洗濯ネットの使用 についてを参照してください い ス ュ 通 90 60 50 40 30 常温 白物または色物の衣類の通常の 汚...

Page 26: ...Woolmark Apparel Care Blue ...

Page 27: ...ん洗剤を使用する場合は 粉末 液体にかかわらず 必ずお湯に溶かしてからドラ ムに直接投入してください 洗剤ケースには入れないでください 使用後は33ページの ステンレスドラムの洗浄 にそってドラムの洗浄を行ってください 洗浄温度を40 以上に設定した場合 洗剤の洗浄効果があがる為洗剤メーカーの推奨使 用量よりも少ない量でご使用できます 泡立ちが多すぎたり すすぎ後も泡が残るよう でしたら 洗剤の投入量を減らしてください を 正しい使用量でお使いください 洗剤や柔軟剤のむだをなくし 環境に配慮してきれいに洗い上げるために 適切な洗剤 洗剤には 生分解性であっても 汚水として大量に 排出されると自然界のバランスを崩してしまう物質が含まれていますのでご注意ください 洗剤の種類および使用量は次の要素に応じて選びます 繊維の種類 デリケート ウール 木綿等 汚れ具合 洗濯物の量 洗濯温度 水の硬度 ...

Page 28: ...の異なる衣類を乾燥をする場合 1回以上のすすぎを行って ドラムを洗浄してください 乾燥が終了したら 空になったドラム パッキン ドアの汚れを湿った布で十分にふき 取ってください 液体洗剤を使用する際は 洗剤ケースを十分引き出し 洗剤投入部の中央付近に投入して ください もし洗剤が付着した場合は そのまま放置せずに拭き取ることで ひび割れを 防止することができます 計量カップから液ダレしたものが正面パネルにかかってしまう あるいは本体に付着する 手指に原液が付着し その手指で洗剤ケースの開閉を行なう 洗剤ケースの引き出し量が不十分なため 正面パネル部分にかけてしまう 柔軟剤を入れすぎると 再汚染 衣類の黒ずみ の原因となりますのでご注意ください 26ページの 衣類の黒ずみや変色について を参照してください レースのついた衣類やランジェリー類などの傷みやすいもの 他の衣類を傷めてしまうおそれ ...

Page 29: ...が 脱水途中に激しい振動が発生 する場合があります そのような場合は Start Pause スタート 一時停止 を押してドラムの 回転を止め 再度 Start Pause スタート 一時停止 を押してください ほぐし運転から脱水 を再開するため片寄りが少なくなりスムーズな脱水が行われます ただし片寄りが全く無くな るわけではありませんので 振動が発生する場合もあります 洗濯物の量が少ない場合には 片寄りが発生することがありますので洗濯物の量を確認してください また 洗濯機が設置さ れている床の状態によっても振動状態が変化します 床面の仕上げがタイル フローリング等 の 滑りやすい 表 面 材の 場 合にも 振 動により洗 濯 機 が 移 動してしまうことが あります ので ご注意ください 振動について 本機は脱水する前に緩やかにドラムを左右に回転させ ほぐし運転に入ります この工程で極端...

Page 30: ... マット ベッドカバー 厚手のジャンパーなどの大きな 衣類を乾燥させない 詰め物を入れたものを乾燥させない 枕 クッション キルト 布団 寝袋 など 防水性および撥水性のある衣類や発泡ゴムまたはゴムに類似した材料を 含有するものを乾燥させない ウェットスーツ レインウェア アノラック オムツカバーなど 整髪料やヘアスプレー 除光液などがついた衣類を乾燥させない 有害なガスや蒸気が発生する恐れがあります デリケートな洗濯物を乾燥させない 乾燥中に発火して火災 事故 故障の恐れがあります 合成繊維のカーテン ウール製品 絹製品 金属の付いた衣類 ナイロンストッキングなど のデリケートな製品を乾燥させると 洗濯物が痛む恐れがあります 警 告 8 2 乾燥について ...

Page 31: ...さい 濃い色の衣類とタオルなどの明るい色 で毛足の長い製品をいっしょに洗うと 濃い色の衣類に綿ぼこりが付着し 洗い 上がりがきれいになりません 別々に 洗ってください 最終脱水の回転速度 洗濯物の種類 洗濯物の量 設定した乾燥レベル 強め 普通 弱め 乾燥後の洗濯物の静電気の発生を防ぐ ためには 洗濯の際に柔軟剤やタンブ ラー乾燥用の柔軟剤を入れてください ご注意 乾燥する際のポイント 衣類の表示 乾燥コースの所要時間について 乾燥時間は次により異なります タンブル乾燥可 高温乾燥 低温乾燥 タンブル乾燥不可 時間設定ができる乾燥コースの平均的な 乾燥時間 Drytime タイマー乾燥 を 14 ページ タイマー乾燥オプションのガイ ドライン に記載しています 何度かお使い になり 繊維の種類ごとに適したコースを お選びください ...

Page 32: ...できる 液温は40 を限度とし 洗濯機で洗濯 ができる 液温は30 を限度とし 洗濯機で洗濯 ができる 家庭での洗濯 禁止 アイロン ドライ クリーニング 乾燥 平干しがよい 低い温度での タンブル乾燥ができる 排気温度上限60 タンブル乾燥禁止 タンブル乾燥ができる 排気温度上限80 吊り干しがよい しずく干しがよい ごしごし洗い デリケート洗い お手入れとクリーニング 10 一般的に お使いの水には石灰分が含ま れています スケール洗浄剤を定期的に 使うことで水垢が付くことを防ぎます スケール洗浄剤は洗剤メーカーの指示に 従い 洗濯とは分けてご使用ください このお手入れは石灰沈着を防ぎます 10 2 スケール 水垢 除去 石鹸とお湯のみを使用してお掃除してくだ さい 表面はしっかり乾かして下さい 注意 アルコール 溶剤 化学薬品などは 使用しないで下さい 10 1 製品表面のお手入れ ...

Page 33: ...ム内に溶け残った 洗剤が蓄積されやすくなり 移染による黒ず みやドラム内の異臭の原因となります これ らを予防するために 必ず定期的にドラム タブ を洗浄してください ダイヤルを回し Tub Cleanを選びます Start Pause スタート 一時停止 を押し Tub Cleanコースを開始します 洗濯が終わったら 必ず排水フィルター を開けて清掃してください 洗濯すると きは 必ず排水フィルターが清掃された 状態で行ってください このプログラムは ドラム タブ 内部を洗浄 するために 水温が約60 になります 洗濯槽専用クリーナーは ドラム タブ の 汚れがきれいに取れない場合にのみお使い ください 酸素系の洗剤と塩素系の洗剤は決して同時に使 用しない 塩素系の洗剤と食酢 アルコール ア ンモニア等を同時に使用しない 有害なガスが発生します 混ぜてしまったときは できるだけ早く その...

Page 34: ... ドラムが回転しない 排水フィルターが詰まり 異常な音がする ディスプレイに排水不良が原因の アラームコードが表示される 排水フィルターを定期的に清掃し 詰まりがないかご確認ください 次の場合は排水フィルターの清掃をして ください 1 電源プラグをコンセントから抜いて ください 警告 2 洗濯機をご使用中はフィルターを取 り外さないでください 庫内に溜ま 排水ポンプを清掃する 1 排水フィルターカバーを開けます 2 出てくる水を受けるために 排水ポン プの凹部の下に容器 トレー や厚手の っている水が熱い場合は排水フィル ターの清掃をお控えください フィ ルターを清掃する前に水が冷えてい ることを確認してください バスタオルなどを置きます ...

Page 35: ...35 3 2つのレバーを押し 排水管を手前 に引いて排水します 4 容器がいっぱいになったら排水管を 戻して 容器の水を捨てます 排水 フィルターから水が出なくなるまで 手順3と4を繰り返します 6 フィルターから綿ほこりや異物を取 除きます 7 フィルターを水道水で清掃します 5 排水管を戻しフィルターを反時計回 りに回して外します ...

Page 36: ...8 ポンプの羽根が回転することを確認 します 回転しない時は サービス センターにご連絡ください 9 フィルターを本体に戻します 漏水 しないよう フィルターがしっかりと 閉まっていることを確認します 10 排水フィルターのドアを閉めます 36 ...

Page 37: ... 給水ホースを元のように取り付けま す 漏水しないように 連結部が しっかりと閉まっていることを確認 します 気温が0 を下回る可能性のある地域に洗濯 機を設置した場合は 給水ホースと排水ホ スに残っている水を抜いてください 非常排水 10 9 凍結防止 電源プラグをコンセントから抜いてくだ さい 蛇口を閉めます 1 2 給水ホースを取り外します 3 排水ホースを背面のガイドから外し 差し込まれている排水管から外します 排水ホースと給水ホースの先端を容器に 入れ 水を抜きます 4 5 水が出なくなったら 給水ホースと排水 ホースを取り付けます 注意 再び洗濯機を使用する前に気温が 0 以上あることを確認してください 押す 45 35 石灰沈着がおき 給水フィルターが詰 まる可能性があります 定期的に清掃 し 取り除いてください ...

Page 38: ...押 してください コースをすぐに開始するに は Delay Start スタート 予約を解除してください ブレーカーがOFFになっている Delay Start スタート予約 が設定され ている 電源が 200V でない など 給水ホースが押しつぶされている また はねじれている コード 給水ホースの接続を確認し てください 排水ホースの位置が低すぎる コード 給水ホース内のフィルターが詰まってい る コード 給水ホースのフィルタ ーを 掃除してください ドアが正しく閉まっていない コード ドアをしっかり閉めてください 蛇口が閉まっている コード 蛇口を開けてください コースがスター トしない 洗濯機に水が 溜まらない 洗濯機に水が溜ま るが すぐに排水 されてしまう 問題 考えられる原因 解決方法 Start Pause ボタンを押していない ドアをしっかり閉めてください 排水ホースが押...

Page 39: ...い上がりに満 足できない ドアが開かない 洗濯機が振動す る または異常 な音がする 洗濯時間がディ スプレイの表示 よりも長い 本機は洗い上がりに影響せずに最小の水量で経済的な運転を行います ドラム内に水がな いように見える 洗濯機が洗濯物の量に応じて 新しい運転時間を計算します 洗濯時間がディ スプレイの表示 よりも短い 洗濯物の片寄りを均一にし 脱水 工程を再び行ってください ページの ドアを開けるには を ご覧ください ドラム内が熱い為 セー フティー機能 によって開かない ドラム内が冷めるまでお待ちください 本機が設置面に対し水平か またはシッ ピ ングボル トが取りはずされているかをお確か めください 詳しくは本機付属の設置 マニ ュアルをご覧ください 洗濯物が少ない為 脱水時に衣類の片より が発生し ている と考えられます 洗濯物の量 を増やすか コー スを一時停止し て衣類...

Page 40: ...洗濯物の 片寄りを均一にしてく ださい 脱水がすぐに始 まらない また は脱水しない 本機は乾燥時に水を給水 し 熱く湿った空気を熱交 換して水滴にし 排水を 行う水冷凝縮方式を採用 しています 性能を十分に 発揮するために 給水接続 に切り替えてください この現象は本機の不具 合ではなく 正常に稼 働しています 洗い上が りに支障はありません 給湯接続されている 問題の原因が分からないとき または解決できないときはサービスセンターに ご連絡ください お電話の前に ドア内側の銘板に記載されている 型名 製造番号 購入日を ご確認いただき サービスセンターにお伝えください 乾燥ができない または 正しく 運転しない ドラム内の洗濯物が片寄って均一でない場合 脱水 などの工程で本機のアンバランス検知機能が作動し て停止することがあります この動作は複数回繰り 返す事があります 洗濯が中断されて...

Page 41: ... フィルターのカバーを元通りに閉めます 上下から強く押す ドアを開けるには 次の手順に従ってください 1 コース選択ボタンを オフ にして電源を 切ります 電源プラグをコンセントから 抜いてください ドアを開ける前に 11 2 緊急時にドアを開けるとき 水温と洗濯物が熱くないか確認し 冷える まで待ってください 警告 ドラムが回転していないことを確認してく ださい 回転している際は 止まるまでお 待ちください 停電や本機に異常が発生して緊急停止した場合 洗濯機のドアは基本的に閉まったままとなります 停電の場合は 復旧後に引き続きコース洗濯が再 開されます 本機に異常が生じてドアが閉じたまま の場合 緊急解除機能を使ってドアを開けることが できます これら3つのいずれかの条件が当てはまる場合 ドアは開きません ...

Page 42: ... 本機を正しく処分することが 適切に 処理されなかった場合にもたらす環境 や人体に及ぼす悪影響を未然に防ぐこ とにつながります 本機のより詳しいリサイクル情報は お住いの地区の市役所 廃棄物処理担当 部局 またはご購入の販売店にお問合せ ください 12 1 梱包材について 12 3 環境保護のためのヒント 12 2 廃棄処分にあたって 環境への配慮 12 マークが付いている製品や梱包材は家 庭ごみと一緒に廃棄しないでください 洗剤 水 時間を節約し環境を守るため に 通常の汚れの洗濯物は 予備洗いを 行わずに洗ってください 洗濯物を本機の既定の範囲内でまとめて 洗濯することで 本機をより経済的に 稼働させることができます 洗濯の前に シミや部分的な汚れを 取っておくことにより 洗濯物を 低温で洗うことができます 水の硬度や汚れの程度 洗濯物量に 合わせて 洗剤量を量ってご使用くだ さい ...

Page 43: ...床等に水滴がついていないかをご確認いただき 水漏れがあった場合は水道栓 を締め 当社サービスセンターにご連絡ください 洗剤ケースに洗剤の溶け残りがないようにしてください 洗剤の入れすぎにつながり 泡立ちすぎの原因となります 漂白剤も入れすぎると泡が立ちますのでご注意ください フィルターを正しく取り付けてください フィルターがしっかり閉められていない場合 すきまから水が漏れます ガラスドアとパッキンの間に洗濯物や異物を挟んだまま洗濯を行うとパッキンが破れ 水漏れが起こります 泡だちの少ない洗剤をご使用ください 泡がたちすぎ ドラム内が泡でいっぱい になってしまうと この泡が洗剤ケースに逆流したり あふれて水漏れの原因にな ることがあります お使いになる洗剤は ドラム式洗濯機対応 の表記があるもの をお選びください ...

Page 44: ...区 本製品は50Hz 60Hz別定格です したがって 50Hzの製品は 60Hzの周波数帯では正常に 動きません 電波周波数が変わる地域へ転居 される場合は 製品をお買い上げの販売店に ご相談ください 製品番号 PNC および製造番号 S N をご確認ください 上記番号は ガラスドア内側の銘板に記載されて います 新潟 群馬 埼玉 東京 神奈川 千葉 栃木 福島 静岡 富士川 静岡 愛知 長野 富山 岐阜 石川 福井 滋賀 三重 山梨 60Hz 50Hz ...

Page 45: ...るときや信頼できるリユース 中古 ショップに買い取って 貰うときは必ず 取扱説明書 設置マニュアルを一緒にお渡しください 設置マニュアルがないと正しい設置が出来ません これはお子さまが本機に閉じ込められる事故など 窒息する危険 を防止するためです 譲渡や買い取って貰うときは野外に仮置きしないですみやかに引き渡してください ドアを外すには30番のトルクスドライバーが必要です 禁止 回収業者に絶対に渡さない 廃棄物処理法に基づく 一般廃棄物収集運搬業の許可 又は 市町村の委託 を受けた回収 業者でも洗濯機 衣類乾燥機を回収する事は出来ません 家電リサイクル法違反になります 製品のリサイクルについて 家電リサイクル法 検索 他の家電製品のリサイクルとは対応が異なりますのでご注意下さい ゴミの減量や資源の有効活用を図るため 洗濯機 衣類乾燥機 冷凍庫 冷蔵庫 エアコン テレビは平成13年4月に施行...

Page 46: ......

Page 47: ...知らせください 製品保証書は 本書に明示した期間 修理規定に従って修理をお約束するものです 従って 製品保証書によってお客様の法律上の権利を制限するものではありません 保証期間終了後の 修理などについてご不明な点があれば 販売店 サービスセンターにご相談ください 補修用性能部品について 修理料金の仕組みについて 出張費 技術料 部品代 製品の設置現場まで技術者が訪問する際の費用となります 別途 高速料金 駐車料金をいただく事があります 技術者が 点検 診断 部品交換などを行う際の弊社の定める修理技術工賃です 製品の修理 補修 その他部材などを使用した際の部品代金です 出張修理のご用命は弊社ホームページからもお申し込み頂けます 修理のご依頼について の に記載されている情報を お申し込みの際に記載してお問い合わ せください 商品の情報 設置 お取り扱いに ついてのご相談は 修理に関するご相談...

Page 48: ... 以上 600 mm以上 820 mm 67 0 kg 定 格 消 費 電 力 洗 濯 方 式 水 道 水 圧 最 大 洗 濯 容 量 最 大 乾 燥 容 量 最 大 総 入 容 量 量 重 外 形 寸 法 幅 奥 行 高 さ 開 口 寸 法 幅 奥 行 高 さ 乾 燥 方 式 洗 濯 時 標 準 使 用 水 量 仕 様 長年ご使用のビルトイン洗濯機の点検を こんな症状は ありませんか 電源コード プラグが異常に熱くなる 電源コードに深いキズや変形がある 焦げくさい臭いがする 床面にいつも水が溜まっている ビリビリと電気を感じる その他の異常や故障がある 使用中止 このような症状のときは 故障や事故 防止のため使用を中止し すぐに電源 プラグをコンセントから抜くか 単独 ブレーカーを落として 必ず販売店 または弊社サービスセンターに点検 修理をご相談ください 愛情点検 洗濯 1500 W ...

Page 49: ...ttp ww w aeg jp com 201710 50Hz 914 900 671 60Hz 914 900 672 モ デ ル 名 注 数字のみで9桁 11桁の番号です 注 数字のみで8桁の番号です お 名 前 お 買 い 上 げ 日 保 障 期 間 ご 住 所 電 話 番 号 本書は お買い上げ日より保証期間中に故障が発生した場合に 修理規定に従い無償修理を行う事をお約束するものです 修理をご依頼の際は 販売店もしくはサービスセンターに 本書の 印欄の内容ならびに故障の状況を出来る限り 詳しくお伝えください 本書の空欄に販売店の印やお買い上げ日が記載されていない場合は お客様にて情報をご記入ください 本書は再発行いたしませんので 紛失しないよう大切に保管してください 修理規定に記載された内容を必ずお読みいただき 本書と共に販売店が発行したお買い上げ日を証明出来る書類 納品書 領収書...

Page 50: ...nager Vapour Touchpad Settings Enabling Disabling End Of Wash Buzzer Child Safety Lock Option Program Options Compatibility Options P P P Loading The Laundry Using Detergent And Additives P Starting A Cycle Changing A Program Changing The Options Opening The Door P P At The End Of The Program P P NON STOP program Washing Program Dryness Option NON STOP program Washing Program Dry Time Option P Was...

Page 51: ... can be found at the back of these directions for use Please ensure that the date of purchase and the name of the shop where you bought the appliance are shown in the guarantee and keep it in a safe place together with the installation manual After reading please keep this manual in a place where the person using the appliance will usually find it The directions for use and the installation manual...

Page 52: ...designed for use in an office medical establishment care home or similar institution 一 After care service does not apply in the event of breakdown other than in general household use Only 1 breaker can be applied per one 200V plug Do not tamper replace scratch fix bundle or damage the cord Do not force the cord to bend do not pull or twist the cord or place heavy weight on it nor restrict the cord...

Page 53: ...l is close to hand Wipe thoroughly to remove any dust from the plug and the surface of the blades When not being used for a long period be sure to turn off the water inflow tap pull the plug out of the socket and drop the breaker When removing the plug from the socket always pull from the plug not the cord Always remove the power plug from the socket or drop the breaker when cleaning Danger of acc...

Page 54: ...achine or its fitting risk of breakdown fire or water leakage risk of accident There is a risk of burning if the clothing in the drum is still hot There is a risk of burning if the clothing in the drum is still hot Danger of fire accident water leakage and breakdown Risk of breakdown during rinsing risk of damage to to the machine or its fitting risk of breakdown fire or water leakage risk of acci...

Page 55: ...f the Child Safety Device Please refer to the instructions for setting the dial on page 58 There is a risk of mistaking powders and liquids for sweets and drinks The space required for installation the methods of fitting and and fixing the space between the surrounding structures the minimum dimensions and correct placement of ventilation holes are all and described in the installation manual Do n...

Page 56: ...achine or cause it to breakdown To allow for opening and closing the door emergency drainage service repairs and maintenance Small animals coming into contact with the cables and hose may become harmed or may cause fire water leakage and breakdown Make sure that laundry is not caught in the door when closing Always make sure that pockets are clothing is emptied of any metallic items coins and othe...

Page 57: ...cooking oil The high temperature during the washing and drying cycle can cause oil soaked garments to catch fire Furthermore if the laundry is piled after drying the heat generated by the oxidation of oil in the drying process cannot escape and this may cause a fire Laundry soiled by vegetable oil cooking oil and hair should firstly be washed in warm water with a natural detergent Then when using ...

Page 58: ...ld Safety Device When you activate this device you cannot close the door This prevents children or pets being locked in the drum To disable this device and restore the possibility of closing the door rotate the button counter clockwise until the groove is vertical Child Safety Device Door Block Button To activate this device rotate the button WITHOUT pressing it inside the door clockwise until it ...

Page 59: ...Prewash Touchpad Child Lock Option see page 64 3 1 Control Panel Description 2 3 6 8 10 9 5 11 13 14 12 4 7 1 3 2 Display Digital Number will tell you The level of the Time Manager Washing Drying Cycle Time The alarm codes Refer to the chapter Troubleshooting for their description Delay Start Time It is on you cannot open the door It is off you can open the door Rinse Plus Icon B A A B Child Lock ...

Page 60: ...elicates Symbol represents Cold water 7 kg if drying option combined please reduce to 4 kg 1200 rpm 7 kg if drying option combined please reduce to 4 kg 1200 rpm Use the Time Manager function extending the length of the wash time according to how deeply soiled or adjust the washing temperature according to the directions for wash on the clothing tag 3 5 kg if drying option combined please reduce t...

Page 61: ...ad Press this touchpad repeatedly to increase or decrease the spin speed or select Rinse Hold if you want your laundry to be spun at a speed different from the one proposed by the washer dryer No spin option eliminates all the spin phases and increase the number of rinses No Spin By selecting this option the water of the last rinse is not emptied out and the drum turns regularly to prevent the lau...

Page 62: ...lated on a default load size At the end of the program the appliance performs the anti crease phase for approx 10 minutes During this time the display will show time remaining and door is locked Type of fabric Load kg Spin Speed rpm Suggested Times Hrs Cotton and linen bathrobes bath towels etc Dry Time Option Guidelines 4 2 5 3 5 2 1200 1200 1200 3 4 2 3 1 2 Synthetic or mixed fabric items jumper...

Page 63: ...ow temperature Additional drying Prewash Touchpad Select this option if you wish your laundry to be pre washed before the main wash Use this option for heavy soil The indicator of this option will be on When you set this function put the detergent into the compartment This function increases the program duration Rinse Plus Option This option is recommended for people who are allergic to detergents...

Page 64: ...resistant so can easily be cleaned Designed to prevent dirt from accumulating This explanation does not guarantee that these test results can be indefinitely obtained the Tub Clean program should be used from time to time It is necessary to keep the inside of the drum clean Steam is not constantly generated when the steam option is selected The best results of the steam option are obtained with a ...

Page 65: ...hpad to pause the program You can only add clothes if Start Pause pilot light is lit Wait for the machine to come to a complete stop before opening the door Resume the program by pressing Start Pause touchpad again Add clothing and close the door 3 7 You cannot open the door if the water inside the machine drum are hot the door remains locked for your safety Although the LED light still remain lit...

Page 66: ...r clockwise or anticlockwise Position Off to reset program switching OFF the machine At the end of the program the selector dial must be turned to position Off to switch the machine off CAUTION 5 2 Detergent Dispenser Drawer 1 The detergent dispenser is divided into three compartments Using Detergent And Additives IMPORTANT Please read Detergents Fabric softeners Bleach on page 75 before use Compa...

Page 67: ...If you wish to carry out the Prewash phase pour it into the compartment marked If required pour fabric softener into the compartment marked Close the drawer gently NOTE Residues of detergent softener and water may remain in the dispenser It is recommended to clean the dispenser regularly to remove any residue The amount used must not exceed the MAX mark in the drawer If you use thick softeners it ...

Page 68: ...ar this means that the machine is already heating and the water level is above the bottom edge of the door or the drum is turning In this case the door CAN NOT be opened If you need to open it you must drain the water to open the door In case of emergency please refer to Emergency door opening on page 89 5 8 Opening The Door NOTE If an option is not compatible with the wash program selected symbol...

Page 69: ... door stays locked 1 To drain the water Press the Start Pause touchpad The appliance drains the water and spins with the maximum spin speed for selected program Alternatively before pressing the Start Pause touchpad you can press the Spin touchpad to change the spin speed You can select No Spin if you want the machine to only drain the water 2 turn the program selector knob to the position Off to ...

Page 70: ... automatic drying press the Dryness option until the icon corresponding to the required dryness level appears on the display see page 62 4 If you wish to select a timed drying press the Dry Time option repeatedly until desired drying time reached see page 62 5 Press Start Pause to start the program The time remaining is updated every minute 6 At the end of the program 7 turn the program selector k...

Page 71: ...c Cotton Linen Cotton Linen Bathrobes bath towels hand towels t shirts etc Synthetic and mixed fibres Jumpers blouses Underwear Shirts tablecloths business shirts etc When drying only large items such as bathrobes and bath towels When drying only large items such as shirts Drying times vary according to the following circumstances Please adjust accordingly Spin dry speed desired dryness type and v...

Page 72: ...cle 4 Start the program by pressing Start Pause touchpad The time remaining is updated every minute on the display 5 At the end of the program turn the program selector knob to the position Off to deactivate the appliance 6 NON STOP program Washing Program Dryness Option NON STOP program Washing Program Dry Time Option NOTE Some drying level options are not available for some programs If you set o...

Page 73: ... or long tapes Remove persistent stains before washing Rub particularly soiled areas with a special detergent or detergent paste Treat curtains with special care Remove hooks or tie them up in a bag or a net Before washing be sure to check the suitable washing temperature indicated on the label of clothing Washing cotton linen color clothing at the wrong washing temperature may shrink or discolor ...

Page 74: ...ine mildew on the interior fittings dirt rust caused by metallic objects in pockets etc and get caught in the wash and deposit a colour on the washing The wool wash cycle of this machine has been approved by The Woolmark Company for the washing of wool garments labelled as hand wash provided that the garments are washed according to the instructions issued by the manufacturer of this washing machi...

Page 75: ...rine bleach will corrode the stainless steel drum Over foaming and bubbling leakage and breakdown Non dissolution overflowing from the insert tray to the drum soiling of clothes and build up of mildew Liquid detergents can not be used with with Prewash or Delay Start washing If using liquid detergent do not put it directly in the drum Liquid detergent should be placed in the input tray indicated f...

Page 76: ...weatshirts and vice versa Use natural drying for these fabric types when laundering them for the first time After washing if using the dryer to dry garments of a different colour run the rinse cycle more than one time to clean the drum After the dry cycle finishes and the drum is emptied use a wet cloth to wipe away any dirt from the drum packing and door Piling and fluffing may also occur with ga...

Page 77: ...iately as tilting can occur with both with heavy and light laundry loads please load appropriately The strength of vibration is also affected by the floor surface where the machine is installed Vibration may cause the machine to move if it is installed on slippery surfaces such as tiles Do not place rugs carpets mats shoes or similar items in the drum Do not put stuffed items in the drum pillows c...

Page 78: ...licate items The dryer operation functions on the water cooled condensation principle Be sure to keep the water faucet fully open during drying Also please make sure that the drain hose is connected to a drain or drain pipe Not to be used for waterproof or water repellant clothing or rubber or rubberised materials wetsuits rainwear anoraks diapers etc Risk of fire damage or breakdown during drying...

Page 79: ...le to stick to them Wash them separately for best results To prevent the laundry from generating static electricity after drying add dryer type or tumble dry type fabric softener before starting the wash The average drying time for a timed drying are indicated in the Dry Time option see page 62 The experience will help you to dry your laundry in a more suitable way according to the different fabri...

Page 80: ...ure Low temperature On clothes hanger On the line Energetic wash Delicate wash warning CARE AND CLEANING 10 The water we use normally contains lime It is a good idea to periodically use a water softening powder in the machine Clean the appliance only with soap and warm water Fully dry all the surfaces You must DISCONNECT the appliance from the electricity supply before you can carry out any cleani...

Page 81: ...t is dissipated If using commercially available cleaners please be aware of the following Use commercially available stainless or plastic drum type cleaners Empty the drum and open it Rotate the dial and select Tub Clean Press Start Pause to start the Tub Clean course After cleaning always open and clean the drainage filter Always ensure that the drainage filter is clean whenever washing laundry T...

Page 82: ...e because of the blockage of the drain pump The display shows an alarm code because of the problem with water drain Regularly examine the drain pump and make sure that it is clean Clean the pump if 1 Disconnect the mains plug from the mains socket WARNING 2 Do not remove the filter while the appliance is operating Do not clean the drain pump if the water in the appliance is hot The water must be c...

Page 83: ...ater put the drainage duct back again and empty the container Do step 3 again and again until no more water flows out from the drain pump 6 Remove fluff and objects from the pump filter if there are any 7 Clean the filter under the water tap 5 Pull back the drainage duct and turn the filter counter clockwise to remove it ...

Page 84: ...hat the impeller of the pump can turn If this does not occur contact the service centre 9 Put the filter back in the pump Make sure that you correctly tighten the filter to prevent leakages 10 Close the drain pump door ...

Page 85: ...t hose again Make sure that the couplings are tight to prevent leakages If the appliance is installed in an area where the temperature can be less than 0 C remove the remaining water from the inlet hose and the drain pump Emergency Drain 10 9 Frost Precautions Disconnect the main plug from the main socket Turn off the water tap 1 2 Remove the water inlet hose 3 Remove the drain hose from the rear ...

Page 86: ...d code Check the inlet hose connection The end of the drain hose is too low code Refer to relevant paragraph in water drainage section The filter in the inlet hose is blocked code Clean the water inlet hose filter The door is not properly closed code Close the door firmly The water tap is closed code Open the water tap The washer dryer does not start The machine does not fill the water The machine...

Page 87: ...phase again Load more laundry The laundry is not evenly distributed in the drum There is very little laundry in the drum Unstable floors eg wooden floors There is water in the drum You must drain the water to open the door refer Opening The Door on page 68 Contact Service If you need to open the door please read carefully Emergency door opening on next page This problem may be caused by a failure ...

Page 88: ...etection device has cut in because the laundry is not evenly distributed in the drum The laundry is redistributed by reverse rotation of the drum This may happen several times before the unbalance disappears and normal spinning can resume If after 10 minutes the laundry is still not evenly distributed in the drum the machine will not spin In this case redistribute the load manually and select the ...

Page 89: ...at the drum is not rotating Wait until the drum stops rotating if necessary Make sure that the water level inside the drum is not too high If necessary perform an Emergency Drain see page 85 2 Remove the filter door as picture below 3 While pulling the emergency unlock strap red strap downward pull the door handle to open the door 4 Take out the laundry 5 Re assemble the filter door squeeze pullin...

Page 90: ...tly you will help prevent potential negative consequences for the environment and human health which could otherwise be caused by inappropriate waste handling of this product For more detailed information about recycling of this product please contact your local city office your household waste disposal service or the shop where you purchased the product 12 1 Packaging Materials 12 3 Ecological Hi...

Page 91: ...hat water is not dripping from the inflow tap or from the outflow hose at the connection point and that there is counterflow due to clogging of the outflow hose When washing check from time to time that there are no drops of water at the connection points of the inflow and outflow hoses or on the floor If there is leaking tighten the water tap and contact our service center Take care to attach the...

Page 92: ...ance If you are moving to an area with a different frequency These numbers are written on the inside of the glass door Make sure of the product number PNC and serial number S N Niigata Gunma Saitama Tokyo Kanagawa Chiba Tochigi Ibaraki Fukushima Shizuoka Fujikawa Fujikawa Shizuoka Aichi Nagano Toyama Gifu Ishikawa Ishikawa Fukui Shiga Triple Yamanashi 60Hz 50Hz Frequency band 50Hz 60Hz areas ...

Page 93: ...cycling office at your local municipal office If selling the appliance to a reliable dealer second hand ensure that its own dedicated transformers directions for usage and installation manual are handed over with the appliance The proper installation of the appliance is not possible without the installation manual Disconnect the power cable and remove the door before recycling this appliance Do no...

Page 94: ...e assume no liability whatsoever If the appliance has been used or installed in a commercial environment or in a healthcare provider nursing home or similar institution or if it has been mounted on a vehicle or on a ship or used outdoors or in a communal area If the malfunction or damage is due to improper operation faulty maintenance or tampering If the reason for the breakdown damage or other im...

Page 95: ...e to describe the problem to the dealer or the service center in as much detail as possible power is not being fed into the appliance error message is given etc The product guarantee commits us to effect a repair according to the terms described within the period stated It does not affect your statutory rights Please contact your dealer or the service center with regard to any questions or concern...

Page 96: ...ng sound Any other abnormality or breakage Pools of water constantly forming own the floor The electric cord is deeply scratched or twisted To prevent damage or breakdown stop using the machine if you notice any of these conditions and immediately pull out the electrical plug Drop the single breaker and immediately consult your dealer or our service centre for inspection or repair Stop using Troub...

Page 97: ...se delivery notice receipt etc Missing stamp or chop may invalidate the terms of repair This document will not be re issued Please keep it safe If the dealer has not stamped the section on the date of purchase please fill in the appropri ate information If requesting a repair please refer to the section of this document to explain the problem in as much detail as possible to the dealer or the serv...

Page 98: ......

Page 99: ......

Page 100: ...G0014301 004 A00973098 ...

Reviews: