background image

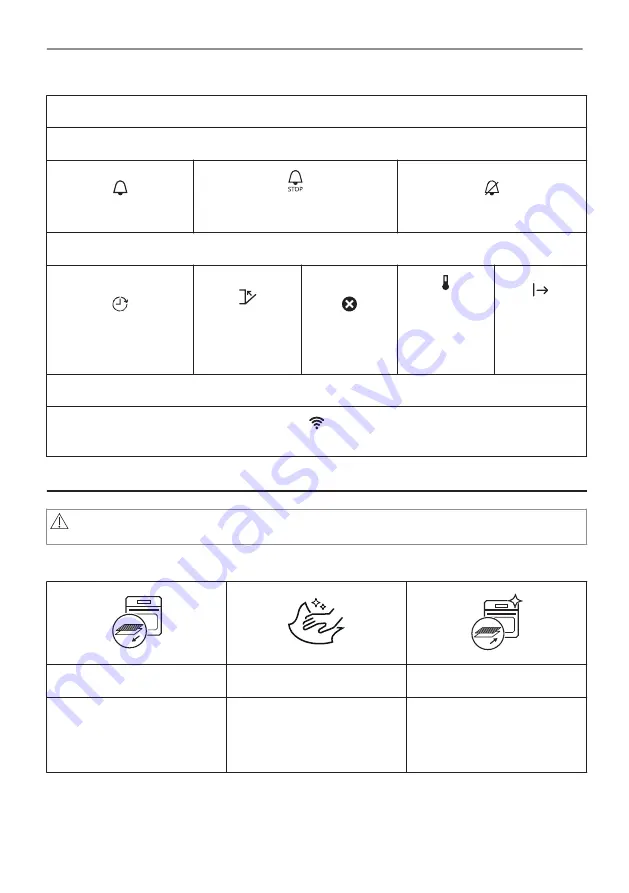
Display indicators

Sound alarm function indicators - when the set time of cooking ends, the signal sounds.

The function is on.

The function is on.

Cooking stops automatically.

Sound alarm is off.

Timer indicators

The timer starts at a lat‐

er time.

The timer starts

after closing the

oven door.

To cancel the

setting.

The timer

starts when

the oven rea‐

ches the set

temperature.

The timer

starts when

cooking

starts.

Wi-Fi indicator - the oven can be connected to Wi-Fi.

Wi-Fi connection is turned on.

5. BEFORE FIRST USE

WARNING!

Refer to Safety chapters.

5.1 Initial Cleaning

Step 1

Step 2

Step 3

Remove all accessories and

removable shelf supports from

the oven.

Clean the oven and the ac‐

cessories with a soft cloth,

warm water and a mild deter‐

gent.

Place the accessories and the

removable shelf supports in

the oven.

5.2 First connection

The display shows welcome message after the first connection.

12/56

BEFORE FIRST USE

Summary of Contents for BFS9800M

Page 1: ...USER MANUAL EN User Manual Steam oven BFS9800M BHS9800M ...

Page 2: ...tion General information and tips Environmental information CONTENTS 1 SAFETY INFORMATION 3 1 1 Children and vulnerable people safety 3 1 2 General Safety 4 2 SAFETY INSTRUCTIONS 5 2 1 Installation 5 2 2 Electrical connection 6 2 3 Use 6 2 4 Care and cleaning 7 2 5 Steam Cooking 8 2 6 Internal lighting 8 2 7 Service 8 2 8 Disposal 8 3 PRODUCT DESCRIPTION 9 3 1 General overview 9 3 2 Accessories 9 ...

Page 3: ... 12 2 How to manage Error codes 45 12 3 Service data 46 13 ENERGY EFFICIENCY 46 13 1 Product Information and Product Information Sheet 46 13 2 Energy saving 47 14 MENU STRUCTURE 48 14 1 Menu 48 14 2 Submenu for Cleaning 48 14 3 Submenu for Options 49 14 4 Submenu for Connections 49 14 5 Submenu for Setup 50 14 6 Submenu for Service 50 15 IT S EASY 51 16 TAKE A SHORTCUT 53 17 ENVIRONMENTAL CONCERNS...

Page 4: ...ll not carry out cleaning and user maintenance of the appliance without supervision 1 2 General Safety Only a qualified person must install this appliance and replace the cable Do not use the appliance before installing it in the built in structure Disconnect the appliance from the power supply before carrying out any maintenance If the mains power supply cable is damaged it must be replaced by th...

Page 5: ...h the appliance Always take care when moving the appliance as it is heavy Always use safety gloves and enclosed footwear Do not pull the appliance by the handle Install the appliance in a safe and suitable place that meets installation requirements Keep the minimum distance from other appliances and units Before mounting the appliance check if the oven door opens without restraint The appliance is...

Page 6: ...es touch or come near the appliance door or the niche below the appliance especially when it operates or the door is hot The shock protection of live and insulated parts must be fastened in such a way that it cannot be removed without tools Connect the mains plug to the mains socket only at the end of the installation Make sure that there is access to the mains plug after the installation If the m...

Page 7: ...ist dishes and food in the appliance after you finish the cooking be careful when you remove or install the accessories Discoloration of the enamel or stainless steel has no effect on the performance of the appliance Use a deep pan for moist cakes Fruit juices cause stains that can be permanent This appliance is for cooking purposes only It must not be used for other purposes for example room heat...

Page 8: ...e physical conditions in household appliances such as temperature vibration humidity or are intended to signal information about the operational status of the appliance They are not intended to be used in other applications and are not suitable for household room illumination This product contains a light source of energy efficiency class G Use only lamps with the same specifications 2 7 Service T...

Page 9: ... drawer Socket for the food sensor Heating element Lamp Fan Descaling pipe outlet Shelf support removable Shelf positions 3 2 Accessories Wire shelf For cookware cake tins roasts Baking tray For cakes and biscuits Grill Roasting pan To bake and roast or as a pan to collect fat 9 56 PRODUCT DESCRIPTION ...

Page 10: ...ing water away from the food during steam cooking Use it to prepare vegetables fish chicken breast The set is not suitable for food that needs to soak in the water e g rice polenta pasta 4 HOW TO TURN OVEN ON AND OFF 4 1 Control panel 1 2 3 4 5 6 1 ON OFF Press and hold to turn the oven on and off 2 Lamp switch To turn the lamp on and off 3 Display Shows the current settings of the oven 10 56 HOW ...

Page 11: ...reen with the heating function and the default temperature 09 37 If you do not use the oven for 2 minutes the display goes to standby 60 C 200 C 12 30 When you cook the display shows the set functions and other available options 100 C 12 30 25min Menu 85 C A I H G E F B C D The display with the maximum number of func tions set A Wi Fi selected models only B Information C Time of day D Menu E Tempe...

Page 12: ...set temperature The timer starts when cooking starts Wi Fi indicator the oven can be connected to Wi Fi Wi Fi connection is turned on 5 BEFORE FIRST USE WARNING Refer to Safety chapters 5 1 Initial Cleaning Step 1 Step 2 Step 3 Remove all accessories and removable shelf supports from the oven Clean the oven and the ac cessories with a soft cloth warm water and a mild deter gent Place the accessori...

Page 13: ...ction The oven wireless module starts within 90 sec Take a shortcut MENU ON Frequency 2 4 GHz WLAN 2412 2484 MHz Protocol IEEE 802 11b DSSS 802 11g n OFDM Max Power EIRP 20 dBm 100 mW 5 4 Software licences The software in this product contains components that are based on free and open source soft ware AEG gratefully acknowledges the contributions of the open software and robotics communi ties to ...

Page 14: ...the test paper supplied with the steam set Step 1 Step 2 Step 3 Step 4 Put the test paper into water for about 1 sec Do not put the test paper under running water Shake the test paper to remove the excess of water After 1 min check water hardness with the table below Set the water hardness level Menu Settings Setup Water hard ness The colours of the test paper continue to change Do not check water...

Page 15: ...How to set Heating functions Step 1 Turn on the oven Step 2 Hold the knob The display shows the default heating functions Step 3 Select the symbol of the heating function and press the knob to enter the submenu Step 4 Select the heating function and press the knob Step 5 Select Press the knob The display shows the temperature settings Step 6 Turn and press the knob to set temperature Step 7 Press ...

Page 16: ...r 6 3 How to use Water drawer Step 1 Push the front cover of the water draw er M A X Step 2 Fill the water drawer up to the maximum level You can do it in two ways A Leave the water drawer inside the oven and pour the water from a contain er B Remove the water drawer from the oven and fill it from a water tap 16 56 DAILY USE ...

Page 17: ...e temperature settings Step 4 Set the temperature and press the knob to confirm Type of the steam heating function depends on the set temperature Steam for Steaming 50 100 C For steaming vegetables grains legumes seafood terrines and spoon desserts Steam for Stewing 105 130 C For cooking stewed and braised meat or fish bread and poultry as well as cheesecakes and casseroles Steam for Gentle Crispi...

Page 18: ...led water Do not use other liquids Do not pour flammable or alco holic liquids into the water drawer Step 7 Wipe the outside of the water drawer with a soft cloth if needed Push the water draw er to its initial position Step 8 Press Steam appears after approximately 2 min When the oven reaches the set tempera ture the signal sounds Step 9 When the water drawer runs out of water the signal sounds R...

Page 19: ...o take out the vacuum bags When the oven is cold remove the water from the bottom of the cavity with a sponge Dry the cavity with a soft cloth Take a shortcut 6 6 How to set Assisted Cooking Every dish in this submenu has a recommended function and temperature You can adjust the time and the temperature For some of the dishes you can also cook with Weight Automatic Food Sensor The degree to which ...

Page 20: ...n To make gratins and to brown True Fan Cooking To bake on up to three shelf positions at the same time and to dry food Set the temperature 20 40 C lower than for Conventional Cooking Frozen Foods To make convenience food e g french fries potato wedges or spring rolls crispy Conventional Cooking To bake and roast food on one shelf position Pizza Function To bake pizza To make intensive browning an...

Page 21: ... e g pickles Dehydrating To dry sliced fruit vegetables and mushrooms Yoghurt Function To prepare yogurt The lamp in this function is off Plate Warming To preheat plates for serving Defrost To defrost food vegetables and fruit The defrosting time depends on the amount and size of the frozen food Au Gratin For dishes such as lasagna or potato gratin To make gratins and to brown Slow Cooking To prep...

Page 22: ...tables to find more information Steam Regenerat ing Food reheating with steam prevents surface drying Heat is distributed in a gentle and even way which allows to recover taste and aroma of food as just prepared This function can be used to reheat food directly on a plate You can reheat more than one plate at the same time using differ ent shelf positions Bread Baking Use this function to prepare ...

Page 23: ... the function is not interrupted and the oven operates with the highest energy efficiency possible When you use this function the lamp automatically turns off after 30 sec For the cooking instructions refer to Hints and tips chapter Moist Fan Baking For general energy saving recommendations refer to Energy Efficiency chapter Energy Saving 7 CLOCK FUNCTIONS 7 1 Clock functions description Clock fun...

Page 24: ...to set the clock Press the knob How to set cooking time Step 1 Select a heating function and set the temperature Step 2 Select Timer Step 3 Turn the knob to set the time Press the knob Step 4 Select End action Press the knob Timer starts counting down immediately Take a shortcut How to choose cooking start end option Step 1 Choose a heating function and set the temperature Step 2 Select Press the ...

Page 25: ... setting the end of cooking Step 1 Select Press the knob Step 2 Select Start criteria At a later time Step 3 Turn the knob to set the start time Press the knob twice to confirm How to extend cooking time When 10 of cooking time is left and the food seems not to be ready you can extend cooking time You can also change the oven function Step 1 Select Timer Step 2 Select preferred time icon to extend...

Page 26: ...re shelf Push the shelf between the guide bars of the shelf support Baking tray Deep pan Push the tray between the guide bars of the shelf support Wire shelf Baking tray Deep pan Push the tray between the guide bars of the shelf support and the wire shelf on the guide bars above 8 2 Food Sensor Food Sensor measures the temperature inside the food You can use it with every heating function 26 56 HO...

Page 27: ...re Step 3 Insert Food Sensor Meat poultry and fish Casserole Insert the tip of Food Sensor into the centre of meat fish in the thickest part if possible Make sure that at least 3 4 of Food Sensor is inside of the dish Insert the tip of Food Sensor exactly in the centre of the casserole Food Sensor should be stabi lized in one place during baking Use a solid in gredient to achieve that Use the rim ...

Page 28: ...Sensor plug from the socket and remove the dish from the oven WARNING There is a risk of burns as Food Sensor becomes hot Be careful when you unplug it and remove it from the food Take a shortcut 9 ADDITIONAL FUNCTIONS 9 1 How to save Favourites You can save your favourite settings such as the heating function the cooking time the temperature or the cleaning function You can save 3 favourite setti...

Page 29: ...ght Food sensor End time Slow Cooking 9 3 Cooling fan When the oven operates the cooling fan turns on automatically to keep the surfaces of the oven cool If you turn off the oven the cooling fan can continue to operate until the oven cools down 9 4 Mechanical door lock The door lock is unlocked when you buy the oven CAUTION Do not move the door lock vertically Do not push the door lock when you cl...

Page 30: ... unlock the door push the door lock back into the panel Opening the locked door You can open the door when the door lock is locked Step 1 Push the door lock slightly and open the door by pulling it with the handle 1 2 When you close the door make sure that the door lock remains locked 30 56 ADDITIONAL FUNCTIONS ...

Page 31: ...s on our website To find the Cooking Hints check the PNC number on the rating plate on the front frame of the oven cavity 10 2 Moist Fan Baking For the best results follow suggestions listed in the table below C min Sweet rolls 16 pieces baking tray or dripping pan 180 2 25 35 Swiss Roll baking tray or dripping pan 180 2 15 25 Whole fish 0 2 kg baking tray or dripping pan 180 3 15 25 Cookies 16 pi...

Page 32: ...8 cm diameter Dark non reflective 26 cm diameter Ceramic 8 cm diameter 5 cm height Dark non reflective 28 cm diameter 10 4 Cooking tables for test institutes Information for test institutes Tests according to EN 60350 IEC 60350 BAKING ON ONE LEVEL Baking in tins C min Fatless sponge cake True Fan Cooking 140 150 35 50 2 Fatless sponge cake Conventional Cook ing 160 35 50 2 Apple pie 2 tins Ø20 cm ...

Page 33: ... 30 Small cakes 20 per tray preheat the empty oven True Fan Cooking 150 20 35 Small cakes 20 per tray preheat the empty oven Conventional Cooking 170 20 30 MULTILEVEL BAKING Biscuits C min Short bread Pastry strips True Fan Cooking 140 25 45 1 4 Small cakes 20 per tray preheat the empty oven True Fan Cooking 150 23 40 1 4 Fatless sponge cake True Fan Cooking 160 35 50 1 4 33 56 HINTS AND TIPS ...

Page 34: ...nstitutes Tests for the function Full Steam Tests according to IEC 60350 Set the temperature to 100 C Container Gastro norm kg min Broccoli pre heat the emp ty oven 1 x 2 3 perfo rated 0 3 3 8 9 Put the baking tray on the first shelf position Broccoli pre heat the emp ty oven 1 x 2 3 perfo rated max 3 10 11 Put the baking tray on the first shelf position 34 56 HINTS AND TIPS ...

Page 35: ...aning Agents Clean the front of the oven with a soft cloth with warm water and a mild deter gent Clean the bottom of the cavity with a few drops of vinegar to remove limestone residue Use a cleaning solution to clean metal surfaces Clean stains with a mild detergent Everyday Use Clean the cavity after each use Fat accumulation or other residue may cause fire Do not store the food in the oven for l...

Page 36: ... Pull the front end of the shelf support away from the side wall Step 4 Pull the supports out of the rear catch Install the shelf supports in the opposite sequence 11 3 How to use Steam Cleaning Before you start Turn off the oven and wait until it is cold Remove all accessories and re movable shelf supports Clean the bottom of the cavity and the inner door glass with a soft cloth with warm water a...

Page 37: ... dry 11 4 Cleaning Reminder When the reminder appears cleaning is recommended Use the function Steam Cleaning Plus You can enable and disable the reminder in the menu Setup 11 5 How to clean Water drawer Step 1 Remove the water drawer from the oven Step 2 Remove the lid of the water drawer Lift the cover in correspondence with the protrusion in the rear X A M Step 3 Remove the wave breaker Pull it...

Page 38: ...eep pan on the first shelf position Step 2 Pour 250 ml of the descaling agent in the water drawer Step 3 Fill the remaining part of the water drawer with water to the maximum level Step 4 Select Menu Cleaning Step 5 Turn on the function and follow the instruction on the display The first part of descaling starts Step 6 After the first part is over empty the deep pan and put it back on the first sh...

Page 39: ...ends you to descale the oven Hard reminder Obligates you to descale the oven If you do not descale the oven when the hard reminder is on the steam functions are disabled These reminders activate each time you turn off the oven 11 8 How to use Rinsing Before you start Turn off the oven and wait until it is cold Remove all accessories Step 1 Place the deep pan on the first shelf position Step 2 Fill...

Page 40: ...ll Door You can remove the door and the internal glass panels to clean it The number of glass panels is different for different models WARNING The door is heavy CAUTION Carefully handle the glass especially around the edges of the front panel The glass can break Step 1 Fully open the door A A Step 2 Lift and press the clamping levers A on the two door hinges Step 3 Close the oven door to the first...

Page 41: ...clean the glass panels in the dish washer Step 8 After cleaning do the above steps in the opposite se quence Step 9 Install the smaller panel first then the larger and the door Make sure that the glasses are inserted in the correct position otherwise the surface of the door may overheat 11 12 How to replace Lamp WARNING Risk of electric shock The lamp can be hot Before you replace the lamp Step 1 ...

Page 42: ...remove the cover Step 3 Remove and clean the metal frame and the seal Step 4 Replace the lamp with a suitable 300 C heat resistant lamp Step 5 Install the metal frame and the seal Tighten the screws Step 6 Install the left shelf support 12 TROUBLESHOOTING WARNING Refer to Safety chapters 12 1 What to do if The oven does not turn on or does not heat up Possible cause Remedy The oven is not connecte...

Page 43: ...o Menu chapter Submenu for Op tions Components Description Remedy The lamp is burnt out Replace the lamp for details refer to Care and Cleaning chapter How to replace Lamp Water drawer does not work properly Description Possible cause Remedy The oven does not retain the water drawer after you insert it You did not fully press the wa ter drawer body Fully insert the water drawer into the oven Water...

Page 44: ...uch water on the bottom of the cavity after cleaning You put too much detergent in the oven before you started cleaning Next time evenly spread the thin layer of a detergent on the cavity walls Cleaning performance is not satisfactory You started cleaning when the oven was too hot Wait until the oven is cold Re peat cleaning You did not remove all the ac cessories from the oven be fore cleaning Re...

Page 45: ...r to Be fore first use chapter Wireless connection F604 the first connection to Wi Fi failed Turn the oven off and on and try again Refer to Before first use chapter Wireless connection F908 the oven system cannot connect with the control panel Turn the oven off and on When one of these error messages continues to appear on the display it means a faulty subsystem may have been disabled In such a c...

Page 46: ...e front frame of the oven cavity Do not remove the rating plate from the oven cavity We recommend that you write the data here Model MOD Product number PNC Serial number S N 13 ENERGY EFFICIENCY 13 1 Product Information and Product Information Sheet Supplier s name AEG Model identification BFS9800M 944188444 BHS9800M 944188443 Energy Efficiency Index 61 9 Energy efficiency class A Energy consumpti...

Page 47: ...with fan When possible use the cooking functions with fan to save energy Residual heat If a programme with the Duration or End Time selection is activated and the cooking time is longer than 30 min the heating elements automatically turn off earlier in some oven functions The fan and lamp continue to operate When you turn off the oven the display shows the residual heat You can use that heat to ke...

Page 48: ...uration Service Shows the software version and con figuration 14 2 Submenu for Cleaning Submenu Application Steam Cleaning Light cleaning Steam Cleaning Plus Thorough cleaning Descaling Cleaning of the steam generation circuit from residual lime stone Rinsing Cleaning of the steam generation circuit Use rinsing after frequent steam cooking Drying Procedure for drying the cavity from the condensati...

Page 49: ...arm for 30 minutes after cooking is finished When this function is on the message Keep warm started appears on the display It is available only for some of the heating functions and if Duration is set 14 4 Submenu for Connections Submenu Description Wi Fi To enable and disable Wi Fi Remote operation To enable and disable remote control Option visible only after you turn on Wi Fi Network To check n...

Page 50: ...te the tones for Alarm Error tones Turns the alarm tones on and off Buzzer volume Sets the volume of key tones and signals Display brightness Sets the display brightness Water hardness Sets the water hardness Temperature unit Sets the temperature unit to C F 14 6 Submenu for Service Submenu Description Demo mode Activation deactivation code 2468 Licence Information about licenses Software version ...

Page 51: ...Step 3 Press and hold press the oven func tion and then press the knob Press Quick Off Turn off the oven at any time any screen or message press and hold until the oven turns off Start cooking Step 1 Step 2 Step 3 Step 4 press to turn on the oven select the heating function and press the knob turn the knob to set the tempera ture and press press to start cooking Steam cooking Steamify Set the temp...

Page 52: ...from the shortcuts Step 1 Step 2 Select Timer Press the knob Select preferred timer value and press the knob 10 Finish assist Use 10 Finish assist to add extra time or change cooking function when 10 of the cooking time is left 1 min 5 min 10 min press the preferred time icon to extend the cooking time Change function Select preferred function select preferred function Press the knob Clean the ove...

Page 53: ... TAKE A SHORTCUT Here you can see all the useful shortcuts You can also find them in the dedicated chapters in the user manual Wireless connection MENU ON How to set Heating functions How to set Steamify Cooking with a steam heating function How to set SousVide Cooking How to set Assisted cooking MENU How to set Cooking time 53 56 IT S EASY ...

Page 54: ...How to delay Start and end of cooking How to cancel Set Timer How to use Food Sensor 54 56 TAKE A SHORTCUT ...

Page 55: ...recycle it Help protect the environment and human health by recycling waste of electrical and electronic appliances Do not dispose of appliances marked with the symbol with the household waste Return the product to your local recycling facility or contact your municipal office 55 56 ENVIRONMENTAL CONCERNS ...

Page 56: ...www aeg com shop 867362063 B 412021 ...

Reviews: