


24
24
side of the blade, but not in line with the blade.
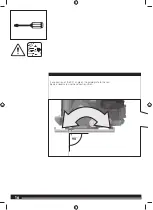
Kickback could cause the saw to jump backwards, but kickback forces
can be controlled by the operator, if proper precautions are taken.
When blade is binding, or when interrupting a cut for any reason,
release the trigger and hold the saw motionless in the material
until the blade comes to a complete stop. Never attempt to
remove the saw from the work or pull the saw backward while
the blade is in motion or kickback may occur.
Investigate and take
corrective actions to eliminate the cause of blade binding.
When restarting a saw in the workpiece, centre the saw blade in
the kerf so that the saw teeth are not engaged into the material.
If a saw blade binds, it may walk up or kickback from the workpiece
as the saw is restarted.
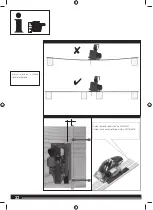
Support large panels to minimise the risk of blade pinching and
kickback.
Large panels tend to sag under their own weight. Supports
must be placed under the panel on both sides, near the line of cut and
near the edge of the panel.
Do not use dull or damaged blades.
Unsharpened or improperly set
blades produce narrow kerf causing excessive friction, blade binding
and kickback.
Blade depth and bevel adjusting locking levers must be tight and
secure before making cut.
If blade adjustment shifts while cutting, it
may cause binding and kickback.
Use extra caution when sawing into existing walls or other blind
areas.
The protruding blade may cut objects that can cause kickback.
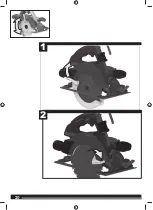
LOWER GUARD FUNCTION
Check lower guard for proper closing before each use. Do not
operate the saw if lower guard does not move freely and close
instantly. Never clamp or tie the lower guard into the open
position.
If saw is accidentally dropped, lower guard may be bent.
Raise the lower guard with the retracting handle and make sure it
moves freely and does not touch the blade or any other part, in all
angles and depths of cut.
Check the operation of the lower guard spring. If the guard and
the spring are not operating properly, they must be serviced
before use.
Lower guard may operate sluggishly due to damaged
parts, gummy deposits, or a build-up of debris.
The lower guard may be retracted manually only for special cuts
such as “plunge cuts” and “compound cuts”. Raise the lower
guard by the retracting handle and as soon as the blade enters
the material, the lower guard must be released
.
For all other
sawing, the lower guard should operate automatically.
Always observe that the lower guard is covering the blade before
placing saw down on bench or floor.
An unprotected, coasting
blade will cause the saw to walk backwards, cutting whatever is in its
path. Be aware of the time it takes for the blade to stop after switch
is released.
ADDITIONAL SAFETY AND WORKING INSTRUCTIONS
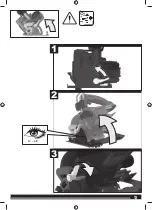
Wear ear protectors.
Exposure to noise can cause hearing loss.
Always wear goggles when using the machine. It is recommended to
wear gloves, sturdy non slipping shoes and apron.
The dust produced when using this tool may be harmful to health. Do
not inhale the dust.
Do not use saw blades not corresponding to the key data given in
these instructions for use.
Use only blade diameter(s) in accordance with the markings.
Do not use any abrasive wheels.
Identify the correct saw blade to be used for the material to be cut.
Use only saw blades that are marked with a speed equal or higher
than the speed marked on the tool.
Use only saw blades recommended by the manufacturer, which
conform to EN 847-1, if intended for wood and analogous materials.
Avoid overheating the blade tips and melting the plastic.
Wear a dust mask.
Do not fix the on/off switch in the “on” position when using the saw
hand-held.
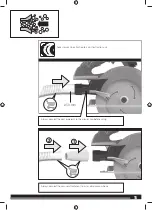
Manually retract the lower guard by
Raise the lower guard by the retracting handle and ensure that the
lower guard returns to the original position. If the lower guard does
not function properly. Stop using the product and have it repaired.
Ambient temperature range for tool during operation is between 0°C
and 40°C.
Ambient temperature range for tool storage is between 0°C and 40°C.
The recommended ambient temperature range for the charging
system during charging is between 10°C and 38°C.
RESIDUAL RISKS
Even when the product is used as prescribed, it is still impossible
to completely eliminate certain residual risk factors. The following
hazards may arise and the operator should pay special attention to
avoid the following:
Ŷ
Injury caused by kickback
–
Read and understand the information in this manual.
Ŷ
Injury caused by dust
–
Dust may enter the eyes or respiratory system. Wear eye
protection at all times. Wear appropriate dust control mask
with filters suitable for protecting against particles from the
material being cut. Do not eat, drink, or smoke in the work
area. Ensure adequate ventilation.
Ŷ
Injury caused by electric shock
–
The blade may contact hidden wiring, causing parts of the
product to become live. Always hold the product by the
designated handles and take care when blind-cutting into
walls and floors where cables may be hidden.
Ŷ
Injury caused by contact with the blade
–
The blades are very sharp and will become hot during use.
Wear gloves when changing blades. Keep hands away from
the cutting area at all times. Never hold workpiece being
cut in your hands or across your leg. Clamp the workpiece
whenever possible.
Ŷ
Injury caused by vibration
–
Limit exposure. See Risk Reduction.
RISK REDUCTION
It has been reported that vibrations from handheld tools may
contribute to a condition called Raynaud’s Syndrome in certain
individuals. Symptoms may include tingling, numbness and blanching
of the fingers, usually apparent upon exposure to cold. Hereditary
factors, exposure to cold and dampness, diet, smoking and work
practices are all thought to contribute to the development of these
symptoms. There are measures that can be taken by the operator to
possibly reduce the effects of vibration:
Ŷ
Keep your body warm in cold weather. When operating the unit
wear gloves to keep the hands and wrists warm. It is reported
that cold weather is a major factor contributing to Raynaud’s
Syndrome.
Ŷ
After each period of operation, exercise to increase blood
circulation.
Ŷ
Take frequent work breaks. Limit the amount of exposure per day.
If you experience any of the symptoms of this condition, immediately
discontinue use and see your doctor about these symptoms.
WARNING!
Injuries may be caused or aggravated by prolonged use of a tool.
When using any tool for prolonged periods, ensure you take regular
breaks.
ADDITIONAL BATTERY SAFETY WARNINGS
Summary of Contents for BKS18BR
Page 1: ...BKS18BR Original instructions ...
Page 4: ...4 4 15 10 20 8 16 90 STOP START 12 ...
Page 5: ...5 5 6 18 14 19 11 13 21 ...
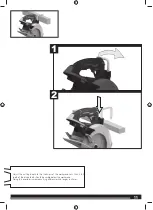
Page 6: ...6 6 Remove the battery pack before starting any work on the machine 1 1 2 2 Click ...
Page 7: ...7 7 75 100 50 75 25 50 0 25 ...
Page 8: ...8 8 1 2 1 2 3 ...
Page 9: ...9 9 3 4 1 2 3 ...
Page 10: ...10 10 0 54 mm 1 2 3 ...
Page 13: ...13 13 0 45 2 1 3 ...
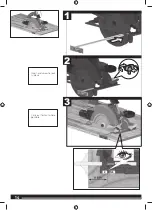
Page 14: ...14 14 1 2 3 Carry out test cut where possible Insert and screw to lock in place Û Û ...
Page 17: ...17 17 0 1 4 2 3 ...
Page 19: ...19 19 1 2 3 1 1 2 Replace the dust pipe joint if worn or broken before use ...
Page 20: ...20 20 1 2 ...
Page 21: ...21 21 9 max 68mm Let the tool do the work Pushing this saw will reduce efficiencies ...
Page 26: ......
Page 27: ......


