background image

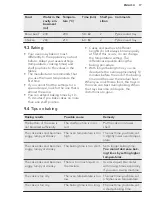
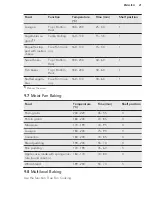
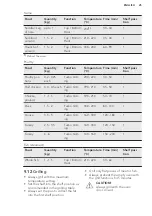
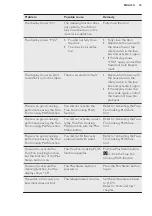
Food

Quantity

Function

Tempera-
ture (°C)

Time (min)

Shelf posi-
tion

Roast beef or fil-
let: rare

per cm of
thickness

Turbo Grill-
ing

190 - 200

1)

5 - 6

1

Roast beef or fil-
let: medium

per cm of
thickness

Turbo Grill-
ing

180 - 190

1)

6 - 8

1

Roast beef or fil-
let: well done

per cm of
thickness

Turbo Grill-
ing

170 - 180

1)

8 - 10

1

1) 

Preheat the oven.

Pork

Food

Quantity
(kg)

Function

Tempera-
ture (°C)

Time (min)

Shelf posi-
tion

Shoulder /
Neck / Ham
joint

1 - 1.5

Turbo Grill-
ing

160 - 180

90 - 120

1

Chop / Spare
rib

1 - 1.5

Turbo Grill-
ing

170 - 180

60 - 90

1

Meatloaf

0.75 - 1

Turbo Grill-
ing

160 - 170

50 - 60

1

Pork knuckle
(precooked)

0.75 - 1

Turbo Grill-
ing

150 - 170

90 - 120

1

Veal

Food

Quantity
(kg)

Function

Temperature
(°C)

Time (min)

Shelf posi-
tion

Roast veal

1

Turbo Grill-
ing

160 - 180

90 - 120

1

Knuckle of
veal

1.5 - 2

Turbo Grill-
ing

160 - 180

120 - 150

1

Lamb

Food

Quantity
(kg)

Function

Temperature
(°C)

Time (min)

Shelf posi-
tion

Leg of lamb /
Roast lamb

1 - 1.5

Turbo Grill-
ing

150 - 170

100 - 120

1

Saddle of
lamb

1 - 1.5

Turbo Grill-
ing

160 - 180

40 - 60

1

www.aeg.com

24

Summary of Contents for BP301350

Page 1: ...EN User Manual Oven BP301350 BP301352 ...

Page 2: ...ry appliances Please spend a few minutes reading to get the very best from it Visit our website for Get usage advice brochures trouble shooter service information www aeg com webselfservice Register your product for better service www registeraeg com Buy Accessories Consumables and Original spare parts for your appliance www aeg com shop CUSTOMER CARE AND SERVICE Always use original spare parts Wh...

Page 3: ...rstand the hazards involved Do not let children play with the appliance Keep all packaging away from children and dispose of it appropriately Keep children and pets away from the appliance when it operates or when it cools down Accessible parts are hot If the appliance has a child safety device this should be activated Children shall not carry out cleaning and user maintenance of the appliance wit...

Page 4: ...SAFETY INSTRUCTIONS 2 1 Installation WARNING Only a qualified person must install this appliance Remove all the packaging Do not install or use a damaged appliance Follow the installation instruction supplied with the appliance Always take care when moving the appliance as it is heavy Always use safety gloves and enclosed footwear Do not pull the appliance by the handle Keep the minimum distance f...

Page 5: ... operate the appliance with wet hands or when it has contact with water Do not apply pressure on the open door Do not use the appliance as a work surface or as a storage surface Open the appliance door carefully The use of ingredients with alcohol can cause a mixture of alcohol and air Do not let sparks or open flames to come in contact with the appliance when you open the door Do not put flammabl...

Page 6: ...ile the Pyrolytic cleaning is in operation The appliance becomes very hot and hot air is released from the front cooling vents Pyrolytic cleaning is a high temperature operation that can release fumes from cooking residues and construction materials as such consumers are strongly advised to provide good ventilation during and after each Pyrolytic cleaning provide good ventilation during and after ...

Page 7: ...an Authorised Service Centre Use original spare parts only 3 PRODUCT DESCRIPTION 3 1 General overview 8 10 9 4 1 2 3 5 6 7 1 2 3 4 5 13 11 12 1 Control panel 2 Knob for the oven functions 3 Power lamp symbol 4 Electronic programmer 5 Knob for the temperature 6 Temperature indicator symbol 7 Plus Steam button 8 Heating element 9 Lamp 10 Fan 11 Shelf support removable 12 Cavity embossment 13 Shelf p...

Page 8: ... After the software version goes off the display shows and 12 00 12 flashes 1 Press or to set the current hour 2 Press to confirm or the set hour will be saved automatically after 5 seconds The display shows and the set hour 00 flashes 3 Press or to set the current minutes 4 Press to confirm or the set minutes will be saved automatically after 5 seconds The display shows the new time 4 3 Changing ...

Page 9: ...ght To activate the lamp without a cooking function True Fan Cook ing To bake on up to three shelf positions at the same time and to dry food Set the temperature 20 40 C lower than for Top Bottom Heat True Fan Cook ing PLUS To add humidity during the cooking To get the right colour and crispy crust during baking To give more juiciness during reheating Pizza Setting To bake food on one shelf positi...

Page 10: ...umidity can cause burns Do not open the appliance door when the function True Fan Cooking PLUS operates with the exception of preheating Open the appliance door with care after the True Fan Cooking PLUS function stops Refer to Hints and tips chapter 1 Open the oven door 2 Fill the cavity embossment with tap water The maximum capacity of the cavity embossment is 250 ml Fill the cavity embossment wi...

Page 11: ...how that the oven temperature increases or decreases 6 CLOCK FUNCTIONS 6 1 Clock functions table Clock function Application TIME OF DAY To set change or check the time of day Refer to Set ting the time MINUTE MINDER Use to set a countdown time maximum 23 h 59 min This function has no effect on the operation of the ap pliance You can set the MINUTE MINDER at any time also if the appliance is off DU...

Page 12: ...R First you set the seconds then the minutes and then the hours At first the time is calculated in minutes and seconds When the time you set is longer than 60 minutes the symbol comes on in the display The appliance now calculates the time in hours and minutes 3 The MINUTE MINDER starts automatically after five seconds After 90 of the set time an acoustic signal sounds 4 When the set time ends an ...

Page 13: ...elescopic runners inserting the accessories With the telescopic runners you can put in and remove the shelves more easily CAUTION Do not clean the telescopic runners in the dishwasher Do not lubricate the telescopic runners CAUTION Make sure you push back the telescopic runners fully in the appliance before you close the oven door Wire shelf Put the wire shelf on the telescopic runners so that the...

Page 14: ... preferences 2 Press and hold and at the same time for 2 seconds An acoustic signal sounds Loc comes on in the display To deactivate the Function Lock repeat step 2 If the Pyrolysis function operates the door is locked and comes on in the display Loc comes on in the display when you turn the knob for the temperature or press a button When you turn the knob for the oven functions the appliance deac...

Page 15: ...he quality and quantity of the ingredients used 9 1 Inner side of the door In some models on the inner side of the door you can find the numbers of the shelf positions information about the oven functions recommended shelf positions and temperatures for typical dishes 9 2 True Fan Cooking PLUS Before preheating fill the cavity embossment with water only when the oven is cold Refer to Activating th...

Page 16: ...0 180 200 35 50 21 Frozen croissant 200 170 180 15 25 21 1 Preheat in an empty oven for 10 minutes before cooking Food regeneration Food Water in the cavi ty embossment ml Temperature C Time min Shelf posi tion Bread 100 110 15 25 2 Bread rolls 100 110 10 20 2 Homestyle pizza 100 110 15 25 2 Focaccia 100 110 15 25 2 Vegetables 100 110 15 25 2 Rice 100 110 15 25 2 Pasta 100 110 15 25 2 Meat 100 110...

Page 17: ...10 minutes before the end of the baking time and then use the residual heat When you cook frozen food the trays in the oven can twist during baking When the trays become cold again the distortions are gone 9 4 Tips on baking Baking results Possible cause Remedy The bottom of the cake is not browned sufficiently The shelf position is incor rect Put the cake on a lower shelf The cake sinks and becom...

Page 18: ...ns Food Function Temperature C Time min Shelf position Ring cake Brio che True Fan Cook ing 150 160 50 70 1 Madeira cake Fruit cakes True Fan Cook ing 140 160 70 90 1 Fatless sponge cake Fatless sponge cake True Fan Cook ing 140 150 35 50 2 Fatless sponge cake Fatless sponge cake Top Bottom Heat 160 35 50 2 Flan base short pastry True Fan Cook ing 170 1801 10 25 2 Flan base sponge mixture True Fan...

Page 19: ...eat 190 2101 20 35 3 Swiss roll Top Bottom Heat 180 2001 10 20 3 Cake with crum ble topping dry True Fan Cook ing 150 160 20 40 3 Buttered al mond cake Sugar cakes Top Bottom Heat 190 2101 20 30 3 Fruit flans made with yeast dough sponge mixture 2 True Fan Cook ing 150 35 55 3 Fruit flans made with yeast dough sponge mixture 2 Top Bottom Heat 170 35 55 3 Fruit flans made with short pastry True Fan...

Page 20: ...ngues True Fan Cook ing 80 100 120 150 3 Macaroons True Fan Cook ing 100 120 30 50 3 Biscuits made with yeast dough True Fan Cook ing 150 160 20 40 3 Puff pastries True Fan Cook ing 170 1801 20 30 3 Rolls True Fan Cook ing 1601 10 25 3 Rolls Top Bottom Heat 190 2101 10 25 3 Small cakes Small cakes 20 per tray True Fan Cook ing 1501 20 35 3 Small cakes Small cakes 20 per tray Top Bottom Heat 1701 2...

Page 21: ... 60 1 Stuffed vegeta bles True Fan Cook ing 160 170 30 60 1 1 Preheat the oven 9 7 Moist Fan Baking Food Temperature C Time min Shelf position Pasta gratin 200 220 45 55 3 Potato gratin 180 200 70 85 3 Moussaka 170 190 70 95 3 Lasagne 180 200 75 90 3 Cannelloni 180 200 70 85 3 Bread pudding 190 200 55 70 3 Rice pudding 170 190 45 60 3 Apple cake made with sponge mix ture round cake tin 160 170 70 ...

Page 22: ...60 20 40 1 4 1 3 5 Short bread Short bread Pastry Stripes 140 25 45 1 4 1 3 5 Biscuits made with sponge mixture 160 170 25 40 1 4 Biscuits made with egg white meringues 80 100 130 170 1 4 Macaroons 100 120 40 80 1 4 Biscuits made with yeast dough 160 170 30 60 1 4 Puff pastries 170 1801 30 50 1 4 Rolls 180 20 30 1 4 Small cakes Small cakes 20 per tray 1501 23 40 1 4 1 Preheat the oven 9 9 Pizza Se...

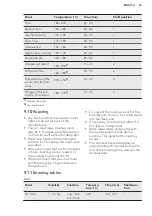
Page 23: ...wire shelf above the deep pan Roast lean meats in the roasting tin with the lid This keeps the meat more succulent All types of meat that can be browned or have crackling can be roasted in the roasting tin without the lid We recommend that you cook meat and fish weighing 1 kg and above in the appliance To prevent the meat juices or fat from burning onto the pan put some liquid into the deep pan If...

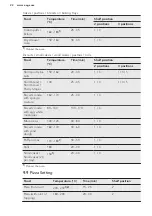
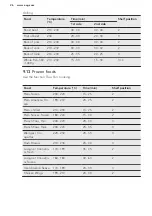
Page 24: ...houlder Neck Ham joint 1 1 5 Turbo Grill ing 160 180 90 120 1 Chop Spare rib 1 1 5 Turbo Grill ing 170 180 60 90 1 Meatloaf 0 75 1 Turbo Grill ing 160 170 50 60 1 Pork knuckle precooked 0 75 1 Turbo Grill ing 150 170 90 120 1 Veal Food Quantity kg Function Temperature C Time min Shelf posi tion Roast veal 1 Turbo Grill ing 160 180 90 120 1 Knuckle of veal 1 5 2 Turbo Grill ing 160 180 120 150 1 La...

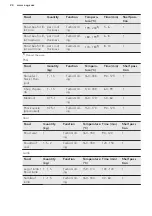
Page 25: ...210 50 70 1 Duck 1 5 2 Turbo Grill ing 180 200 80 100 1 Goose 3 5 5 Turbo Grill ing 160 180 120 180 1 Turkey 2 5 3 5 Turbo Grill ing 160 180 120 150 1 Turkey 4 6 Turbo Grill ing 140 160 150 240 1 Fish steamed Food Quantity kg Function Temperature C Time min Shelf posi tion Whole fish 1 1 5 Top Bottom Heat 210 220 40 60 1 9 12 Grilling Always grill with the maximum temperature setting Set the shelf...

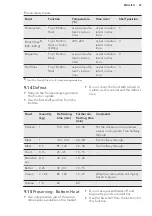
Page 26: ...Use the function True Fan Cooking Food Temperature C Time min Shelf position Pizza frozen 200 220 15 25 2 Pizza American fro zen 190 210 20 25 2 Pizza chilled 210 230 13 25 2 Pizza Snacks frozen 180 200 15 30 2 French Fries thin 200 220 20 30 3 French Fries thick 200 220 25 35 3 Wedges Cro quettes 220 230 20 35 3 Hash Browns 210 230 20 30 3 Lasagne Cannello ni fresh 170 190 35 45 2 Lasagne Cannell...

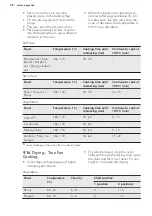
Page 27: ...on a plate Use the first shelf position from the bottom Do not cover the food with a bowl or a plate as this can extend the defrost time Food Quantity kg Defrosting time min Further de frosting time min Comments Chicken 1 100 140 20 30 Put the chicken on an upturned saucer in a big plate Turn halfway through Meat 1 100 140 20 30 Turn halfway through Meat 0 5 90 120 20 30 Turn halfway through Trout...

Page 28: ...5 Stone fruit Food Temperature C Cooking time until simmering min Continue to cook at 100 C min Pears Quinces Plums 160 170 35 45 10 15 Vegetables Food Temperature C Cooking time until simmering min Continue to cook at 100 C min Carrots1 160 170 50 60 5 10 Cucumbers 160 170 50 60 Mixed pickles 160 170 50 60 5 10 Kohlrabi Peas As paragus 160 170 50 60 15 20 1 Leave standing in the oven after it is ...

Page 29: ...n stubborn dirt with a special oven cleaner Clean all accessories after each use and let them dry Use a soft cloth with warm water and a cleaning agent If you have nonstick accessories do not clean them using aggressive agents sharp edged objects or a dishwasher It can cause damage to the nonstick coating 10 2 Cleaning the cavity embossment The cleaning procedure removes limestone residue from the...

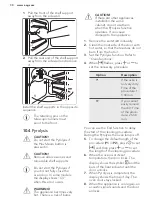
Page 30: ...e the worst dirt manually 2 Clean the inner side of the door with hot water so that the residues do not burn from the hot air 3 Set the Pyrolysis function Refer to Oven functions 4 When flashes press or to set the necessary procedure Option Description P1 If the oven is not very dirty Time of the procedure 1 h 30 min P2 If you cannot easily remove the dirt Time of the proce dure 2 h 30 min You can...

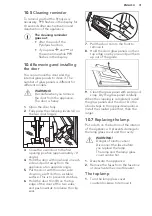
Page 31: ... with the outer side down on a soft cloth on a stable surface This is to prevent scratches 6 Hold the door trim B on the top edge of the door at the two sides and push inwards to release the clip seal 1 2 B 7 Pull the door trim to the front to remove it 8 Hold the door glass panels on their top edge one by one and pull them up out of the guide 9 Clean the glass panel with water and soap Dry the gl...

Page 32: ... sure that the settings are correct The oven does not heat up The automatic switch off is activated Refer to Automatic switch off The oven does not heat up The Child Lock is on Refer to Using the Child Lock The oven does not heat up The fuse is blown Make sure that the fuse is the cause of the malfunction If the fuse is blown again and again contact a quali fied electrician The lamp does not opera...

Page 33: ... the True Fan Cooking PLUS function Refer to Activating the True Fan Cooking PLUS func tion There is no good cooking performance using the True Fan Cooking PLUS function You did not activate correct ly the True Fan Cooking PLUS function with the Plus Steam button Refer to Activating the True Fan Cooking PLUS func tion There is no good cooking performance using the True Fan Cooking PLUS function Yo...

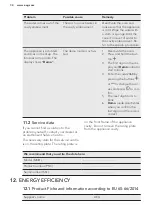
Page 34: ...or start to blink 4 Enter the code 2468 by pressing the buttons or to change the val ues and press to con firm 5 The next digit starts to blink 6 Demo mode deactivates when you confirm the last digit and the code is correct 11 2 Service data If you cannot find a solution to the problem yourself contact your dealer or an Authorised Service Centre The necessary data for the service centre is on the ...

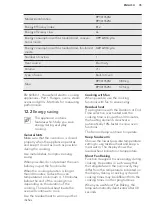
Page 35: ...s reduce the oven temperature to minimum 3 10 minutes before the end of the cooking time depending on the duration of the cooking The residual heat inside the oven will continue to cook Use the residual heat to warm up other dishes Cooking with fan When possible use the cooking functions with fan to save energy Residual heat If a programme with the Duration or End Time selection is activated and t...

Page 36: ...ainers to recycle it Help protect the environment and human health and to recycle waste of electrical and electronic appliances Do not dispose appliances marked with the symbol with the household waste Return the product to your local recycling facility or contact your municipal office www aeg com 36 ...

Page 37: ...ENGLISH 37 ...

Page 38: ...www aeg com 38 ...

Page 39: ...ENGLISH 39 ...

Page 40: ...www aeg com shop 867325980 B 192016 ...

Reviews: