background image

User’s Manual

BP5023001M 24” Built-in Multi Function Oven - 
User’s Manual

Summary of Contents for BP5023001M

Page 1: ...User s Manual BP5023001M 24 Built in Multi Function Oven User s Manual ...

Page 2: ...se spend a few minutes reading to get the very best from it ACCESSORIES AND CONSUMABLES In the AEG webshop you ll find everything you need to keep all your AEG appliances looking spotless and working perfectly Along with a wide range of accessories designed and built to the high quality standards you would expect from specialist cookware to cutlery baskets from bottle holders to delicate laundry b...

Page 3: ...ps 26 Care and cleaning 30 What to do if 31 Installation 33 Environment concerns 33 Guarantee Customer Service Centres The following symbols are used in this user manual Important information concerning your personal safety and information on how to avoid damaging the appliance General information and tips Environmental information Subject to change without notice Contents 3 ...

Page 4: ...ts children and animals from accidental operation of the appliance General safety Do not change the specifications of this appliance There is the risk of injury and damage to the appliance Do not let the appliance stay unattended during operation Switch off the appliance after each use Installation Only an approved electrician can install and connect the appliance Contact an approved service centr...

Page 5: ...e Always pull the mains plug if applicable Use The appliance is only for domestic use Do not use the appliance for commercial and in dustrial use Only use the appliance for domestic cooking tasks This is to prevent physical injury to persons or prevent damage to property Do not use the appliance as a work surface or storage surface The interior of the appliance becomes hot during use There is the ...

Page 6: ...th abrasive cleaning agents or metal scraper Heat resist ant surface of the inner glass can break and shatter When the door glass panels are damaged they become weak and can break You must replace them Contact the service centre Be careful when you remove the door from the appliance The door is heavy Do not clean catalytic enamel if applicable Risk of fire Open the door carefully The use of ingred...

Page 7: ...risk of electrical shock Service centre Only an approved engineer can repair or work on the appliance Contact an approved service centre Use only original spare parts Disposal of the appliance To prevent the risk of physical injury or damage Disconnect the appliance from the power supply Cut off the mains cable and discard it Discard the door catch This prevents children or small animals from bein...

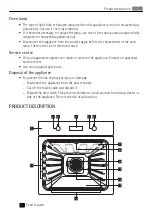
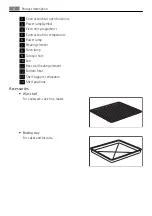
Page 8: ...l knob for temperature 6 Power lamp 7 Heating element 8 Oven lamp 9 Turnspit hole 10 Fan 11 Rear wall heating element 12 Bottom heat 13 Shelf support removable 14 Shelf positions Accessories Wire shelf For cookware cake tins roasts Baking tray For cakes and biscuits 8 Product description ...

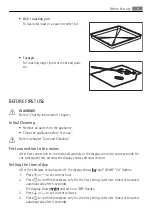
Page 9: ... all symbols in the display are on for some seconds For the subsequent few seconds the display shows software version Setting the time of day After the software version goes off the display shows and 12 00 12 flashes 1 Press or to set current hour 2 Press to confirm necessary only for the first setting later new time will be saved automatically after 5 seconds The display shows and set hour 00 fla...

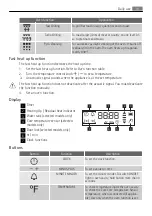
Page 10: ...to the appliance overview The indicator comes on when the oven heats up The lamp comes on when the appliance operates The symbol shows whether the knob controls one of the cooking zones the oven func tions or the temperature Oven Functions Oven function Application Fast Heat Up To decreases the heat up time True Fan Cooking To bake maximum on three oven levels at the same time Decrease the oven te...

Page 11: ...at the set temperature The fast heat up function does not deactivate after the acoustic signal You must deactivate the function manually 4 Set an oven function Display 1 Timer 2 Heating Up Residual heat indicator 3 Water tank selected models only 4 Core temperature sensor selected models only 5 Door lock selected models only 6 hr min 7 Clock functions 1 7 2 3 4 5 6 7 Buttons Button Function Descri...

Page 12: ...again and again to switch between the clock functions To confirm settings of the clock functions use or wait 5 seconds for an automatic con firmation Setting the DURATION or END 1 Press again and again until the display shows or or flashes in the display 2 Press or to set minutes 3 Press to confirm 4 Press or to set the necessary hour 5 Press to confirm A sound operates after the time ends for 2 m...

Page 13: ...et the MINUTE MINDER when the DURATION or END function operates the symbol comes on in the display Count Up Timer Use the Count Up Timer to monitor how long the oven operates It is on immediately when the oven starts to heat Reset the Count Up Timer press and hold and then the timer start to count up again You can not use Count Up Timer when Duration or End is set USING THE ACCESSORIES WARNING Ref...

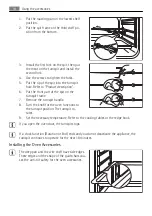
Page 14: ...rame 7 Remove the turnspit handle 8 Turn the knob for the oven functions to the turnspit position The turnspit ro tates 9 Set the necessary temperature Refer to the cooking tables or the recipe book If you open the oven door the turnspit stops If a clock function Duration or End ends and you do not deactivate the appliance the turnspit continues to operate for the next 10 minutes Installing the Ov...

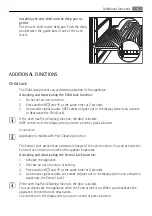
Page 15: ...u turn a knob or press a button Control Lock Applicable to models with Pyro Cleaning function The Control Lock prevents an accidental change of the oven function You can activate the Control Lock function only when the appliance operates Activating and deactivating the Control Lock function 1 Activate the appliance 2 Activate an oven function or setting 3 Press and hold and at the same time for 2 ...

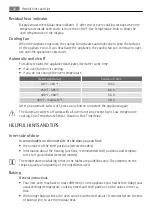
Page 16: ...ress a any button to operate the appliance again The Automatic switch off works with all oven functions except Light Low temperature cooking Core Temperature Sensor Duration End Time delay HELPFUL HINTS AND TIPS Inner side of door In some models on the inner side of the door you can find the numbers of the shelf positions selected models information about the heating functions recommended shelf po...

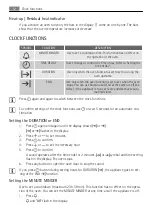
Page 17: ...function Shelf position Temperature F Time in min Ring cake or brio che True Fan Cooking 1 300 320 50 70 Madeira cake fruit cakes True Fan Cooking 1 280 320 70 90 Sponge cake True Fan Cooking 2 280 300 35 50 Sponge cake Conventional Cooking 2 320 35 50 Flan base short pastry True Fan Cooking 2 340 360 1 10 25 Flan base sponge mixture True Fan Cooking 2 300 340 20 25 Apple pie 2tins Ø20cm diagonal ...

Page 18: ...h sponge mixture 2 True Fan Cooking 3 300 35 55 Fruit flans made with yeast dough sponge mixture 2 Conventional Cooking 3 340 35 55 Fruit flans made with short pastry True Fan Cooking 3 320 340 40 80 Yeast cakes with delicate toppings e g quark cream custard Conventional Cooking 3 320 360 1 40 80 1 Pre heat the oven 2 Use deep pan Biscuits Type of baking Oven function Shelf position Temperature F ...

Page 19: ...entional Cooking 3 3401 20 30 1 Pre heat the oven Multileveled Baking Cakes pastries breads on baking trays Type of baking True Fan Cooking Temperature in F Time in min Shelf position 2 levels 3 levels Cream puffs Eclairs 1 4 320 360 1 25 45 Dry streusel cake 1 4 300 320 30 45 1 Pre heat the oven Biscuits small cakes pastries rolls Type of baking True Fan Cooking Temperature in F Time in min Shelf...

Page 20: ... Bak ing times cannot be reduced by setting higher tempera tures The cake sinks becomes soggy lumpy streaky There is too much liquid in the mixture Use less liquid Pay attention to mixing times especially if you use a mixing machine The cake is too dry The oven temperature is too low The next time you bake set a higher oven temperature The cake is too dry The baking time is too long The next time ...

Page 21: ...d the instructions of the manufacturer Large roasting joints can be roasted directly in the deep pan if present or on the wire shelf above the deep pan Roast lean meats in a roasting tin with a lid This will keep the meat more succulent All types of meat that can be browned or have crackling can be roasted in the roasting tin without the lid Roasting with Turbo Grilling Beef Type of meat Quantity ...

Page 22: ... meat Quantity Oven func tion Shelf position Temperature F Time min Leg of lamb roast lamb 1 1 5 kg Turbo Grilling 1 300 340 100 120 Saddle of lamb 1 1 5 kg Turbo Grilling 1 320 360 40 60 Game Type of meat Quantity Oven func tion Shelf position Temperature F Time min Saddle of hare leg of hare up to 1 kg Conventional Cooking 1 450 1 30 40 Saddle of ven ison 1 5 2 kg Conventional Cooking 1 410 430 ...

Page 23: ...ing CAUTION Always grill with the oven door closed Always pre heat the empty oven with the grill functions for 5 minutes Set the shelf in the shelf position as recommended in the grilling table Always set the pan to collect the fat into the first shelf position Grill only flat pieces of meat or fish Grilling Food to be gril led Shelf position Temperature F Time in min 1st side 2nd side Roast beef ...

Page 24: ...Pizza thin crust 2 400 450 1 2 15 20 Pizza with a lot of topping 2 360 400 20 30 Tarts 1 360 400 40 55 Spinach flan 1 320 360 45 60 Quiche Lorraine 1 340 380 45 55 Swiss Flan 1 340 380 45 55 Apple cake covered 1 300 340 50 60 Vegetable pie 1 320 360 50 60 Unleavened bread 2 450 4801 10 20 Puff pastry flan 2 320 360 1 45 55 Flammekuchen Pizza like dish from Alsace 2 450 4801 12 20 Piroggen Russian ...

Page 25: ...tal tins Use the first shelf from the bottom for this function Put no more than six one litre preserve jars on the baking tray Fill the jars up to the same level and close with a clamp The jars cannot touch each other Put approximately 1 2 litre of water into the baking tray to give sufficient moisture in the oven When the liquid in the jars starts to simmer after approx 35 60 minutes with one lit...

Page 26: ...d Shelf position Temperature F Time in hours 1 level 2 levels Beans 3 1 4 140 160 6 8 Peppers 3 1 4 140 160 5 6 Vegetables for sour 3 1 4 140 160 5 6 Mushrooms 3 1 4 120 140 6 8 Herbs 3 1 4 100 120 2 3 Fruit Food to be dried Shelf position Temperature F Time in hours 1 level 2 levels Plums 3 1 4 140 160 8 10 Apricots 3 1 4 140 160 8 10 Apple slices 3 1 4 140 160 6 8 Pears 3 1 4 140 160 6 9 Informa...

Page 27: ...1 Remove the worst of the residual dirt manually 2 Set the Pyrolytic cleaning function refer to section Oven functions 3 When flashes press or to set the necessary procedure P1 1 30 for a low degree of dirt P2 2 30 for a usual degree of dirt After 2 seconds procedure starts To change length of selected procedure P1 or P2 press to set then press or to set length for the pyrolytic procedure You can ...

Page 28: ...lamp glass cover can be hot Before you change the oven lamp Deactivate the appliance Remove the fuses from the fuse box or deactivate the circuit breaker CAUTION Put a cloth on the bottom of the interior of the appliance It prevents damage to the lamp glass cover and the cavity Replacing the oven lamp 1 You can find the lamp glass cover at the cavity ceiling Turn the lamp glass cover counterclockw...

Page 29: ...reverse The number of glass panels if different for the different models CAUTION Put the door with the outer side down on a soft and level surface to prevent scratches Removing and cleaning the door glass panels 1 Remove the door 2 Hold the door trim B on the top edge of the door at the two sides and push inwards to release the clip seal 3 Pull the door trim to the front to re move it 4 Hold the d...

Page 30: ...copic runners are not removed Remove support telescopic runners The pyrolytic cleaning does not operate the time display shows C3 The door is not correctly closed or door lock is defective Close the door correctly The turn spit does not rotate The turn spit is not correctly installed into the turnspit hole Refer to Turn spit The display shows F102 The door is not closed cor rectly The door lock is...

Page 31: ...avity We recommend that you write the data here Model MOD Product number PNC Serial number S N INSTALLATION WARNING Refer to Safety information chapter The built in unit must meet the stability requirements of DIN 68930 min 3 mm 20 30 5 21 200 590 567 579 572 547 546 594 594 114 590 min 530 min 560 min cm2 Installation 31 ...

Page 32: ...max R1200 mm 130 140 alternativ 100 H05VV F H05RR F min 1600 mm 90º 32 Installation ...

Page 33: ... and recyclable Plastic parts are marked with international abbreviations such as PE PS etc Dispose of the packaging material in the containers provided for this purpose at your local waste management facility GUARANTEE CUSTOMER SERVICE CENTRES EURO LINE APPLIANCES INC LENGTH OF WARRANTY EURO LINE WILL PAY FOR TWO YEAR FULL WARRANTY from original date of purchase including parts and labour to the ...

Page 34: ...EURO PARTS Service will be provided during normal busi ness hours Should you have a service problem that is not resolved locally contact For Service and Parts Contact EURO PARTS USA EURO PARTS CANADA EURO LINE APPLIANCES Tel 1 800 561 4614 Fax 1 519 528 5001 Tel 1 800 678 8352 Fax 1 519 528 5001 1 800 421 6332 Tel Direct 1 905 829 3980 Fax 1 905 829 3985 User Instructions Installation Manual Servi...

Page 35: ...region AEG products are supported by a national service support system Call our customer service department for attention Please retain your invoice AEG to quote should you require service assistance This will identify your product for our priority service back up Please attach your invoice to this manual for easy future reference AEG Canada 871 Cranberry Court Oakville Ontario L6L 6J7 Canada Tel ...

Page 36: ...nformation visit www euro line appliances com www elawest com 871 Cranberry Court Oakville ON L6L 6J7 Canada Toll Free 1 800 421 6332 Showroom 905 829 3980 marketing euro line appliances com 2912 West 4th Ave Vancouver BC V6K 1R2 Canada Toll Free 1 855 352 9378 Showroom 604 235 3980 info elawest com ...

Reviews: