background image

2.7 

Disposal

WARNING!

Risk of injury or suffocation.

• Disconnect the appliance from the

mains supply.

• Cut off the mains cable and discard it.

• Remove the door catch to prevent

children and pets to get closed in the

appliance.

2.8 

Service

• To repair the appliance contact an

Authorised Service Centre.

• Use original spare parts only.

3. 

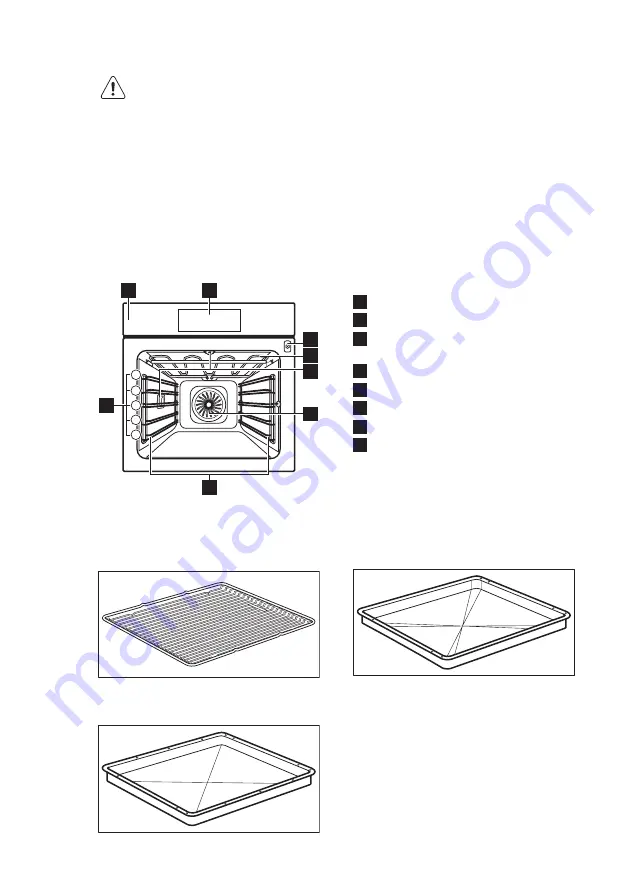
PRODUCT DESCRIPTION

3.1 

General overview

2

7

1

8

4

3

5

6

5

4

3

2

1

1

Control panel

2

Electronic programmer

3

Socket for the core temperature

sensor

4

Heating element

5

Lamp

6

Fan

7

Shelf support, removable

8

Shelf positions

3.2 

Accessories

Nonstick wire shelf

For cookware, cake tins, roasts.

Baking tray

For cakes and biscuits.

Grill- / Roasting pan

To bake and roast or as a pan to collect

fat.

ENGLISH

7

Summary of Contents for BP831460K

Page 1: ...EN User Manual Oven BP831460K ...

Page 2: ...might not find on ordinary appliances Please spend a few minutes reading to get the very best from it Visit our website for Get usage advice brochures trouble shooter service information www aeg com webselfservice Register your product for better service www registeraeg com Buy Accessories Consumables and Original spare parts for your appliance www aeg com shop CUSTOMER CARE AND SERVICE Always use...

Page 3: ...y and understand the hazards involved Do not let children play with the appliance Keep all packaging away from children Keep children and pets away from the appliance when it operates or when it cools down Accessible parts are hot If the appliance has a child safety device we recommend you activate it Cleaning and user maintenance shall not be made by children without supervision Children of less ...

Page 4: ...commended for this appliance 2 SAFETY INSTRUCTIONS 2 1 Installation WARNING Only a qualified person must install this appliance Remove all the packaging Do not install or use a damaged appliance Obey the installation instruction supplied with the appliance Always be careful when you move the appliance because it is heavy Always wear safety gloves Do not pull the appliance by the handle Keep the mi...

Page 5: ...perate the appliance with wet hands or when it has contact with water Do not apply pressure on the open door Do not use the appliance as a work surface or as a storage surface Open the appliance door carefully The use of ingredients with alcohol can cause a mixture of alcohol and air Do not let sparks or open flames to come in contact with the appliance when you open the door Do not put flammable ...

Page 6: ...in operation The appliance becomes very hot and hot air is released from the front cooling vents Pyrolytic cleaning is a high temperature operation that can release fumes from cooking residues and construction materials as such consumers are strongly advised to provide good ventilation during and after each Pyrolytic cleaning provide good ventilation during and after the first use at maximum tempe...

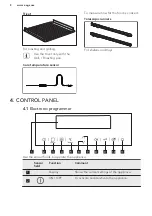
Page 7: ...ct an Authorised Service Centre Use original spare parts only 3 PRODUCT DESCRIPTION 3 1 General overview 2 7 1 8 4 3 5 6 5 4 3 2 1 1 Control panel 2 Electronic programmer 3 Socket for the core temperature sensor 4 Heating element 5 Lamp 6 Fan 7 Shelf support removable 8 Shelf positions 3 2 Accessories Nonstick wire shelf For cookware cake tins roasts Baking tray For cakes and biscuits Grill Roasti...

Page 8: ...ar the food is cooked Telescopic runners For shelves and trays 4 CONTROL PANEL 4 1 Electronic programmer 2 1 3 4 5 7 6 8 9 10 11 Use the sensor fields to operate the appliance Sensor field Function Comment 1 Display Shows the current settings of the appliance 2 ON OFF To activate and deactivate the appliance www aeg com 8 ...

Page 9: ...e Touch the field for 3 seconds to activate or deactivate the function Fast heat up 6 Down key To move down in the menu 7 Up key To move up in the menu 8 OK To confirm the selection or setting 9 Home key To go back one level in the menu To show the main menu touch the field for 3 seconds 10 Time and addi tional functions To set different functions When a heating func tion operates touch the sensor...

Page 10: ...Up Indicator The function is active It decreases the heat up time Weight Automatic The display shows that the automatic weight system is active or that weight can be changed Heat Hold The function is active 5 BEFORE FIRST USE WARNING Refer to Safety chapters 5 1 Initial Cleaning Remove all accessories and removable shelf supports from the appliance Refer to Care and cleaning chapter Clean the appl...

Page 11: ...gs Favourite Programme Contains a list of favourite cooking programmes created by the user Submenu for Basic Settings Sym bol Submenu Description Set Time of Day Sets the current time on the clock Time Indication When ON the display shows the current time when you deactivate the appliance Set Go When ON in the Select Options window you can choose the function Set Go Heat Hold When ON in the Select...

Page 12: ...ing Functions Heating function Application True Fan Cooking To bake on up to 3 shelf positions at the same time and to dry food Set the temperature 20 40 C lower than for the function Conventional Cooking Pizza Setting To bake food on 1 shelf position for a more inten sive browning and a crispy bottom Set the tem perature 20 40 C lower than for the function Conventional Cooking Slow Cooking To pre...

Page 13: ...ng To make vegetable preserves such as pickles Drying To dry sliced fruit e g apples plums peaches and vegetables e g tomatoes zucchini mush rooms Plate Warming To preheat your plate for serving ECO Roasting The ECO functions let you optimize the energy consumption during cooking It is necessary to set the cooking time first To get more information about the recommended settings refer to the cooki...

Page 14: ...ng func tion max 23 h 59 min If you set the time for a clock function the time starts to count down after 5 seconds If you use the clock functions Duration End Time the appliance deactivates the heating elements after 90 of the set time The appliance uses the residual heat to continue the cooking process until the time ends 3 20 minutes 7 2 Setting the clock functions Before you use the functions ...

Page 15: ...r the end of Duration Applicable to all heating functions with Duration or Weight Automatic Not applicable to heating functions with the core temperature sensor 1 When the cooking time ends an acoustic signal sounds Press a sensor field The display shows the message 2 Press to activate or to cancel 3 Set the length of the function 4 Press 8 AUTOMATIC PROGRAMMES WARNING Refer to Safety chapters 8 1...

Page 16: ...e and the core temperature The core temperature sensor measures the core temperature of the meat When the meat is at the set temperature the appliance deactivates CAUTION Only use the core temperature sensor supplied or the correct replacement parts The core temperature sensor must stay in the meat and in the socket during the cooking 1 Activate the appliance 2 Put the tip of the core temperature ...

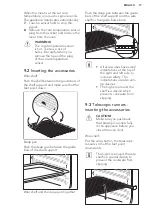
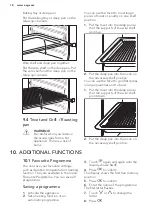
Page 17: ...n between the guide bars of the shelf support Wire shelf and the deep pan together Push the deep pan between the guide bars of the shelf support and the wire shelf on the guide bars above All accessories have small indentations at the top of the right and left side to increase safety The indentations are also anti tip devices The high rim around the shelf is a device which prevents cookware from s...

Page 18: ...can use the trivet to grill flat dishes in large quantities and to toast 1 Put the trivet into the deep pan so that the supports of the wire shelf point down 2 Put the deep pan into the oven on the necessary shelf position 10 ADDITIONAL FUNCTIONS 10 1 Favourite Programme You can save your favourite settings such as duration temperature or heating function They are available in the menu Favourite P...

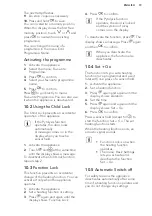
Page 19: ...tivate it only when the appliance operates 1 Activate the appliance 2 Set a heating function or setting 3 Press again and again until the display shows Function Lock 4 Press to confirm If the Pyrolysis function operates the door is locked and the symbol of a key comes on in the display To deactivate the function press The display shows a message Press again and then to confirm When you deactivate ...

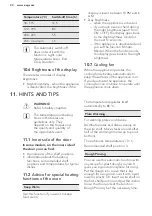
Page 20: ... Safety chapters The temperature and baking times in the tables are guidelines only They depend on the recipes and the quality and quantity of the ingredients used 11 1 Inner side of the door In some models on the inner side of the door you can find the numbers of the shelf positions information about the heating functions recommended shelf positions and temperatures for typical dishes 11 2 Advice...

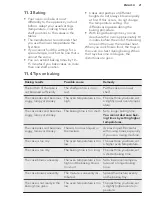
Page 21: ... is not browned sufficiently The shelf position is incor rect Put the cake on a lower shelf The cake sinks and becomes soggy lumpy or streaky The oven temperature is too high The next time you bake set a slightly lower oven temper ature The cake sinks and becomes soggy lumpy or streaky The baking time is too short Set a longer baking time You cannot decrease bak ing times by setting higher tempera...

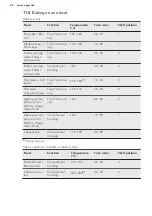
Page 22: ...t pastry True Fan Cook ing 170 1801 10 25 2 Flan base sponge mixture True Fan Cook ing 150 170 20 25 2 Apple pie Ap ple pie 2 tins Ø20 cm diago nally off set True Fan Cook ing 160 60 90 2 Apple pie Ap ple pie 2 tins Ø20 cm diago nally off set Conventional Cooking 180 70 90 1 Cheesecake Conventional Cooking 170 190 60 90 1 1 Preheat the oven Cakes pastries breads on baking trays Food Function Tempe...

Page 23: ...tered al mond cake Sugar cakes Conventional Cooking 190 2101 20 30 3 Fruit flans made with yeast dough sponge mixture 2 True Fan Cook ing 150 35 55 3 Fruit flans made with yeast dough sponge mixture 2 Conventional Cooking 170 35 55 3 Fruit flans made with short pastry True Fan Cook ing 160 170 40 80 3 Yeast cakes with delicate top pings e g quark cream custard Conventional Cooking 160 1801 40 80 3...

Page 24: ...ook ing 100 120 30 50 3 Biscuits made with yeast dough True Fan Cook ing 150 160 20 40 3 Puff pastries True Fan Cook ing 170 1801 20 30 3 Rolls True Fan Cook ing 1601 10 25 3 Rolls Conventional Cooking 190 2101 10 25 3 Small cakes Small cakes 20 per tray True Fan Cook ing 1501 20 35 3 Small cakes Small cakes 20 per tray Conventional Cooking 1701 20 30 3 1 Preheat the oven 11 6 Bakes and gratins Fo...

Page 25: ...an Baking Food Type of food Temperature C Time min Shelf position Pasta bake 180 200 45 60 2 Lasagne 180 200 45 60 2 Potato gratin 190 210 55 80 2 Sweet dishes 180 200 45 60 2 Ring cake or brioche 160 170 50 70 1 Plaited bread bread crown 170 190 40 50 2 Cake with crumble topping dry 160 170 20 40 3 Biscuits made with yeast dough 160 170 20 40 2 11 8 Multilevel Baking Use the function True Fan Coo...

Page 26: ...ugh 160 170 30 60 1 4 Puff pastries 170 1801 30 50 1 4 Rolls 180 20 30 1 4 Small cakes Small cakes 20 per tray 1501 23 40 1 4 1 Preheat the oven 11 9 Slow Cooking Use this function to prepare lean tender pieces of meat and fish with core temperatures no more than 65 C This function is not applicable to such recipes as pot roast or fatty roast pork You can use the core temperature sensor to guarant...

Page 27: ...of beef 1000 1500 g 120 90 150 3 Roast veal 1000 1500 g 120 120 150 1 Steaks 200 300 g 120 20 40 3 11 10 Pizza Setting Food Temperature C Time min Shelf position Pizza thin crust 200 2301 2 15 20 2 Pizza with a lot of topping 180 200 20 30 2 Tarts 180 200 40 55 1 Spinach flan 160 180 45 60 1 Quiche Lorraine 170 190 45 55 1 Swiss Flan 170 190 45 55 1 Apple cake covered 150 170 50 60 1 Vegetable pie...

Page 28: ...s during roasting This gives better roasting results You can deactivate the appliance approximately 10 minutes before the end of the roasting time and use the residual heat 11 12 Roasting tables Beef Food Quantity Function Tempera ture C Time min Shelf posi tion Pot roast 1 1 5 kg Convention al Cooking 230 120 150 1 Roast beef or fil let rare per cm of thickness Turbo Grill ing 190 2001 5 6 1 Roas...

Page 29: ...mperature C Time min Shelf posi tion Saddle Leg of hare up to 1 kg Conventional Cooking 2301 30 40 1 Saddle of venison 1 5 2 kg Conventional Cooking 210 220 35 40 1 Haunch of venison 1 5 2 kg Conventional Cooking 180 200 60 90 1 1 Preheat the oven Poultry Food Quantity Function Temperature C Time min Shelf posi tion Poultry por tions 200 250 g each Turbo Grill ing 200 220 30 50 1 Half chicken 400 ...

Page 30: ...ect the fat into the first shelf position Grill only flat pieces of meat or fish Always preheat the empty oven with the grill functions for 5 minutes CAUTION Always grill with the oven door closed Grilling Food Temperature C Time min Shelf position 1st side 2nd side Roast beef 210 230 30 40 30 40 2 Filet of beef 230 20 30 20 30 3 Back of pork 210 230 30 40 30 40 2 Back of veal 210 230 30 40 30 40 ...

Page 31: ...20 230 20 35 3 Hash Browns 210 230 20 30 3 Lasagne Cannello ni fresh 170 190 35 45 2 Lasagne Cannello ni frozen 160 180 40 60 2 Oven baked cheese 170 190 20 30 3 Chicken Wings 190 210 20 30 2 Frozen ready meals Food Function Temperature C Time min Temperature C Frozen pizza Conventional Cooking as per manufac turer s instruc tions as per manufac turer s instruc tions 3 French fries1 300 600 g Conv...

Page 32: ...120 20 30 Turn halfway through Trout 150 g 25 35 10 15 Strawber ries 300 g 30 40 10 20 Butter 250 g 30 40 10 15 Cream 2 x 200 g 80 100 10 15 Whip the cream when still slightly frozen in places Gateau 1 4 kg 60 60 11 16 Preserving Use only preserve jars of the same dimensions available on the market Do not use jars with twist off and bayonet type lids or metal tins Use the first shelf from the bott...

Page 33: ...s1 160 170 50 60 5 10 Cucumbers 160 170 50 60 Mixed pickles 160 170 50 60 5 10 Kohlrabi Peas As paragus 160 170 50 60 15 20 1 Leave standing in the oven after it is deactivated 11 17 Drying Cover trays with grease proof paper or baking parchment For a better result stop the oven halfway through the drying time open the door and let it cool down for one night to complete the drying Vegetables Food ...

Page 34: ...d 180 200 40 60 2 Baguette 200 220 35 45 2 Brioche 180 200 40 60 2 Ciabatta 200 220 35 45 2 Rye Bread 190 210 50 70 2 Dark Bread 180 200 50 70 2 All Grain bread 170 190 60 90 2 11 19 Core temperature sensor table Beef Food Food core temperature C Rib Fillet steak rare 45 50 Rib Fillet steak medium 60 65 Rib Fillet steak well done 70 75 Pork Food Food core temperature C Shoulder Ham Neck joint of p...

Page 35: ...soft cloth with warm water and a cleaning agent To clean metal surfaces use a usual cleaning agent Clean the appliance interior after each use Fat accumulation or other food remains may result in a fire The risk is higher for the grill pan Clean stubborn dirt with a special oven cleaner Clean all accessories after each use and let them dry Use a soft cloth with warm water and a cleaning agent If y...

Page 36: ...ance 1 Clean the inner side of the door with hot water so that the residues do not burn from the hot air 2 Activate the appliance and select from the main menu the function Pyrolysis Press to confirm 3 Set the duration of the cleaning procedure Option Description Quick 1 h for a low degree of dirt Normal 1 h 30 min for a usual de gree of dirt Intense 2 h 30 min for a high degree of dirt 4 Touch to...

Page 37: ...els on their top edge one by one and pull them up out of the guide 9 Clean the glass panel with water and soap Dry the glass panel carefully When the cleaning is completed install the glass panels and the door Do the above steps in the opposite sequence Install the smaller panel first then the larger 12 5 Replacing the lamp Put a cloth on the bottom of the interior of the appliance It prevents dam...

Page 38: ... The oven is deactivated Activate the oven The oven does not heat up The clock is not set Set the clock The oven does not heat up The necessary settings are not set Make sure that the settings are correct The oven does not heat up The automatic switch off is activated Refer to Automatic switch off The oven does not heat up The Child Lock is on Refer to Using the Child Lock The oven does not heat u...

Page 39: ...en for too long Do not leave the dishes in the oven for longer than 15 20 minutes after the cooking process ends 13 2 Service data If you cannot find a solution to the problem yourself contact your dealer or an Authorised Service Centre The necessary data for the service centre is on the rating plate The rating plate is on the front frame of the appliance cavity Do not remove the rating plate from...

Page 40: ...e energy Residual heat In some heating functions if a programme with time selection Duration End Time is activated and the cooking time is longer than 30 minutes the heating elements deactivate automatically 10 earlier The fan and lamp continue to operate Cooking with the lamp off deactivate the lamp during the cooking and activate only when you need it Keep food warm if you want to use the residu...

Page 41: ...ENGLISH 41 ...

Page 42: ...www aeg com 42 ...

Page 43: ...ENGLISH 43 ...

Page 44: ...www aeg com shop 867303436 C 362015 ...

Reviews: